How do I get the Ticket Lister widget to display a Ticket when I click on one of the tickets in the list in the widget?
I realize I could use the Ticket Explorer widget instead, but I cannot control the way the Explorer widget is displayed (i.e. change font size, choose columns, column width, etc.)
On the topic of the Ticket Lister widget, I am confused about the setting values for Width, Min Width, Max Width etc. It seems the Lister is somehow linked to a Printer… that is, I can’t seem to set the character count to something longer than ~40 characters - justification does not behave properly - it seems the larger the Width, the sooner wrapping occurs, which seems backwards to me.
Yes I’ve tried to give all possible formatting parameters to properly format ticket boxes.
Width : Line width in character count.
Min Width: Minimum box width in pixels.
Max Width: Maximum box width in pixels. If line width exceeds Max width it will wrap to next line.
Min Height: Normally box will increase height automatically by height. If you enter a height in pixels here box height won’t be less than that value.
These values are depended on font name and font size. If lines seems exceeds box width try decreasing line character count. If there is room left on right side you can adjust max width to make box appear smaller so more boxes will fit to a single row.
You should create an automation command (for example ticket selected) and type this command name on Command Buttons section to create a button for that command. Normally widget will automatically pass clicked ticket id to automation command so you can create a rule for ticket selected automation command and execute any action you like (print, pay, display ticket,etc)…
Thanks for the explanation on the formatting values for the Ticket Lister Properties.
I am still unsuccessful at getting the Ticket to display, after 3 days. I was hoping to see a Tutorial on a working implementation.
Please let me know what I’m missing here…
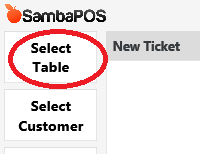
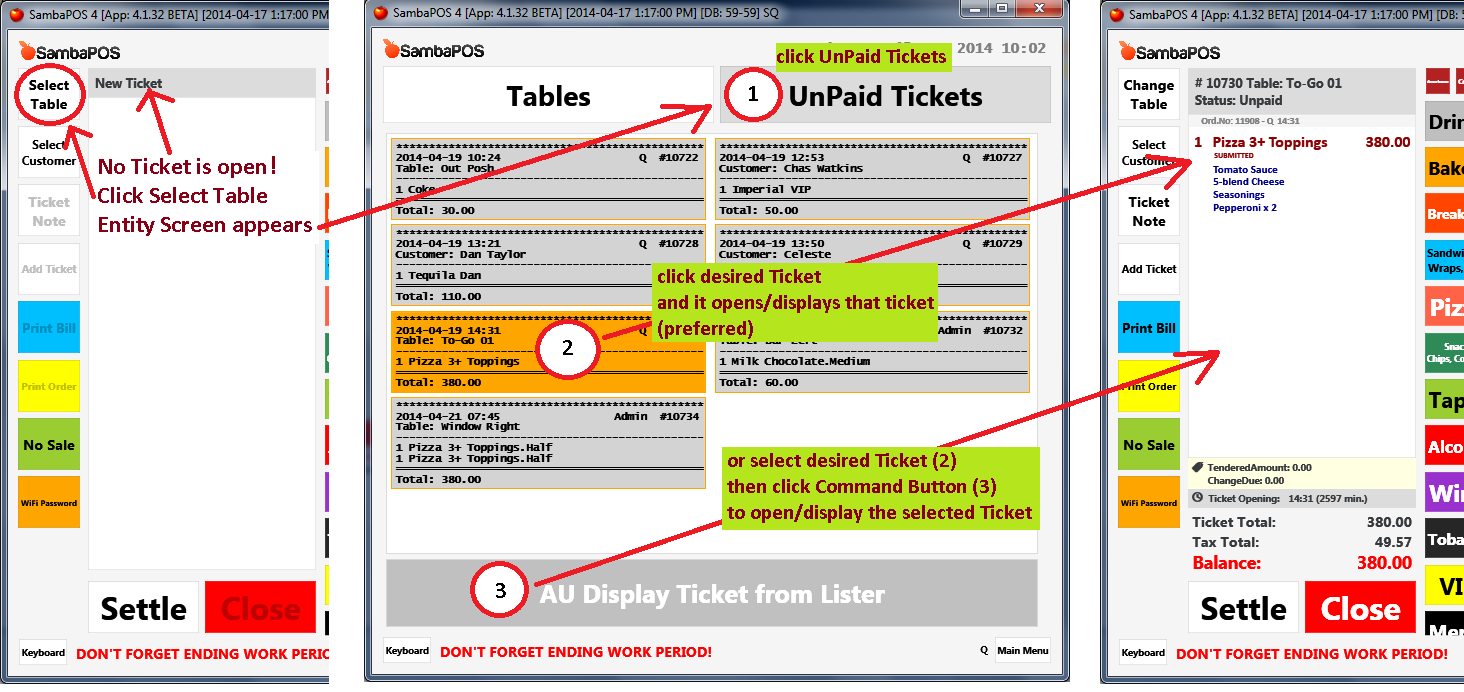
Click SELECT TABLE to open Entity Screen, which contains the Ticket Lister Widget…
Click on Ticket to display ticket (preferred), or click ticket to select, then click Command button…
@QMcKay I think I’m misunderstanding something. Do you want to click Select Table inside a ticket and select a ticket from Ticket Lister ?
btw you don’t need to enter {TICKET NO} as command parameter. By default ticket Lister widget automatically sends selected ticket Id as command parameter. You can just leave it empty.
I simply want to click a ticket to make it display/open, so that I can add to it or settle it or whatever. The Lister widget just happens to be in my custom table screen.
It can be done easily.
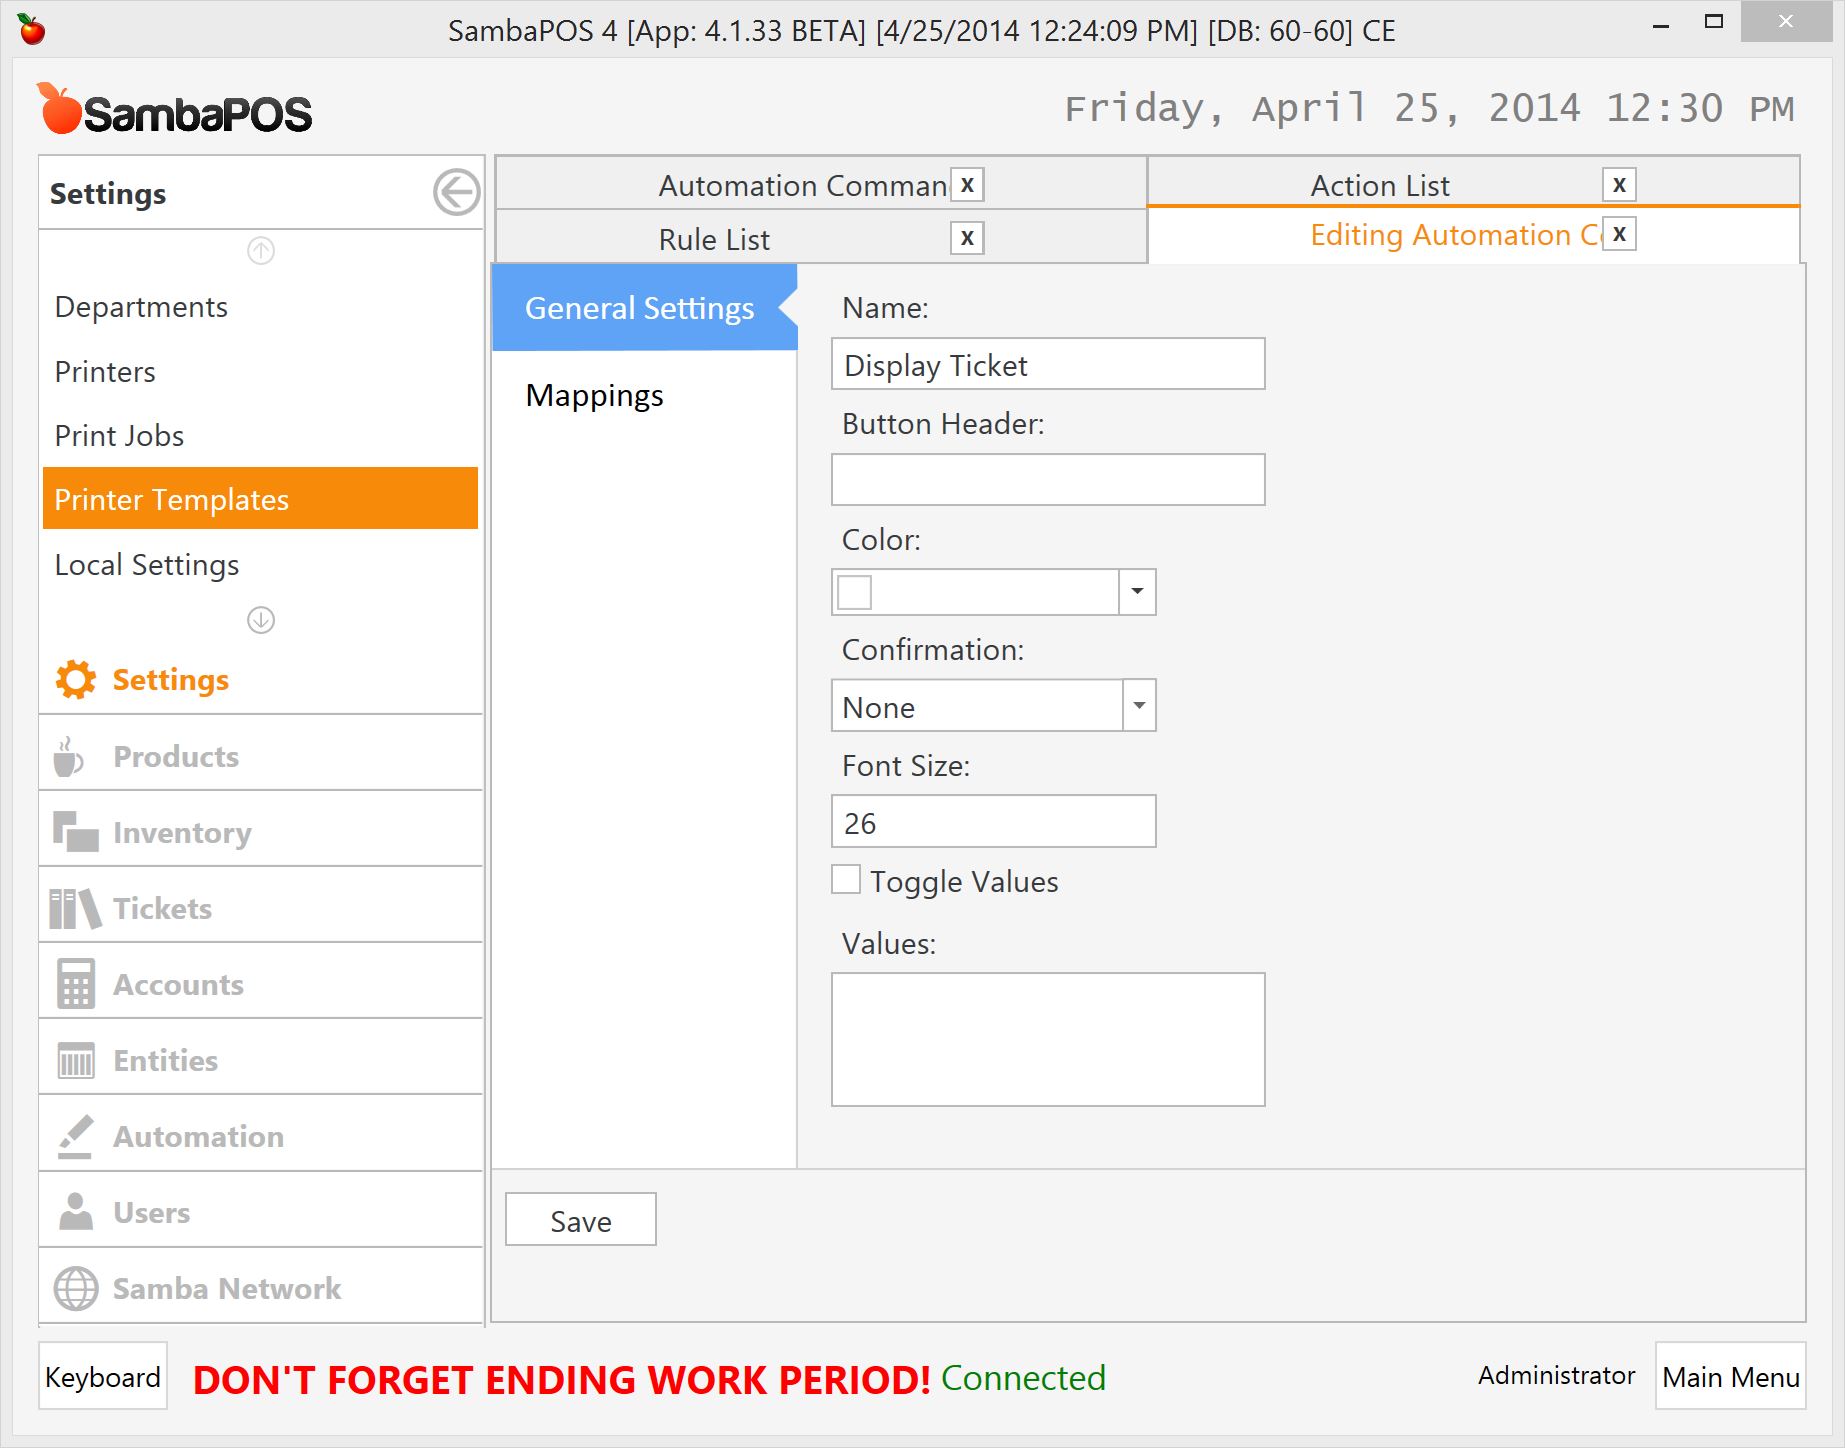
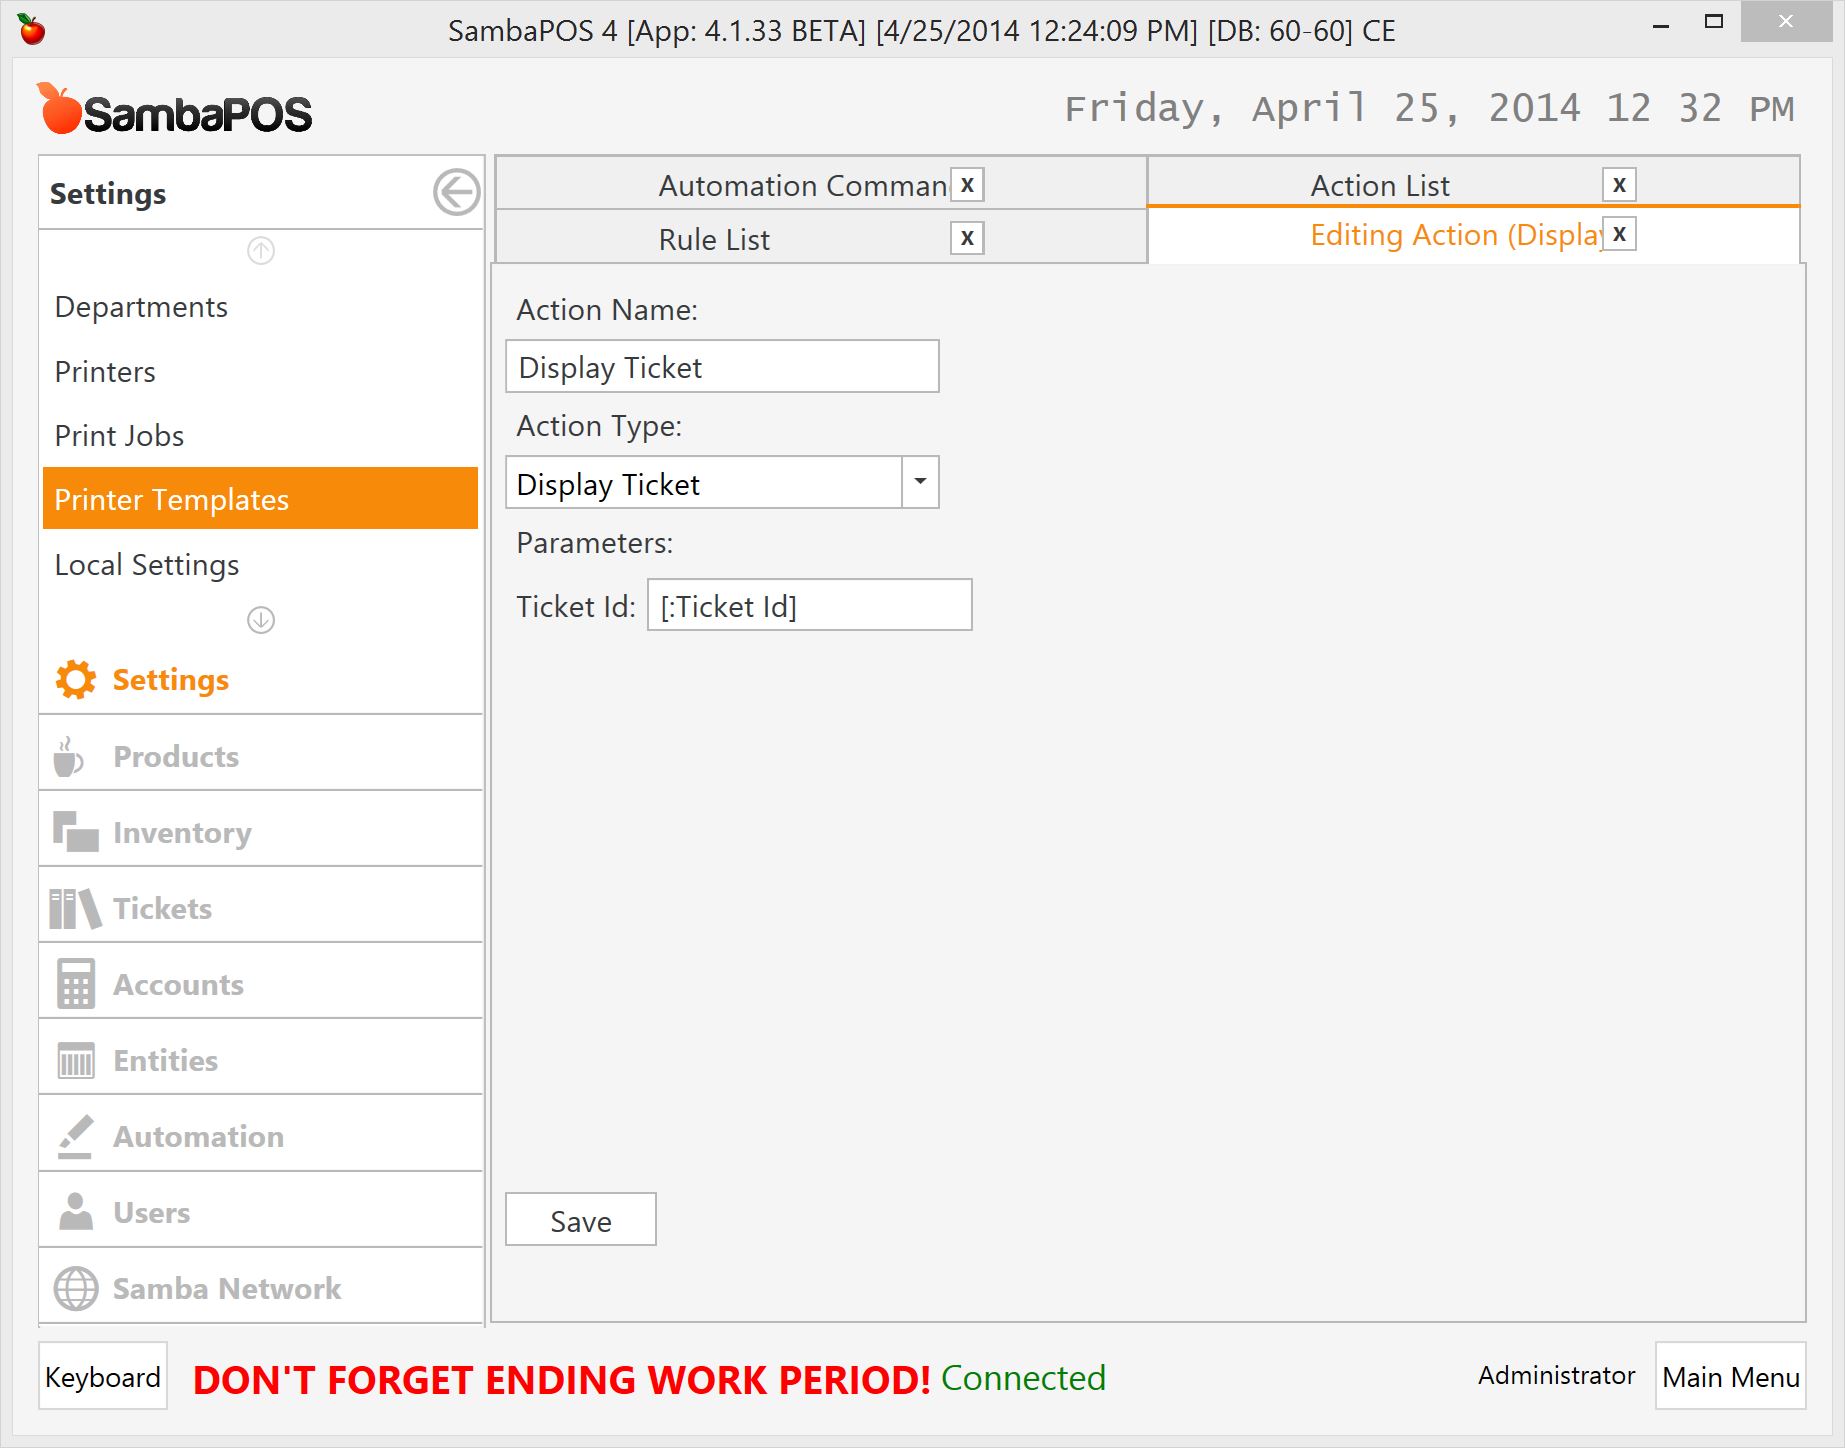
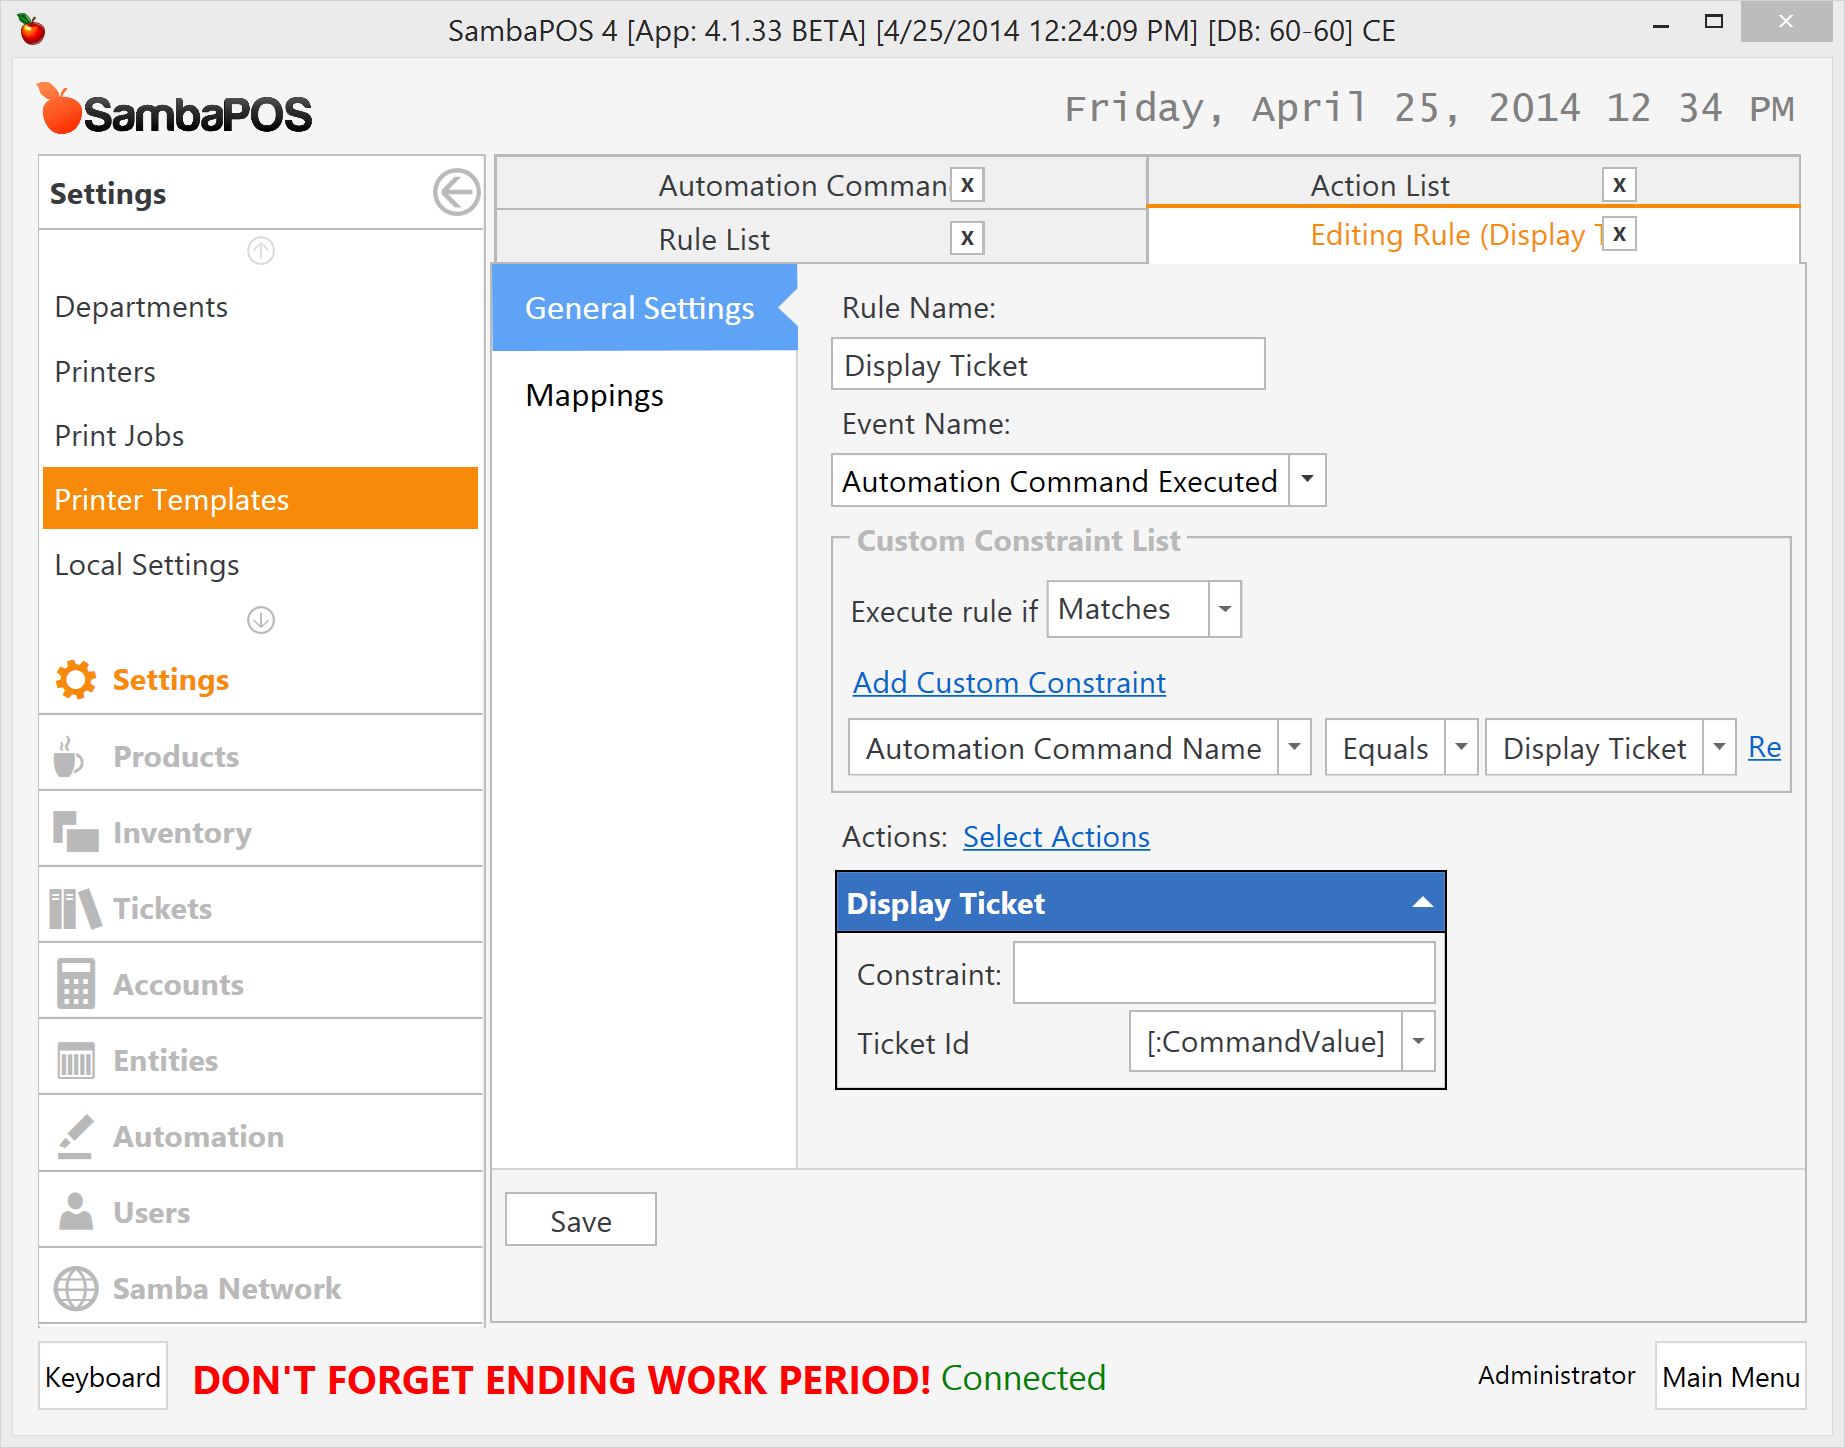
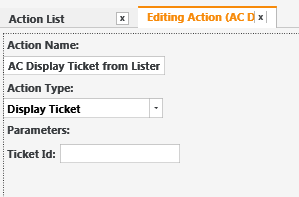
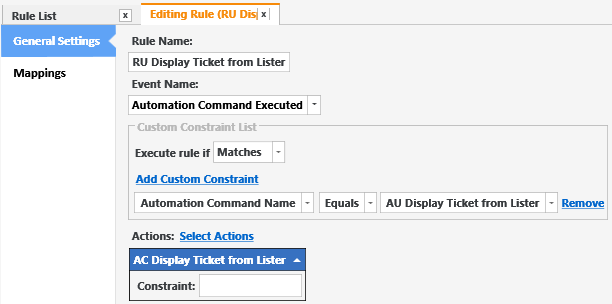
You need an Automation Command to display the ticket using Automation Command Value.
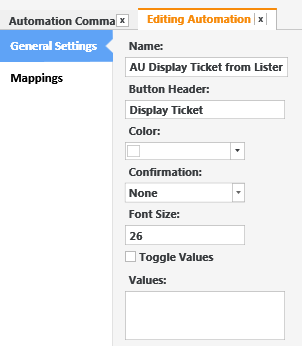
Assign the Automation Command in the Ticket Lister Widget. As Emre said, it will automatically pass the Ticket No as Automation Command value.
@JohnS, yes, of course. Please see earlier in the thread for my Action, Automation Command, and Rule, as well as the Ticket Lister settings.
I’ve tried several different configurations, including passing values (i.e. [:CommandValue] passed to blank Display Ticket action, or passed to [:TicketToDisplay] set in the Display Ticket action, or blank-to-blank, or blank-to-zero), leaving everything blank (default), using Load Ticket, then Display Ticket, or Display Ticket only, or Set Widget Value action, then Load/Display action(s), etc; I’ve even deleted and recreated all automation objects and widgets, leaving everything as default and configuring as you and @emre have described, by placing the Automation Command in the Lister’s Command buttons box and/or selecting it in the Lister’s Command name value picker.
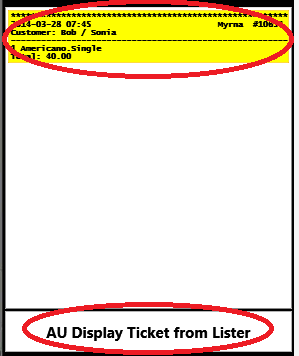
It seems there is a misunderstanding about Ticket No. What display ticket action works with is Ticket Id. Ticket Id is the unique number auto generated by sambapos and you can access it with {TICKET ID} tag. What we need is that number. {TICKET NO} is the number generated with numerators and we have nothing to do with that. What Ticket lister automatically passes is not Ticket No. It is Ticket Id.
So I’ll write step by step configuration once more to test if it works fine or not.
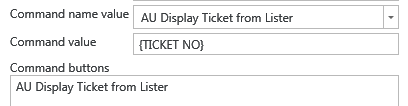
I’m creating an automation command. I’ll name it as Display Ticket. No mapping is needed.
I was sure I had tried this configuration at some point, but I must have been passing the incorrect value, such as {TICKET NO}.)
This is important:
This also really clears things up:
Also, using a variable[:Ticket Id] (the name is not important, my variable is called [:T2D] (TicketToDisplay)) in the Action is absolutely necessary, as is referencing [:CommandValue] in the Rule to pass the {TICKET ID} to the Action.
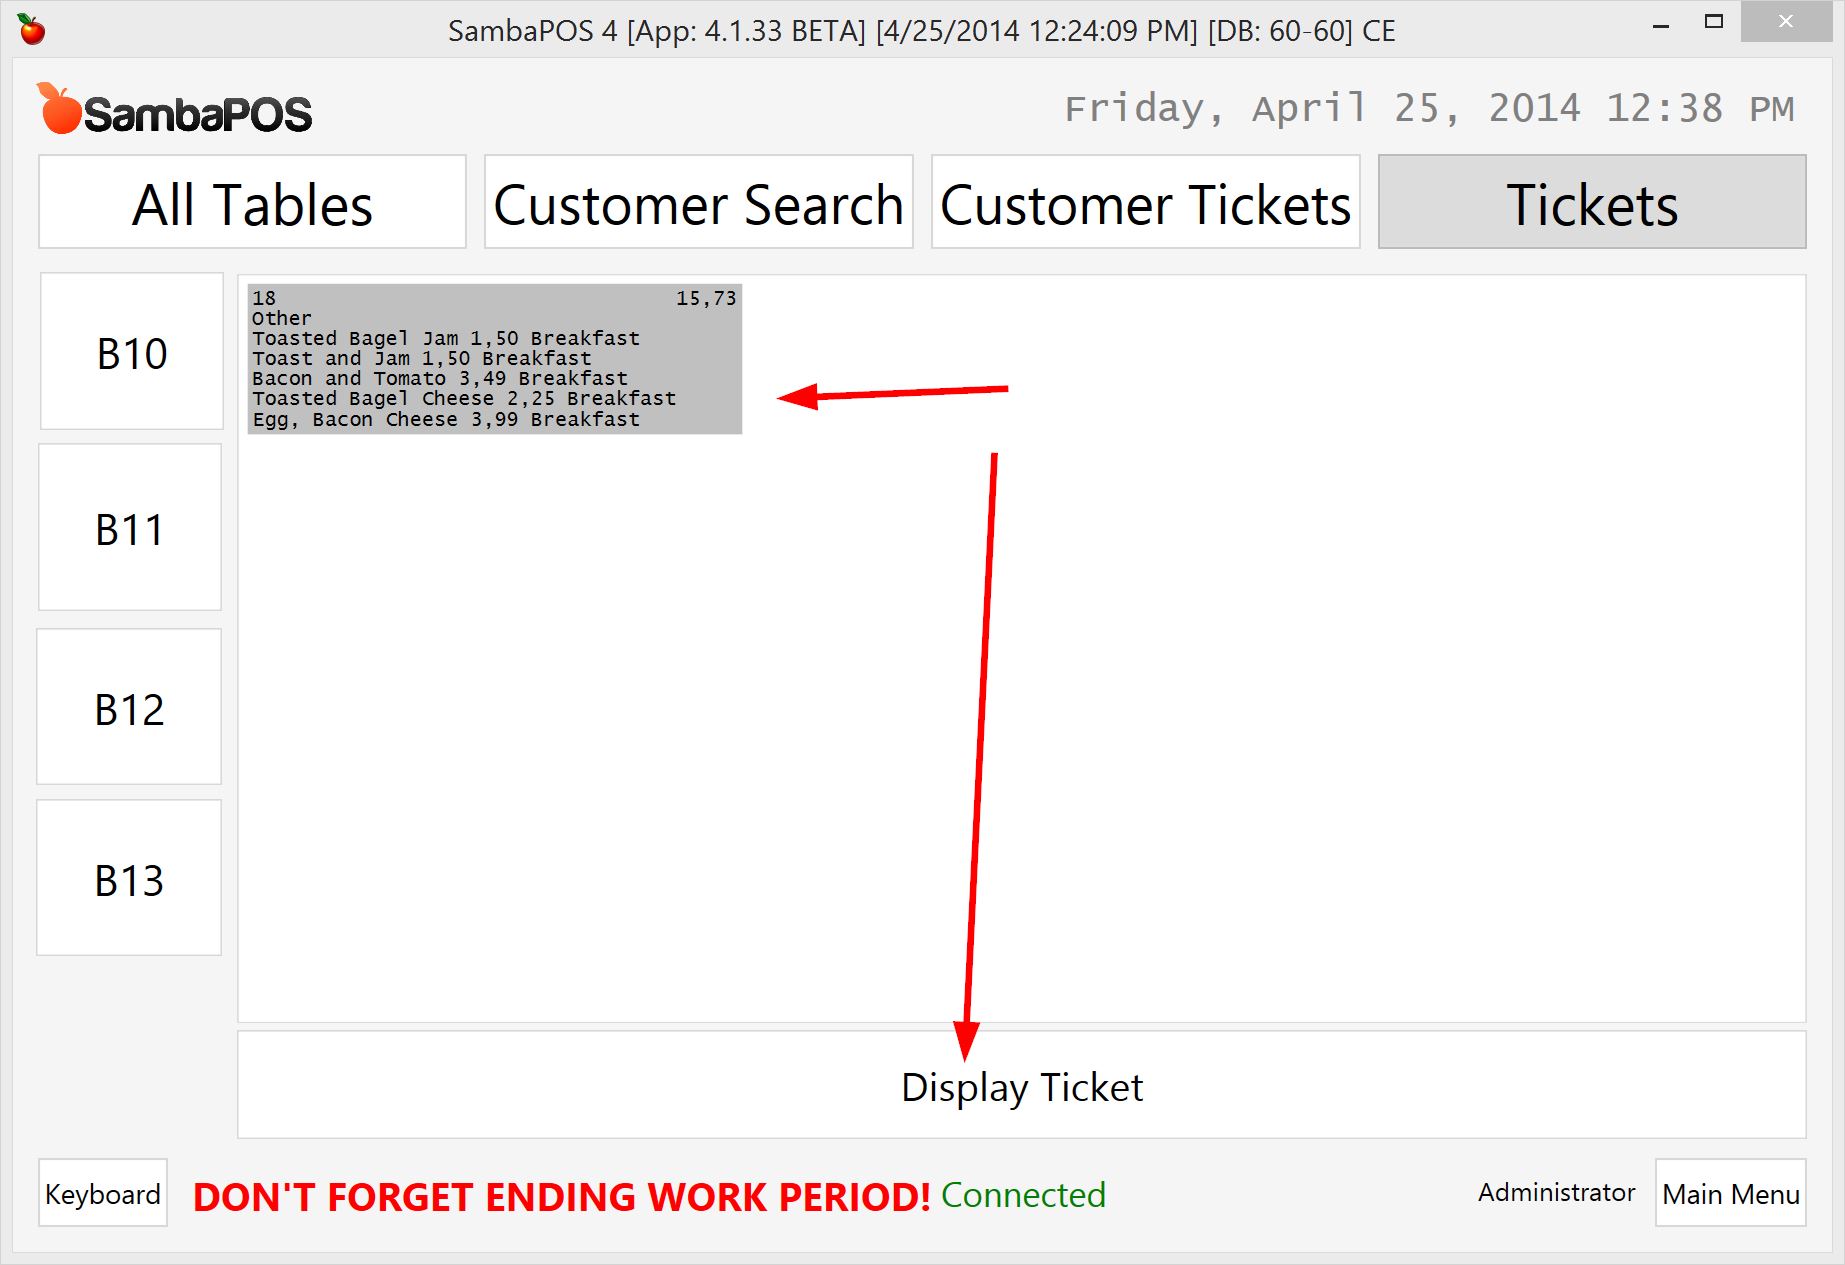
For future reference, the following Ticket List Widget settings also work just fine… this eliminates the need to click on the Automation Command button; instead, simply click on the Ticket to display it…
 It seems there is a misunderstanding about