This tutorial written to help new users get a familiar with some of the configuration that are available within SambaPOS. It also shows a little into how development process of a creating a system.
I’ll post a condensed version in a separate post below. Click here
Before you start, I recommend that you think and write down what fields you want to display. I hope to provide enough information for anyone to be able to add/replace fields for their needs.
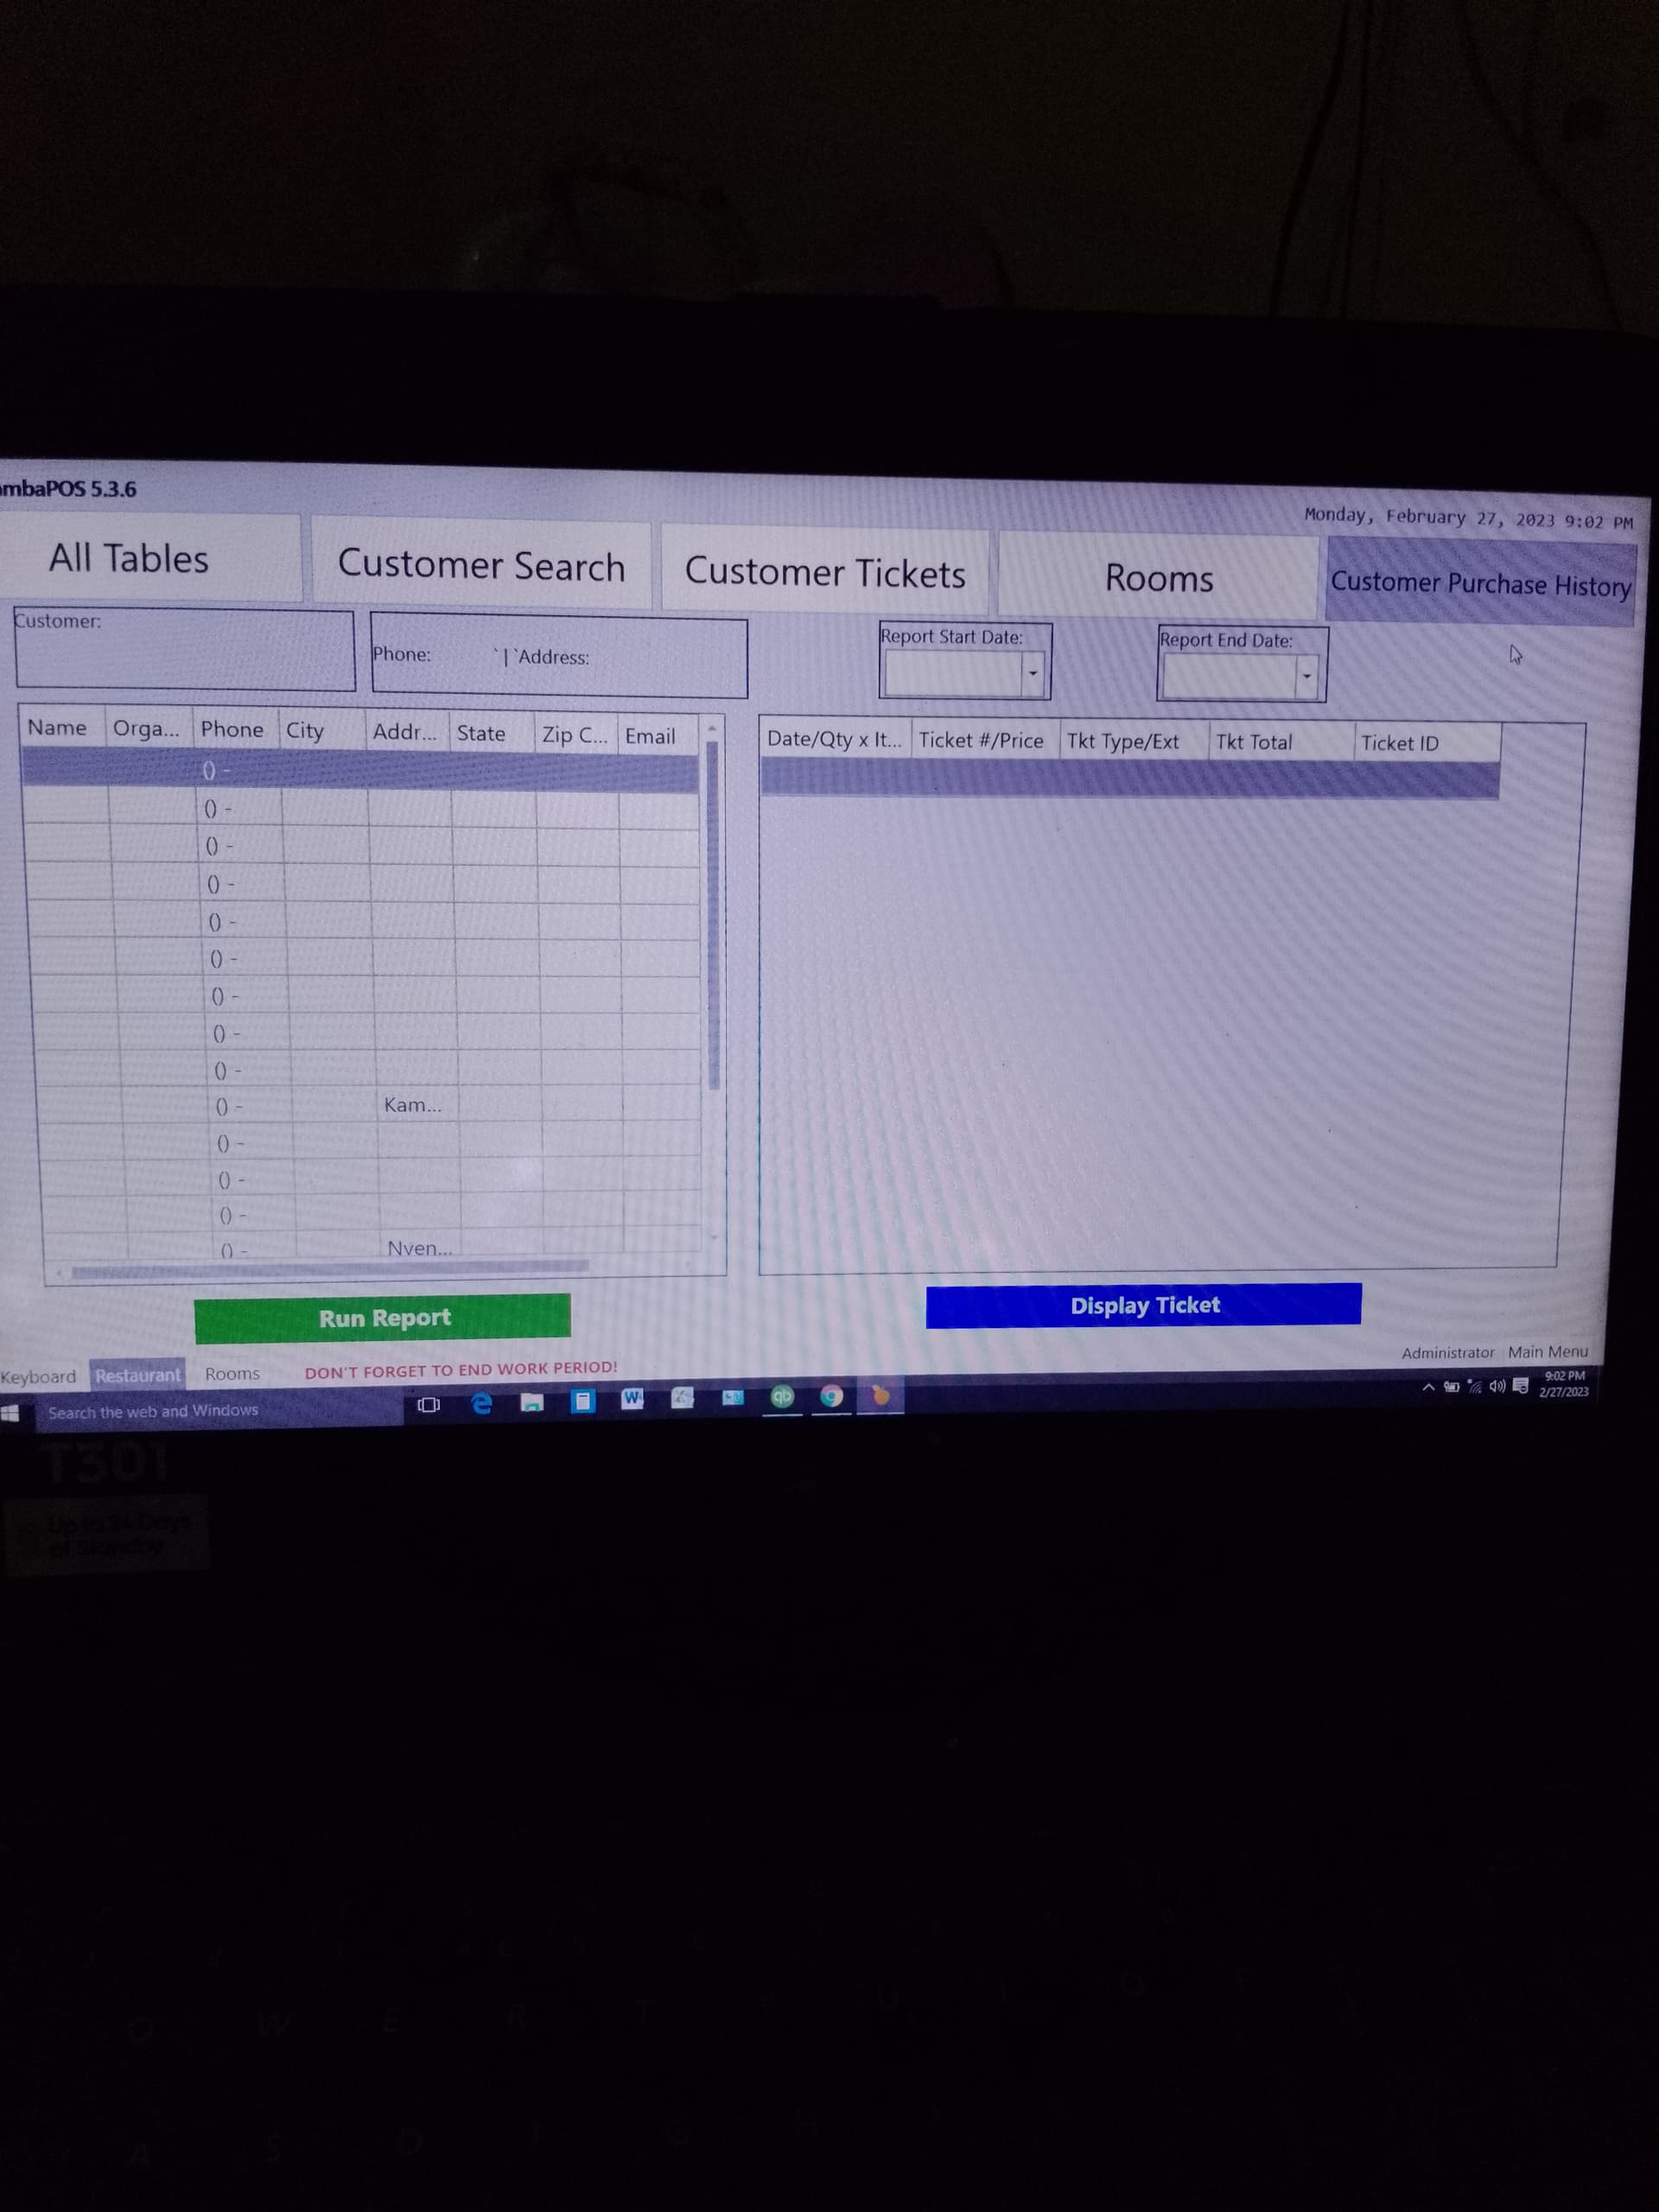
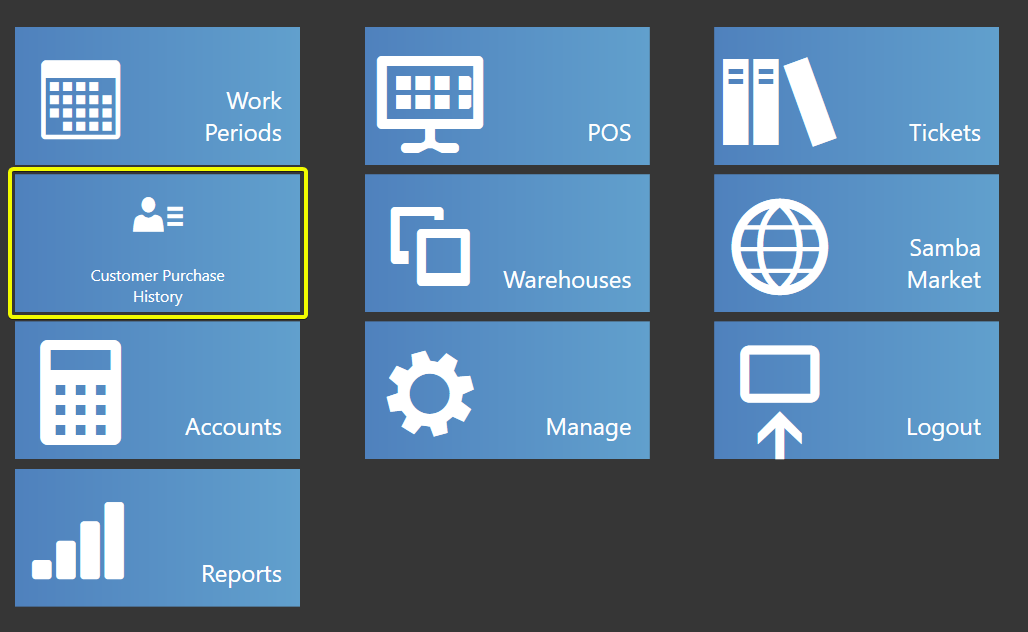
But first lets look at the finished produce:
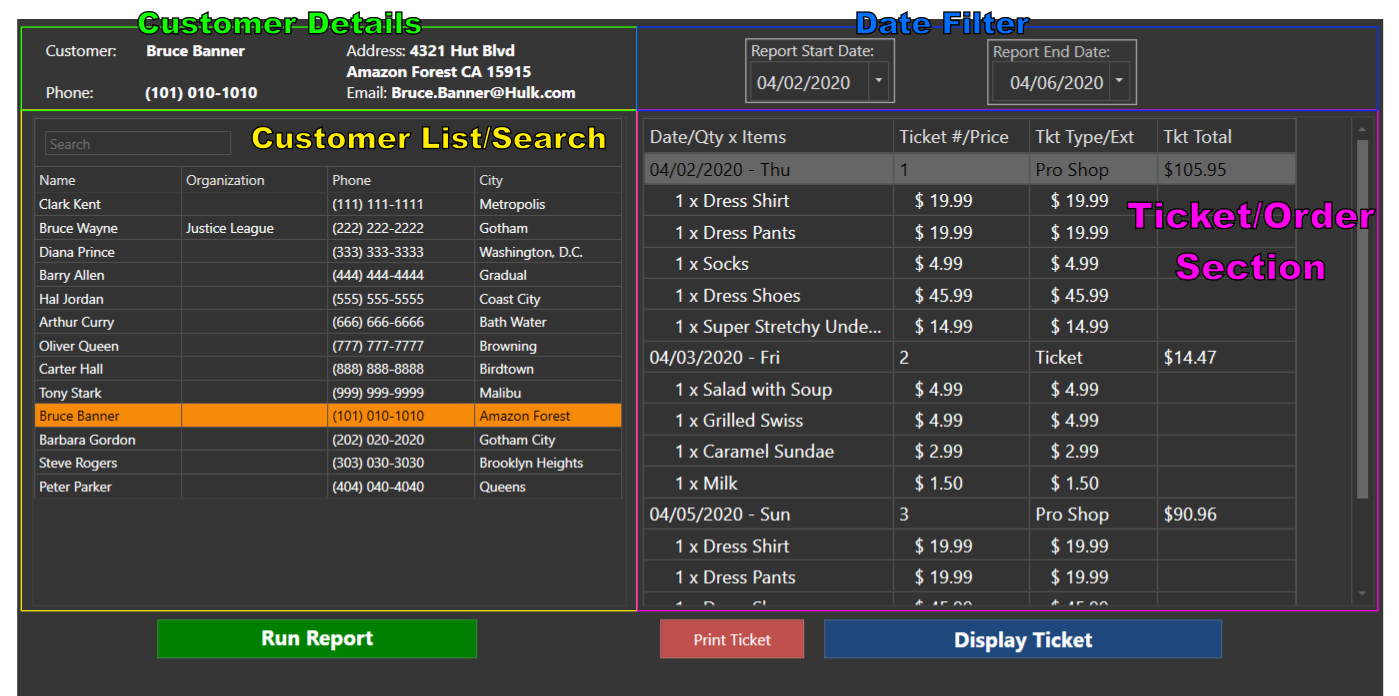
As you can see there are 4 main sections to this screen.
- Customer details*
- Customer List/Search*
- Date Filter
- Ticket/Order section*
*Sections that can be modified for users preferences.
Report (1 of 2): Customer List
| Report Name: | CPH-Customers Report |
| Page Size: | 500 |
| Display in Report Explorer: | (unchecked) |
| Visual Printing: | (unchecked) |
| Template: | (We will build one step by step below.) |
Everybody’s report is going to be different! Below, I will help create the report for your own needs.
The source for reports can be found here: 9. Reports – SambaPOS Knowledgebase
The first line we need to create is the header (table name) and the number of columns. The normal report structure for the first line would be [<table name>:#,#]. We will call this first report table Customers. We don’t know how many columns we will need, for now we will start with 4 (we will come back and change it later). Our first line will look like this: [Customers:1,1,1,1]. There is a special tool we will need to use to convert a conventional report into a Table View, that will give some unique tools to work with on the Customer Purchase History screen. We will need add a # just before the table name. Our report should look like this:
[#Customers:1,1,1,1]
The next row we need is Column Headers. The start of the row will need a > (greater sign),in a normal report this would this row headers bold. However, in Table View this will designated as column headers. Columns names are separated with a pipe character ( | ). For now, I’m going to name my headers Name, Organization, Phone & City (yours can be different). We will be expanding this later once we know the fields we are going to use. Our report should look similar to this:
[#Customers:1,1,1,1]
>Name|Organization|Phone|City
Report syntax explanation
Reports syntax is this:
{<REPORT NAME>:<field(s)>:<expression>:<format>:<delimiter>}
| Report Part | Explanation |
|---|---|
<REPORT NAME> |
Name of the report to run. All capital letters. |
<field(s)> |
Fields are separated with a comma. When Report name is typed correctly, a list of available fields for the report will pop-up after the colon or comma. Custom field names will not shown, they will have to typed in. |
<expression> |
Think of this as a filter. Used to narrow down the results to get the desired results. |
<format> (optional) |
A way of displaying, not displaying, calculating, combining fields into column and/or re-arrange columns the results of the report fields. Encased in curly brackets, starting with the number 0 (zero) {0}, separating columns with a pipe character ( | ). When no format is present, fields will be used. |
<delimiter> (optional) |
When building a list, a way of separating each results. |
Before we go any further, you will need to look at your Customers Entity Type settings. Manage->Entities->Entity Types->Customers->Custom Fields. This is what this example looks like:
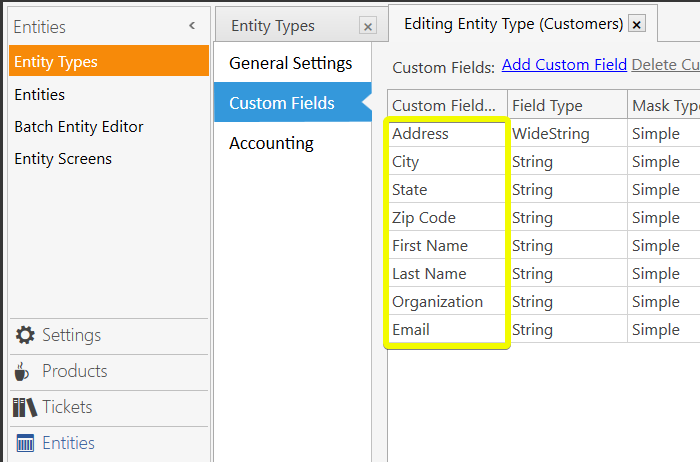
This is where you will find the fields you will need to for your report.
<REPORT NAME>
The final part of the report we are going to be using the
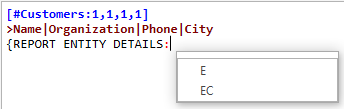
{REPORT ENTITY DETAILS: report.
<field(s)>
The first field will be E.Name, you will notice after you typed the colon a pop-up appears with 2 options:
If we select E, then type a period, another pop-up will appear displaying the available fields:
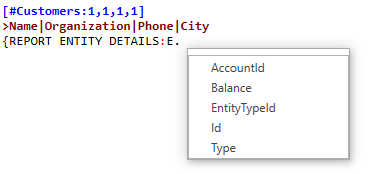
However Name is not listed, but we will type in. Our report should look similar to this:
[#Customers:1,1,1,1]
>Name|Organization|Phone|City
{REPORT ENTITY DETAILS:E.Name
Next we will type a comma then EC followed by a period. Now we will use an Entity Custom Field name. Followed by another comma. Continue 2 more times using a different field name and add a colon at the end. Now our report should look similar to this:
[#Customers:1,1,1,1]
>Name|Organization|Phone|City
{REPORT ENTITY DETAILS:E.Name,EC.Organization,EC.Phone,EC.City:
<expression>
Now we need to filter this report. If we didn’t filter this report, SambaPOS will not know what entity we want displayed. It will display all entities including Table entities and any other entities. To filter this report we are going to use (ET=Customers). This is telling to report to filter using Entities (ET for short) equals Customers. Lets end this report with a ending curly bracket }. The report should look similar to this:
[#Customers:1,1,1,1]
>Name|Organization|Phone|City
{REPORT ENTITY DETAILS:E.Name,EC.Organization,EC.Phone,EC.City:(ET=Customers)}
The most common mistake is not closing out brackets. You will know that reports did not have closing brackets when you try to run the report, SambaPOS will freeze, then windows will show a unresponsive window. SambaPOS will have to forced closed. Any changes made will not be saved.
Lets save the report, then reopen it and view it. (Because we are using Table View, if you don’t save it you will get an error message.)
As you can see I made a few mistake with the fields, but we are making progress! I’m using a phone number as the primary field (E.Name) and I don’t have a custom field called Phone (EC.Phone). I will move the E.Name field behind EC.Organization field and replace it with 2 fields, EC.First Name & EC.Last Name. I will also put in the remaining custom fields. The report looks like this:
[#Customers:1,1,1,1]
>Name|Organization|Phone|City|Address|State|Zip Code|Email|Primary
{REPORT ENTITY DETAILS:EC.First Name,EC.Last Name,EC.Organization,E.Name,EC.City,EC.Address,EC.State,EC.Zip Code,EC.Email,E.Name:(ET=Customers)}
You will notice that I have 9 column headings (in blue).

We will have to adjust the header column count numbers to match the column count of the column Header. The very top of the report we will add 5 more 1. It should look like this:
[#Customers:1,1,1,1,1,1,1,1,1]
>Name|Organization|Phone|City|Address|State|Zip Code|Email|Primary
{REPORT ENTITY DETAILS:EC.First Name,EC.Last Name,EC.Organization,E.Name,EC.City,EC.Address,EC.State,EC.Zip Code,EC.Email,E.Name:(ET=Customers)}
You will also notice, in this example, we have 10 fields (the red numbers) in the report. We will combine 2 fields into 1 column using <format>. Depending on how you have structured your Customer Entities, you may have equal numbers.
<format>
Using format we can pick a report field and place it where we want it. We can also combine fields into a single column. The first report field will start with {0}.

We will add another colon behind (ET=Customers) and before the ending curly bracket }. The first report field is going to label {0}, add a space, then add {1}, followed by a pipe character. The pipe character is used as a separator for columns.
Our report is going to start looking similar to this:
[#Customers:1,1,1,1,1,1,1,1,1]
>Name|Organization|Phone|City|Address|State|Zip Code|Email|Primary
{REPORT ENTITY DETAILS:EC.First Name,EC.Last Name,EC.Organization,E.Name,EC.City,EC.Address,EC.State,EC.Zip Code,EC.Email,E.Name:(ET=Customers):{0} {1}|}
We will save the report, reopen it and Preview it:
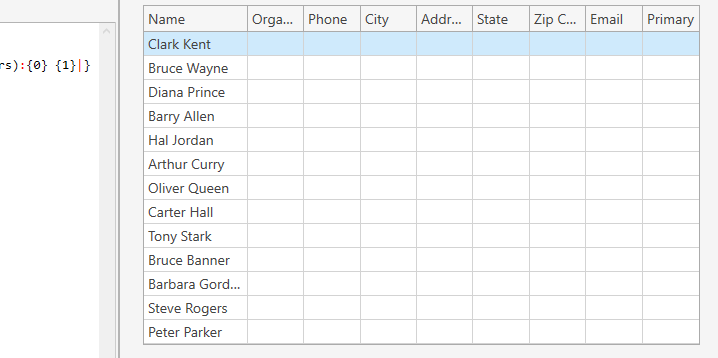
Notice, since we only defined the first 2 report fields in the first column, those are the only ones displayed.
Alternative way to display First Name & Last Name
Let’s change the format display. We will switch the format fields and place a comma between to display Last Name, First Name
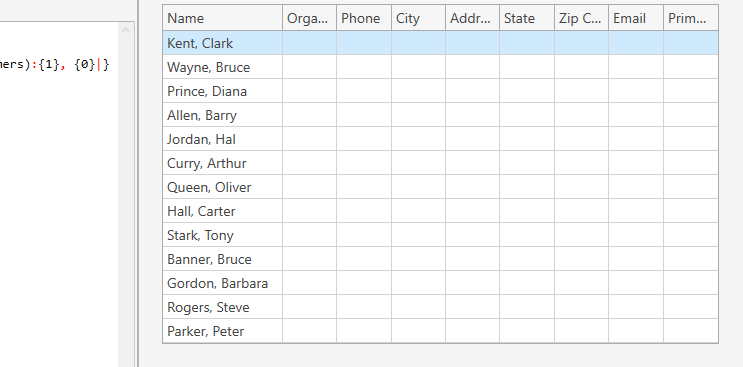
If you wanted to sort by last name we will need to add the tag .asc to the report field (
EC.Last Name.asc ) By default, this report will list names as they were entered into SambaPOS.
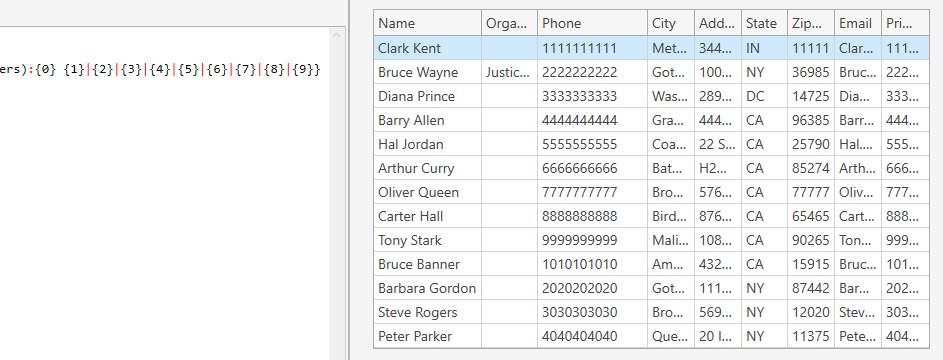
Let’s fill in the rest of the format fields. Our report should look similar to this now:
[#Customers:1,1,1,1,1,1,1,1,1]
>Name|Organization|Phone|City|Address|State|Zip Code|Email|Primary
{REPORT ENTITY DETAILS:EC.First Name,EC.Last Name,EC.Organization,E.Name,EC.City,EC.Address,EC.State,EC.Zip Code,EC.Email,E.Name:(ET=Customers):{0} {1}|{2}|{3}|{4}|{5}|{6}|{7}|{8}|{9}}
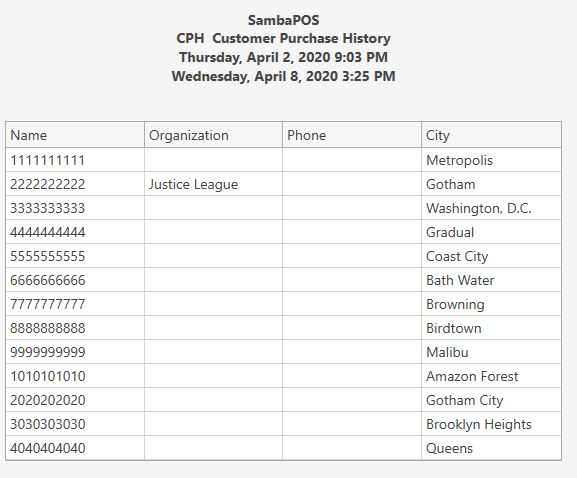
Here is our report now:
![]() If you get an error message, chances the column counts will be wrong (the 2nd most common mistake). Double check your header (table name), column header & report format columns.
If you get an error message, chances the column counts will be wrong (the 2nd most common mistake). Double check your header (table name), column header & report format columns.
Notice the Phone column. It is not in a very readable friendly format. Let’s fix that. We want the numbers to be displayed as (###) ###-####. To do this we are going to use [=F(TN(‘{3}’),‘(###) ###-####’)].
- The [= ] brackets is going to SambaPOS that there is going to be a calculation/format that is going to be done.
- The F(,‘(###) ###-####’) is letting SambaPOS that we are going to format to a specific format. Everything in between the single quotes is how it is going to be displayed.
- The TN(‘xxx’) stands for “To Number”, it will convert what’s inside the
''to a number. Even though it looks like they are numbers, to SambaPOS they are a collection of characters, called a string. We need to tell Samba to treat the characters as numbers in order to do the formatting.
When formatting numbers, the F & TN, typically go hand-in-hand F(TN('<somenumber>'),'<format>')
This is our report:
[#Customers:1,1,1,1,1,1,1,1,1]
>Name|Organization|Phone|City|Address|State|Zip Code|Email|Primary
{REPORT ENTITY DETAILS:EC.First Name,EC.Last Name,EC.Organization,E.Name,EC.City,EC.Address,EC.State,EC.Zip Code,EC.Email,E.Name:(ET=Customers):{0} {1}|{2}|[=F(TN('{3}'),'(###) ###-####')]|{4}|{5}|{6}|{7}|{8}|{9}}
And here is how it looks:
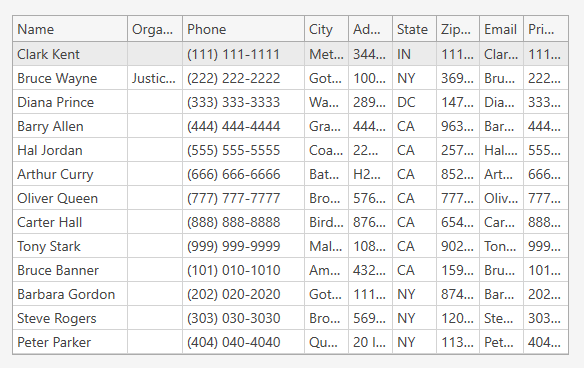
The phone column looks much better. Notice I have a duplicate E.Name report field as the last column. This is because Primary field I am using is a phone number, stored in the database as ########## (10 numbered characters). We changed the format of the first E.Name report field (Phone column) to (###) ###-###. Later, we will need the original format to search for tickets. If we used the formatted version of the phone number, SambaPOS will not be able to find it because it contains parenthesis, spaces and a dash.
Save the report.
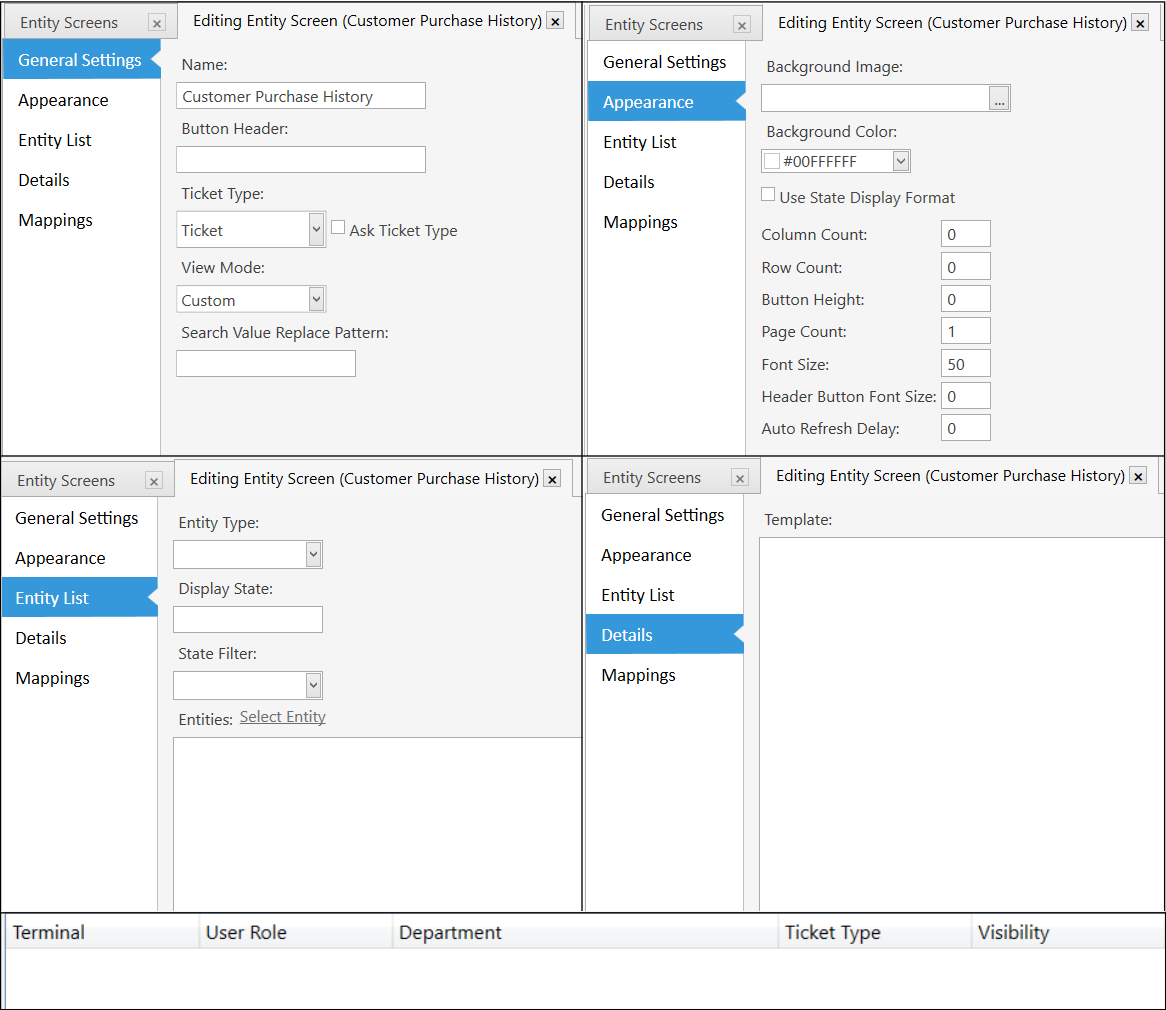
Entity Screen
Navigate to Manage->Entities->Entity Screens->Add Entity Screen (right side of the screen)
| Name: | Customer Purchase History |
| Button Header: | (blank) |
| Ticket Type: | (your default ticket) |
| View Mode: | Custom |
| Search Value Replacement Pattern: | (blank) |
| — | — |
| Appearance tab | (no changes) |
| Entity List tab | (no changes) |
| Details tab | (no changes) |
| Mappings tab | (none) |
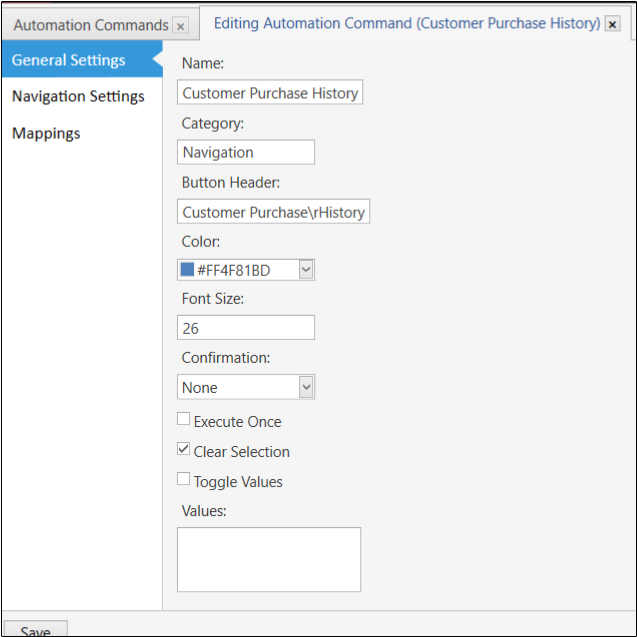
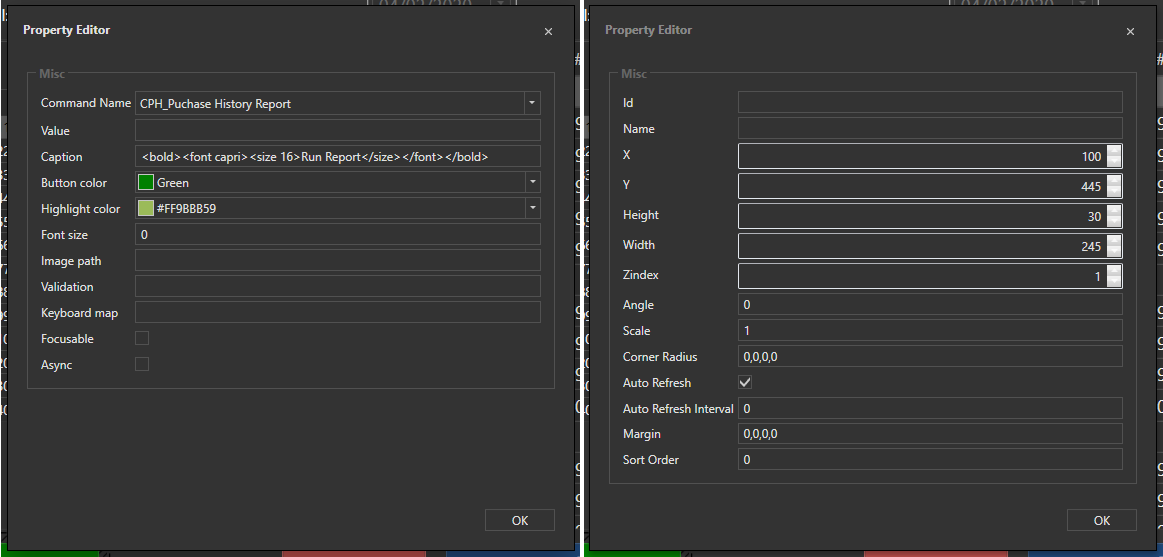
Now that we have a new screen, we have to be able to navigate to it. Manage->Automation->Automation Commands->Add Automation Command (right side of screen).
| General Settings tab | |
|---|---|
| Name: | Customer Purchase History |
| Category: | Navigation |
| Button Header: | Customer Purchase\rScreen |
| Color: | #FF4F81BD (or your choice) |
| Font Size: | 26 |
| Confirmation: | None |
| Execute Once: | unchecked |
| Clear Selection: | checked |
| Toggle Values: | unchecked |
| Values: | (blank) |
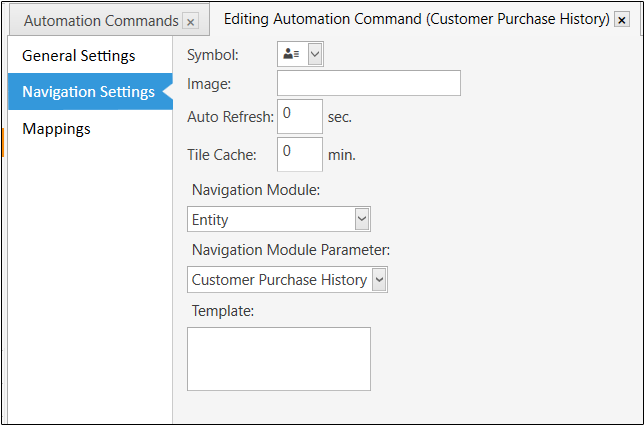
| Navigation Settings tab | |
|---|---|
| Symbol: | (choice) |
| Image: | (blank) |
| Auto Refresh: | 0 |
| Tile Cache: | 0 |
| Navigation Module: | Entity |
| Navigation Module Parameters: | Customer Purchase History |
| Template: | (blank) |
| Mappings tab | |
|---|---|
| Mappings: | * * * * * * Display on Navigation |
You should have tile on the navigation screen.
Clicking on the tile should brink you to a blank entity screen.
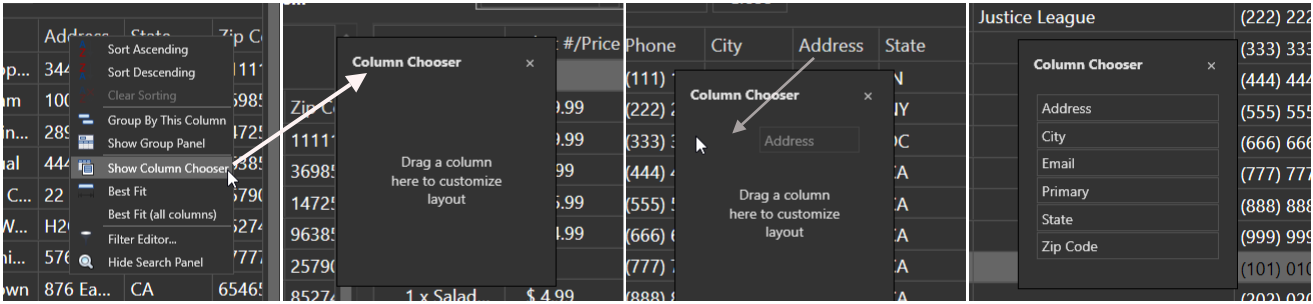
Right click anywhere in the black box. A pop will appear, click on “Design Mode”. Right click again, the box will appear again with option available. Click on “Add Widget”, then “Custom Report Viewer”.

A rectangle box will appear in the upper left hand corner of the screen. Click on the box to move it and resize to it fills roughly the left half of the screen and about 3/4 of the lower screen.

While the box is still selected, right click on the border or outside the border, then select “Settings [Custom Report Viewer]”.
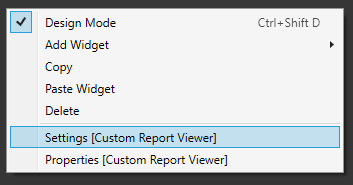
In the “Report Name” field select the “CPH-Customers Report”
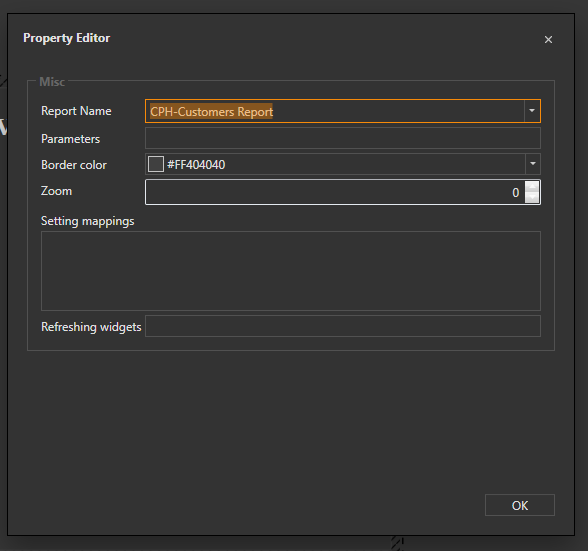
Click on the OK button. Right click again anywhere outside the report and select “Design Mode” to exit the Design Mode. Our report should appear:
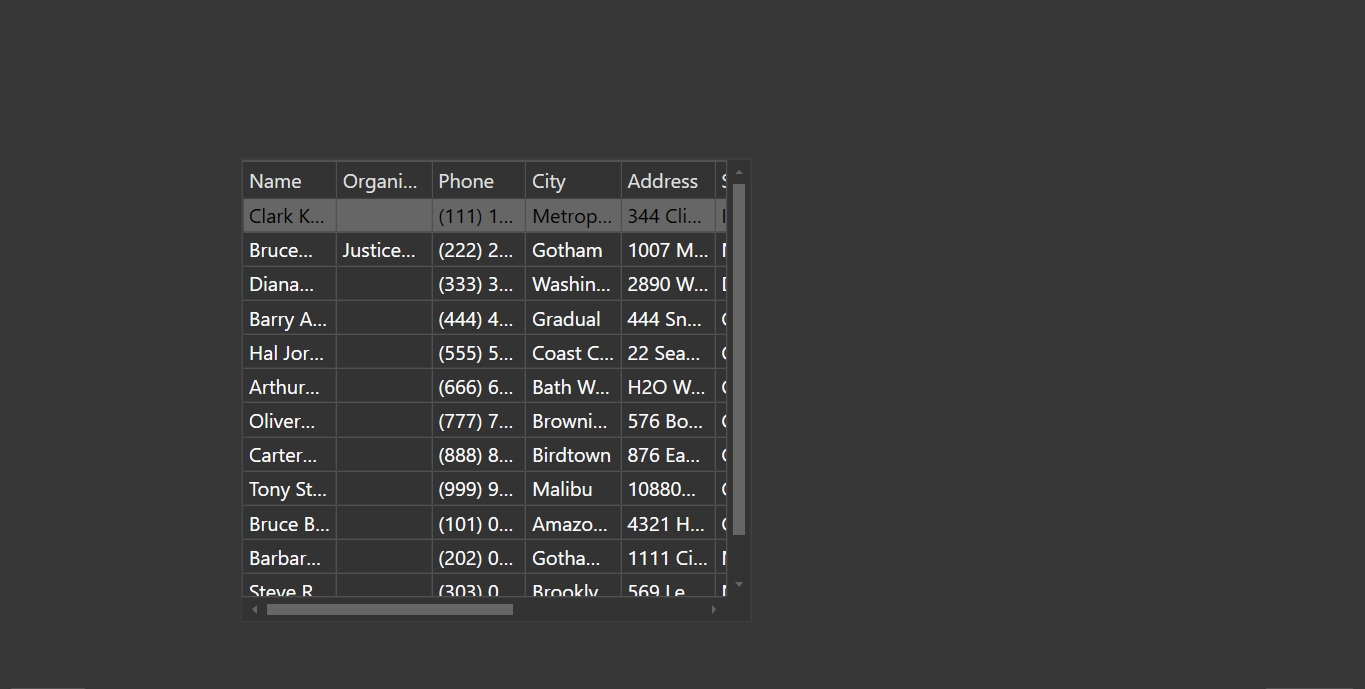
Right now it is not very pretty…but we are still working on it.
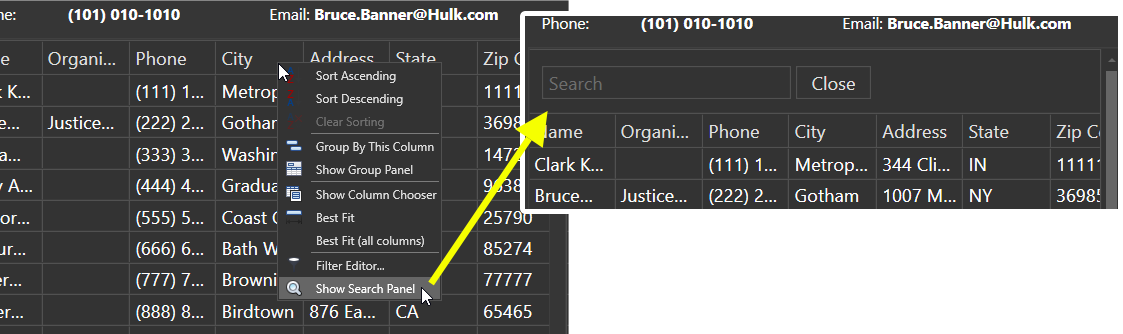
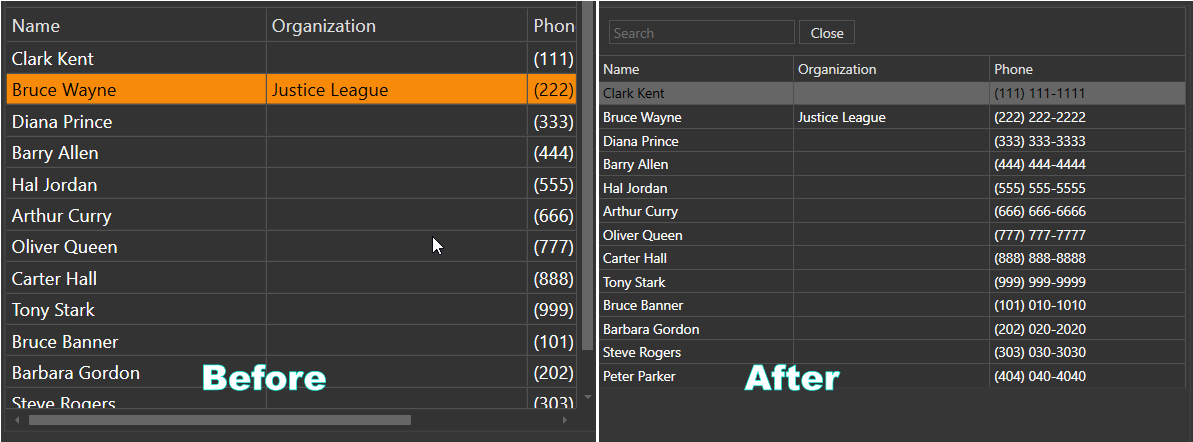
Lets take a look at the desired results:
As you can see we have 4 main sections: Customer Details, Customer List/Search, Date Filter & Ticket/Orders Section. Right now our Customer List/Search has allot of information that makes the screen look clutter. We want to have just the basic information showing in the Customer List/Search, but also want to show more detailed information when we select a customer, that is where we will use the Customer Details section.
Let go back into Design Mode (clicking outside the report viewer section), select the Report Viewer Widget and go to Settings [Custom Report Viewer]. In the Settings mappings section we are going to put:
STG_CPH-Customer=Customers.1
Let’s break this line down to understand what it means. The first section ( STG_CPH-Customer ) is a name we are going to use a setting which SambaPOS can quickly access (or think of it as cache or memory). The name can be anything, as long as it is unique from other names. The equals ( = ) a separator. Customers is the table name..not the Report Name. This part of the report:
[#Customers:1,1,1,1,1,1,1,1,1]
The last part ( .1 ) is the column that will be used to get the setting information.
The proper syntax for this is:
<setting name>=<table name>.<column number>
To access this setting we use {LOCAL SETTING:<setting name>}. We will be doing that later.
Let’s fill in the rest of the settings:
STG_CPH-Organization=Customers.2
STG_CPH-Phone=Customers.3
STG_CPH-City=Customers.4
STG_CPH-Address=Customers.5
STG_CPH-State=Customers.6
STG_CPH-Zip Code=Customers.7
STG_CPH-Email=Customers.8
STG_CPH-Primary=Customers.9
As long as we are here lets fill in the “Refreshing widgets” field with:
wdg_CPH-Customer1,wdg_CPH-Customer2
These names can be anything. Refreshing widgets field will automatically refresh when a change has happened within the report widget.
Click OK to close this dialog box.
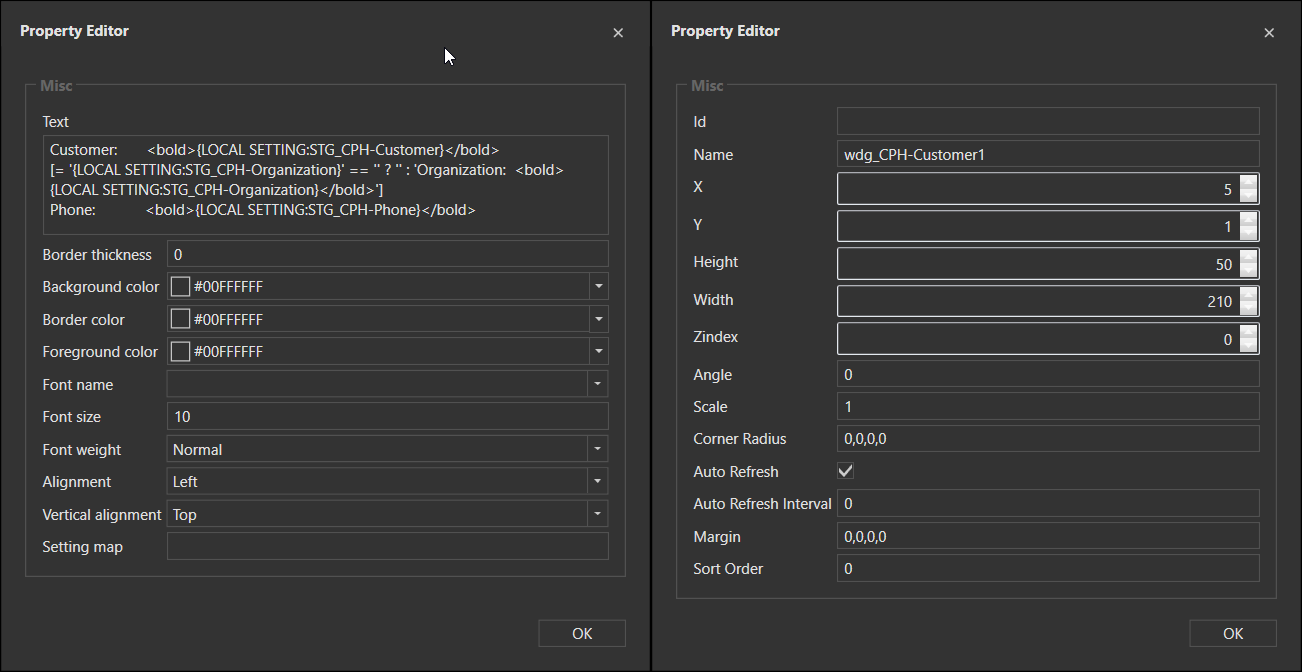
Create a “Label Widget”, move it above the Report Viewer and size it to the left half of the report widget. Go to the Properties [Label Widget], in the name field put the first name we used in the Refreshing Widget section wdg_CPH-Customer1. Click OK then open up the settings. In the Text section, lets put:
Name: {LOCAL SETTING:STG_CPH-Customer}
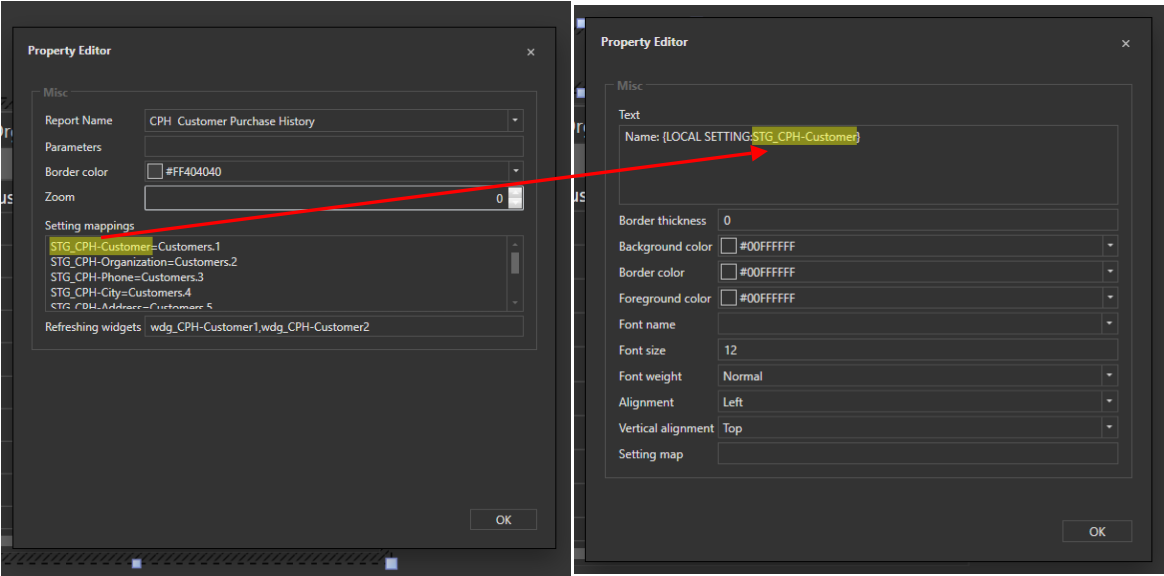
We are getting the settings name from the Settings mappings from the Custom Report Viewer Widget.
Click OK and exit Design Mode. Lets test it out. Click on a row in the report and arrow up & down or click different rows in the report. You should see the label widget automatically change as you change rows. If your not seeing any names or names changing, double check the Refreshing Widgets names, Label Widget name and the Text field for proper spelling.
Right about now you should be getting a good feeling!
Let’s go back into design mode and edit the text field of the label widget. Let’s delete what is there and replace it with this:
Customer:       <bold>{LOCAL SETTING:STG_CPH-Customer}</bold>
[= '{LOCAL SETTING:STG_CPH-Organization}' == '' ? '' : 'Organization:  <bold>{LOCAL SETTING:STG_CPH-Organization}</bold>']
Phone:            <bold>{LOCAL SETTING:STG_CPH-Phone}</bold>
Notice the second line. [= '{LOCAL SETTING:STG_CPH-Organization}' == '' ? '' : 'Organization: <bold>{LOCAL SETTING:STG_CPH-Organization}</bold>']
This is called Ternary Expression. Used as “If true” do this, “If false” do that. The first part, the condition, ( '{LOCAL SETTING:STG_CPH-Organization}' == '' ) is testing the setting to see if the setting is empty (empty defined as 2 single quotes next to each other-no space). When scrolling through the customer list, if a column is empty, the setting will also be empty. The ? ends the condition and starts the True statement. Since when a setting is empty we don’t want to display anything, we will put 2 single quotes again, meaning-do nothing. The colon separates the True/False section. Since we want to show something when the condition is false we are going to put 'Organization: <bold>{LOCAL SETTING:STG_CPH-Organization}</bold>', this will display the Organization setting.
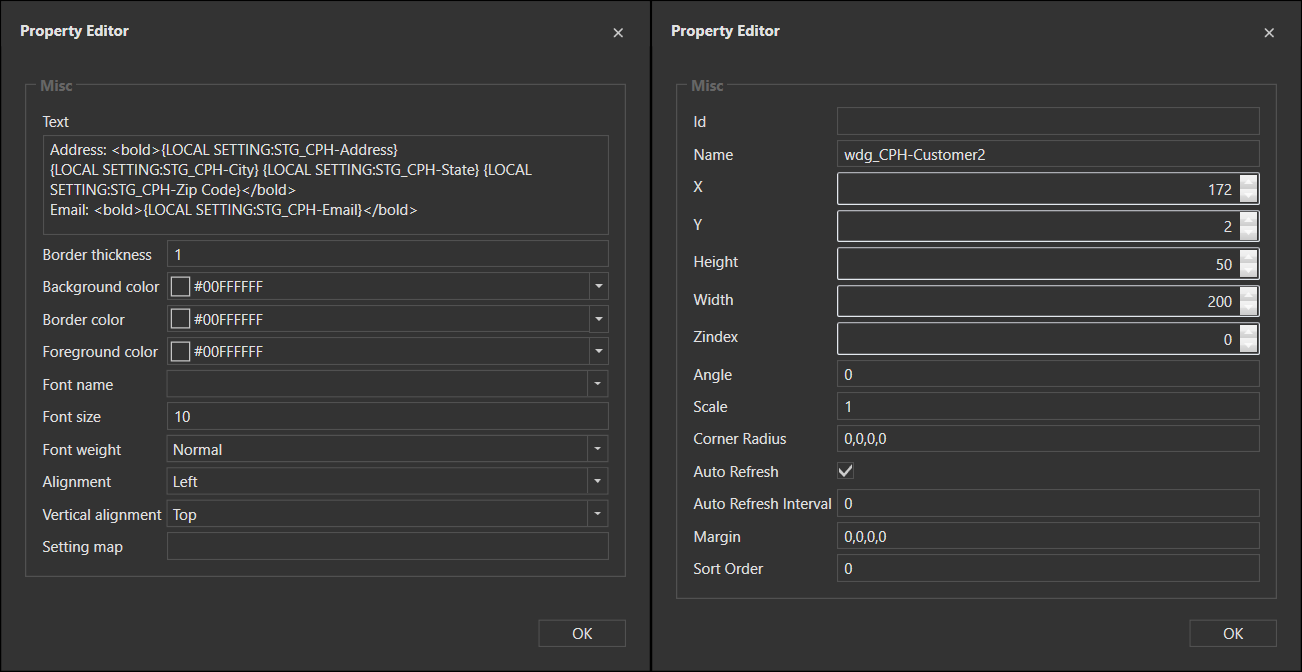
Lets add another Label widget, resize & move it to the left of the first label widet, name it wdg_CPH-Customer2, in the Text field lets put:
Address: <bold>{LOCAL SETTING:STG_CPH-Address}
{LOCAL SETTING:STG_CPH-City} {LOCAL SETTING:STG_CPH-State} {LOCAL SETTING:STG_CPH-Zip Code}</bold>
Email: <bold>{LOCAL SETTING:STG_CPH-Email}</bold>
Exit Design Mode and lets make sure everything is working.
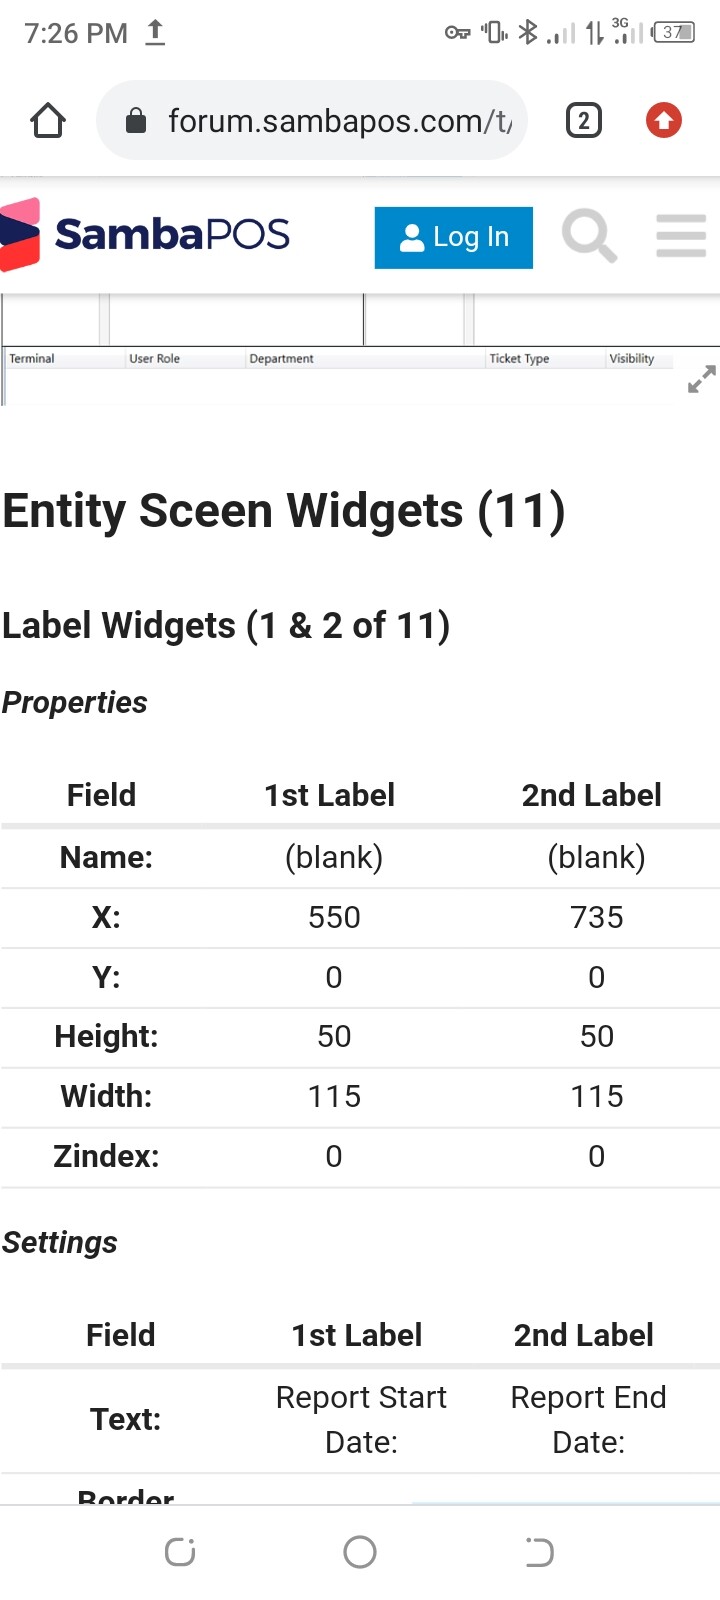
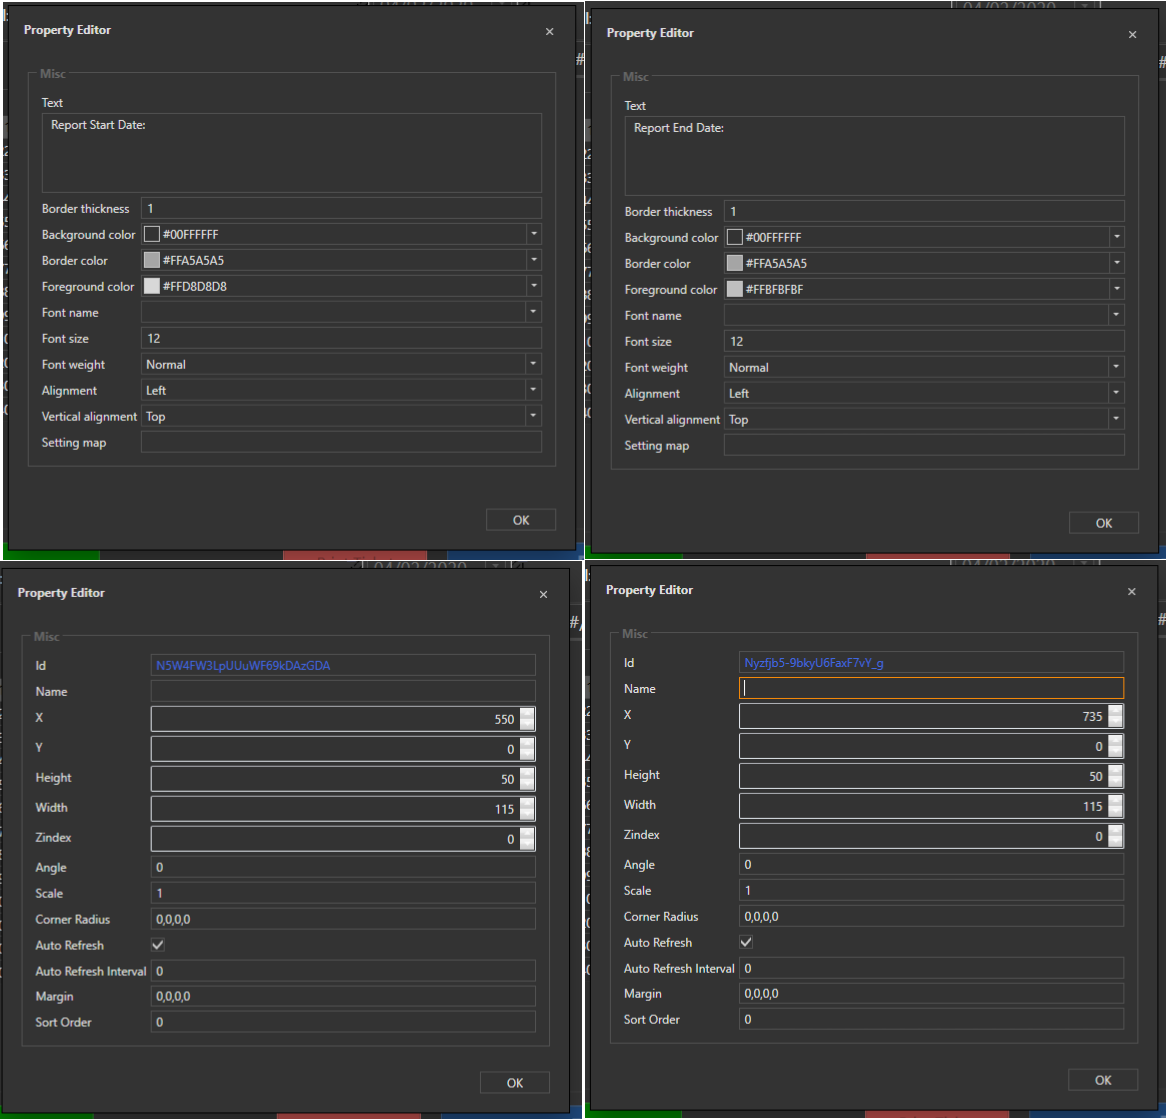
Once everything is working, lets start working on the other half of this screen. Enter back into Design Mode. Add 2 more Label Widgets and enter these setting.
Properties:
| Field | 1st Label | 2nd Label |
|---|---|---|
| Name: | (blank) | (blank) |
| X: | 550 | 735 |
| Y: | 0 | 0 |
| Height: | 50 | 50 |
| Width: | 115 | 115 |
| Zindex: | 0 | 0 |
Settings
| Field | 1st Label | 2nd Label | |
|---|---|---|---|
| Text: | Report Start Date: | Report End Date: | |
| Border thickness: | 1 | 1 | |
| Background color: | #00FFFFFF | #00FFFFFF | |
| Border color: | #FFA5A5A5 | #FFA5A5A5 | |
| Foreground color: | #FFD8D8D8 | #FFD8D8D8 |
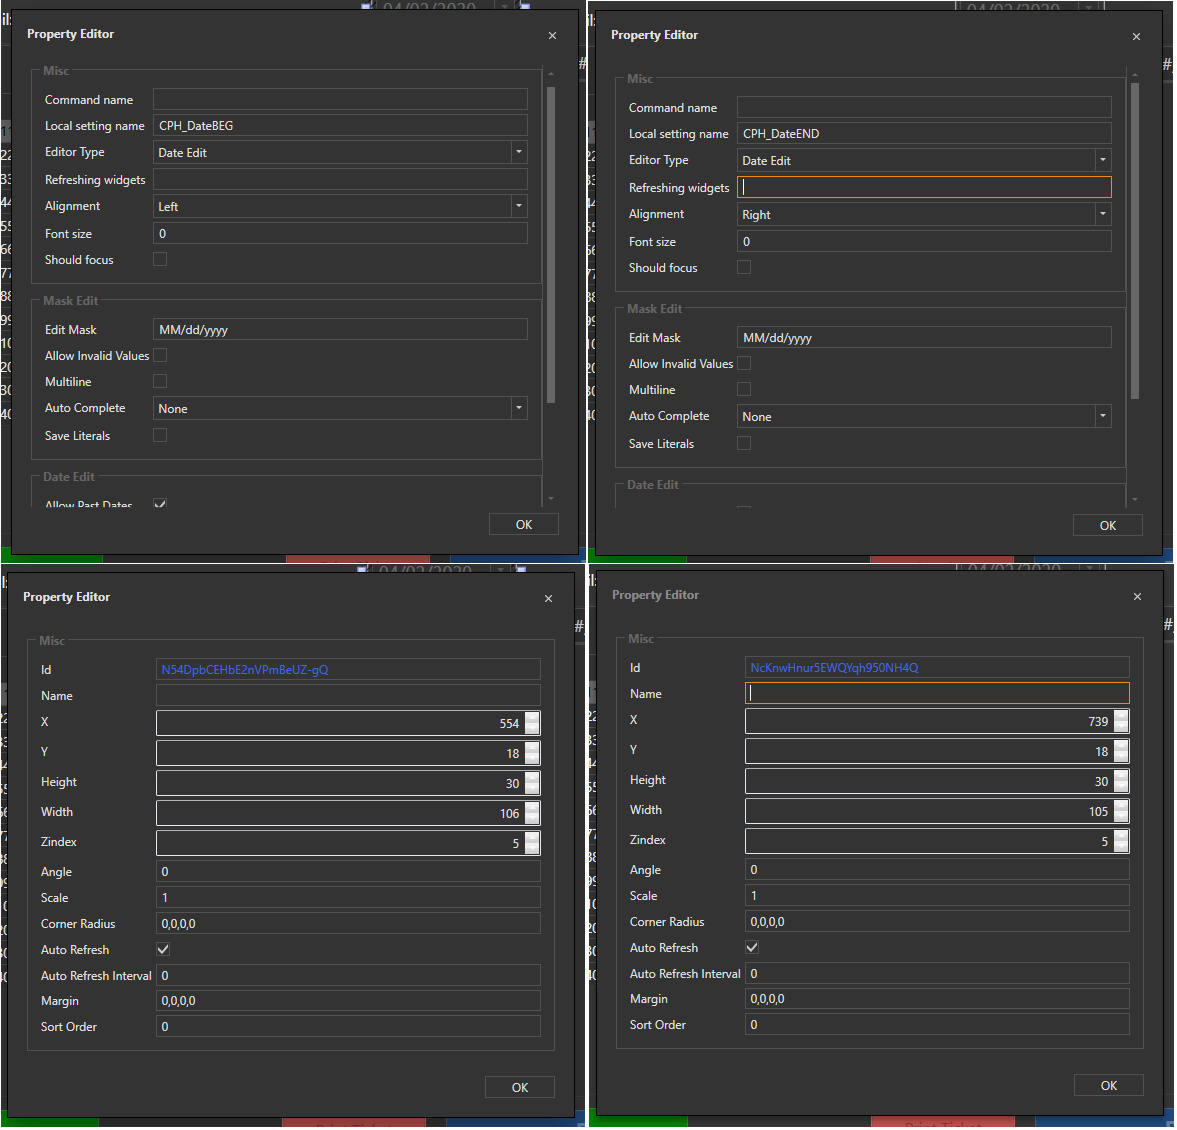
Date picking widgets
Now we need to add 2 Editor widgets.
Properties
| Field | 1st Editor | 2nd Editor |
|---|---|---|
| Name: | (blank) | (blank) |
| X: | 554 | 739 |
| Y: | 18 | 18 |
| Height: | 30 | 30 |
| Width: | 106 | 105 |
| Zindex: | 5 | 5 |
Settings
| Field | 1st Editor | 2nd Editor |
|---|---|---|
| Command name: | (blank) | (blank) |
| Local setting name: | CPH_DateBEG | CPH_DateEND |
| Editor Type: | Date Edit | Date Edit |
| Refreshing widgets: | (blank) | (blank) |
| Alignment: | Left | Right |
| Font size: | 0 | 0 |
| Should focus: | (unchecked) | (unchecked) |
| *Edit Mask: | MM/dd/yyyy | MM/dd/yyyy |
| * Edit mask is used to convert the date format into Month/day/year. Your regional setting may be different. |
Let exit design mode and create the last the report.
Report (2 of 2): Customer Purchase History
| Report Name: | CPH-Customer Purchase History |
| Page Size: | 500 |
| Display in Report Explorer: | (unchecked) |
| Visual Printing: | (unchecked) |
| Template: |
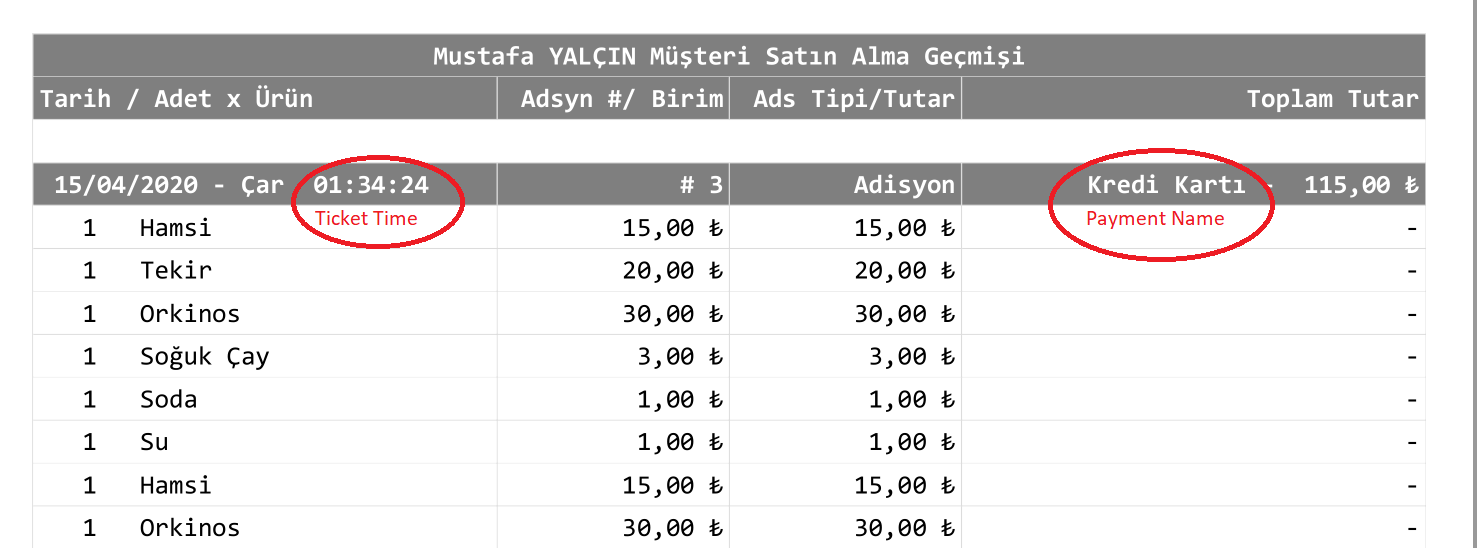
[#Customers Purchase History:1,1,1,1,1]
>Date/Qty x Items|Ticket #/Price|Tkt Type/Ext|Tkt Total|Ticket ID
@{REPORT TICKET DETAILS:T.TicketNumber:(TEN.Customers={LOCAL SETTING:STG_CPH-Primary})::,}
{REPORT TICKET DETAILS:T.Date,T.TicketNumber,T.TicketType,T.TotalAmount,T.Id:T.TicketNumber="$1":[=FD('{0}','MM/dd/yyy - ddd')]|{1}|{2}|${3}|{4}}
{REPORT ORDER DETAILS:O.Quantity,O.MenuItemName,O.Price,O.ExactTotal,T.Id:T.TicketNumber="$1":     {0} x {1}|   $ {2}|   $ {3}||{4}}
[= '{REPORT TICKET DETAILS:T.TicketNumber:(TEN.Customers={LOCAL SETTING:STG_CPH-Primary})::,}' == '' ? '' : '    ------------------------------  |  ----------  |  ----------  |  ----------  |' ]
{REPORT TICKET DETAILS:T.ItemCount.sum,T.TicketAmount.count,T.TotalAmount.sum:(TEN.Customers={LOCAL SETTING:STG_CPH-Primary}):Items\: [=F('{0}','0')]    Ticket Count\: {1}<!rn>Avg Itm\: $[=F(TN('{2}')/TN('{0}'),'0.00')]   Avg Tkt\: $[=F(TN('{2}')/TN('{1}'),'0.00')]|||Total\: $ {2}}

{REPORT TICKET DETAILS:EC.First Name,EC.Last Name,EC.Organization,EN.Customers.asc:(TEN.Customers={LOCAL SETTING:STG_CPH-Primary}):{0} {1}}
{REPORT TICKET DETAILS:EC.Organization.asc:(TEN.Customers={LOCAL SETTING:STG_CPH-Primary})}
Notice the 3rd line of this report that starts with a @. This line will create a parameter. A parameter will create a list that can be accessed later from within the report. We then access the parameter using $1. If we had more than 1 parameter, we would use $2, $3 etc.The parameter we will be creating is a list of Ticket Numbers (T.TicketNumber) where the customers we have selected on our customers report ( (TEN.Customers={LOCAL SETTING:STG_CPH-Primary}) ) are attached to the tickets.
The last column on this report (T.Id) we will use to display and/or print the selected ticket/order.
The last 2 reports lines are used as a reference of the customer and/or organization the report was ran for if we select a different customer on the Customers report. Both reports are optional.
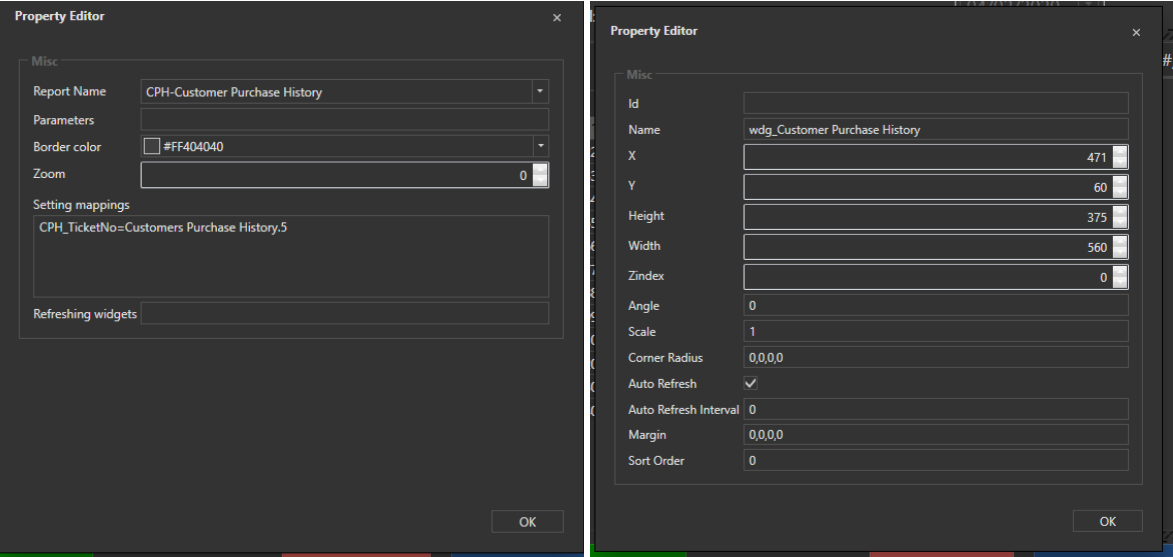
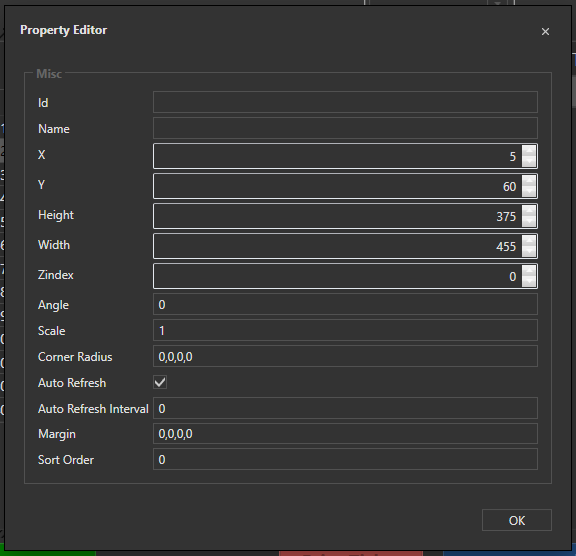
Lets add this report to the Customer Purchase History.
Properties
| Name: | wdg_Customer Purchase History |
| X: | 471 |
| Y: | 60 |
| Height: | 375 |
| Weight: | 560 |
| Zindex: | 0 |
Settings
| Report Name: | CPH-Customer Purchase History |
| Parameters: | (blank) |
| Border Color: | #FF404040 |
| Zoom: | 0 |
| Settings mapping: | CPH_TicketNo=Customers Purchase History.5 |
Actions
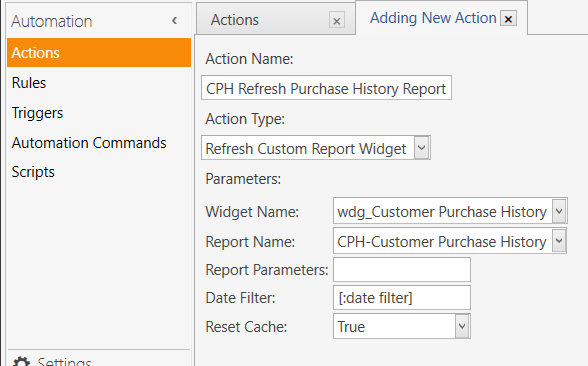
CPH Refresh Purchase History Report (1 of 4)
| Action Name: | CPH Refresh Purchase History Report |
| Action Type: | Refresh Custom Report Widget |
| Widget Name: | wdg_Customer Purchase History |
| Report Name: | CPH-Customer Purchase History |
| Report Parameters: | (blank) |
| Date Filter: | [:date filter] |
| Reset Cache: | True |
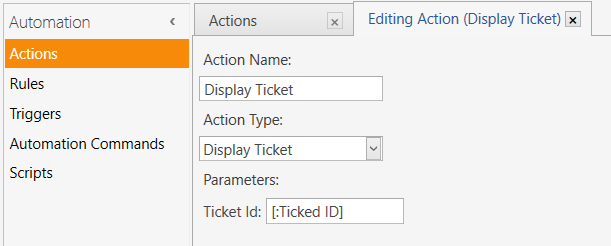
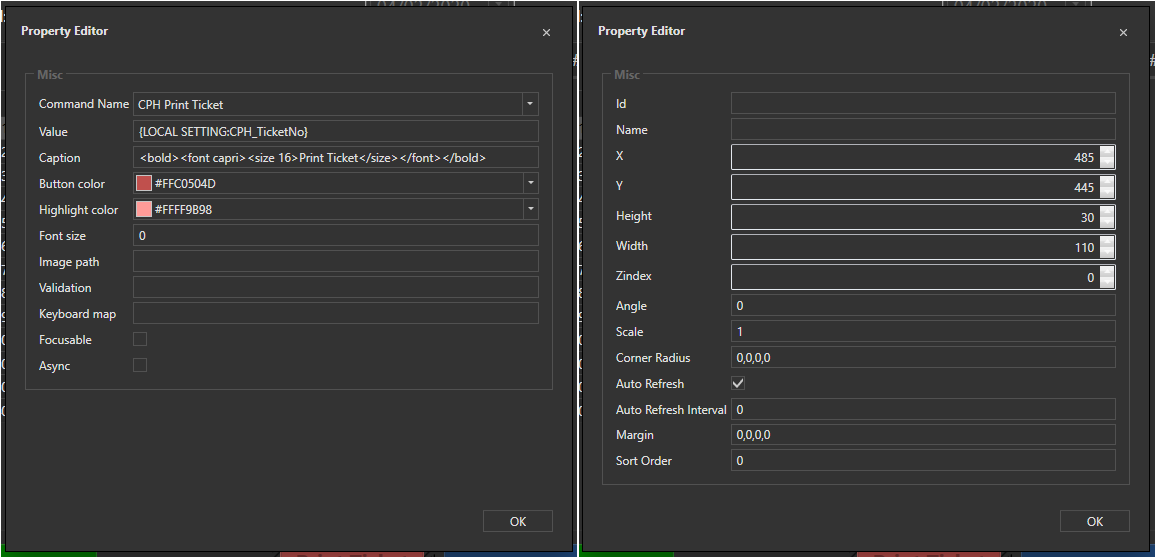
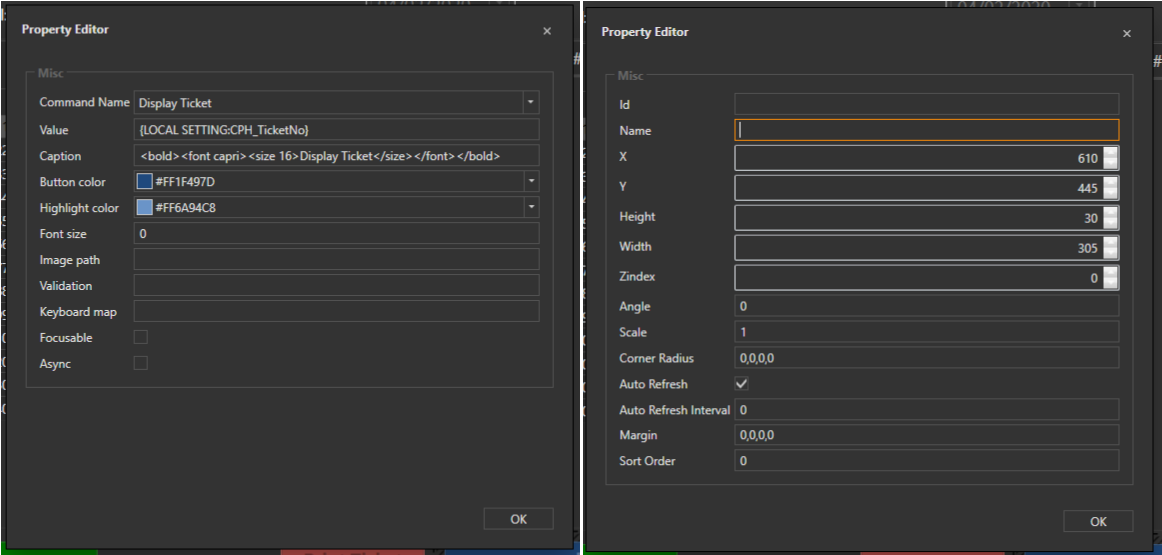
Display Ticket (2 of 4)
| Action Name: | Display Ticket |
| Action Type: | Display Ticket |
| Ticket Id: | [:Ticket ID] |
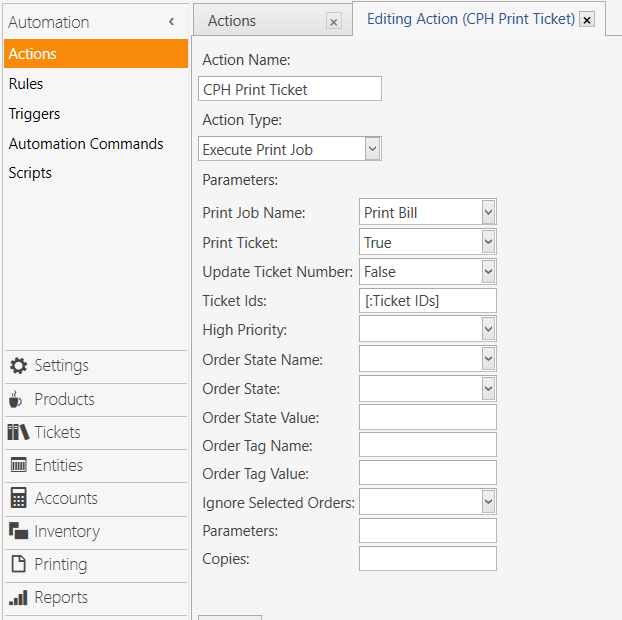
CPH Print Ticket (3 of 4)
| Action Name: | CPH Print Ticket |
| Action Type: | Execute Print Job |
| Print Job Name: | Print Bill |
| Print Ticket: | True |
| Update Ticket Number: | False |
| Ticket Ids: | [:Ticket IDs] |
| High Priority: | (blank) |
| Order State Name: | (blank) |
| Order State: | (blank) |
| Order State Value: | (blank) |
| Order Tag Name: | (blank) |
| Order Tag Value: | (blank) |
| Ignore Selected Orders: | (blank) |
| Parameters: | (blank) |
| Copies: | (blank) |
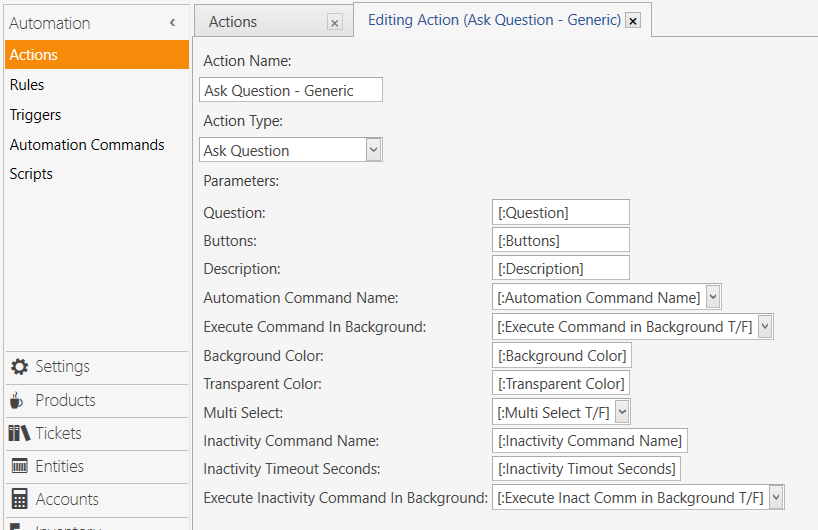
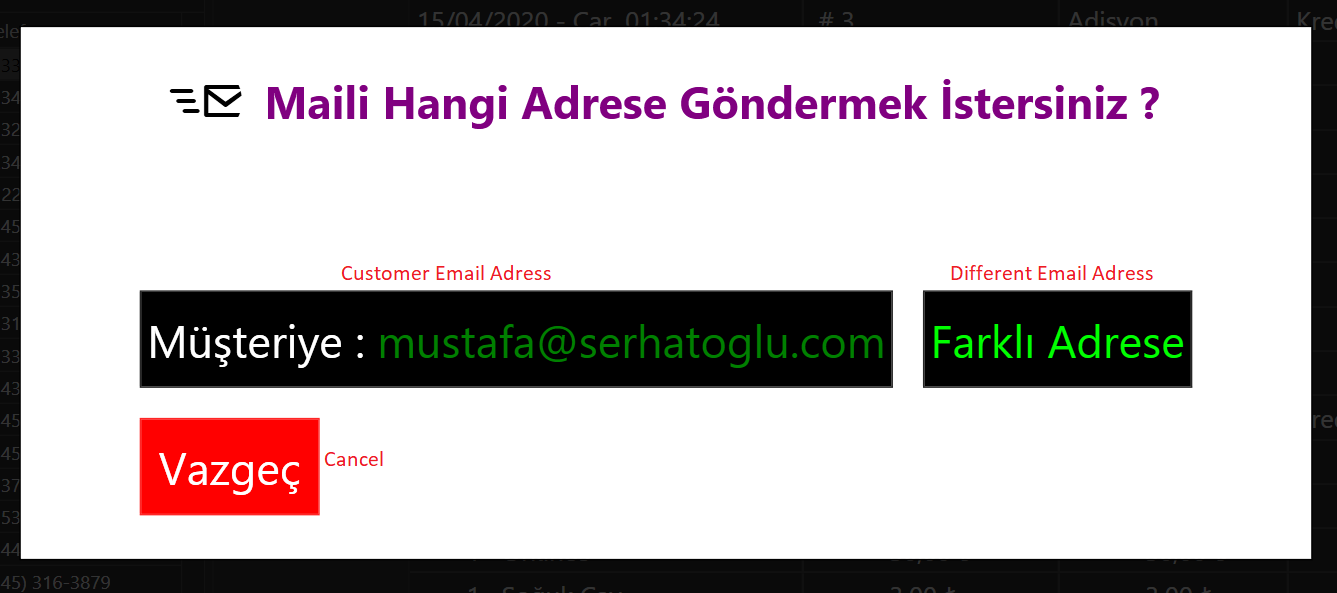
Ask Question - Generic (4 of 4)
| Action Name: | Ask Question - Generic |
| Action Type: | Ask Question |
| Question: | [:Question] |
| Buttons: | [:Buttons] |
| Description: | [:Description] |
| Automation Command Name: | [:Automation Command Name] |
| Execute Command In Background: | [:Execute Command In Background T/F] |
| Background Color: | [:Background Color] |
| Transparent Color: | [:Transparent Color] |
| Multi Select: | [:Multi Select T/F] |
| Inactivity Command Name: | [:Inactivity Command Name] |
| Inactivity Timeout Seconds: | [:Inactivity Timeout Seconds] |
| Execute Inactivity Command In Background: | [:Execute Inact Comm in Background T/F] |
Rules
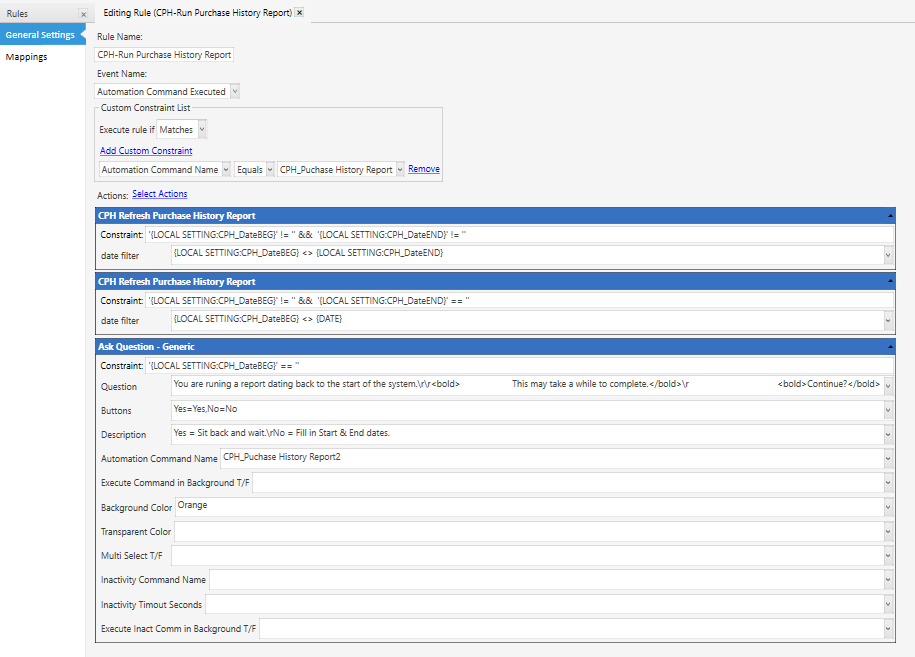
CPH-Run Purchase History Report (1 of 3)
| Rule Name: | CPH-Run Purchase History Report |
| Event Name: | Automation Command Executed |
| Custom Constraint List | |
| — | — |
| Execute Rule If: | Matches |
| Automation Command Name | Equals CPH_Purchase History Report |
---- Actions ----
| Action (1 of 3): | CPH Refresh Purchase History Report |
|---|---|
| Constraint: | ‘{LOCAL SETTING:CPH_DateBEG}’ != ‘’ && ‘{LOCAL SETTING:CPH_DateEND}’ != ‘’ |
| date filter | {LOCAL SETTING:CPH_DateBEG} <> {LOCAL SETTING:CPH_DateEND} |
* To add a second of the same action you will need to right click in the left box and select “Display All Values” option.
| Action (2 of 3): | CPH Refresh Purchase History Report |
|---|---|
| Constraint: | ‘{LOCAL SETTING:CPH_DateBEG}’ != ‘’ && ‘{LOCAL SETTING:CPH_DateEND}’ != ‘’ |
| date filter | {LOCAL SETTING:CPH_DateBEG} <> {LOCAL SETTING:CPH_DateEND} |
| Action (3 of 3): | Ask Question - Generic |
|---|---|
| Constraint: | ‘{LOCAL SETTING:CPH_DateBEG}’ == ‘’ |
| Question | You are running a report dating back to the start of the system.\r\r This may take a while to complete.</bold>\r <bold>Continue?</bold> |
| Buttons | Yes=Yes,No=No |
| Description | Yes = Sit back and wait.\rNo = Fill in Start & End dates. |
| Automation Command Name | CPH_Puchase History Report2 |
| Execute Command In Background T/F | (blank) |
| Background Color | Orange (or choice) |
| Transparent Color | (blank) |
| Multi Select T/F | (blank) |
| Inactivity Command Name | (blank) |
| Inactivity Timeout Seconds | (blank) |
| Execute Inact Comm in Background T/F | (blank) |
What's happening
1st Action The constraint in the first action is going to check to see if the beginning and end dates have been set. If both conditions are true, action will use the beginning and end dates to run the report
2nd Action The constraint in the second action is going to check to see if the beginning date is set and the ending date is blank. If both conditions are true, the action will use the beginning date and use the current date for the end date.
3rd Action The constraint in the third action is going to check to see if beginning date is empty. If true, a pop-up message will appear to alert the user that the report may take some time to run. SambaPOS will appear to freeze while it generates the report for databases that have a high ticket count. This popup will also give the user a change to set begining date.
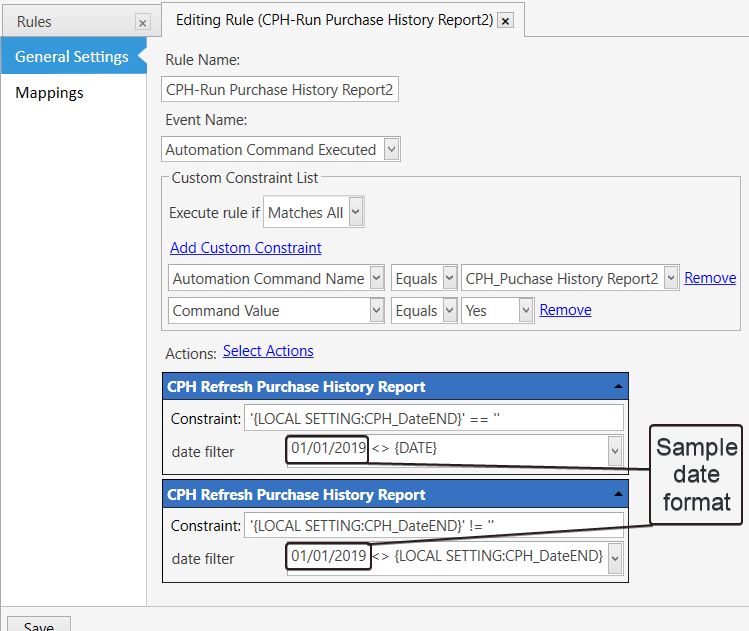
CPH-Run Purchase History Report2 (2 of 3)
| Rule Name: | CPH-Run Purchase History Report2 |
| Event Name: | Automation Command Executed |
| Custom Constraint List | |
| — | — |
| Execute Rule If: | Matches All |
| Automation Command Name | Equals CPH-Run Purchase History Report2 |
| Command Value | Equals Yes |
---- Actions ----
| Action (1 of 2): | CPH Refresh Purchase History Report |
|---|---|
| Constraint: | ‘{LOCAL SETTING:CPH_DateEND}’ == ‘’ |
| date filter | (enter the date of your ticket # 1)** <> {DATE} |
** You will need to enter the date you started using SambaPOS. The report will use this date to run the report. You can find the date in Tickets and rolling back the date until you see ticket #1, or the lowest number under the Number column.
| Action (2 of 2): | CPH Refresh Purchase History Report |
|---|---|
| Constraint: | ‘{LOCAL SETTING:CPH_DateEND}’ != ‘’ |
| date filter | (enter the date of your ticket # 1)** <> {LOCAL SETTING:CPH_DateEND} |
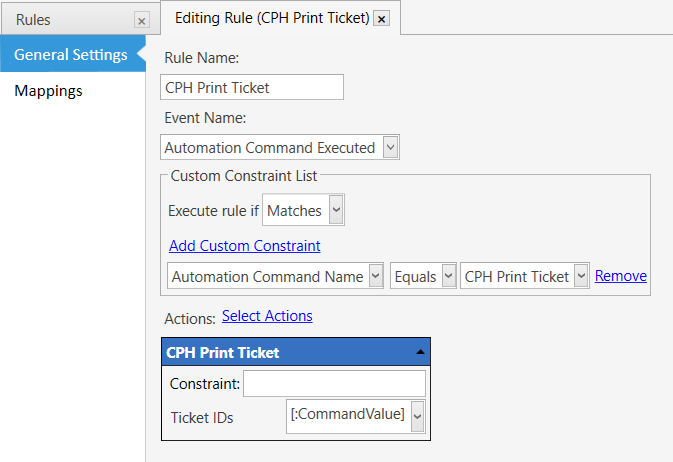
CPH Print Ticket (3 of 3)
| Rule Name: | CPH Print Ticket |
| Event Name: | Automation Command Executed |
| Custom Constraint List | |
| — | — |
| Execute Rule If: | Matches |
| Automation Command Name | Equals CPH Print Ticket |
---- Actions ----
| Action (1 of 1): | CPH Refresh Purchase History Report |
|---|---|
| Constraint: | (blank) |
| Ticket IDs | [:CommandValue] |


 I like it!