#State Names (Groups), States, and State (flow) Control
Before we start into explanations, we almost always recommend that you do not change, delete, rename, or otherwise alter any of the Default
Statesor the Actions that control the defaultStatesin SambaPOS. You are best to leave them as-is until you understand how they work. Even seasoned users still prefer to leave DefaultStateflows untouched, because in most cases, there is no need to change them.
Instead, you should create your own
State NamesandStates, and build your own flow control around yourStatesto achieve your desired result.
There are 2 things that I believe initially confuse people.
State Nameis not theStateitself. Instead, theState Nameis more like a variable name or Group that contains or holds theStateas a value.- “Status” is not a
State. It is the word used to define some of theState Names, which then contain or hold the actualState.
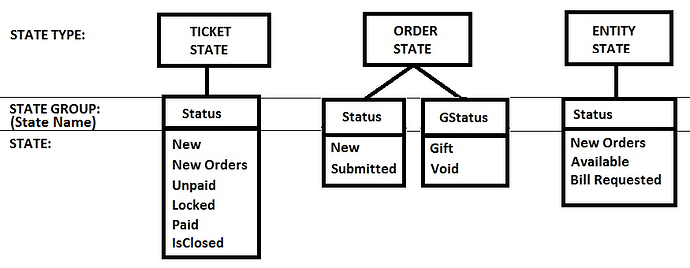
The following image is from the Wiki document which explains States in detail:
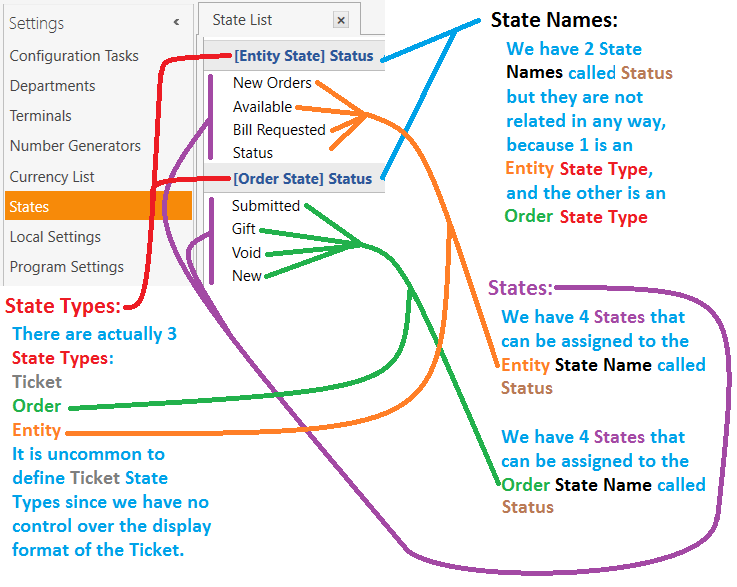
Here is another picture, that shows how they look in SambaPOS State Configuration in Manage > Settings > States:
##State Types
There are only 3 Types of States:
- Entity States
- Order States
- Ticket States
You may define and control multiple State Names and possible States for each of the above Types.
You are not required to define a
Stateto be able to control it using Actions. The only reason to define aStateis to alter the display format on the screen, such as it’s Color or Font.
##State Name
Think of the State Name as the name of a variable or State Group. The State Name in turn contains or holds the value of the State itself. We use words like the following to define the State Name:
- Status
- GStatus
- TCStatus
- PrintStatus
- StaffLevel
- DiscountType
For each of the State Names (Groups), we can defined multiple States.
##States
The State is the actual value currently assigned to the State Name (Group).
For example, we have the Status State Name (Group). This group is further filtered to Ticket, Entity, or Order, and they can all be controlled individually. The actual value assigned to the Status State Name is the State itself. Examples of States we use are:
- New Orders
- Available
- Bill Requested
- New
- Submitted
- Gift
- Void
- PunchIn or PunchOut
- Loaded or Unloaded
- ND, HH, or VIP
- Printed or NotPrinted
- any alphanumeric value, such as 1, 2, 3, A, B, C, etc
##Controlling States
States are controlled with one of the following Actions:
- Update Entity State
- Update Ticket State
- Update Order State
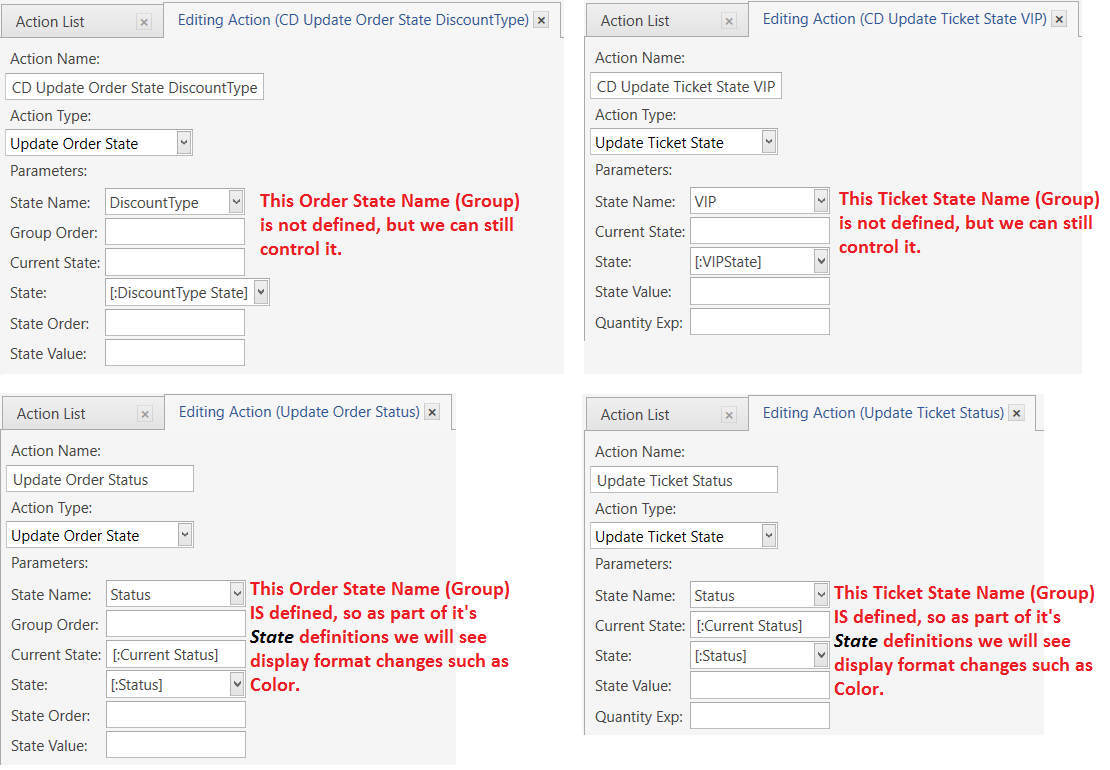
Here are some examples of the Actions:
Note that the top 2 Actions are controlling a State Name (Group) that has no State definitions. We are allowed to do this, regardless of whether or not a State is defined.
The bottom 2 Actions are controlling State Names (Groups) which do have State definitions. This allows us to also define display formatting such as Color, Font, Bold, Italic, etc.
When we set or assign a State for a State Name (Group), then the State Name contains or holds that State.
For example, if we set the Order Status State (Name) to New, then we can read this value using this Tag:
{ORDER STATE:Status}
The value displayed from the Tag above will be New.
By the same token, we can use Tags within Constraints, as follows, where we are testing to see if the Status (State Name) of the Order contains or holds a value (State) equal to New:
'{ORDER STATE:Status}' == 'New'
Here is an example of constraining 2 Actions based on an Order State with a State Name of DiscountType:
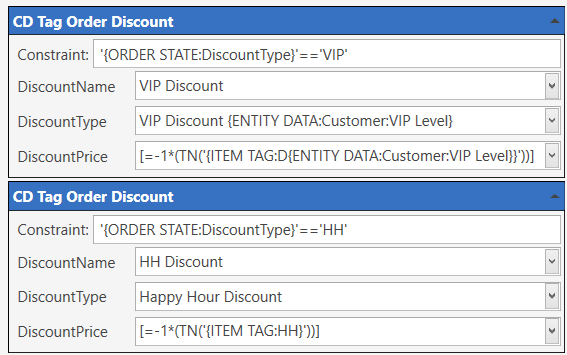
In the above screenshot, the State Name (Group) is called DiscountType. We are checking to see if the DiscountType State Name has a State (value) of ‘VIP’ or ‘HH’.
Only 1 of the Actions will fire, depending on the value of DiscountType. Or perhaps neither will fire if DiscountType contains a State other than VIP or HH.
In any case, when talking about States or State Names, we can assign multiple States of State Names to Entities, Tickets, or Orders. So an Order on a Ticket could look like the following:
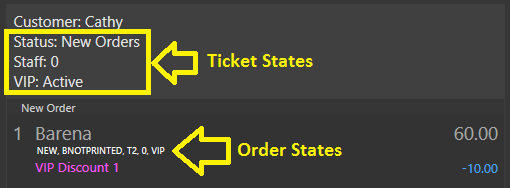
We know the Ticket has 3 State Names, containing these 3 States:
- Status (contains
New Orders) - Staff (contains
0) - VIP (contains
Active)
This is like saying the following:
- the State Name (Group or variable) called “Status” contains or holds a value equal to “New Orders”
- the State Name (Group or variable) called “Staff” contains or holds a value equal to “0”
- the State Name (Group or variable) called “VIP” contains or holds a value equal to “Active”
Or in programming:
Status = 'New Orders'
Staff = '0'
VIP = 'Active'
Because these are Ticket States, this is a more “accurate” depiction:
{TICKET STATE:Status} = 'New Orders'
{TICKET STATE:Staff} = '0'
{TICKET STATE:VIP} = 'Active'
We also know the Order has 5 States assigned, but we are unable to determine the State Name (Group) from the image. Because I set these Order States using Actions, I can tell you what they are - the State Name is enclosed in (brackets) after the State:
New(Status)BNotPrinted(KDStatus)T2(TaxTemplate)0(Staff)VIP(DiscountType)
So if we wanted to test the values (States) held in these State Names, so we could use them as constraints, we would do it like this:
'{ORDER STATE:Status}' == 'New'
'{ORDER STATE:KDStatus}' == 'BNotPrinted'
'{ORDER STATE:TaxTemplate}' == 'T2'
'{ORDER STATE:Staff}' == '0'
'{ORDER STATE:DiscountType}' == 'VIP'
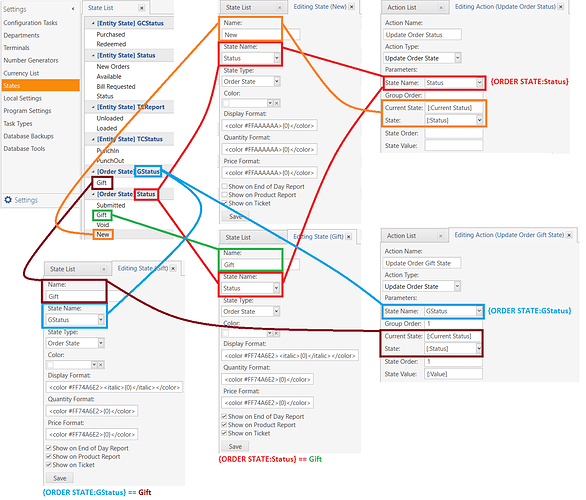
The following image attempts to show the linkage between State Names, States, and the Actions that control them. It might cause more confusion for some, but this is essentially the way it ties together:
One thing to note in the above image is that there really is in fact 2 “Gift” States defined. But 1 State belongs to Status, while the other belongs to GStatus. This is perfectly acceptable, since the 2 “Gift” States belong to different State Names.
And again, remember…
You are not required to define a
Stateto be able to control it using Actions. The only reason to define aStateis to alter the display format on the screen, such as it’s Color or Font.
This is why we often do not see any Ticket State Types defined in the State list. We have no control over the Color or Font used to display Tickets, so there is no need to define States for Tickets. But we can still control and test Ticket States to control flow. In fact, there are a few Ticket States that are used by default (via Actions), which are assigned to or stored by the Ticket “Status” State Name (Group). They are: New, New Orders, Unpaid, Locked, Paid, and IsClosed.
On the other hand, we can change the way Entities appear. By default, Customer or Table Entities change color from white (Available) to orange (New Orders) to maroon (Bill Requested).
We can also control the way Orders appear. By default, New is white, Submitted is grey, Gifts are blue, and Voids are red, .
