Action Display Ticket List
has filters for Entity Type and Entity:
Ticket List displays first 30 characters of Ticket Note:
Action Display Ticket List
has filters for Entity Type and Entity:
Ticket List displays first 30 characters of Ticket Note:
##5.1.21
Load Ticket
Action can load a Ticket by Ticket Tag
or Ticket State
Custom Product Tags
may have default values.
If you want to setup a default value that contains comma character you can use double quotes to escape commas. For example, if your decimal separator is a comma (,
) this will be useful:
Discount=No,"VIP Rate=1,10"
Existing products will not receive default values, but new products will get default values.
Product Tag Editor
to edit multiple Tags… Select a few cells, edit value, and it will ask if you want to update all values.
All action Parameters
will be trimmed of whitespace
This is to ensure a user does not accidentally add spaces while copy & pasting values.
Grouping in Tickets
Use Update Order Group
Action to group orders as needed.
Group Tag: the name of the group
Key: another group identifier. It is not displayed on screen. You can use it to have multiple groups with same name.
Format: {0}
is a placeholder for Group Name. You can use format parameter to change size, color, font of the group bar.
Background Color: is the background color for the group bar so you may have multiple groups with different colors.
Group Printing
Notice there are two Menu 1’s printed separately because different Key parameters used in action.
Template:
PS: [ORDERS:GROUP TAG=*]
is a special template section for orders that have a group tag.
[LAYOUT]
<T>Ticket
<L00>Date:{TICKET DATE}
<L00>Time:{TIME}
{ENTITIES}
<L00>Ticket No:{TICKET NO}
<F>-
{ORDERS}
<F>=
<J10>Total:|{TICKET TOTAL}
<F>=
[ORDERS GROUP|GROUP TAG]
<J00>--- {GROUP KEY}|{GROUP SUM}
[ORDERS GROUP:]
[ORDERS]
<J00>- {QUANTITY} {NAME}|{TOTAL PRICE}
{ORDER TAGS}
[ORDERS:GROUP TAG=*]
<J00> {QUANTITY} {NAME}
{ORDER TAGS}
[ORDER TAGS]
<J00> * {ORDER TAG NAME} | {ORDER TAG PRICE}
##5.1.22
Update Application Subtitle
Action changes
Update Application Subtitle
Action accepts height setting.Update Application Subtitle
Action accepts Tag formatting so foreground and font settings deleted.Create Entity
Action will break if another entity with same name exists.{ORDER INDEX}
and {INDEX TOTAL}
tags implemented to print 1/5 … 4/5, 5/x counters next to orders (labels)admin_tiles.txt
file users that have admin role will use that file to store layout. If there is no role specific file tiles.txt
file used. We can create an auto configurator later to create / delete that file.Program Settings > Maintenance
to Local Settings > Online Services
.Ask Question
Action accepts Transparent color to change transparency of question dialog.##5.1.23##
Implemented CURRENTMENU setting. You can read it with {:CURRENTMENU}
tag.
JS API Objects added:
api.PaymentType(name).Processors(name).Exists();
api.PaymentType(name).Processors(name).Create();
api.PaymentType(name).Processors(name).Delete();
api.EntityType(name).Entities().State(name).Update(value);
api.EntityType(name).Fields(name).Exists();
api.EntityType(name).Fields(name).Create(fieldtype,[format],[valuesource],[hidden]);
api.Entity(name).State(name).Update(state);
api.Entity(name).State(name).Get();
api.Entity(name).Data(name).Update(value);
api.Entity(name).Data(name).Get();
api.Entity(name).Exists();
api.Entity(name).Create(entityTypeName);
PS: [param]
indicates an optional parameter but you can’t skip parameters. If you want to set third optional parameter you should also set values for former optional parameters.
Not sure what else is new … please edit the post to include other new features… I unlocked the Topic to allow editing.
Ask Question transparency is great for full screen messages/instructions, a few of my examples below
{RANDOM:L:C}
tag accepts characters used to generate random strings
{RANDOM:<length>:<chars>}
<length> : Length of generated string. Default 8.
<chars> : Characters used to generate string. Default ABCDEFGHJKLMNPQRSTUVWZYZ123456789
Invalid <img>
tags will not crash SambaPOS. It will display an error message inside content.
Warning displayed if rule constraint has unmatching parenthesis structure. (eg [:Variable}
)
Automation command’s Image setting moved to Navigation
page and used to define background images for Tiles.
Button heights automatically calculated when Menu Item Button Height set as 0. Buttons will fully expand to available size.
Browser Printer - new Add-on Module
The Browser Printer
can be used to display printing content in Internet Explorer which will be useful for building Customer Display Screens. After enabling the Add-on Module we can set a printer type as Custom Printer > Browser Printer
.
[Documents]\SambaPOS5\CustomerDisplay.html
will be used.Now you can use Execute Print Job
action to send data to Browser Window. This printer will not process any printer template formatting tags such as <J>
, <L>
. Instead, use html
tags to format your output.
Use this on top of the HTML template if IE blocks page content.
<!doctype html>
<!-- saved from url=(0014)about:internet -->
On future versions we plan to have +2 monitor support for a specific device we have. For now only secondary monitor is supported.
##5.1.26##
Update Program Setting
Action contains a new Update Type: Delete
The Delete update type removes a setting from the database.
Menu Numberpad Height % can be changed per-Category
Menu Item buttons supports displaying values for reporting tags and global printing tags
For example: {SETTING:X}
, {CALL:X}
New tag {REPORT INVENTORY:<inventory item name>:<warehouse name>}
Other than reporting we can also use this tag to display inventory level on specific menu item buttons or test specific inventory levels on the fly.
IMPORTANT: Inventory level calculation needs to process all Tickets and all Inventory Transactions created in current work period (for each inventory item). So to avoid unnecessary network traffic try to use this feature for only a few menu items that really have mission critical meaning.
{WORKPERIOD ID}
, {FIRST TICKET NO}
, {LAST TICKET NO}
report tags implemented
These tags can be useful for creating more complete Work Period Reports for accounting and auditing purposes.
Order State Formatting
Display Format
is used while displaying product namesQuantity Format
used while displaying quantitiesPrice Format
used while displaying prices{0}
indicates placeholder for formatted valueExample:
<color #FF888888><italic>{0}</italic></color>
When you override Submitted state format you should also set a display format for Gift & Void states otherwise they’ll appear in submitted color as these orders already have that state.
Header setting added to Menu Categories
Now you can individually change how categories appear without changing category name. You can also choose to display Text only, Image only, or both.
[ORDERS:INDEX:x]
section tag added
Useful to change formatting for orders that have a specific index. For example, in this Ticket, the Order at Index 3 is displayed on the Customer Display in bold red…
Template:
[ORDERS:INDEX:1]
<div id="orderline" style="width:99%; font-size:16px; border-top:solid 1px #BBB; padding:3px;">
<div id="prodimg" style="width:15%; display:inline-block; vertical-align:middle"><img src="D:\Programs\POS\images\[='{ITEM TAG:ProdImage}' !='' ? '{ITEM TAG:ProdImage}' : 'znoimage-th.jpg']"> </div>
<div id="prodqty" style="width:5%; display:inline-block; vertical-align:middle">{QUANTITY}</div>
<div id="prodname" style="width:45%; display:inline-block; overflow:hidden; vertical-align:middle;color:#FF0000"><b>{NAME}</b></div>
<div id="prodprice" style="width:13%; display:inline-block; text-align:right; vertical-align:middle">{PRICE}</div>
<div id="prodamount" style="width:15%; display:inline-block; text-align:right; vertical-align:middle">{TOTAL AMOUNT}</div>
</div>
<div style="width:99%; text-align:left; font-size:10px;">{ORDER TAGS}</div>
[ORDERS]
<div id="orderline" style="width:99%; font-size:16px; border-top:solid 1px #BBB; padding:3px;">
<div id="prodimg" style="width:15%; display:inline-block; vertical-align:middle"><img src="D:\Programs\POS\images\[='{ITEM TAG:ProdImage}' !='' ? '{ITEM TAG:ProdImage}' : 'znoimage-th.jpg']"> </div>
<div id="prodqty" style="width:5%; display:inline-block; vertical-align:middle">{QUANTITY}</div>
<div id="prodname" style="width:45%; display:inline-block; overflow:hidden; vertical-align:middle">{NAME}</div>
<div id="prodprice" style="width:13%; display:inline-block; text-align:right; vertical-align:middle">{PRICE}</div>
<div id="prodamount" style="width:15%; display:inline-block; text-align:right; vertical-align:middle">{TOTAL AMOUNT}</div>
</div>
<div style="width:99%; text-align:left; font-size:10px;">{ORDER TAGS}</div>
Last Update Time Desc
sorting option added to printer templates
An example use of this sorting option is a Customer Display Template where you want the most recent order to appear at the top, and the earliest order to appear at the bottom.
Automatic sizing menu buttons optimized
Generates better button layouts while searching products on POS screen.
State settings refresh when user logs in
For example, {:ISCURRENTWORKPERIODOPEN}
will be refreshed on User Login.
##5.1.27##
Create Account Transaction Document
Action has new parameter: Date
Default will use current Date/Time, but you can force a Date/Time in the Past or Future via this parameter.
One example usage is when you want your Reporting to show Employee Wage Payments on certain dates, but today is not that date.
Add limit
payment processor supports limiting by ticket amount.You’ll be able to format / validate free tags
by using regular expressions. In this example free tag entry area will only accept upper case letters.
Automatic Sub-menu Selection
Create a Category containing only Sub-menus with no items at the root Category - it selects the first Sub-menu, as defined by the Item Sort Order.
Category Display Format
HTML <table>
Tag support in HTML Printers
It is possible to use html table tag inside html printer templates.
This allows us to use variable-width fonts. Will be useful for foreign languages and also allow fine tuning for layouts. For example we’ll be able to align order quantities properly.
Custom report detail tags accept line format and line splitter parameters.
{REPORT TICKET DETAILS:T.TicketNumber,T.TotalAmount:Ticket.Id > 0:#{0} - ${1}:<br/>}
#{0} - ${1}
.#114 - $39.00
<br/>
.<br/>
instead of new line character.#114 - $39.00<br/>#115 - $49.00
This feature will be useful while using custom report tags as button formats or other places that accepts formatting tags.
We’ll be able to setup a default state for new created entities.
In this sample all new Customers will have CStatus=Active
state.
We can setup more states by adding them with semicolon character like CStatus=Active;Status=Available
In batch entity editor screen we can use Update Entity State
function to update states for multiple entities. It will update only selected entities. We can select all visible entities by using right click > Select All
command.
It will be useful to update current entities when we create a new entity state.
To be able to use Entity Search screen’s empty space better I’ve implemented a new feature called Entity Search Details
. We’ll setup detail screen template in Entity Screen > Details
section.
We can use formatting tags and reporting tags here.
This template will appear when we have a single entity displayed in Entity Search screen.
Regular Search
Single Entity View
When a single entity displays empty space used to display details screen.
Image fetched from gravatar.com website. You can use customer e-mails to display Gravatar profile image. Here is the function I’ve created to read image from gravatar.com. This will convert e-mail to a gravatar url.
function Get(email)
{
if(email == undefined || email == '') return "http://www.gravatar.com/avatar/00000000000000000000000000000000";
while (email.indexOf(' ')>=0)
{email = email.replace(' ','');}
email = email.toLowerCase();
var hash = Helper.Md5(email);
return "http://www.gravatar.com/avatar/"+hash;
}
You’ll be able to configure state specific entity display templates.
Here I’ve configured a custom display template for New Orders
state. Entities that have New Orders
state will appear with that custom formatting.
This is configured template as Display Format
We can enable / disable formatting for specific entity screens. You need to enable this setting to enable formatting.
This feature will also work for Entity Grid Widget and Entity Button Widget.
Use this feature wisely as it triggers a new formatting task for each button on every screen refresh. This setting is also available for 5.1.31 version but don’t test it as it does not have required optimizations.
I’ve radically changed how we save Tickets to detect some rare multi terminal issues . With that change I’ve also implemented Save Ticket
action. That action will persist ticket to database and read ticket’s latest state from database. You can use it to save new tickets to update ticket ids, save moved tickets automatically or refresh tickets inside rules. I’ve basically implemented it to call it before printing tickets to ensure we’re printing latest version of ticket. Not essential but if you have automation rules that may change tickets from other terminals (for example if kitchen may change ticket’s tags or states while ticket is open on another terminal) you can use it to ensure a final refresh.
###Custom Report Expression Syntax improvement
We already support two summary expression syntax. Third one is new.
[T.Field1.Sum]*[T.Field2.Sum] Multiplies Field1.Sum by Field2.Sum.
([T.Field1]*[T.Field2]).Sum Sum of Field1 * Field2.
[([T.Field1]*[T.Field2]).Sum]/[T.Field2.Sum] Divides sum of Field1 * Field2 by sum of field 2.
This syntax will allow us to use an summary expression inside a summary expression. You’ve noticed that will be useful to calculate weighted averages.
###New Ticket Creation Method
A new Ticket Creating Method implemented for departments called Ticket Selection
. Might not have a wide usage but that was a nice V2 feature. It basically uses Ticket List View as primary view. Useful for small venues that have 5~6 tables but does not need table based tracking. It will list open tickets for the department. You can click a ticket to display or use menu buttons to create a new ticket.
I’ve noticed mapping products to printers by product group is a lot of job especially if you have many product groups. Now you can Create a product group for printing and map products by custom product tags. Mapping to terminals is also added so you won’t need to create multiple rules for each terminals for terminal based printing.
We’ll be able to store cc info within payment. That will be displayed on settle screen and new printing tags added to print that info on bills.
We’ll be able to change stored decimal places count on database and also displayed decimal place count on screen.
Rate-based Order Tag Calculation
Rate based order tag price calculation and order tag formatting feature explained here. [New 5.1.38] Rate based Order tag Prices
It is amazing to see how much people uses order based discounts. In our country it is generally ticket based. For some places a different price list does the job for most cases. I still don’t know if it is a killer feature o not but I’ve added rate based calculation for order tag prices.
Rate based order tag price calculation is cumulative. I mean sum of order’s price and other order tags before rate tag used for calculation. So placing discount tag to last place on order tag group list will use other order tag prices while calculating price. Adding, removing tags, changing order quantity or price will also update amount.
That will have no connection to accounting but we can still use order tag template tags for reporting or printing needs.
I hope that will help order based discount or servicing amount implementation.
Order Tag Description field
Additionally Description
field for order tags added so you can use that field for adding more info about order tags. For example you can store second language names here and use them for kitchen printing.
Related actions and printing tags also improved to support these features.
{REPORT COST:X} To read cost for product X. Use <ProductName>.<PortionName> syntax as X.
{REPORT CONSUMPTION DETAILS:X} Reports inventory item consumption details.
{REPORT COST DETAILS:([^}]+)} Reports product cost details.
For people who loves to use SQL we’ll also start storing average product price in [CostItems]
table so you can easily calculate profits.
You can check database field names to get a hint. We may provide additional values.
For example Report Order Details supports T.x or O.x to read both Ticket and Order values. For Inventory, try these:
C.StartDate
C.EndDate
C.Name
C.Unit
C.Inventory
C.Warehouse
C.Consumption
Create Recipes Tool
Creates 1:1:1 mappings of Products to Inventory Items to Recipes.
Print Report
Action has Printer Name
parameter
Allows for sending Reports to specific Printers - for example, an A4/Letter Printer.
Create Account Transaction Document Action supports AccountId
This makes setup simpler for Automation Commands on Account Screens…
Order Tag Header Field
Overrides display format of Order Tag Button.
Custom Automation Command Buttons for Menus
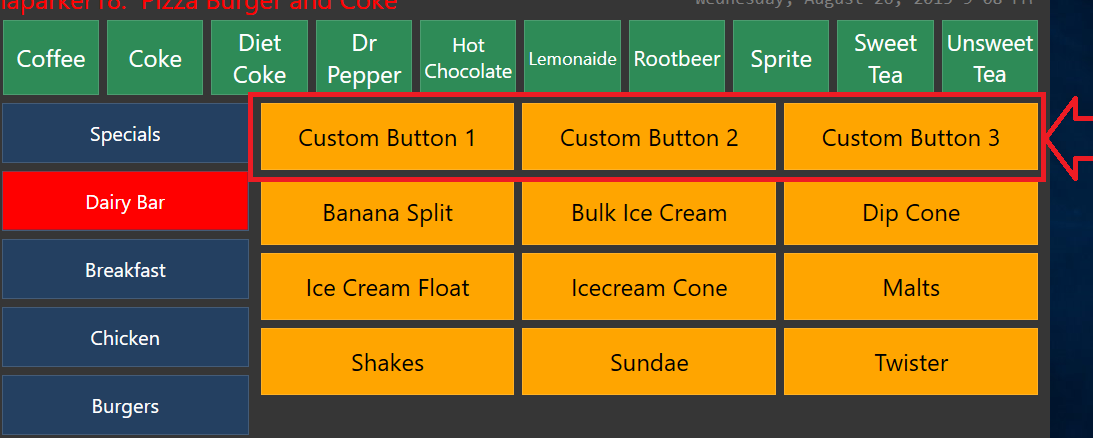
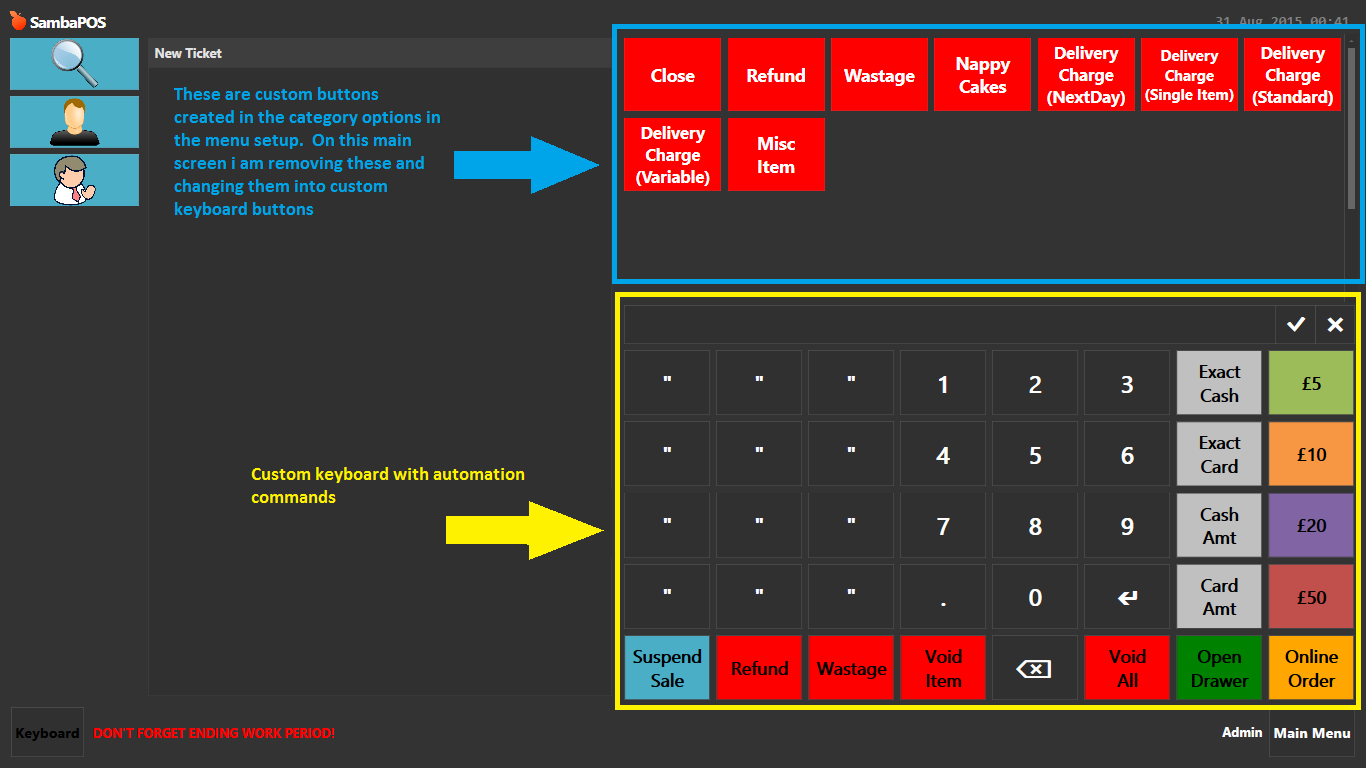
This allows us to place a Button inside a Menu to perform some function… without the need of having it associated with a Product.
This can be used to create a Retail Setup, which contains no Menu Items per-say (i.e. no buttons are shown for products - instead they all have scannable barcodes). Instead the Menu simply contains Retail Functions. @RickH is building one here …
Add Task
ActionThis will be a very powerful tool for multiple uses including storing data from Tweets, Order Level Tracking and interaction similar to Ticket Lister but per order, and possibly even more.
Refresh Widgets
This Action will refresh specified widget and will communicate via Message Server to update all terminals widgets.
Example of Add Task action used to show Tweets as they come in via the Twitter Device:
We can export Report Data to CSV or XML.
###Orders XML
<orders>
{REPORT ORDER DETAILS:
O.MenuItemName,
O.Quantity,
O.Price,
([O.Quantity]*[O.Price]-[O.ExactTotal]),
O.ExactTotal
:O.MenuItemName.Contains("Toasted")
: <order>
<name>"{0}"</name>
<quantity>{1}</quantity>
<price>{2}</price>
<service>{3}</service>
<total>{4}</total>
</order>}
</orders>
###Orders CSV with Summary
Report
Index;Name;Quantity;Price;Service;ExactTotal
{REPORT ORDER DETAILS:
<row>,
O.MenuItemName,
O.Quantity,
O.Price,
([O.Quantity]*[O.Price]-[O.ExactTotal]),
O.ExactTotal,
:
:"{0}";"{1}";"{2}";"{3}";"{4}";"{5}"}
;;;;;=SUM(F3:F<row-1>)
###Orders CSV Group
[Report:1,1,1,1,1,1]
Index;Name;Quantity;Price;Service;ExactTotal
@Breakfast,Wraps,Soup
{REPORT ORDER DETAILS:
O.ItemGroup,
O.MenuItemName,
O.Quantity,
O.Price,
([O.Quantity]*[O.Price]-[O.ExactTotal]),
O.ExactTotal,
:(MG=$1)
:"{0}";"{1}";"{2}";"{3}";"{4}";"{5}"}
"$1 Total";;;;;=SUM(F<row-{REPORT ORDER COUNT:(MG=$1)}>:F<row-1>)
###SYNTAX
{REPORT ORDER DETAILS:::}
We can prepare CSV files that support Excel functions.
<row>
tag will replace with row index. We can use expressions like <row+2>
or <row-1>
to reference previous, next rows…
Excel displays it fine.
PS: Because of Excel’s language settings (TR) I’ve used ;
as delimiter.
Data Export
Action.