Custom Package Delivery for V5

  • This tutorial is a re-implementation for V3 Custom Delivery Tutorial.
  • You need to install at least 5.1.55 :arrow_down: Version.

In this tutorial I’ll show you how to implement a custom package delivery system. This implementation will allow you to assign tickets to deliverers and track waiting / delivered items.

##Preparing Deliverers

We’ll start by creating a new Entity Type for Deliverers.

When we create a new Entity Type we can assign them to Tickets. That definition tells SambaPOS we want to assign Deliverers to Tickets.

We may want to track few more data for deliverers. Before saving Entity Type I’ll switch to Custom Fields section and add two custom fields for Phone Number and Address.

Before proceeding you can create few deliverers from Entities > Add Entity screen and test if custom fields working fine.

Or better you can use Batch Entity Editor tool to create Entities. As highlighted on screen shot switch to Deliverers tab and click Batch Create link and add Deliverer Names.

You can edit details after creating deliverers.

##Creating Ticket Type

We’ll create a new ticket type for delivery orders. This ticket type is useful to separate dine-in ticket from delivery tickets.

For delivery tickets we’ll assign Customers and Deliverers. Unlike dine-in tickets we won’t assign tables for delivery tickets. To configure this switch to Entity Type List screen, click Select link and choose Customers and Deliverers.

##Setting up Entity Screens

###Delivery

On this step we’ll define a custom Entity Screen that we’ll use to assign deliverers to delivery tickets. You can create a new entity screen from Entities > Entity Screens menu.

Ticket Type for this screen will be Delivery Ticket and View Mode will be Layout.

Switch to Entity List screen and set Entity Type as Deliverers. This setting means we’ll work with Deliverer entities on this screen.

Finally create a mapping on Mappings screen. That definition tells how to display this screen. Default values will be OK for now.

On POS screen a new Entity Screen labelled as Delivery will appear.

###Customers

We’ll use already existing Customers screen to manage Delivery Customers. We’ll make a simple change on Customer Screens. Edit Entities > Entity Screens > Customer Search and change Ticket Type as Delivery Ticket.

Do the same thing for Customer Tickets screen.

So when we create Tickets through Customer Screens Ticket Type for tickets will be Delivery Ticket. Tickets we’ll create on Tables screen will be regular tickets.

##Automating Delivery States

###Updating Delivery State for new tickets.

On this step we’ll create few actions and rules that updates delivery state of ticket.

:bulb: We’ll track Ticket’s Delivery status by defining a new state for Delivery tickets. Delivery status might have Waiting, Delivering or Delivered states. Waiting means no deliverer assigned yet. Delivering means deliverer assigned but not yet paid. Delivered means ticket delivered and paid.

Update Ticket's Delivery Status action will be used to update Ticket’s Delivery Status.

[:Delivery Status] means we’ll set State value while calling this action. When a parameter defined in square brackets like that, it becomes a variable instead of a static value.

When we create a new Delivery Ticket we’ll update it’s delivery status as Waiting. We’ll create a rule for that.

We can test if it works fine by creating a new Delivery Ticket.

Create a new Customer

Update Details.

You should see Customer Name and Delivery status correctly assigned.

We can close ticket if it is working fine.

###Updating Ticket’s delivery state when deliverer selected

For new delivery tickets delivery status becomes Waiting. When we assign a deliverer to ticket Delivery Status should change as Delivering.

We’ll create a new Ticket Entity Changed rule that works when we assign a deliverer.

:bulb: You’ll probably notice this rule will work for all ticket types but as we can select a deliverer for only delivery tickets that rule will work for delivery tickets. If needed you can exclusively map this rule to delivery tickets through Mappings screen.

When we settle a delivery ticket we’ll update ticket’s Delivery Status as Delivered. To do this I’ll create a new rule for Before Ticket Closing event and Update status as Delivered if Remaining Amount equals 0.

##Delivery Screen Actions

After implementing how ticket’s delivery state updates we’ll add few actions that will be useful while implementing custom screen behavior.

Now we can switch to Automation>Actions screens and start adding actions.

###Show Message

Show message action is a useful action to display some data on screen. We’ll use it while experimenting default settings.

###Display Ticket

We’ll use Display Ticket action to display ticket for the given Ticket Id.

###Load Ticket

Load Ticket Action loads a ticket for the given id and keeps it open in background until we call Close Ticket. While a ticket is loaded we can call ticket related actions to update tickets. We’ll use it while assigning a deliverer to ticket.

###Update Ticket Deliverer

Change Ticket Entity action sets or changes Ticket’s entity. We’ll use this action to change Ticket deliverer.

###Close Ticket

We’ll use Close Ticket action to close loaded tickets after updating deliverer but I’m not showing it’s implementation as it is a default action and should already exists. So you don’t need to create this action.

###Popup Browser

This action displays a full screen Web Browser and loads given URL. We’ll use this action to display Google Maps page for Customer Address.

##Custom Screen Setup

We have all needed actions. We’ll also implement few rules but I’ll show them while implementing Custom Delivery Screen.

###Adding Ticket Listers

Switch to Delivery Screen and right click to Enable Design Mode. After enabling design mode right click again and add two Ticket Lister widgets.

Two widgets appears on top.

Click on widgets and align them on the screen.

Now you should have two ticket listers one on the left and the other one on the right side of the screen. Disable design mode from right click menu and check if widgets appears fine on screen.

###Adding Labels

Switch to Design mode and Add a new Label Widget on screen.

Edit settings to update widget as shown in the screen shot.

Now click on widget and move it on top of Ticket Lister 1. If needed you can adjust height by dragging widget borders.

Disable design mode once more to see if Label Widget aligns correctly and appears fine on screen.

Add one more Label Widget on top of Ticket Lister 2 and change settings as shown.

Your screen will appear like that when you disable Design Mode.

###Displaying Waiting Orders

We’ll display tickets waiting for deliver assignment on left ticket lister. Enable design mode, Right click on widget and click settings and update settings as shown on the screen shot. Changing highlighted values will be enough.

This is the Row Format.

<L00><block 10 transparent left *>
<L00><size 20>{ENTITY NAME:Customers}</size><br/>
<L00>[='{ENTITY DATA:Customers:Address}'.replace('<!rn>','<br/>')]
<L00></block>

<L00><block 10><size 40>${TICKET TOTAL}</size></block>

Before explaining how that format works please create few Customer Tickets and test if they appears fine inside widget. Switch to Customer Search screen, create few customers if needed and create tickets through this screen. Please remember we configured this screen to create delivery tickets.

After creating 3-4 tickets switch to delivery screen and test if they appears fine. You’ll find explanations of specific format features in the screen shot.

###Configuring Deliverer Buttons

Under left ticket lister we’ll show buttons for deliverers. When we select a ticket and click deliverer button we’ll assign that deliverer to ticket.

:bulb: On this section I’ll show how each setting works so even it looks like a long section try to follow each step. I’ll demonstrate some great new V5 features.

####Displaying Buttons

Edit left Ticket Lister settings and add deliverer names into Command Buttons area. Update highlighted settings on the screen shot too.

Jamie Brown
Jenny Purple
Marry Pink
Jack White

Important!!! You need to type your deliverer names here. If you didn’t do so create few deliverers and type their names here.

When you disable design mode you’ll see 4 buttons located under first ticket lister. Clicking these buttons does nothing. We need to tell what each button does when we click on them.

:bulb:Command button syntax is <Button Header>=<Command Name>

####Assigning Commands

Edit Ticket Lister settings and change Command Buttons setting as follows…

Jamie Brown=Deliverer Command
Jenny Purple=Deliverer Command
Marry Pink=Deliverer Command
Jack White=Deliverer Command

So we configured Ticket Lister to execute Deliverer Command when a deliverer button clicked.

To test that I’ll create a new rule for Deliverer Command.

When Deliverer Command triggers we’ll execute Show Message action that displays a plain text message.

Now you can test it to see how it works.

Important!!! If nothing happens when you click on deliverer buttons that means you didn’t selected a ticket. Ticket Lister works against selected tickets so you need to select a ticket to enable deliverer buttons.

####Passing Parameters

To be able to implement something useful we need to know which tickets are selected and which deliverer button is clicked. We’ll use V5’s command parameter feature for that.

Jamie Brown=Deliverer Command:TicketId=$1,Deliverer=Jamie Brown
Jenny Purple=Deliverer Command:TicketId=$1,Deliverer=Jenny Purple
Marry Pink=Deliverer Command:TicketId=$1,Deliverer=Marry Pink
Jack White=Deliverer Command:TicketId=$1,Deliverer=Jack White

So when we examine first line command button syntax becomes…

<Button Header>=<Command Name>:<Parameters>

Parameters appended to command name with : delimitier and they formatted as <key>=<value>. For example >>> Header=Command:Param1=Value1,Param2=Value2

:bulb: Ticket Lister replaces $1 with Selected Ticket id.
:bulb: Inside rules we can read TicketId parameter with [:TicketId] and Deliverer parameter with [:Deliverer]

Edit Ticket Lister settings and update it as follows. Enable Multi Selection and Loop Commands settings too.

:bulb: When Loop Commands setting enabled Widget executes clicked command one by one for each selected ticket. When disabled it sends selected ticket ids as a comma delimited command parameter and executes command once. For this tutorial we’ll enable Loop Commands.

Finally we’ll change Show Message Action to display parameter values.

Edit Handle Deliverer Command rule and update Show Message Action’s message parameter as…

Deliverer [:Deliverer] is selected.\rTicket id is [:TicketId]

You should see this when you select a Ticket and Click on a deliverer button.

####Updating Ticket’s deliverer

Now we know widget works fine and we can change Handle Deliverer Command rule to Load Ticket and assign Deliverer to ticket.

Edit Handle Deliverer Command, Remove show message action and add Load Ticket, Update Ticket Deliverer and Close Ticket actions.

###Displaying Delivered Orders

Before testing our setup we need to configure Second Ticket Lister to display Delivered Tickets. Edit Right Widget settings as shown on the screen shot.

This is what you can paste inside Format area. Similar to Left Widget’s format but this one displays Deliverer Name.

<L00><block 10 transparent left *>
<L00><size 20>{ENTITY NAME:Deliverer}</size><br/>
<L00>[='{ENTITY NAME:Customer}'.replace('<!rn>','<br/>')]
<L00></block>

<L00><block 10><size 40>${TICKET TOTAL}</size></block>

Now we can test if Tickets updates fine when we assign deliverers.

You’ll see waiting tickets on left and delivered tickets on right side of the screen.

###Better Deliverer Buttons

You probably didn’t like how we hardcoded deliverer names inside Ticket Lister Widget. When we create new deliverers or update existing ones we need to change widgets to reflect changes to our widgets. Instead of hardcoding deliverer names inside widget we can use a Custom Report feature to dynamically generate Deliverer buttons.

Edit Ticket Lister setting and change Command Buttons section with that reporting tag.

{REPORT ENTITY DETAILS:
E.Name.asc
:(ET=Deliverer)
:{0}=Deliverer Command\:TicketId=$1,Deliverer={0}}

This report tag generates exact hardcoded button format dynamically.

###Displaying Tickets

On this step we’ll add Display Ticket button under second ticket lister so when we select a ticket and click this button it displays selected ticket.

Edit Widget Settings and add Display Ticket button inside Command Buttons area.

When you configure no parameter for a command Ticket Lister automatically adds Ticket Id as command parameter. So without needing further button configuration we can add a rule that handles button click and displays ticket.

Create a new rule that handles Display Ticket Command and add Display Ticket action.

After creating this rule clicking on Display Ticket button should display selected ticket.

###Displaying Map

We’ll add another button under second ticket lister to display a google map route for customer address.

https://maps.google.com/maps?saddr=<your address>&daddr={ENTITY DATA:Customer:Address}&hl=en

Before updating Ticket Lister we need to configure Google Maps url properly. saddr parameter (source) should be your business address and daddr parameter (destination) should be Customer’s delivery address. We’ll read customer address with {ENTITY DATA:Customer:Address} printer tag so the only thing you need to do for is replacing your address with <your address> part or the URL.

After constructing google maps URL we can add button code inside Ticket Lister.

Display Map=Display Map:"TicketId=$1","MapURL=https://maps.google.com/maps?saddr=Aşkabat Cd. No 30/A Bahçelievler Ankara&daddr={ENTITY DATA:Customer:Address}&hl=en"

Edit Ticket lister settings and add this line under Display Ticket command button.

:bulb: Don’t forget enabling Loop Commands setting.

Our command button executes Display Map command with MapURL parameter. We need to create a rule to handle that button.

Now when you select a ticket and click Display Map button you should see the map.

###Removing Tickets

We already implemented it. Settling a ticket should remove ticket from Delivered Orders list.

##Further Improvements

This is the end of this tutorial. Depending on your needs you can add Entity Search Widgets for Customers or Deliverers to be able to search them directly on this screen or add some icons in front of command buttons with <sym> tag to beautify your screen. Please share your ideas with us.

11 Likes

Great tutorial. I have implemented myslef fou our pizza delivery and could not be happier. Its GREAT!!!

Thanks @Emre and all who had great ideas to implement this!!!

Thanks!!!

G.

Sorry but I do not know how to implement the tag to show the symbols you have.

I like the look, looks nicer. Thanks

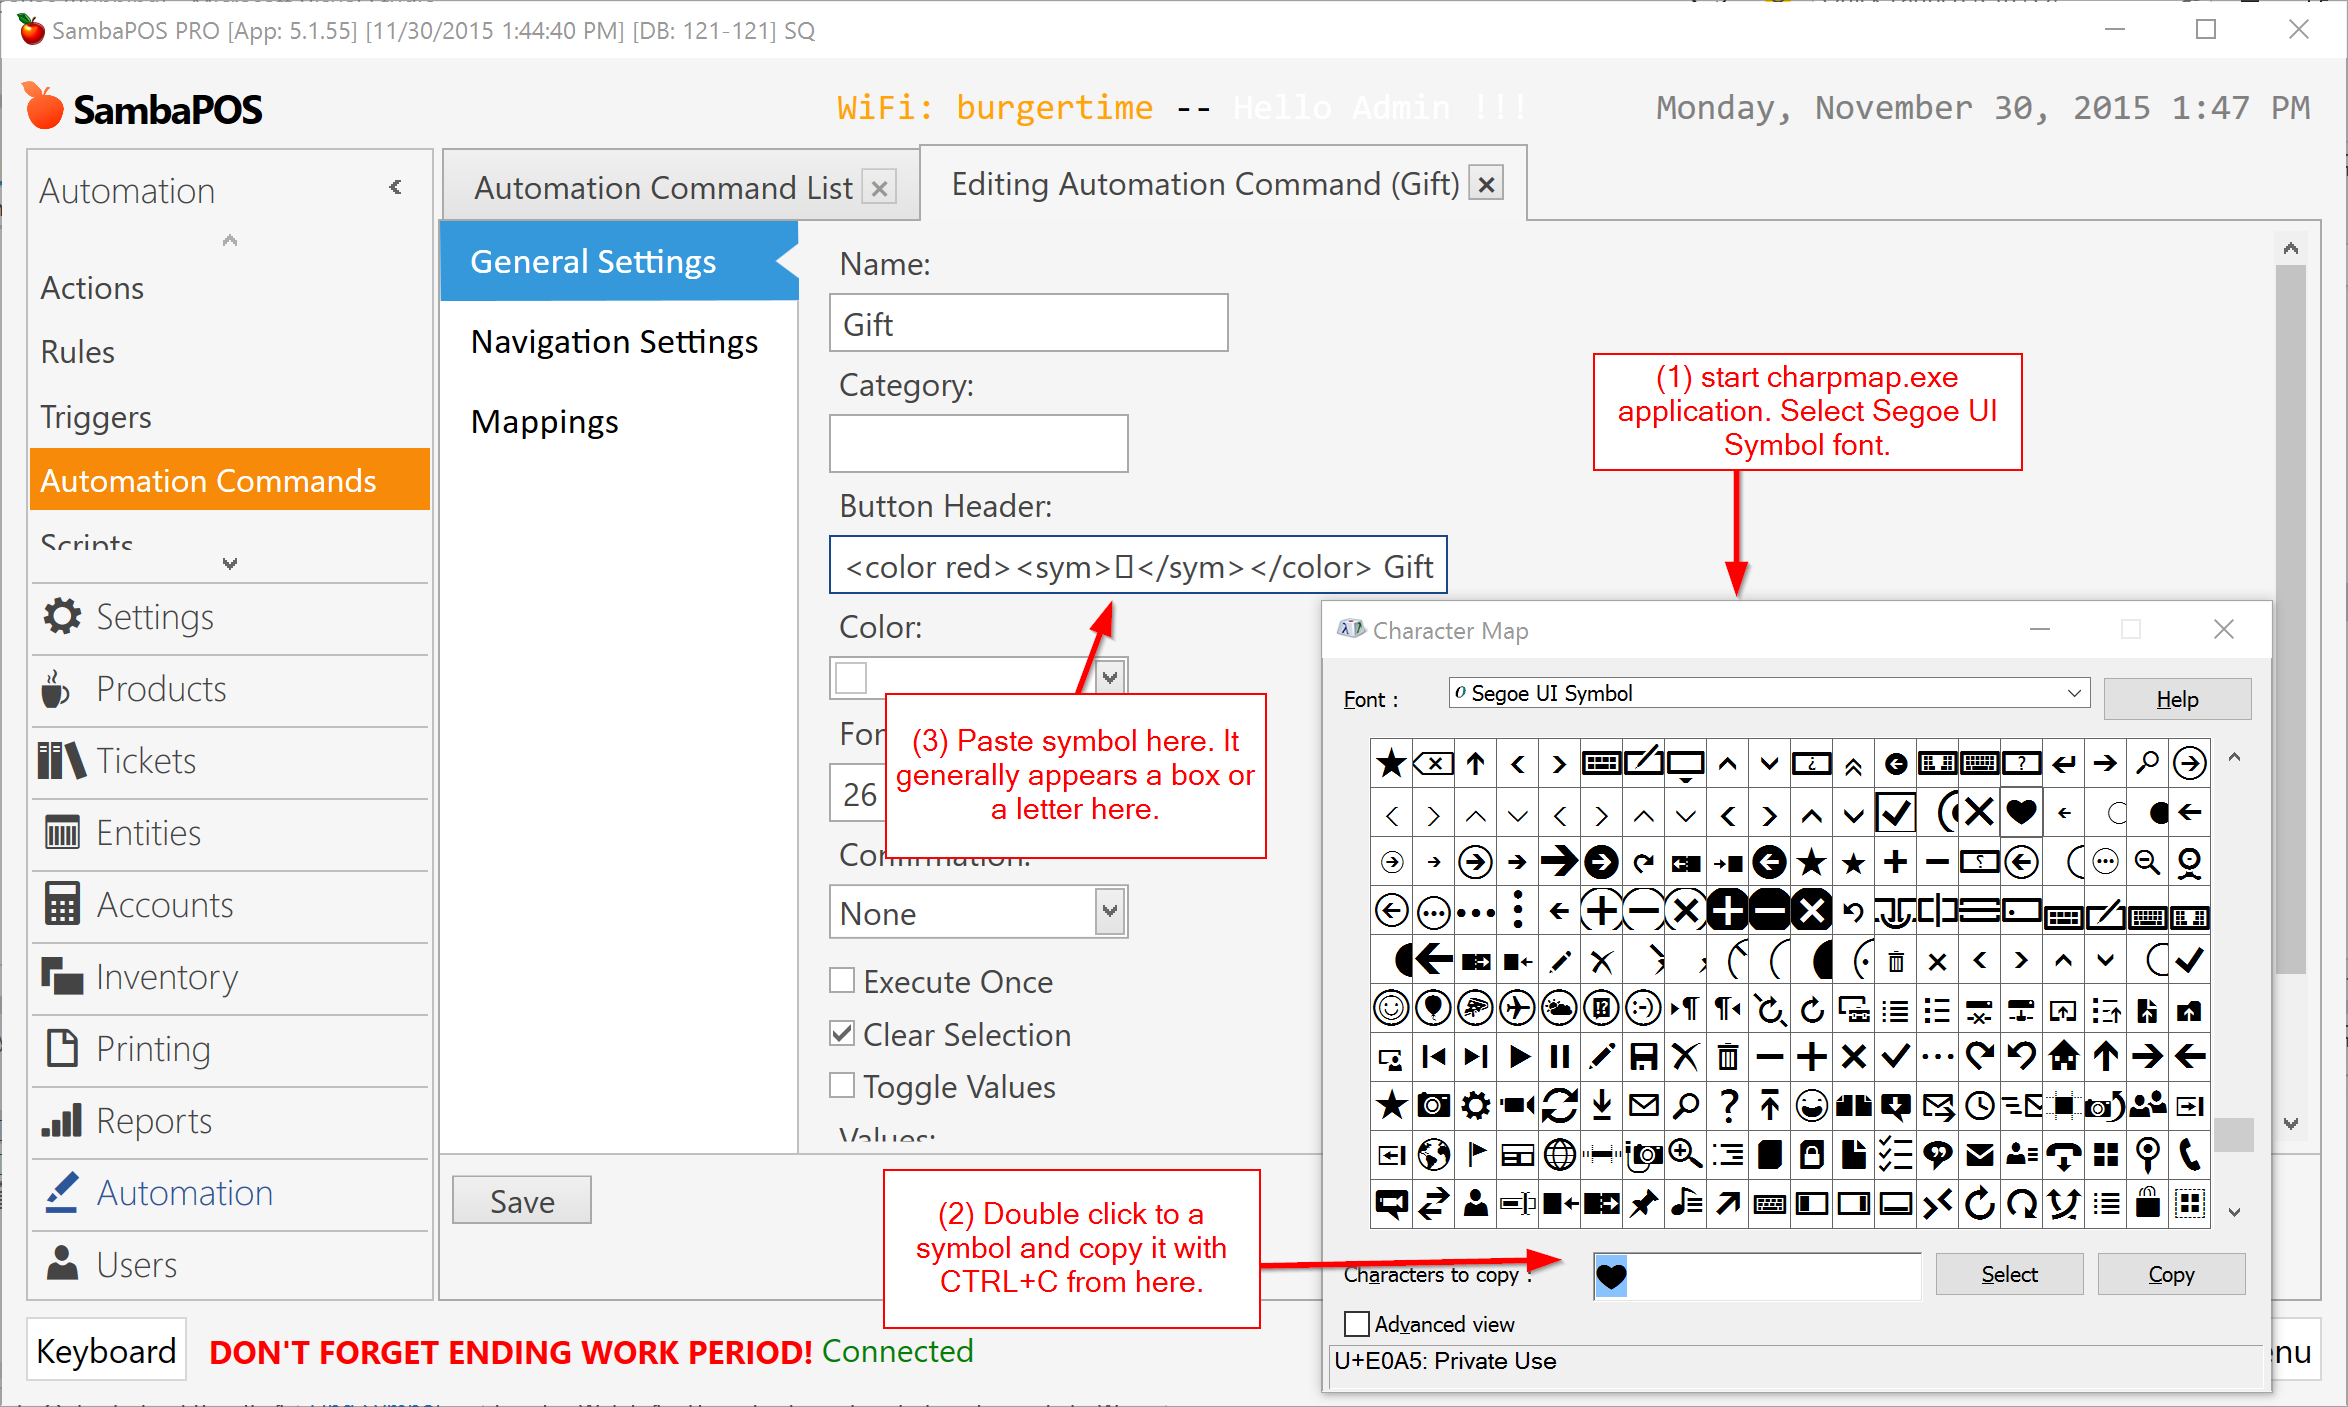
On button headers you can use <sym> tag to add symbols and <color> tag to change foreground color.

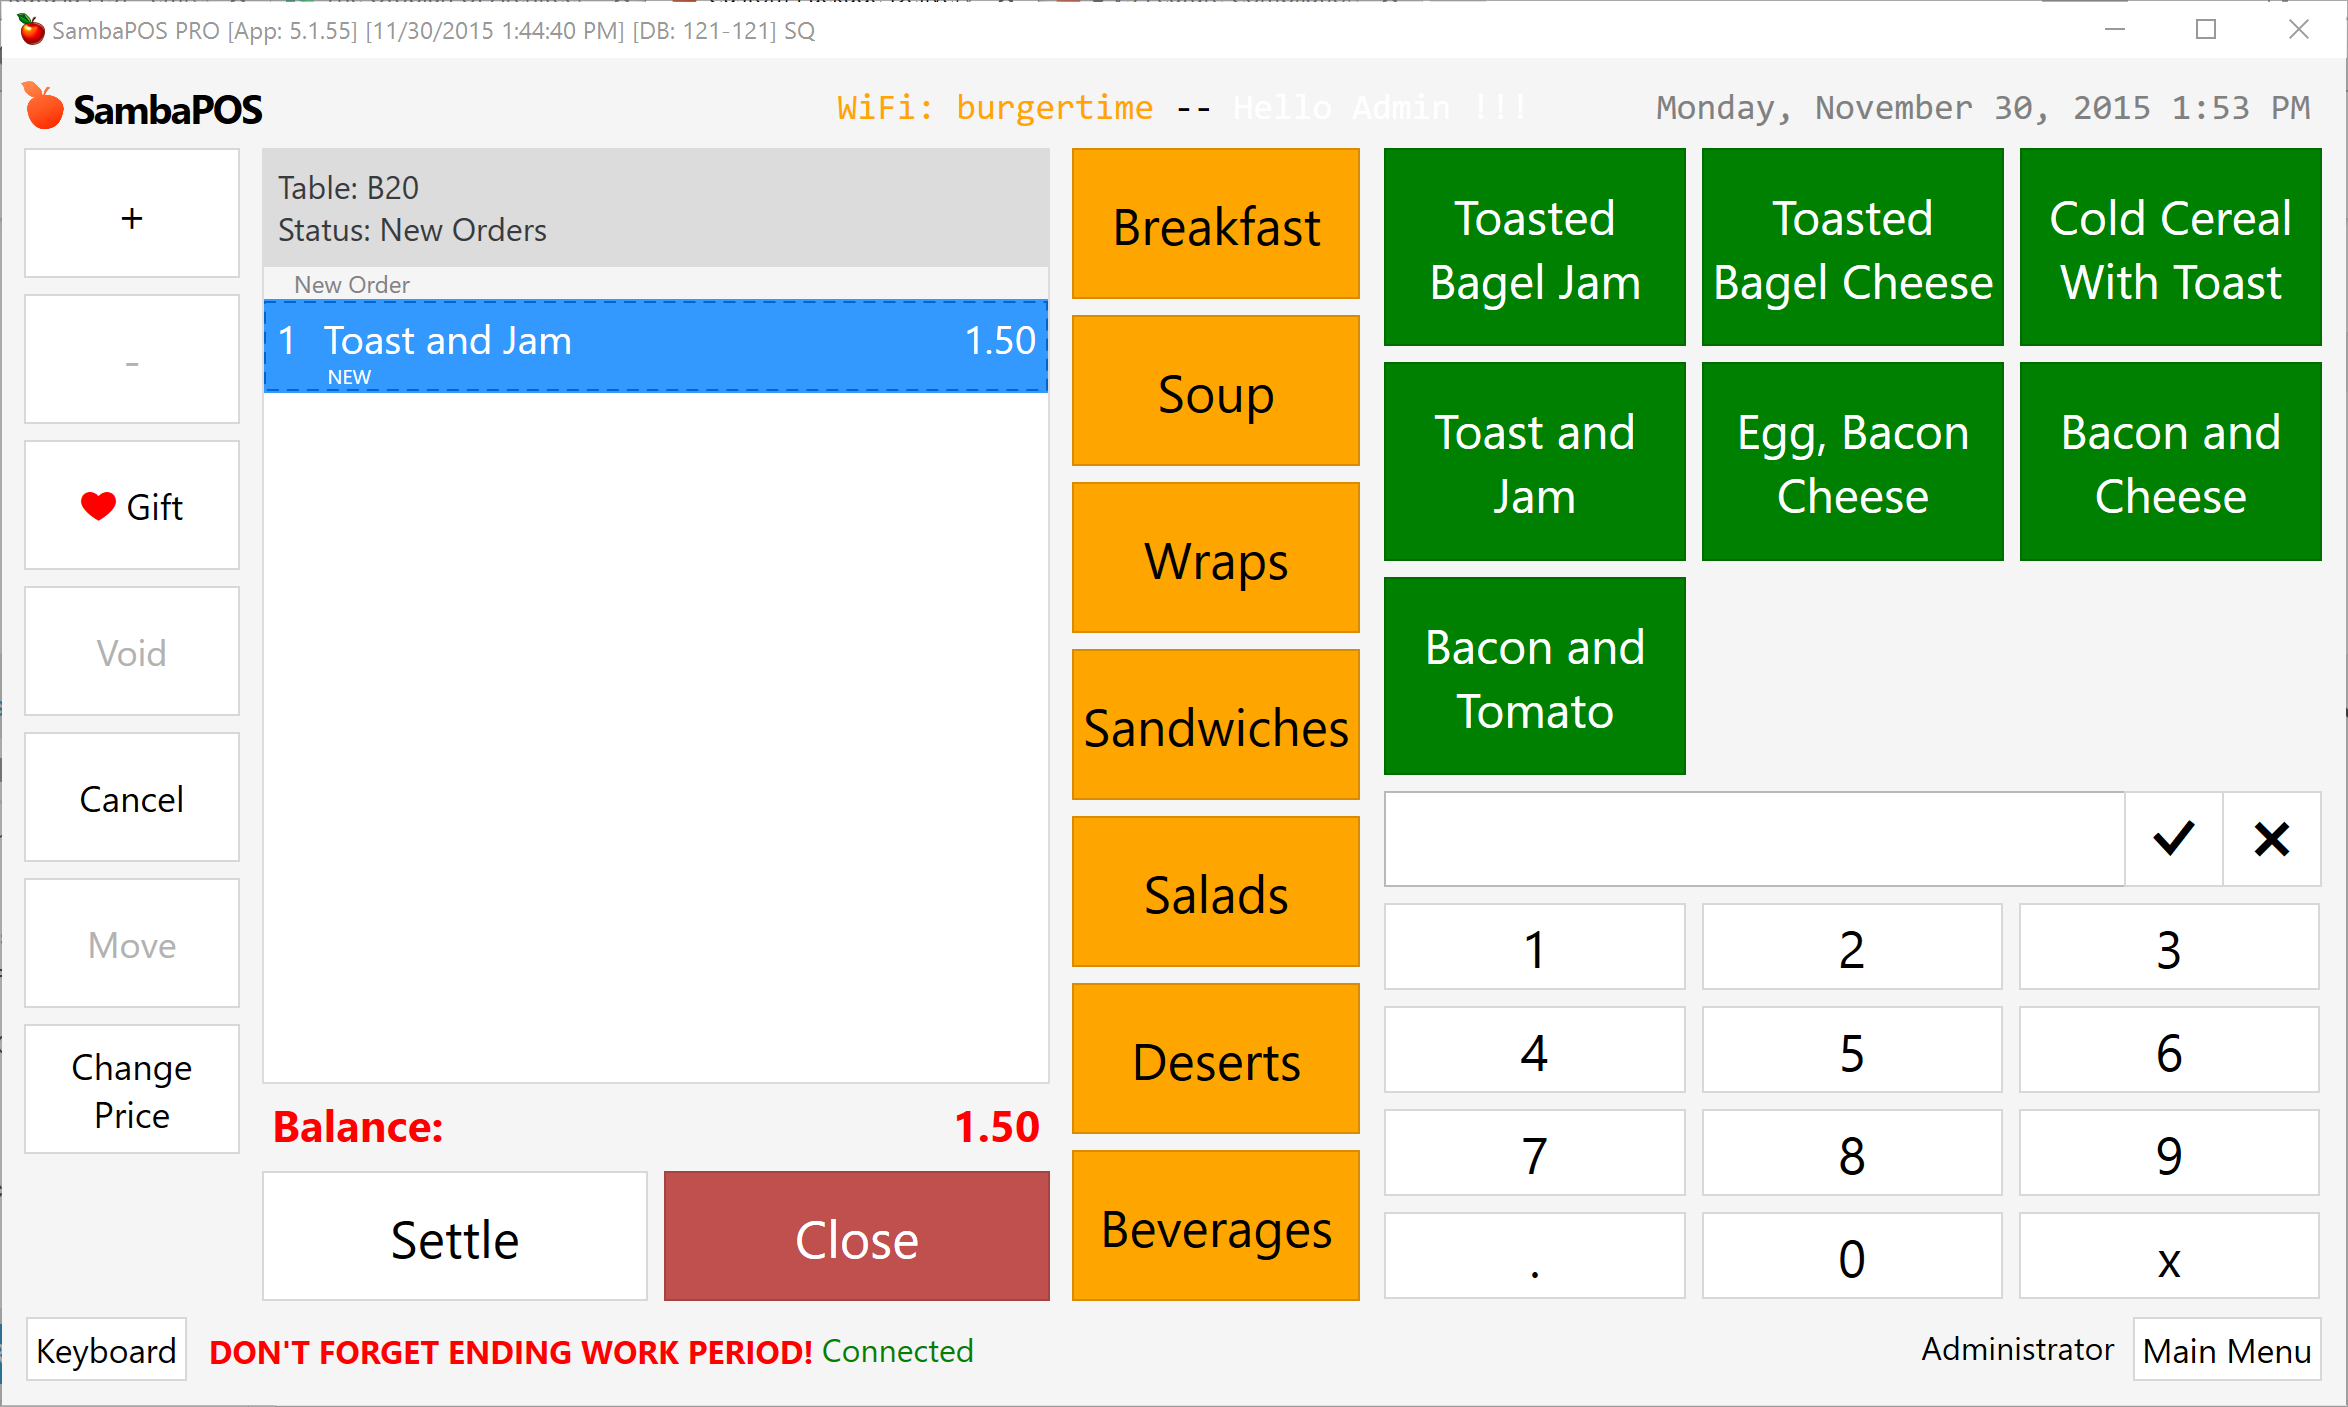
Now Gift Button appears with a red heart symbol.

You can also use different symbol fonts by using <font> tag. You can find a sample use here.

2 Likes

I have got problems, after selected the order id and clicking the deliverer, in my condition it doesn’t do anything, the order just won’t move from Waiting orders into delivered orders, also in my case as i am also installing Membership balance mod, the list of items on waiting orders only displayed as Total Price.

I have modified accordingly the Left Row Format as following , but still the name and address doesn’t correctly displayed. Also the same with Right Ticker Lister, it only displaying the price only eventough i have modified as such.

Please i really need help as i am nearly approaching deadline.

Edit:
Found out it’s a typo on “Handle Deliverer Command” Rules, it was “[:Ticket Id]” which should be “[:TicketId]”, only one problem exist, both on Ticket Lister “Waiting Orders” and “Delivered Orders” still only showing “${TICKET TOTAL}”.

Edit2:
Also got it about why it’s only showing ${TICKET TOTAL}, deleting word transparent seems fixed it, somehow it’s a bug?, but now the item only occupying not all of empty spaces. How to fix the transparent and the formatting to use & indent all remaining space?.

Review these settings and set highlighted values (max width and column count) as shown on the screen shot.

http://forum.sambapos.com/uploads/default/original/3X/a/8/a81ba6bde197d90e0551000cf72a00471b37167b.png

@emre
Thanks alot for saving me :smile: , how about tutorials for fixing this bugs? , the deliverer become empty because of user select deliverer directly on Order pages.

Also how to change main currency for ${TICKET TOTAL} from usd $ into something else?, i have changed my windows region country code into Indonesia. But the ${TICKET TOTAL} still displaying as $?.

You set something up wrong still. That is not a deliverer that’s a customer. You should go back through tutorial make sure you set it up correctly. You have made a mistake somewhere.

Sambapos does not use a default currency. You set your prices via products. If you need to setup other currencies then you can setup exchange rates based off your product prices. The dollar sign you see is part of the template simply change that sign in the template to whatever you want.

For example try :){TICKET TOTAL} for happy face currency.

1 Like

I have already following the tutorials thoroughly for dosen of time, if you take a look at this screenshot from above

you can Select deliverer from customer page. Selecting through the delivery working fine though, the only missing is manually Select Deliverer from the customer page. The problem only happened if the cashier forgot to close the ticket, if the cashier close the ticket, it will work fine.

Doh, you are correct i missed the $ sign before the TICKET TOTAL

I’m sorry but you have set something up wrong. Go through it again carefully.

I have re-followed the tutorial 10 time now, and still cannot figuring out in which steps that i have did wrong, could you please pin point me in which steps most probably i have did it wrong ?. Have you even install this mod on your setup?.

Would you mind if testing my database backup?. I would be very appreciated it because i am pulling my hair out in which that i have did wrong :frowning: .

Show your rules you did from the tutorial

Handle Deliverer Command :

Update Paid Delivery Ticket status :

Update new Delivery Ticket Status :

Update Ticket Status when Deliverer selected :

Rules :

Thank you for your help

OK. I was in vacation. Sorry for late reply. I think we couldn’t understand your issue but I think I got that. Please follow these steps.

###(1) Add Entity Name Constraint for “Update Ticket Status when Deliverer selected” rule.

###(2) Create a new page for choosing deliverers inside ticket.

Add a new Entity Screen. Ticket Type will be Delivery Ticket.

Adjust appearance for new entity screen.

Setup Entities for this screen.

Add a mapping for this entity screen and set visibility as “Ticket” so this screen will appear only if you select a deliverer from inside a ticket.

###(3) Edit Visibility for existing Delivery Entity Screen.

After this change this screen will only appear when you navigate from POS button. It won’t appear when you attempt to select a deliverer from inside a ticket.

See how choosing deliverer from ticket behavior changes…

1 Like

@emre
Thank you again and welcome back! :smile:, it works.

One remaining newbie question, there is ‘bug’ in my “Member/Customer Ticket” Entity screen, if i wanted to just use normal table ordering (not delivering):

  1. Select a table
  2. Pick the orders
  3. Select a member
  4. Close
  5. Go to “Member/Customer Tickets Screen” it will listed the member name as an order but when i clicked it shows empty order.
  6. Click close, the member name will dissapear from the “Member/Customer Tickets Screen”
  7. Yet on All Table page/screen the order still listed as such

Here is the record to illustrated the problem :

The question is how to display both of normal table ordering and delivering order in “Member Tickets” ?.

My “Member Tickets Entity Screen” :


And other question how display “Order List” in an item on “Develivered Orders” Ticket Lister ?

What i have meant is the one on “Red Rectangle” just like on the gif ?

The only tutorials that i have install is add funds/balance to member/customer.

Be sure Ticket Type setting for Member Search and Member Tickets entity screens are same.

@emre
Yes the Ticket Type both for “Member Search” and “Member Tickets” are “Delivery Ticket”

And what’s the Row Format for “Delivered Orders” Ticket lister for displaying these :

I’ve used this row format for that part.

<L00><block 10 transparent left *>
<L00><size 20>{ENTITY NAME:Deliverer}</size><br/>
<L00>[='{ENTITY NAME:Customer}'.replace('<!rn>','<br/>')]
<L00></block>

<br/>
<L00><block 10 transparent right><size 10>
{ORDERS}
<L00></size>

<br/><size 20>${TICKET TOTAL}</size></block>

<R00><block><size 16>{CALL:tlister.min('{TICKET STATE MINUTES:Status}')}</size></block>

[ORDERS]
<J00>{QUANTITY} - {NAME} | {PRICE}<br/>

[ORDERS:Gift]
<J00>{QUANTITY} - {NAME} | {PRICE}<br/>

[ORDERS:Void]

Ticket Type configured for Customer Tickets screen is “Delivery Ticket” but for “All Tables” screen Ticket Type is “Ticket”. So you create a “Ticket” from all tables screen and as Customer Tickets’ ticket type is “Delivery Ticket” it thinks you want to create a new delivery ticket for this customer.

I think you can set ticket type as “Ticket” for customer search and customer tickets screen and use these screens only for managing table service customers.

To create a delivery ticket for a customer you can use customer search widget in Delivery screen.

You can also create a new department to separate delivery workflow from table service workflow. In this case you can create separate customer selection screens for each department to separate active delivery customers from table service customers.

1 Like

@emre
Thanks a lot, The solution works after i have changed both of Ticket Type into “Ticket” but somehow "Delivery Ticket still shown in Member/Customer Tickets after Member Delivery creation on Delivery, how to exclude “Ticket Delivery” for being shown on Member/Customer Tickets?, so only Table Ticket shown on it.

Why “Ticket Delivery” being detected as “Ticket”'s New Orders?. Isn’t it, it’s a bug?, “Delivery Ticket” Ticket type being detected as “Ticket” New Orders and “Ticket” being detected as “Delivery Ticket” New Orders?

Illustration :

Question :

  • How to create separate customer selection screens for each department ?, in Entity Screen there is no options to separate it or to select department.
  • How to separate active delivery customers from the table service customers ?

Edit Update New Order Entity Color rule…

… and map it to Ticket Ticket Type.

So it updates entity buttons for only Table Service tickets. Not Delivery Tickets.

1 Like