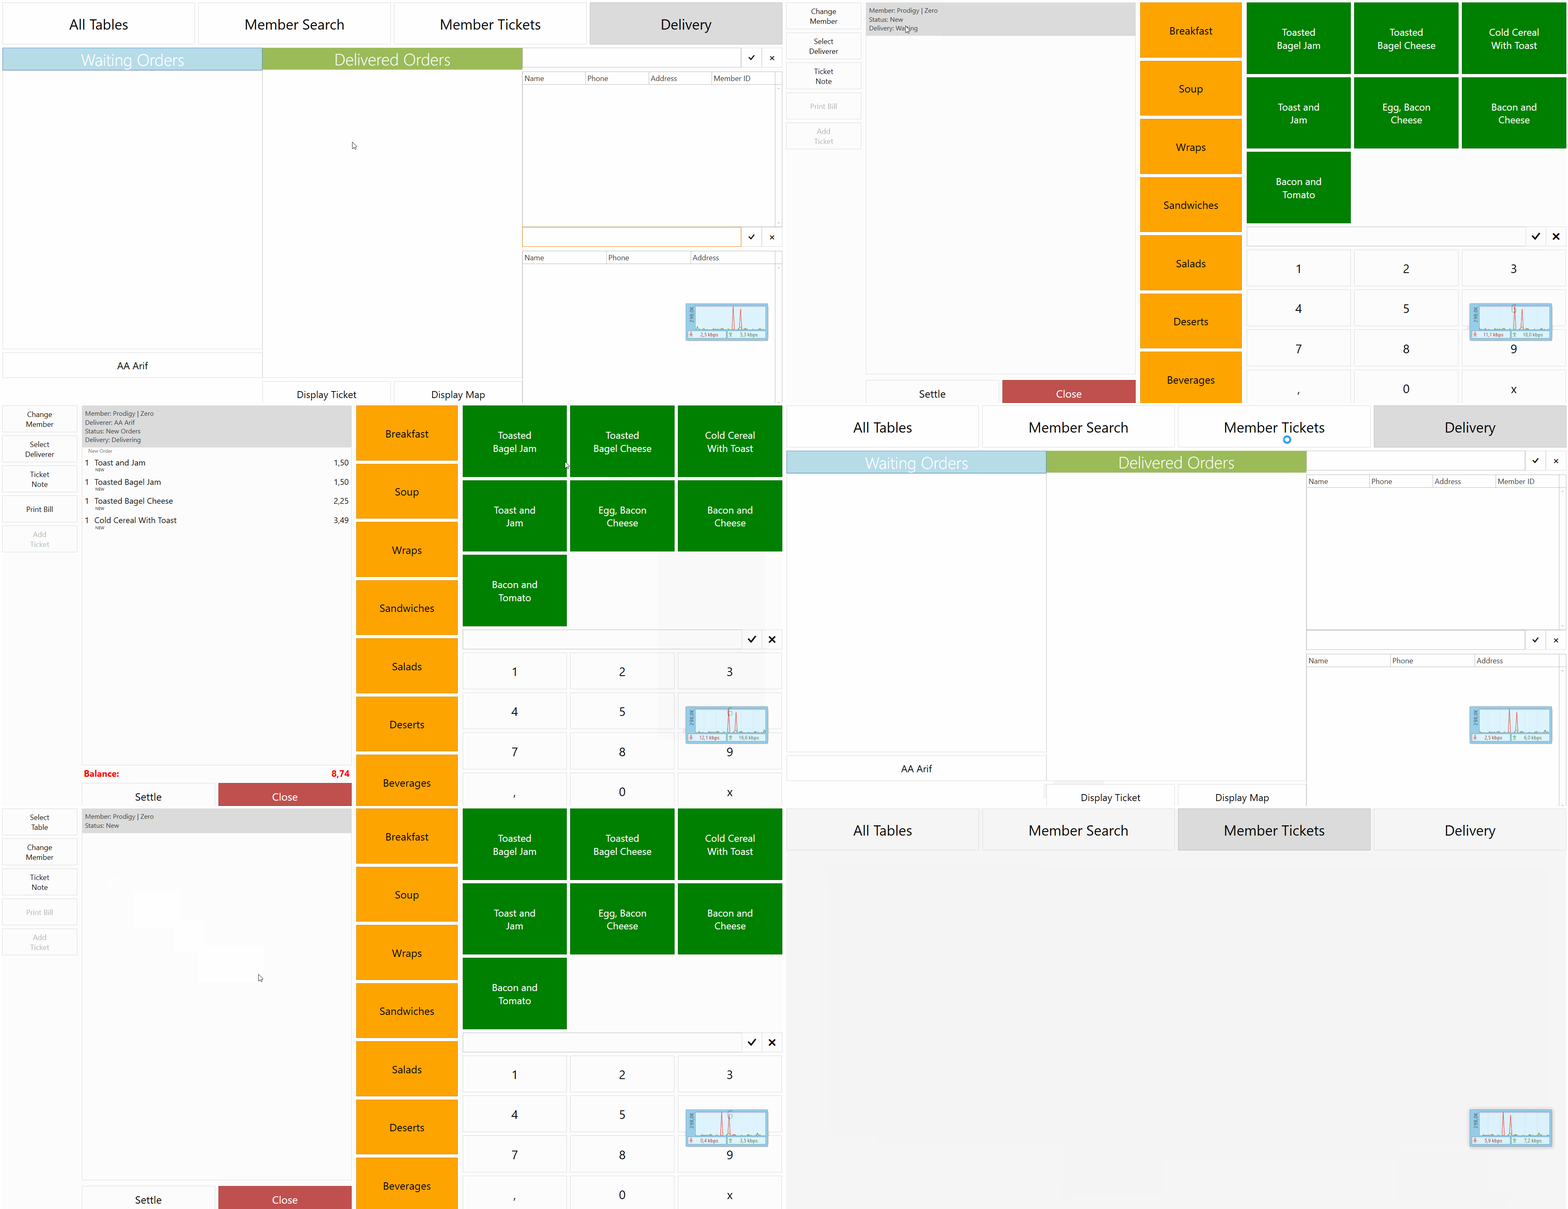
- This tutorial is a re-implementation for V3 Custom Delivery Tutorial.
In this tutorial I’ll show you how to implement a custom package delivery system. This implementation will allow you to assign tickets to deliverers and track waiting / delivered items.
##Preparing Deliverers
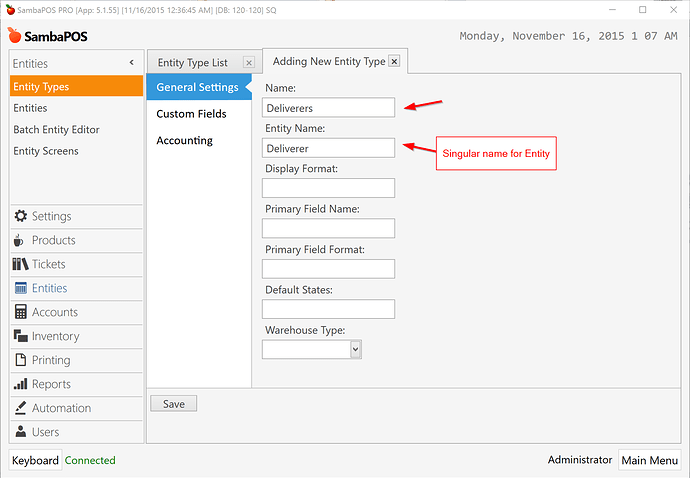
We’ll start by creating a new Entity Type for Deliverers.
When we create a new Entity Type we can assign them to Tickets. That definition tells SambaPOS we want to assign Deliverers to Tickets.
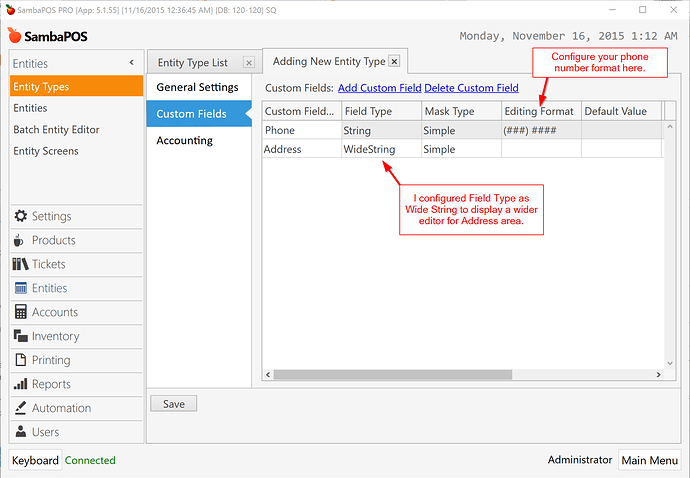
We may want to track few more data for deliverers. Before saving Entity Type I’ll switch to Custom Fields section and add two custom fields for Phone Number and Address.
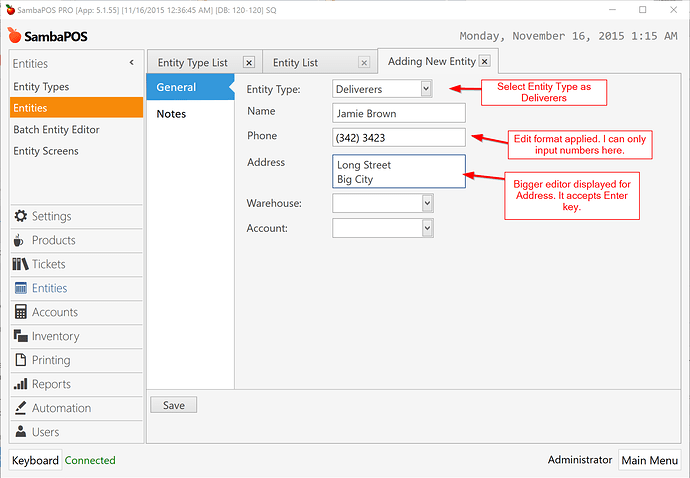
Before proceeding you can create few deliverers from Entities > Add Entity screen and test if custom fields working fine.
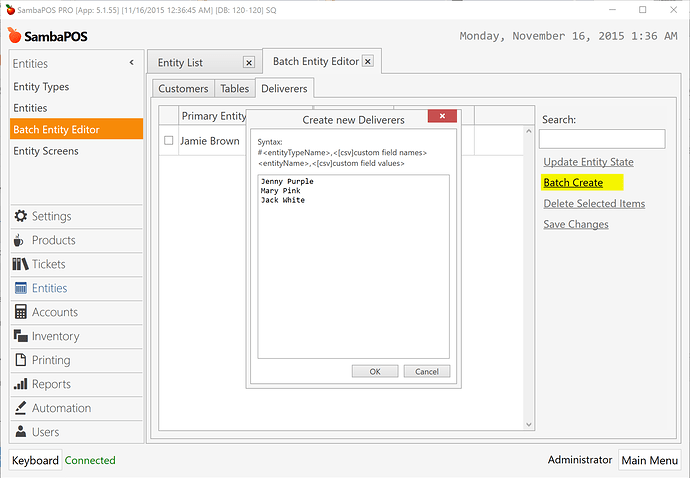
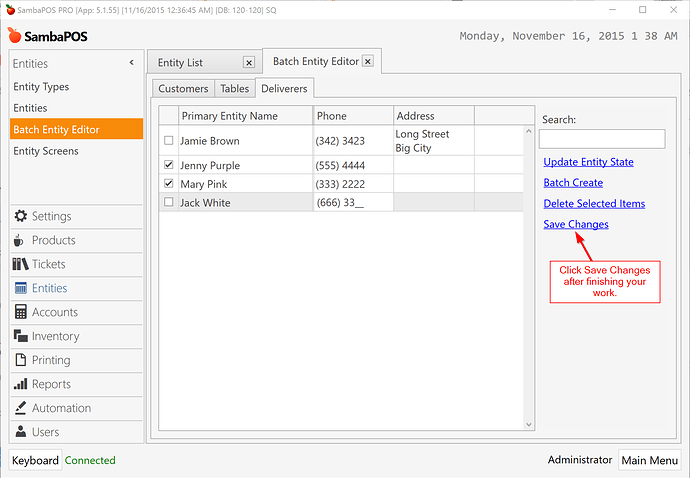
Or better you can use Batch Entity Editor tool to create Entities. As highlighted on screen shot switch to Deliverers tab and click Batch Create link and add Deliverer Names.
You can edit details after creating deliverers.
##Creating Ticket Type
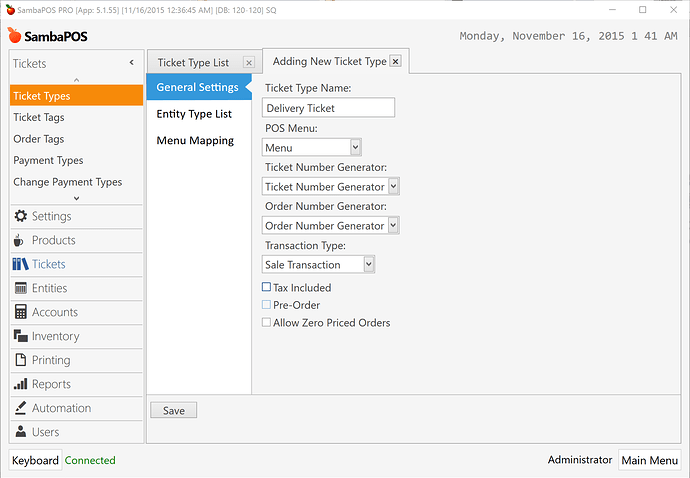
We’ll create a new ticket type for delivery orders. This ticket type is useful to separate dine-in ticket from delivery tickets.
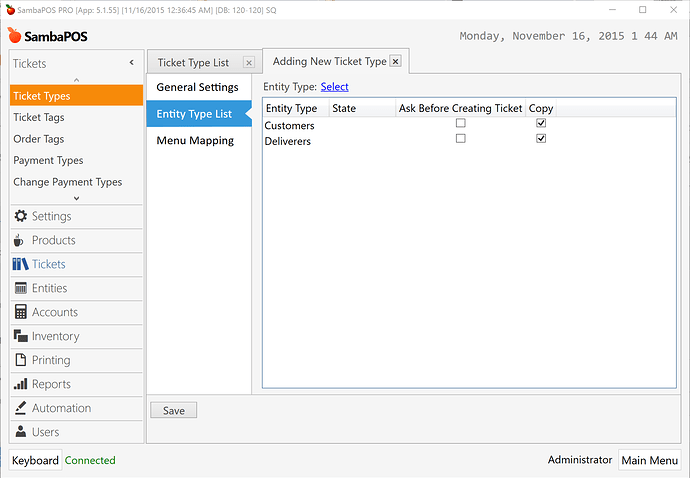
For delivery tickets we’ll assign Customers and Deliverers. Unlike dine-in tickets we won’t assign tables for delivery tickets. To configure this switch to Entity Type List screen, click Select link and choose Customers and Deliverers.
##Setting up Entity Screens
###Delivery
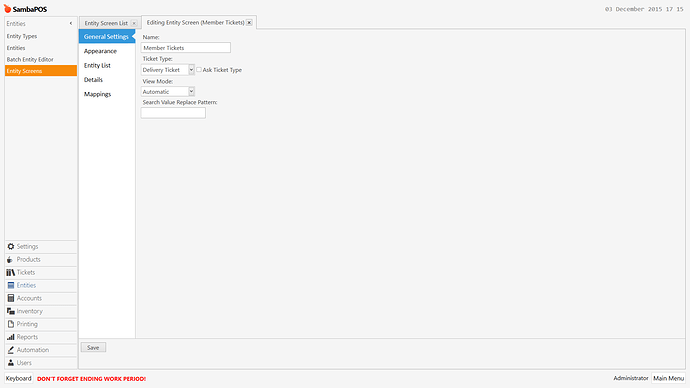
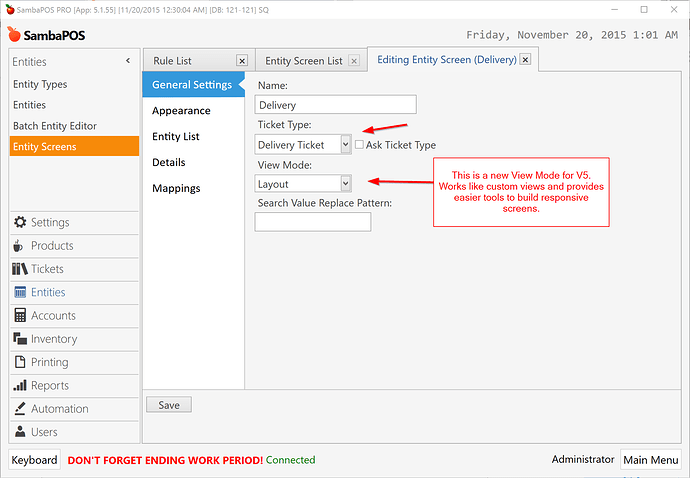
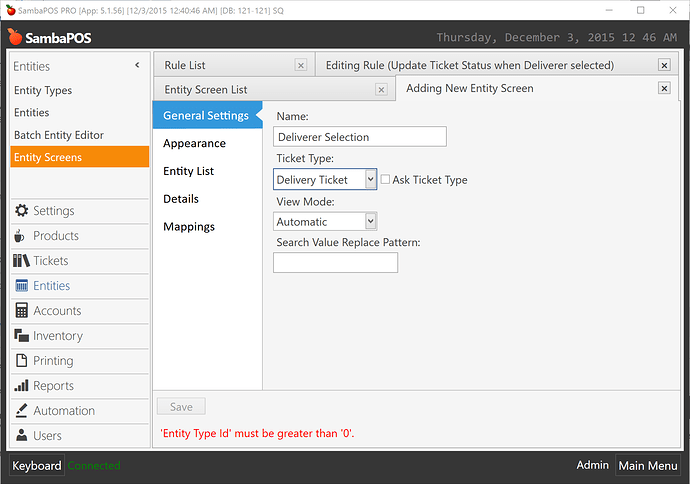
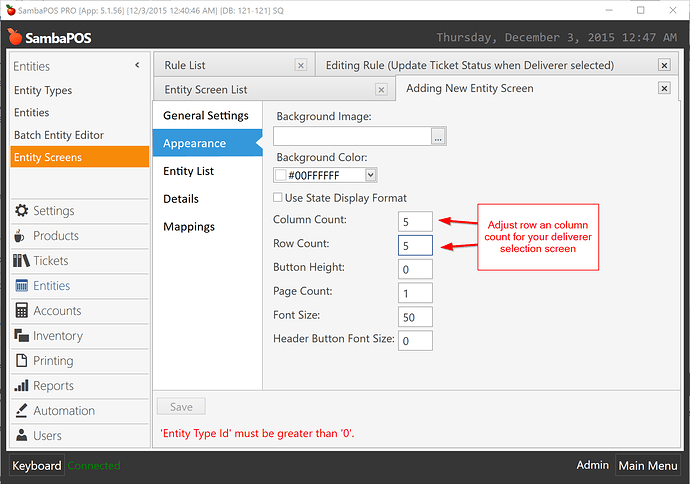
On this step we’ll define a custom Entity Screen that we’ll use to assign deliverers to delivery tickets. You can create a new entity screen from Entities > Entity Screens menu.
Ticket Type for this screen will be Delivery Ticket and View Mode will be Layout.
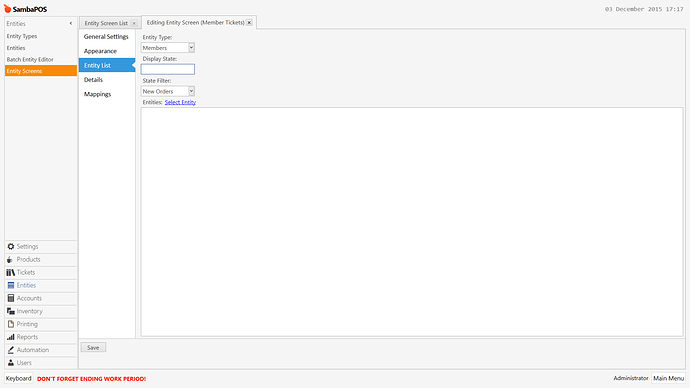
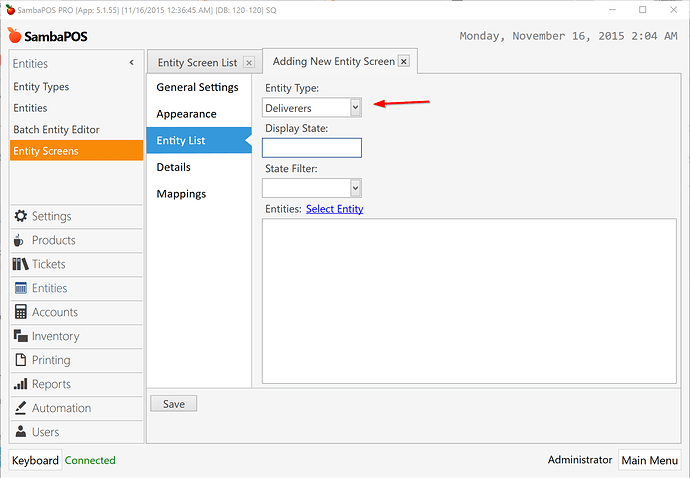
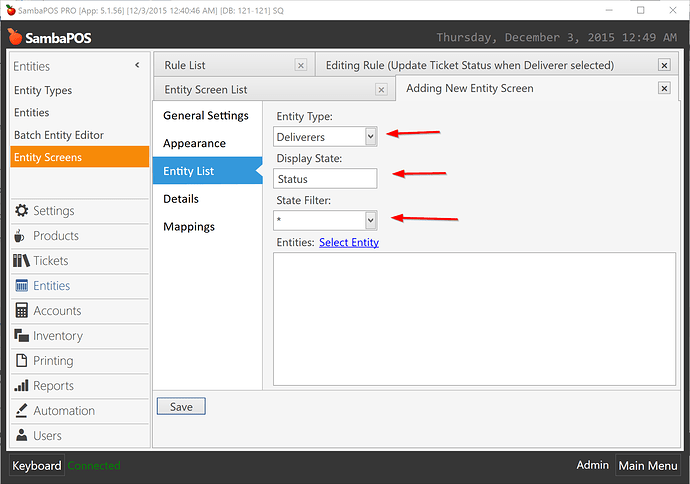
Switch to Entity List screen and set Entity Type as Deliverers. This setting means we’ll work with Deliverer entities on this screen.
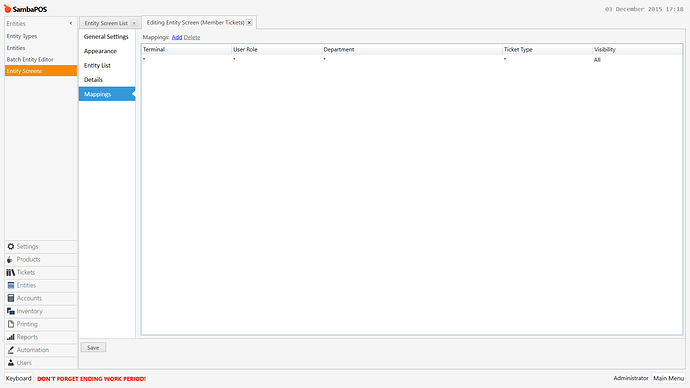
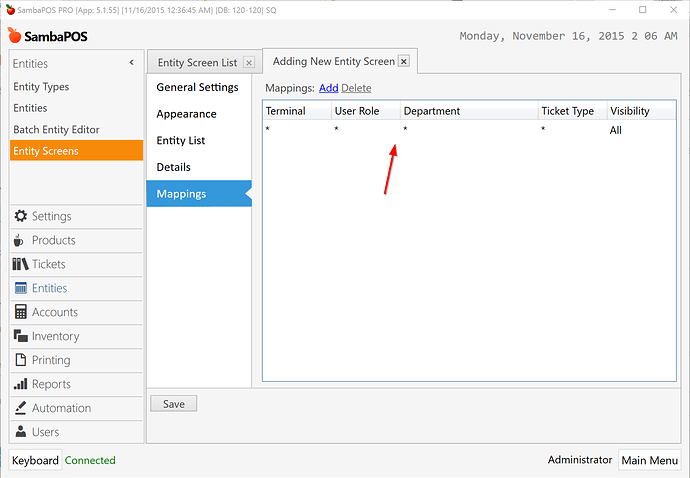
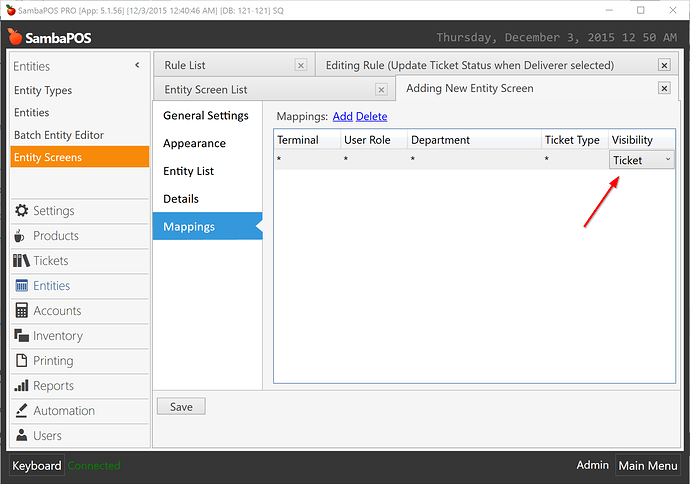
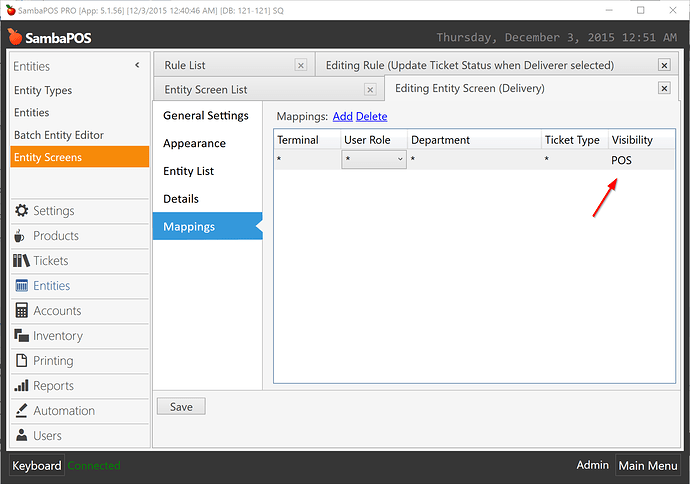
Finally create a mapping on Mappings screen. That definition tells how to display this screen. Default values will be OK for now.
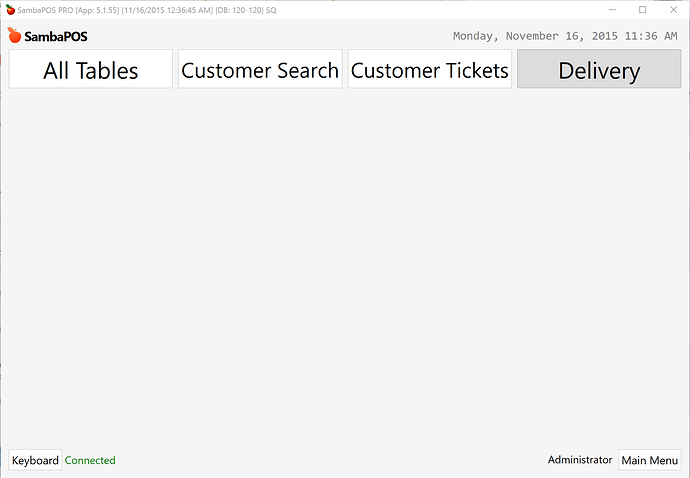
On POS screen a new Entity Screen labelled as Delivery will appear.
###Customers
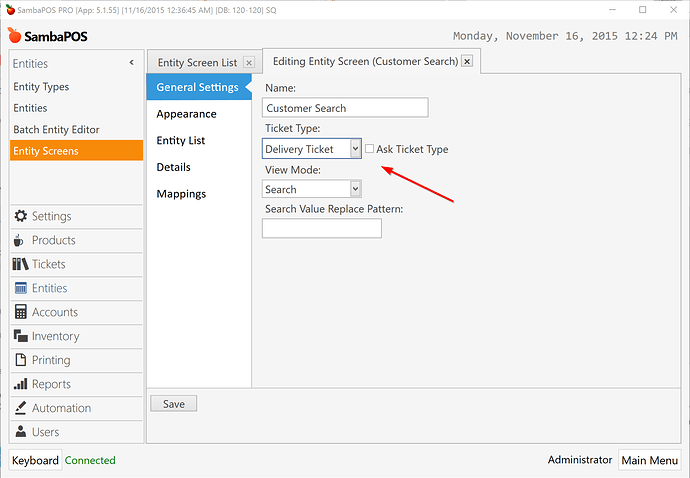
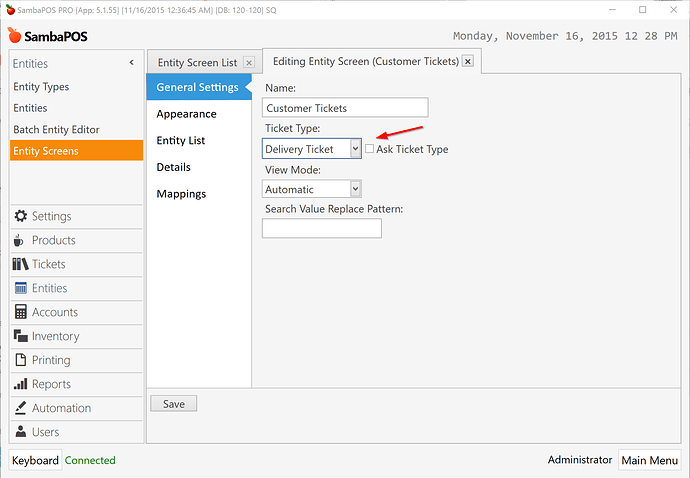
We’ll use already existing Customers screen to manage Delivery Customers. We’ll make a simple change on Customer Screens. Edit Entities > Entity Screens > Customer Search and change Ticket Type as Delivery Ticket.
Do the same thing for Customer Tickets screen.
So when we create Tickets through Customer Screens Ticket Type for tickets will be Delivery Ticket. Tickets we’ll create on Tables screen will be regular tickets.
##Automating Delivery States
###Updating Delivery State for new tickets.
On this step we’ll create few actions and rules that updates delivery state of ticket.
We’ll track Ticket’s Delivery status by defining a new state for Delivery tickets. Delivery status might have
Waiting,DeliveringorDeliveredstates. Waiting means no deliverer assigned yet. Delivering means deliverer assigned but not yet paid. Delivered means ticket delivered and paid.
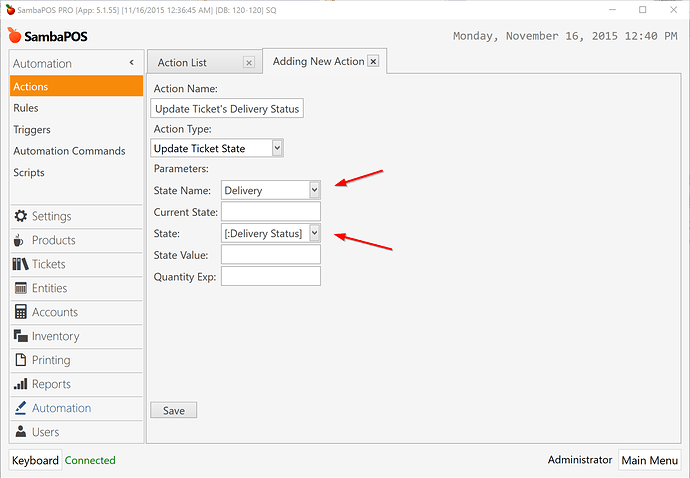
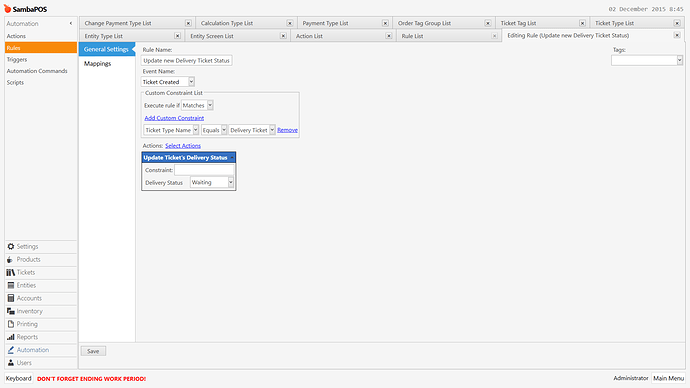
Update Ticket's Delivery Status action will be used to update Ticket’s Delivery Status.
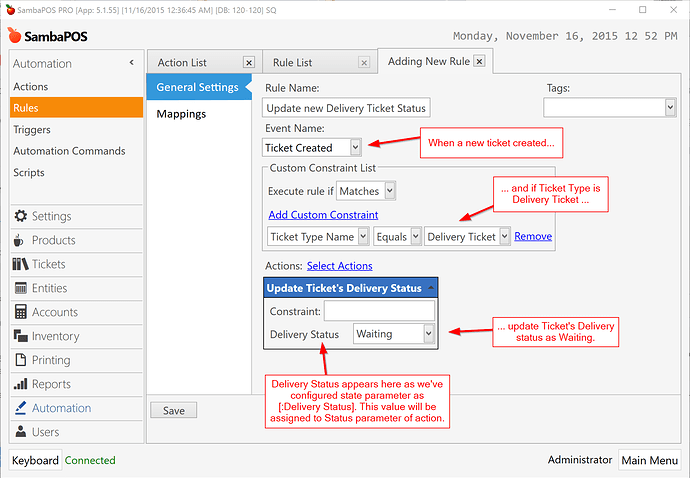
[:Delivery Status] means we’ll set State value while calling this action. When a parameter defined in square brackets like that, it becomes a variable instead of a static value.
When we create a new Delivery Ticket we’ll update it’s delivery status as Waiting. We’ll create a rule for that.
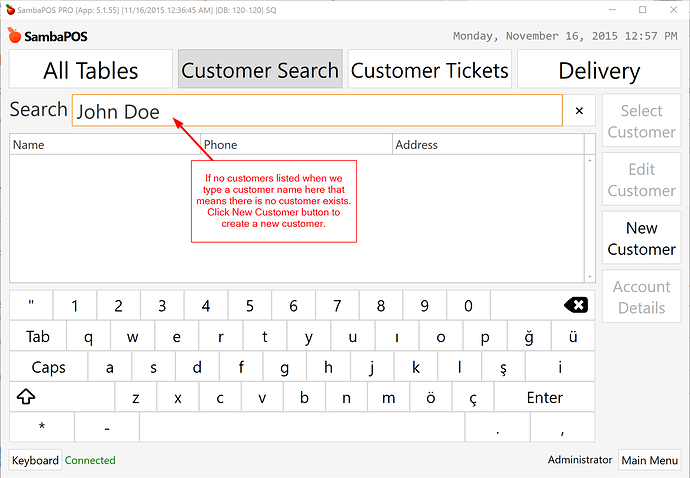
We can test if it works fine by creating a new Delivery Ticket.
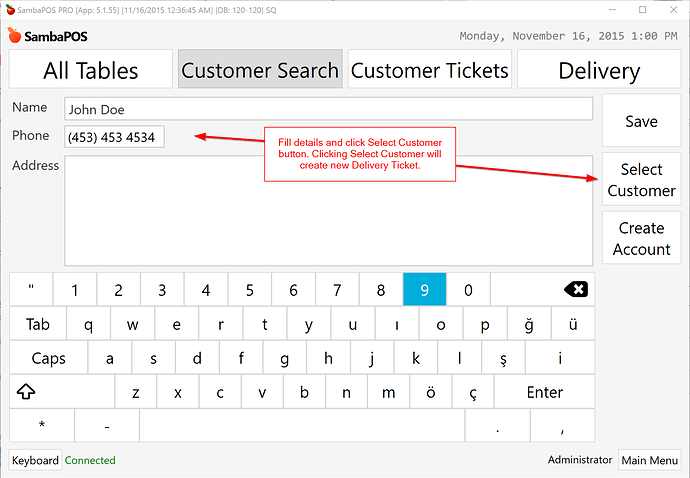
Create a new Customer
Update Details.
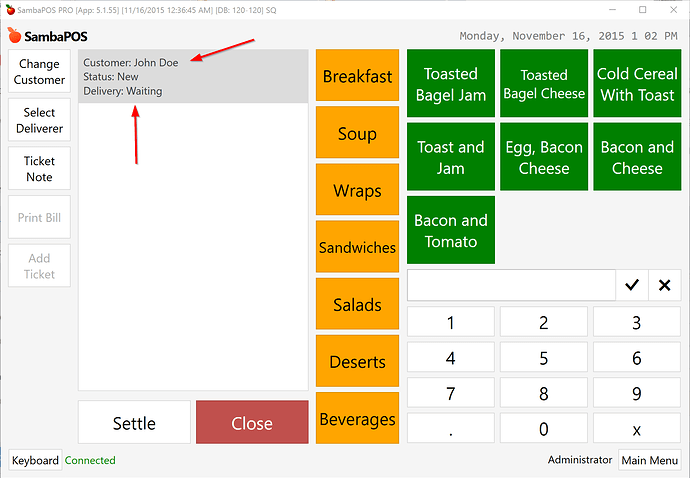
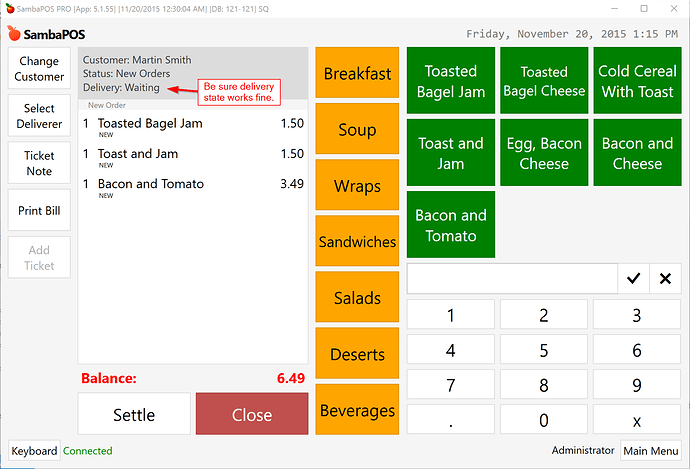
You should see Customer Name and Delivery status correctly assigned.
We can close ticket if it is working fine.
###Updating Ticket’s delivery state when deliverer selected
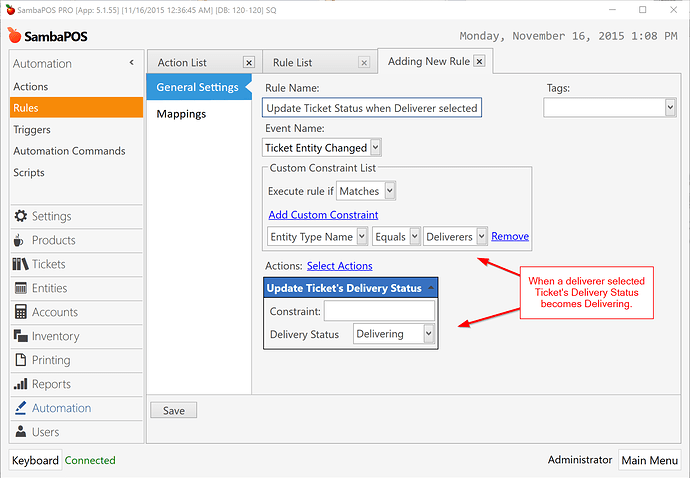
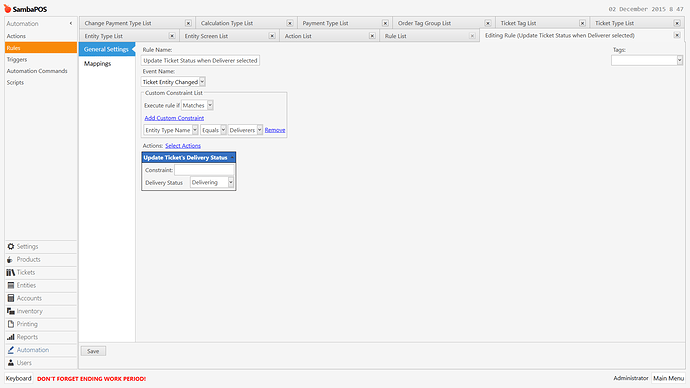
For new delivery tickets delivery status becomes Waiting. When we assign a deliverer to ticket Delivery Status should change as Delivering.
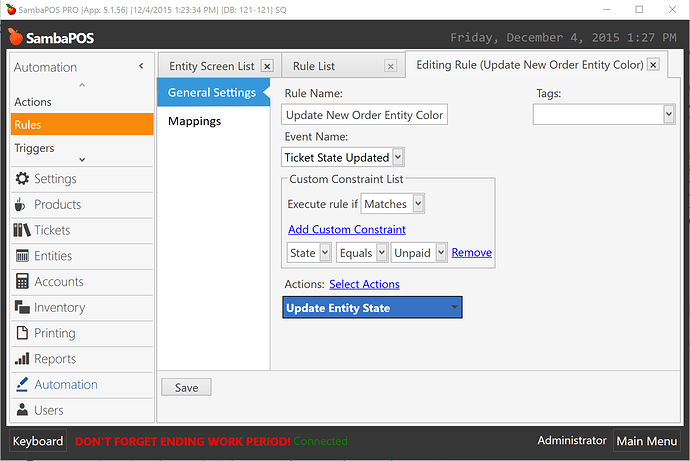
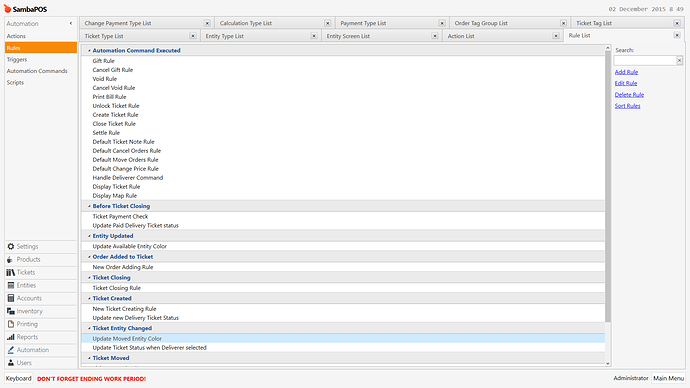
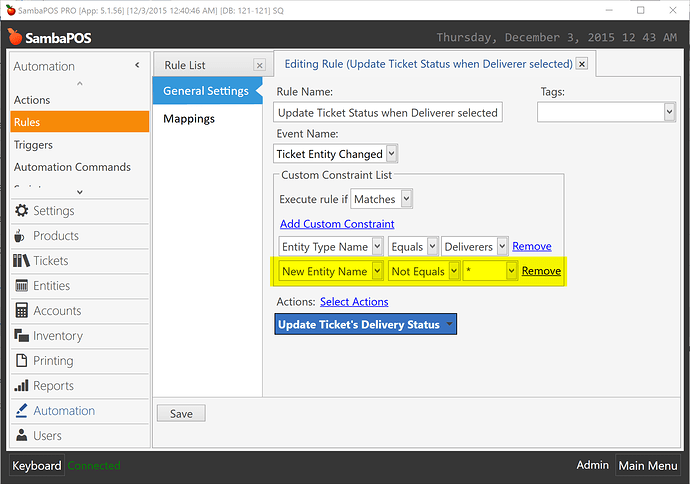
We’ll create a new Ticket Entity Changed rule that works when we assign a deliverer.
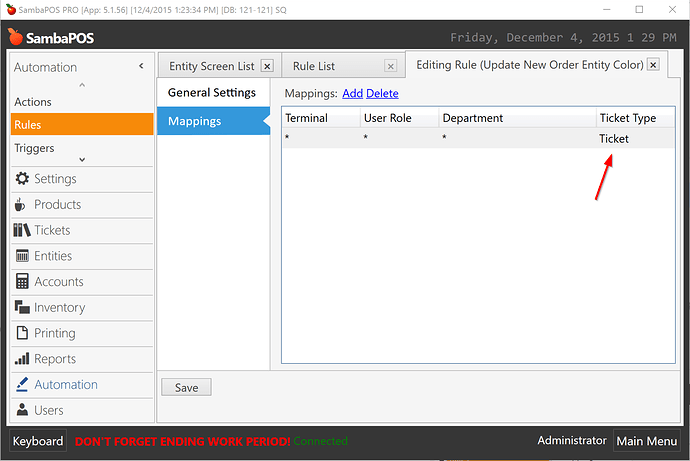
You’ll probably notice this rule will work for all ticket types but as we can select a deliverer for only delivery tickets that rule will work for delivery tickets. If needed you can exclusively map this rule to delivery tickets through Mappings screen.
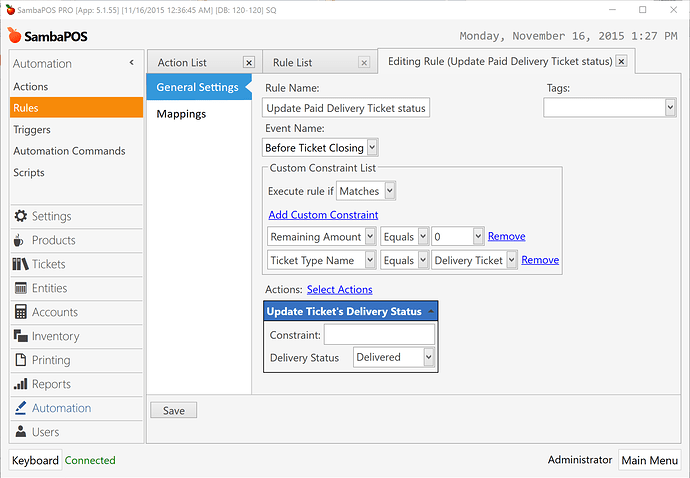
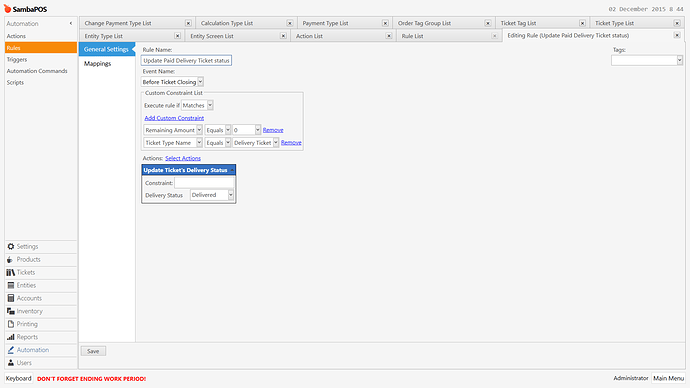
When we settle a delivery ticket we’ll update ticket’s Delivery Status as Delivered. To do this I’ll create a new rule for Before Ticket Closing event and Update status as Delivered if Remaining Amount equals 0.
##Delivery Screen Actions
After implementing how ticket’s delivery state updates we’ll add few actions that will be useful while implementing custom screen behavior.
Now we can switch to Automation>Actions screens and start adding actions.
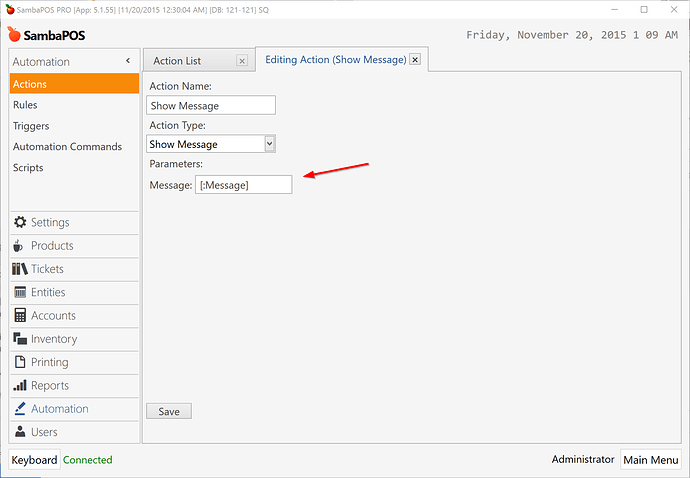
###Show Message
Show message action is a useful action to display some data on screen. We’ll use it while experimenting default settings.
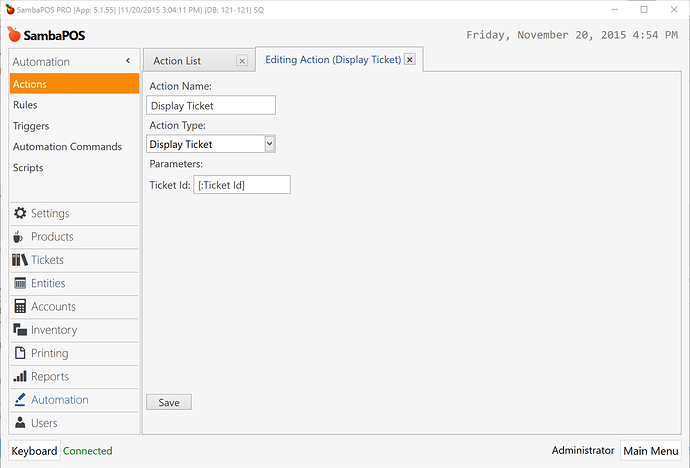
###Display Ticket
We’ll use Display Ticket action to display ticket for the given Ticket Id.
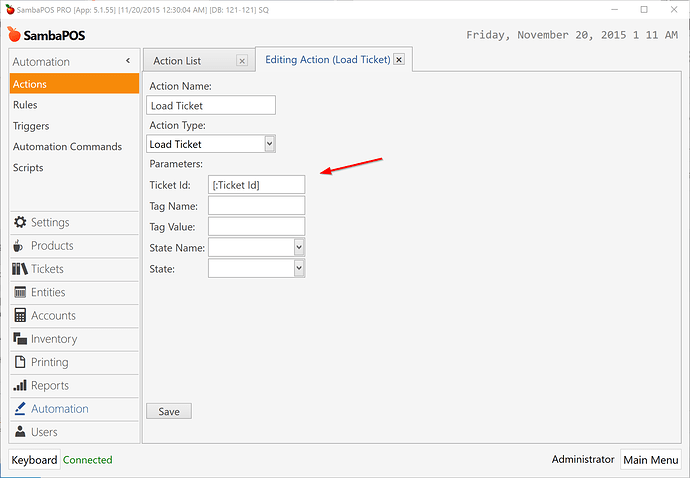
###Load Ticket
Load Ticket Action loads a ticket for the given id and keeps it open in background until we call Close Ticket. While a ticket is loaded we can call ticket related actions to update tickets. We’ll use it while assigning a deliverer to ticket.
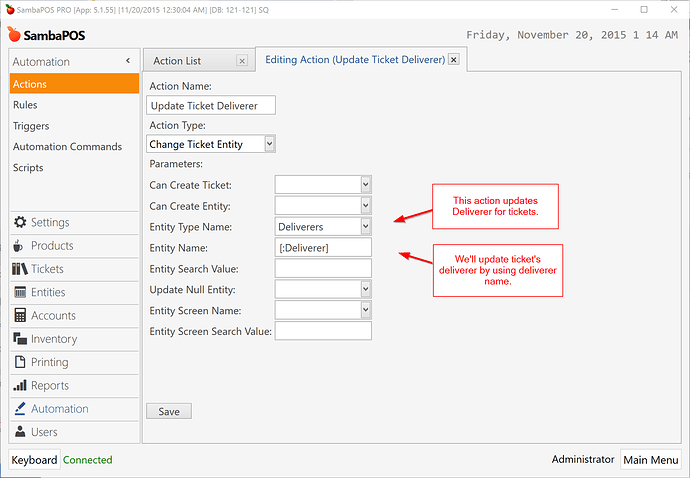
###Update Ticket Deliverer
Change Ticket Entity action sets or changes Ticket’s entity. We’ll use this action to change Ticket deliverer.
###Close Ticket
We’ll use Close Ticket action to close loaded tickets after updating deliverer but I’m not showing it’s implementation as it is a default action and should already exists. So you don’t need to create this action.
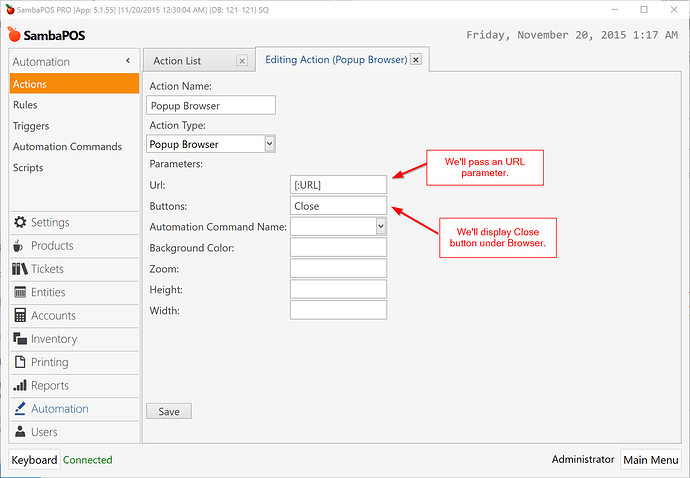
###Popup Browser
This action displays a full screen Web Browser and loads given URL. We’ll use this action to display Google Maps page for Customer Address.
##Custom Screen Setup
We have all needed actions. We’ll also implement few rules but I’ll show them while implementing Custom Delivery Screen.
###Adding Ticket Listers
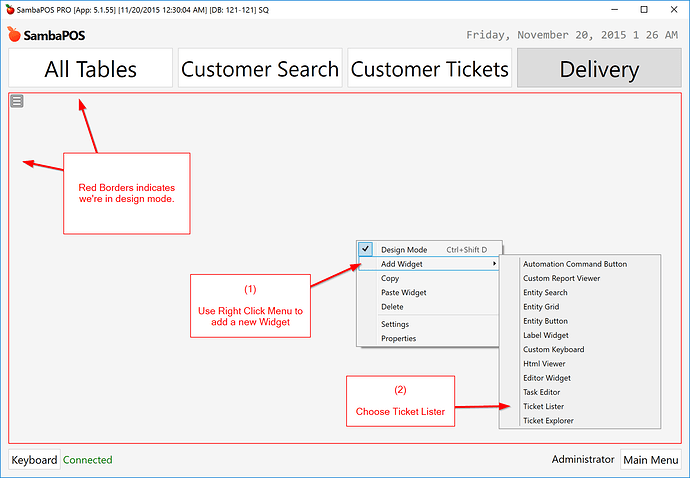
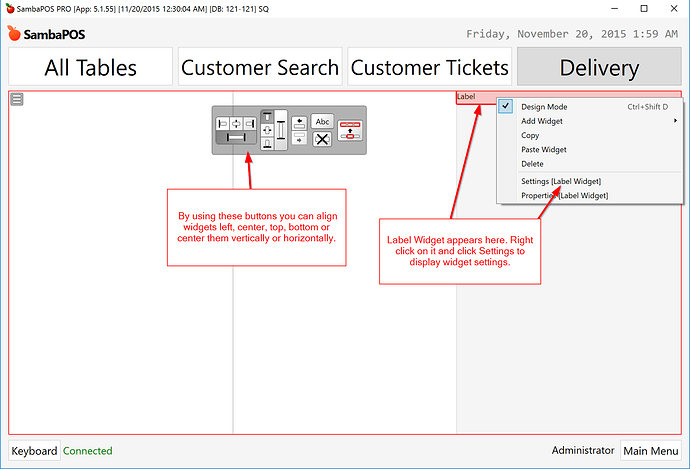
Switch to Delivery Screen and right click to Enable Design Mode. After enabling design mode right click again and add two Ticket Lister widgets.
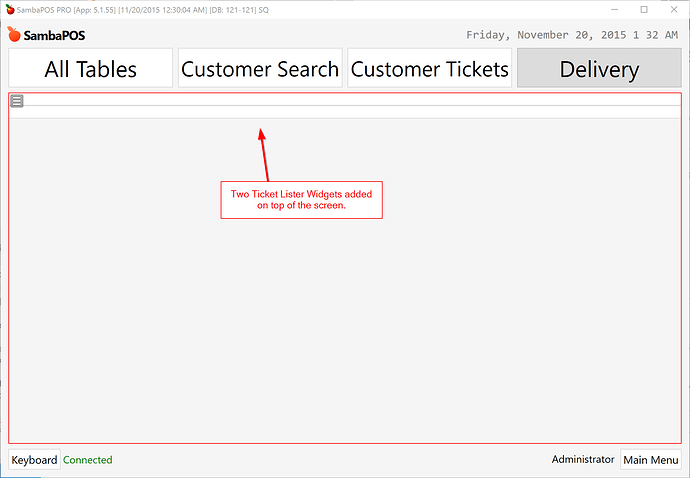
Two widgets appears on top.
Click on widgets and align them on the screen.
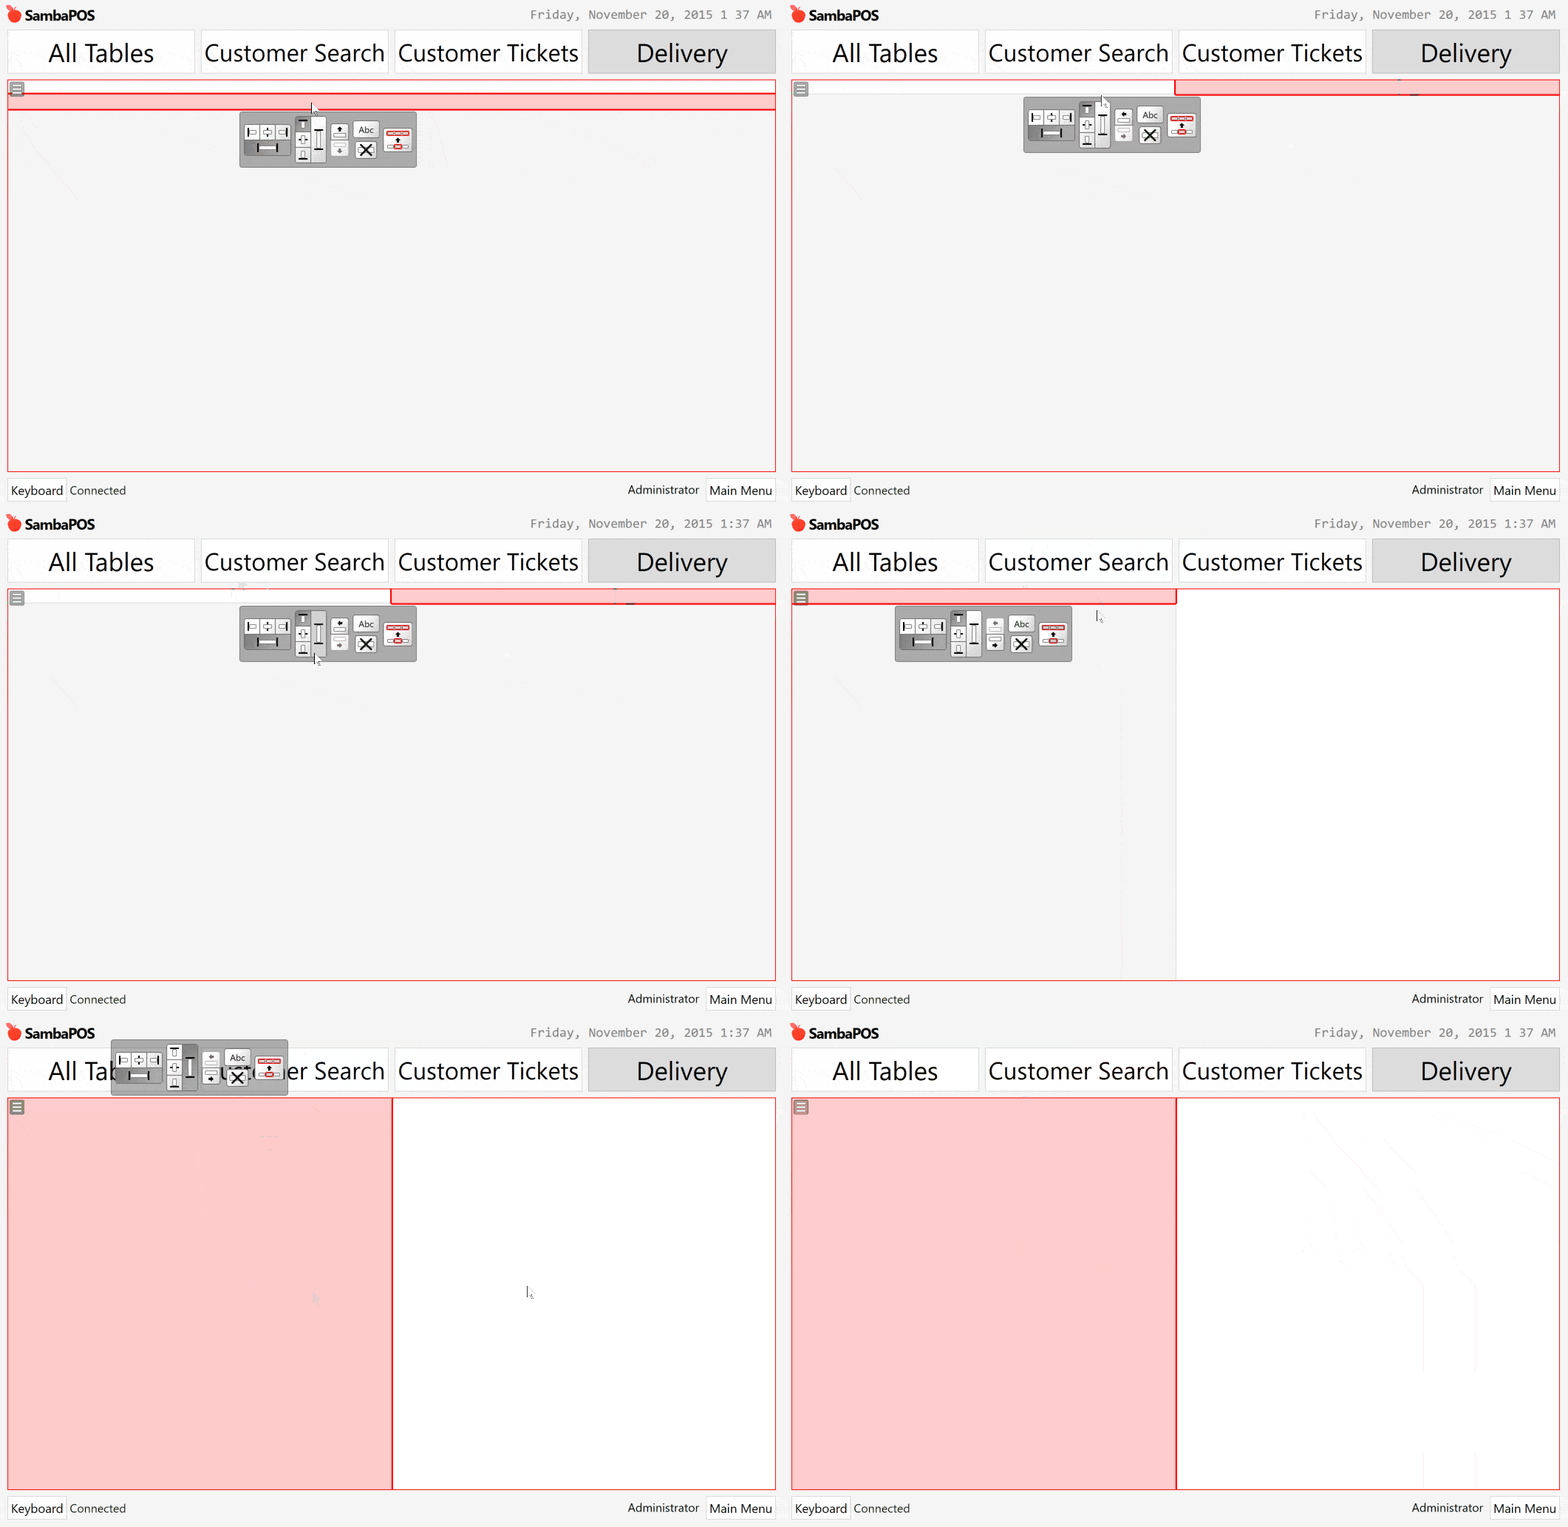
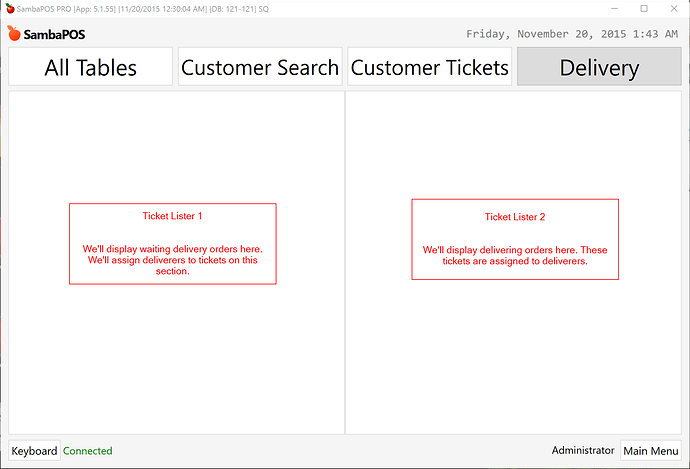
Now you should have two ticket listers one on the left and the other one on the right side of the screen. Disable design mode from right click menu and check if widgets appears fine on screen.
###Adding Labels
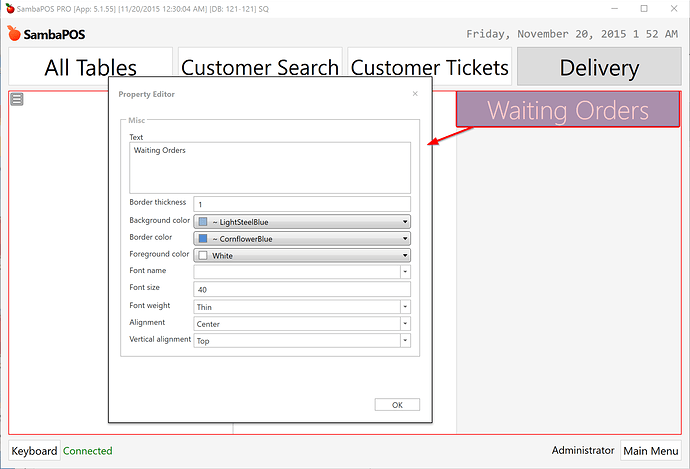
Switch to Design mode and Add a new Label Widget on screen.
Edit settings to update widget as shown in the screen shot.
Now click on widget and move it on top of Ticket Lister 1. If needed you can adjust height by dragging widget borders.
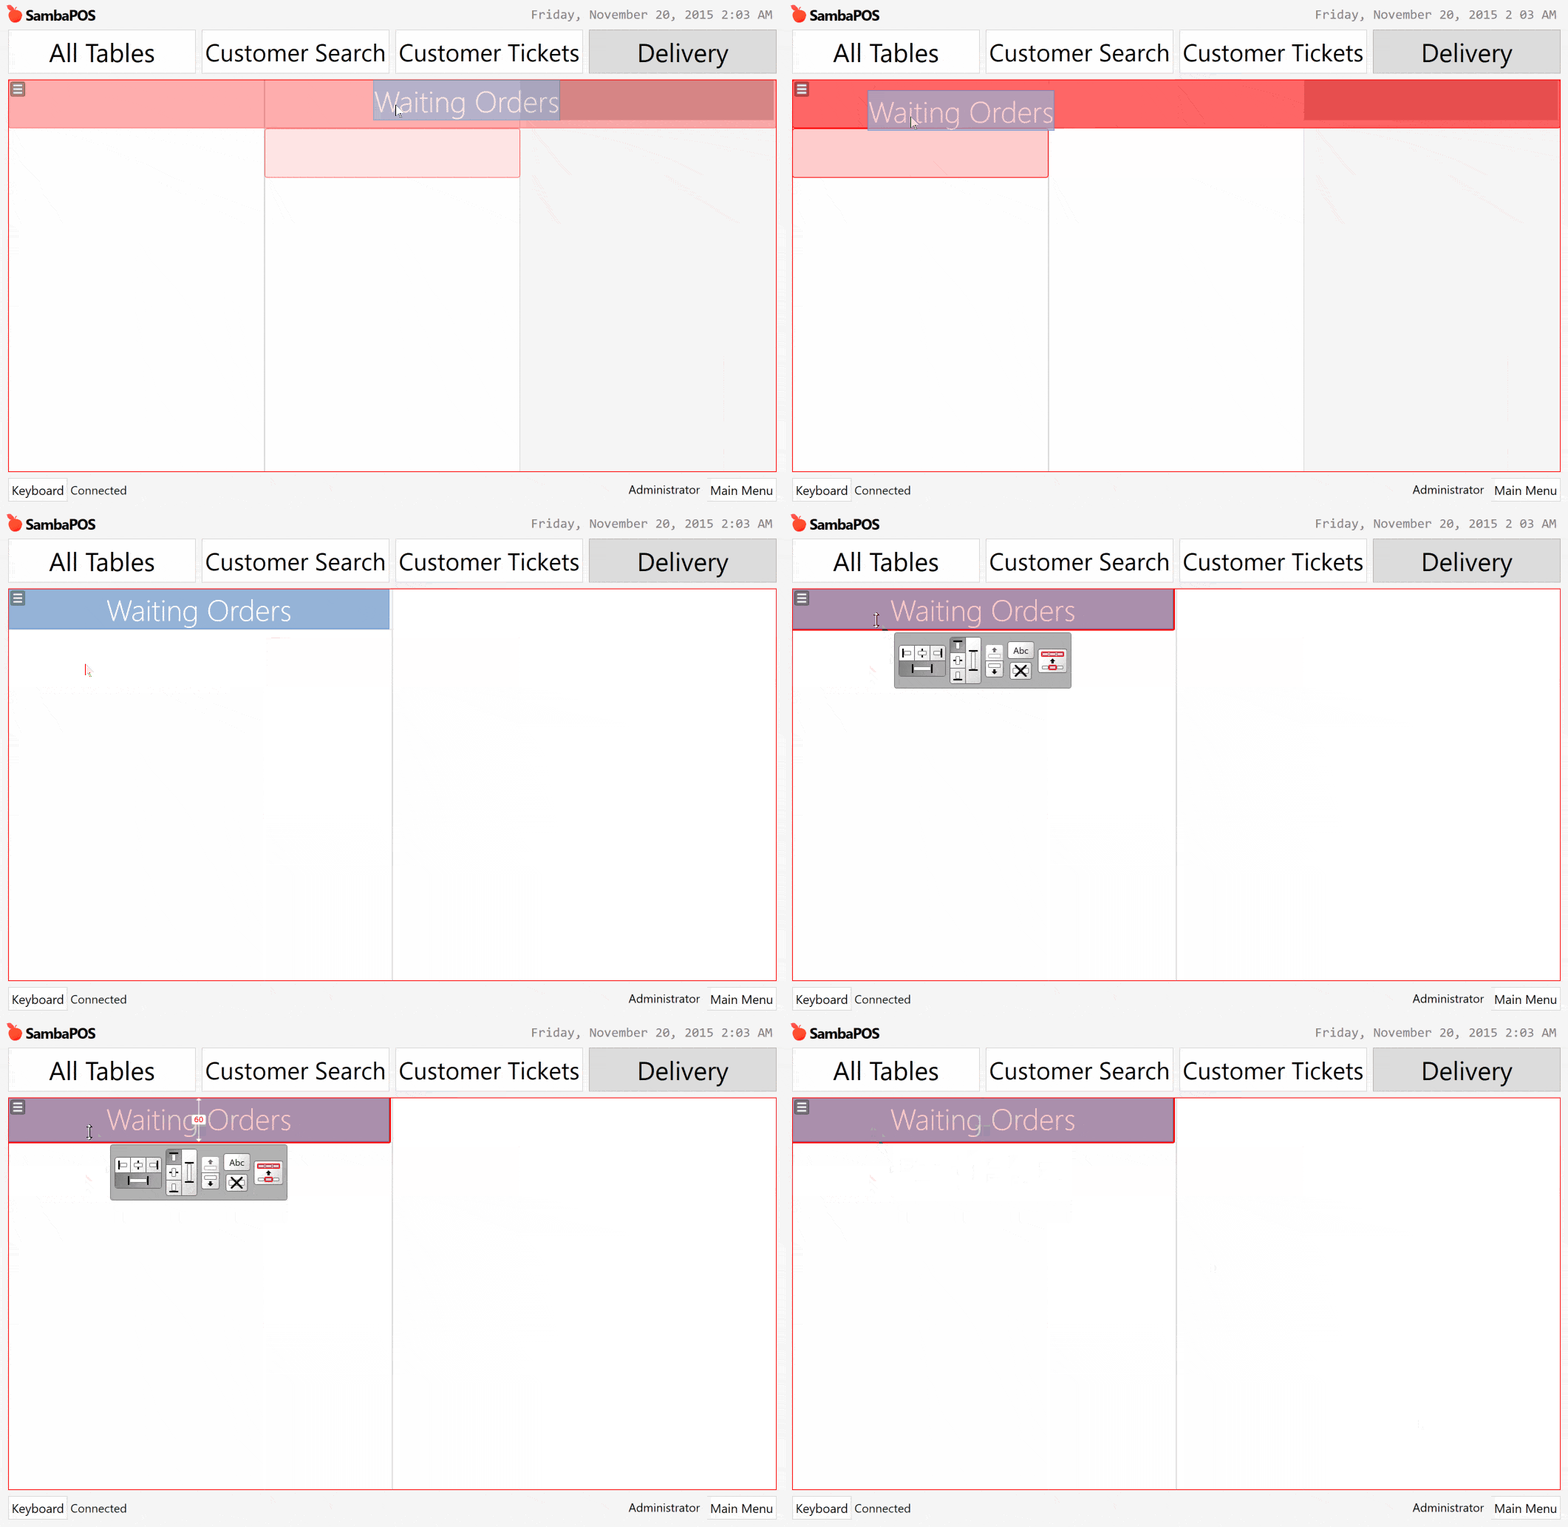
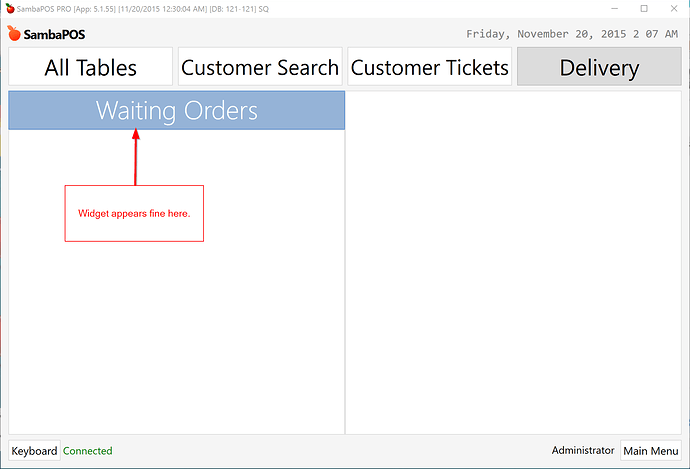
Disable design mode once more to see if Label Widget aligns correctly and appears fine on screen.
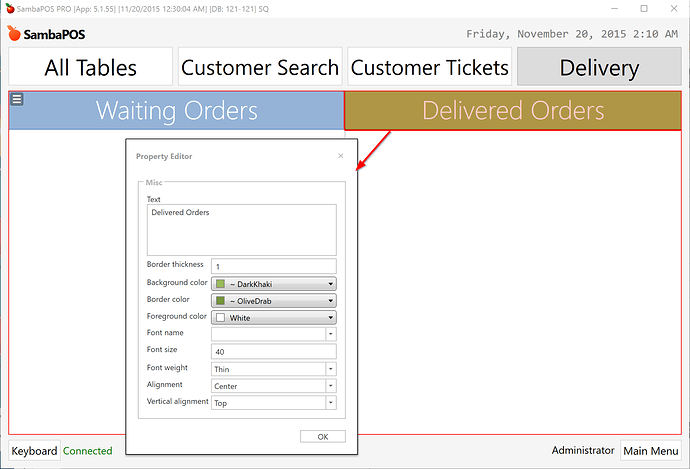
Add one more Label Widget on top of Ticket Lister 2 and change settings as shown.
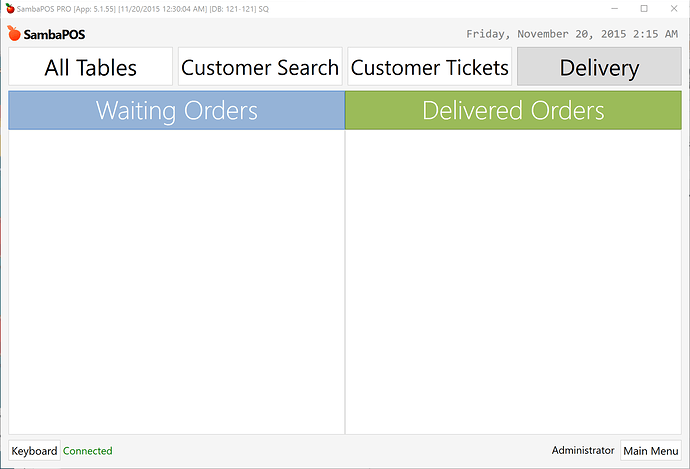
Your screen will appear like that when you disable Design Mode.
###Displaying Waiting Orders
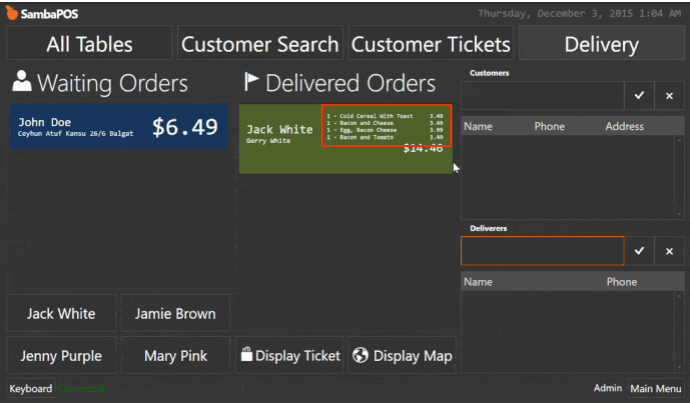
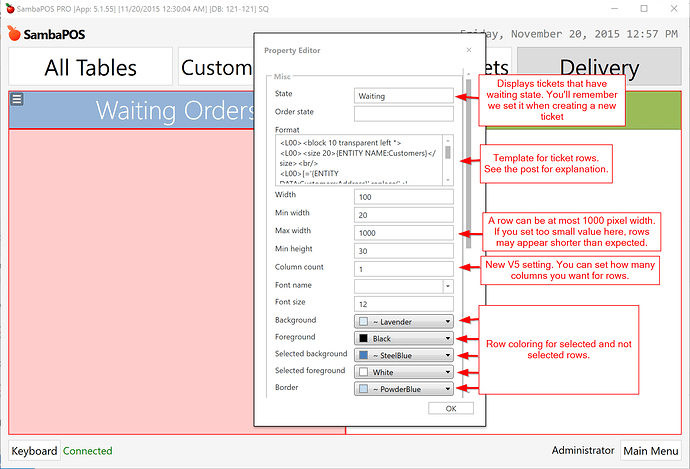
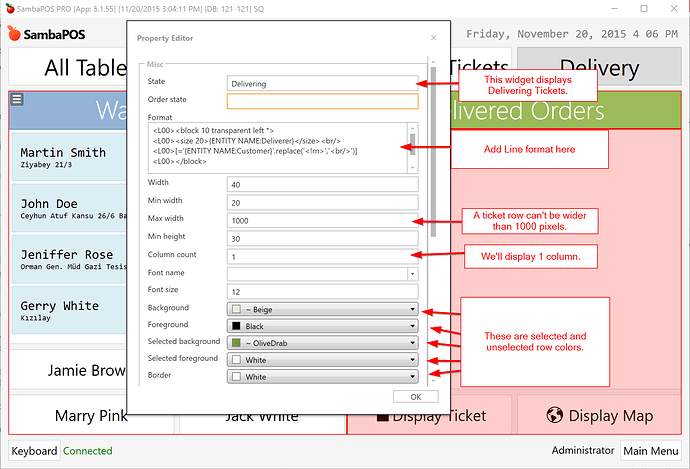
We’ll display tickets waiting for deliver assignment on left ticket lister. Enable design mode, Right click on widget and click settings and update settings as shown on the screen shot. Changing highlighted values will be enough.
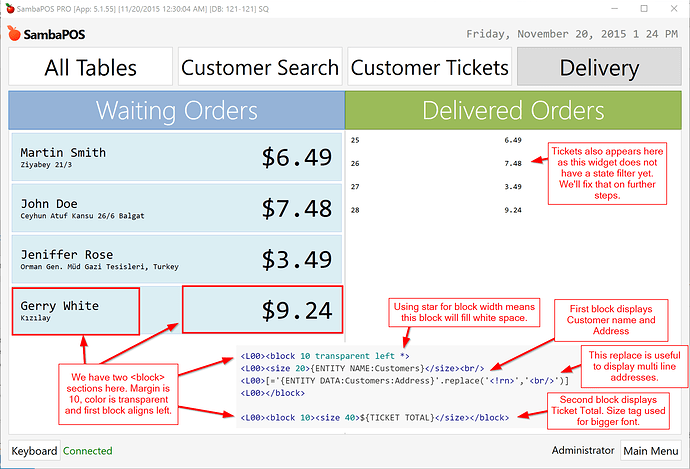
This is the Row Format.
<L00><block 10 transparent left *>
<L00><size 20>{ENTITY NAME:Customers}</size><br/>
<L00>[='{ENTITY DATA:Customers:Address}'.replace('<!rn>','<br/>')]
<L00></block>

<L00><block 10><size 40>${TICKET TOTAL}</size></block>
Before explaining how that format works please create few Customer Tickets and test if they appears fine inside widget. Switch to Customer Search screen, create few customers if needed and create tickets through this screen. Please remember we configured this screen to create delivery tickets.
After creating 3-4 tickets switch to delivery screen and test if they appears fine. You’ll find explanations of specific format features in the screen shot.
###Configuring Deliverer Buttons
Under left ticket lister we’ll show buttons for deliverers. When we select a ticket and click deliverer button we’ll assign that deliverer to ticket.
On this section I’ll show how each setting works so even it looks like a long section try to follow each step. I’ll demonstrate some great new V5 features.
####Displaying Buttons
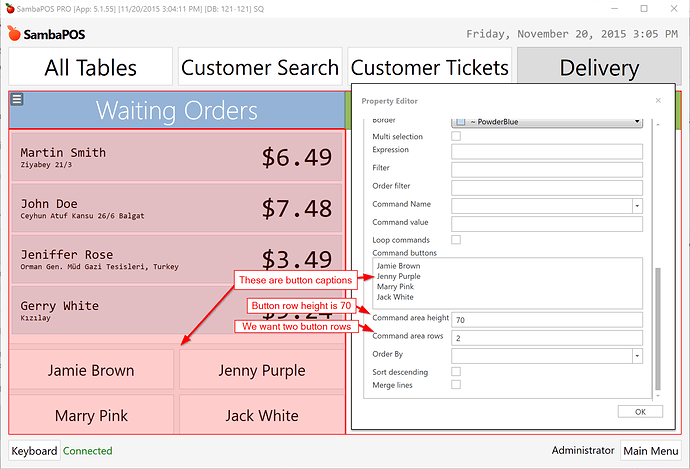
Edit left Ticket Lister settings and add deliverer names into Command Buttons area. Update highlighted settings on the screen shot too.
Jamie Brown
Jenny Purple
Marry Pink
Jack White
Important!!! You need to type your deliverer names here. If you didn’t do so create few deliverers and type their names here.
When you disable design mode you’ll see 4 buttons located under first ticket lister. Clicking these buttons does nothing. We need to tell what each button does when we click on them.
Command button syntax is
<Button Header>=<Command Name>
####Assigning Commands
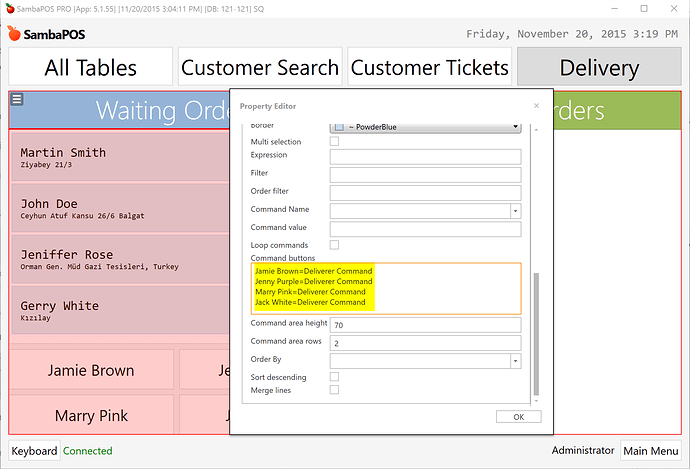
Edit Ticket Lister settings and change Command Buttons setting as follows…
Jamie Brown=Deliverer Command
Jenny Purple=Deliverer Command
Marry Pink=Deliverer Command
Jack White=Deliverer Command
So we configured Ticket Lister to execute Deliverer Command when a deliverer button clicked.
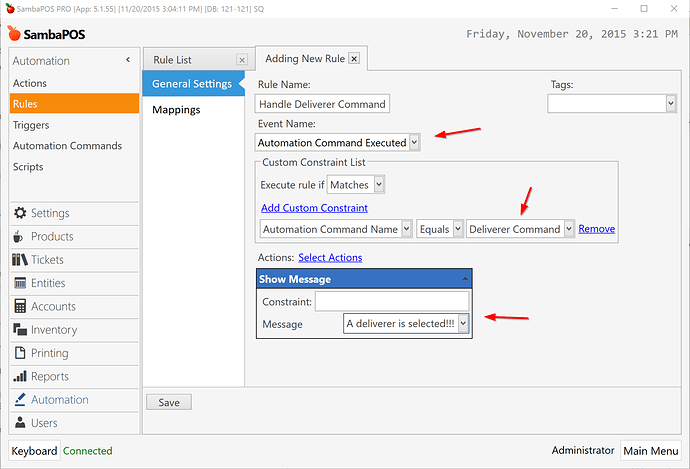
To test that I’ll create a new rule for Deliverer Command.
When Deliverer Command triggers we’ll execute Show Message action that displays a plain text message.
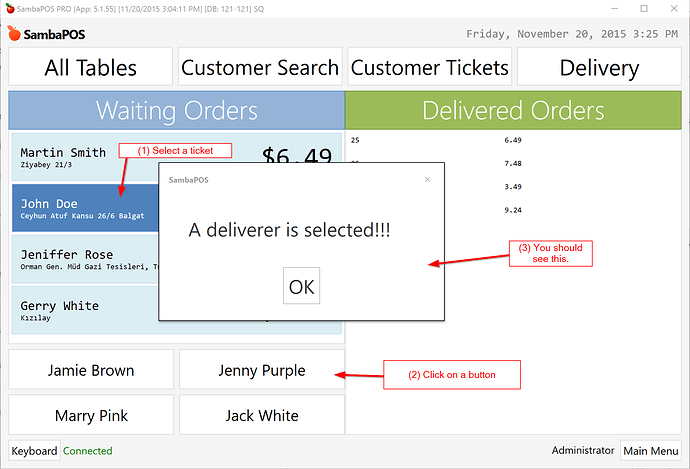
Now you can test it to see how it works.
Important!!! If nothing happens when you click on deliverer buttons that means you didn’t selected a ticket. Ticket Lister works against selected tickets so you need to select a ticket to enable deliverer buttons.
####Passing Parameters
To be able to implement something useful we need to know which tickets are selected and which deliverer button is clicked. We’ll use V5’s command parameter feature for that.
Jamie Brown=Deliverer Command:TicketId=$1,Deliverer=Jamie Brown
Jenny Purple=Deliverer Command:TicketId=$1,Deliverer=Jenny Purple
Marry Pink=Deliverer Command:TicketId=$1,Deliverer=Marry Pink
Jack White=Deliverer Command:TicketId=$1,Deliverer=Jack White
So when we examine first line command button syntax becomes…
<Button Header>=<Command Name>:<Parameters>
Parameters appended to command name with : delimitier and they formatted as <key>=<value>. For example >>> Header=Command:Param1=Value1,Param2=Value2
Ticket Lister replaces $1 with Selected Ticket id.
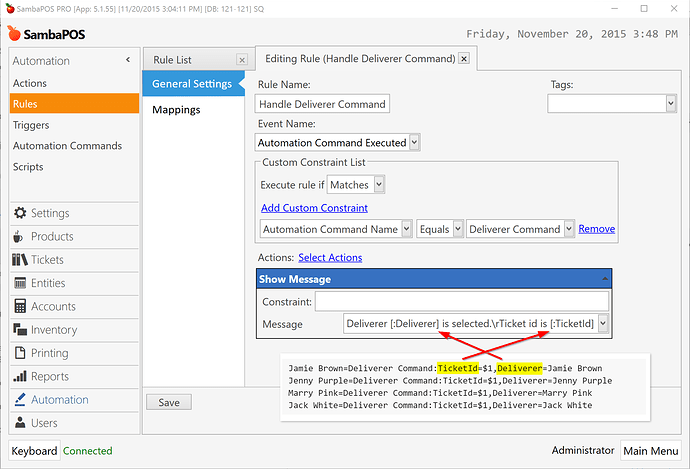
Inside rules we can read TicketId parameter with [:TicketId] and Deliverer parameter with [:Deliverer]
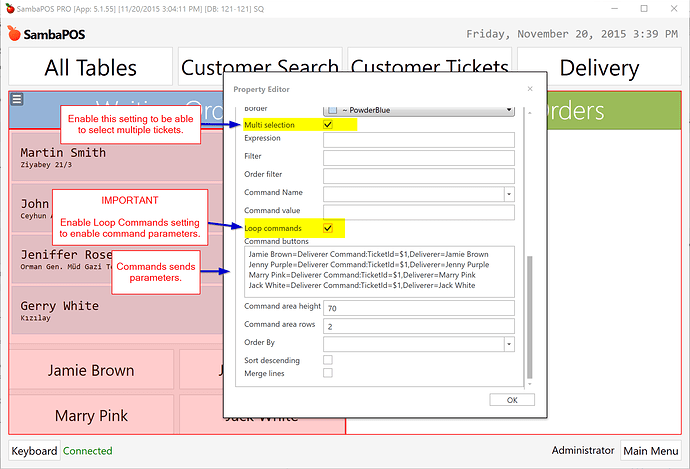
Edit Ticket Lister settings and update it as follows. Enable Multi Selection and Loop Commands settings too.
When
Loop Commandssetting enabled Widget executes clicked command one by one for each selected ticket. When disabled it sends selected ticket ids as a comma delimited command parameter and executes command once. For this tutorial we’ll enable Loop Commands.
Finally we’ll change Show Message Action to display parameter values.
Edit Handle Deliverer Command rule and update Show Message Action’s message parameter as…
Deliverer [:Deliverer] is selected.\rTicket id is [:TicketId]
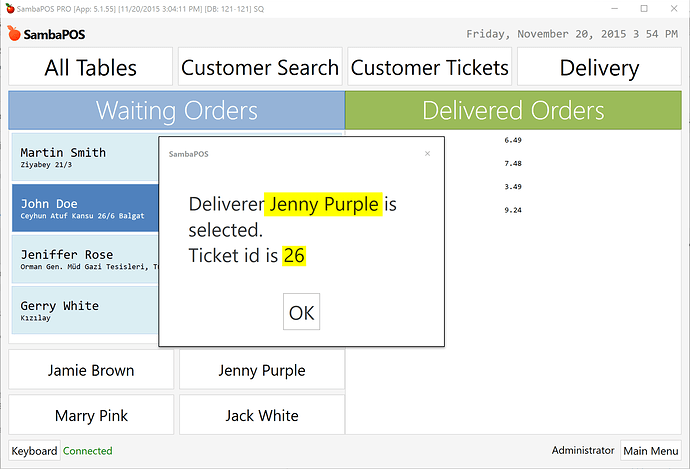
You should see this when you select a Ticket and Click on a deliverer button.
####Updating Ticket’s deliverer
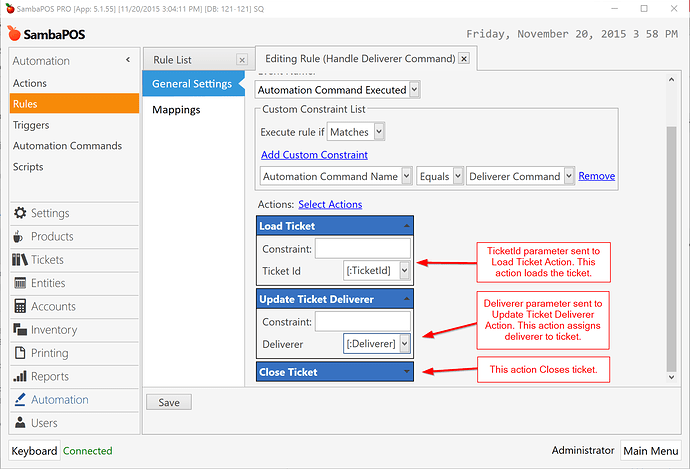
Now we know widget works fine and we can change Handle Deliverer Command rule to Load Ticket and assign Deliverer to ticket.
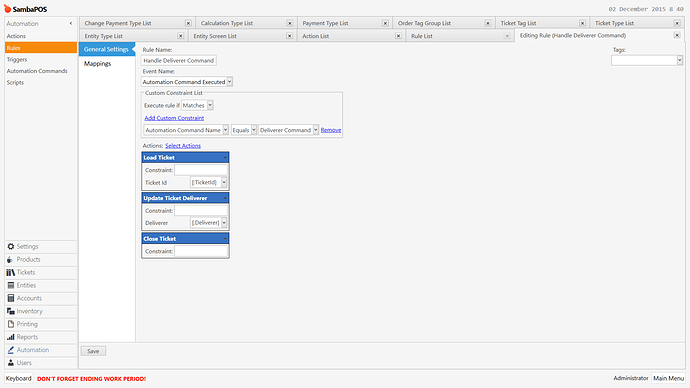
Edit Handle Deliverer Command, Remove show message action and add Load Ticket, Update Ticket Deliverer and Close Ticket actions.
###Displaying Delivered Orders
Before testing our setup we need to configure Second Ticket Lister to display Delivered Tickets. Edit Right Widget settings as shown on the screen shot.
This is what you can paste inside Format area. Similar to Left Widget’s format but this one displays Deliverer Name.
<L00><block 10 transparent left *>
<L00><size 20>{ENTITY NAME:Deliverer}</size><br/>
<L00>[='{ENTITY NAME:Customer}'.replace('<!rn>','<br/>')]
<L00></block>

<L00><block 10><size 40>${TICKET TOTAL}</size></block>
Now we can test if Tickets updates fine when we assign deliverers.
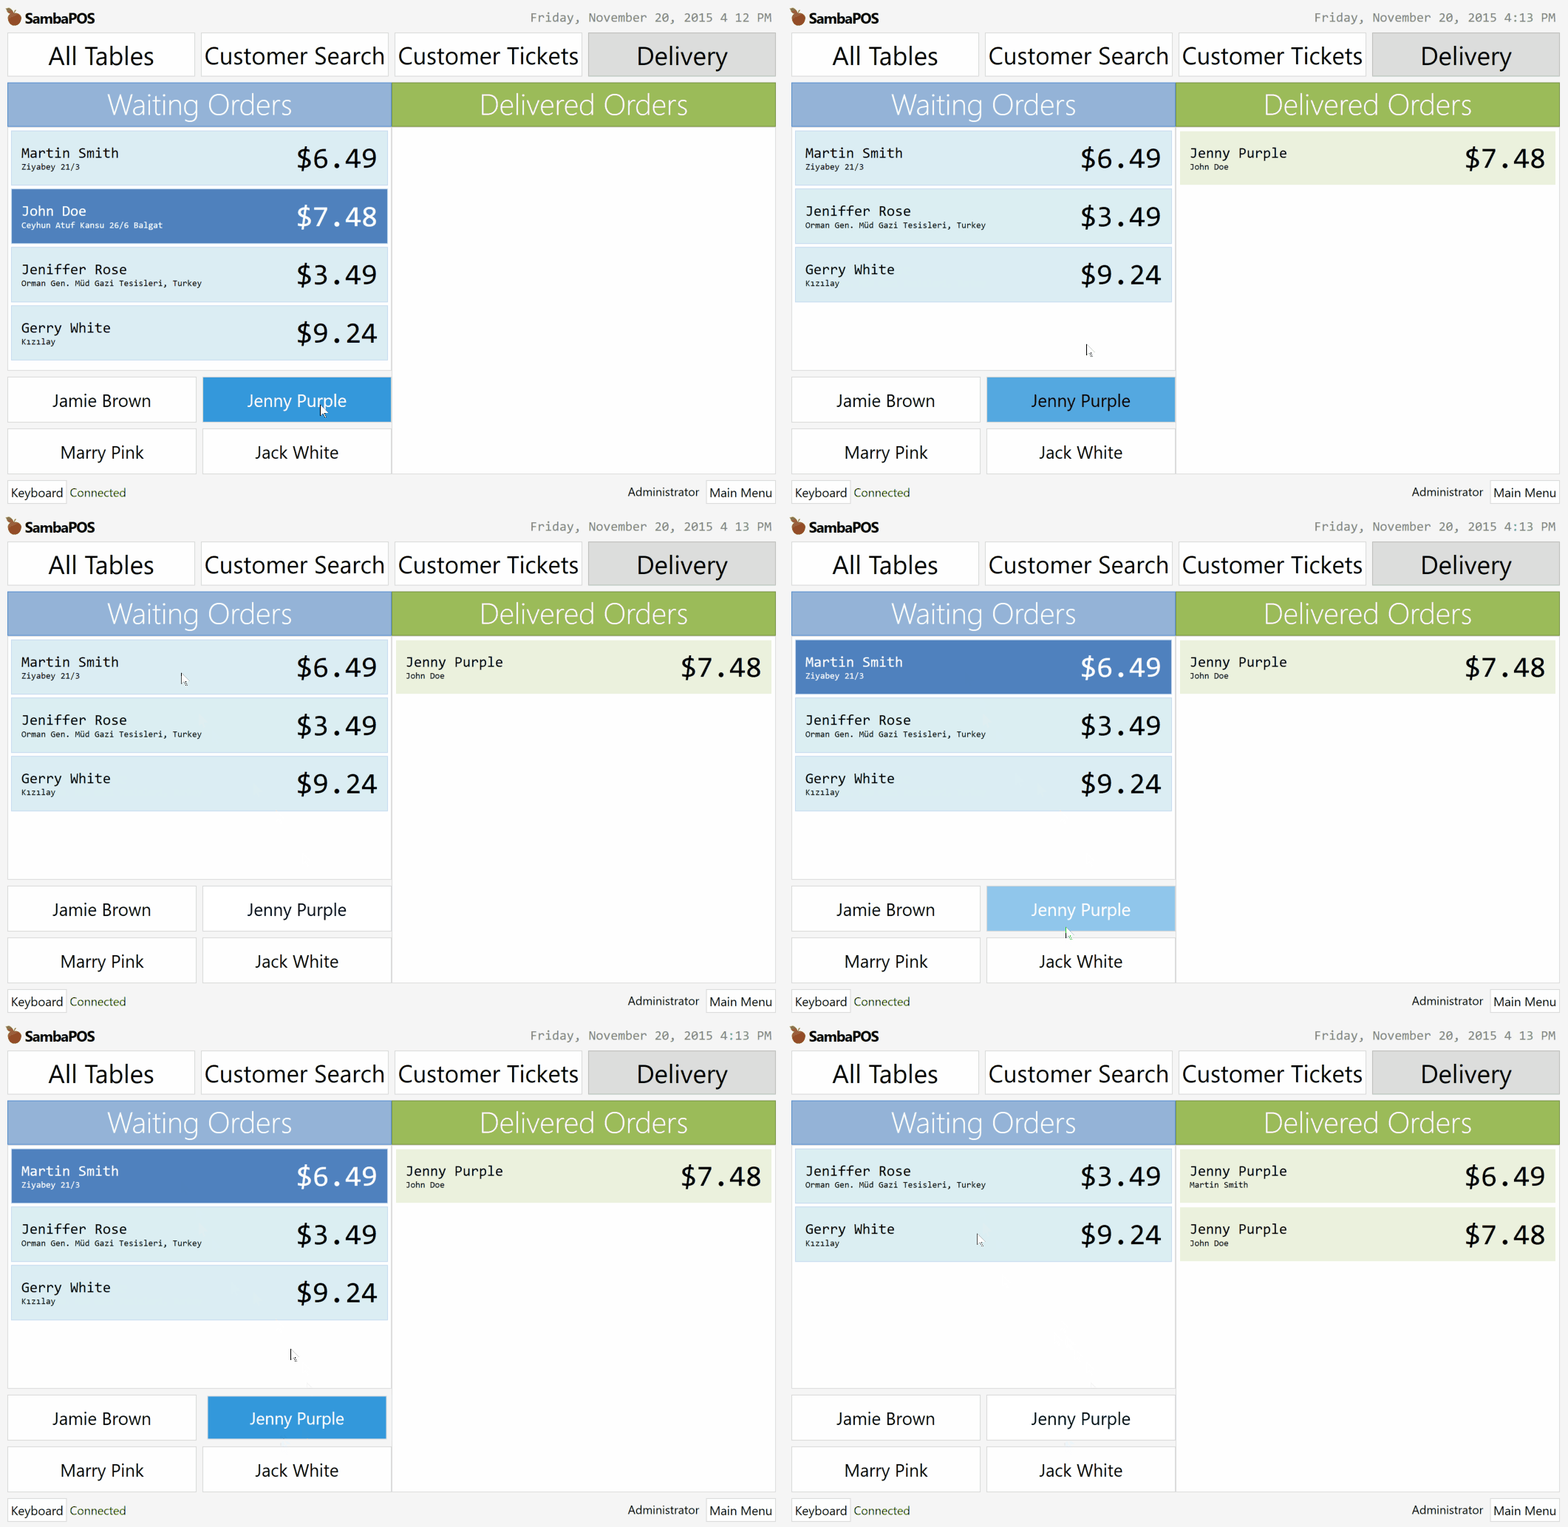
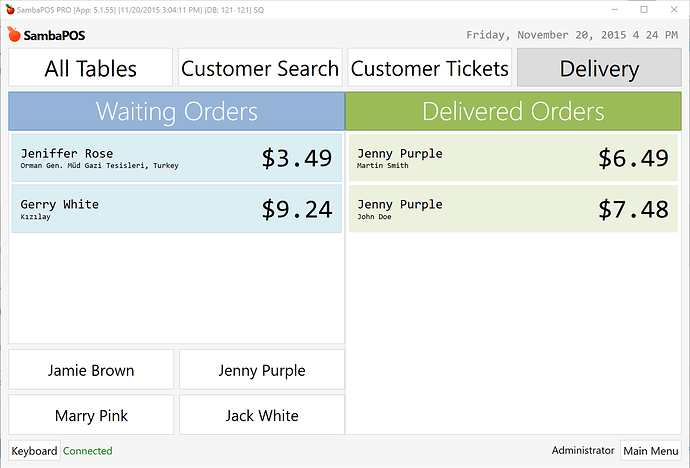
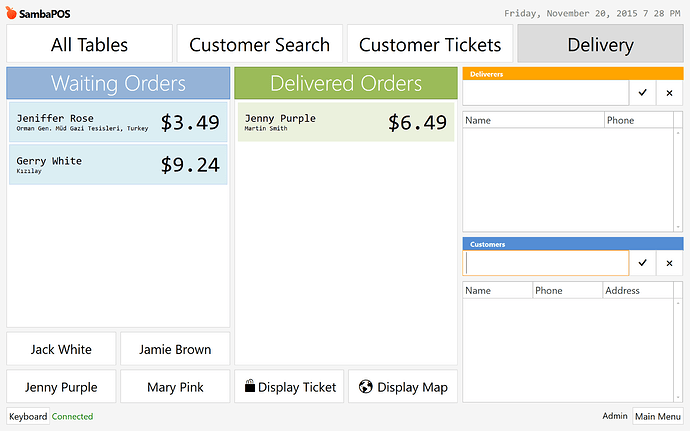
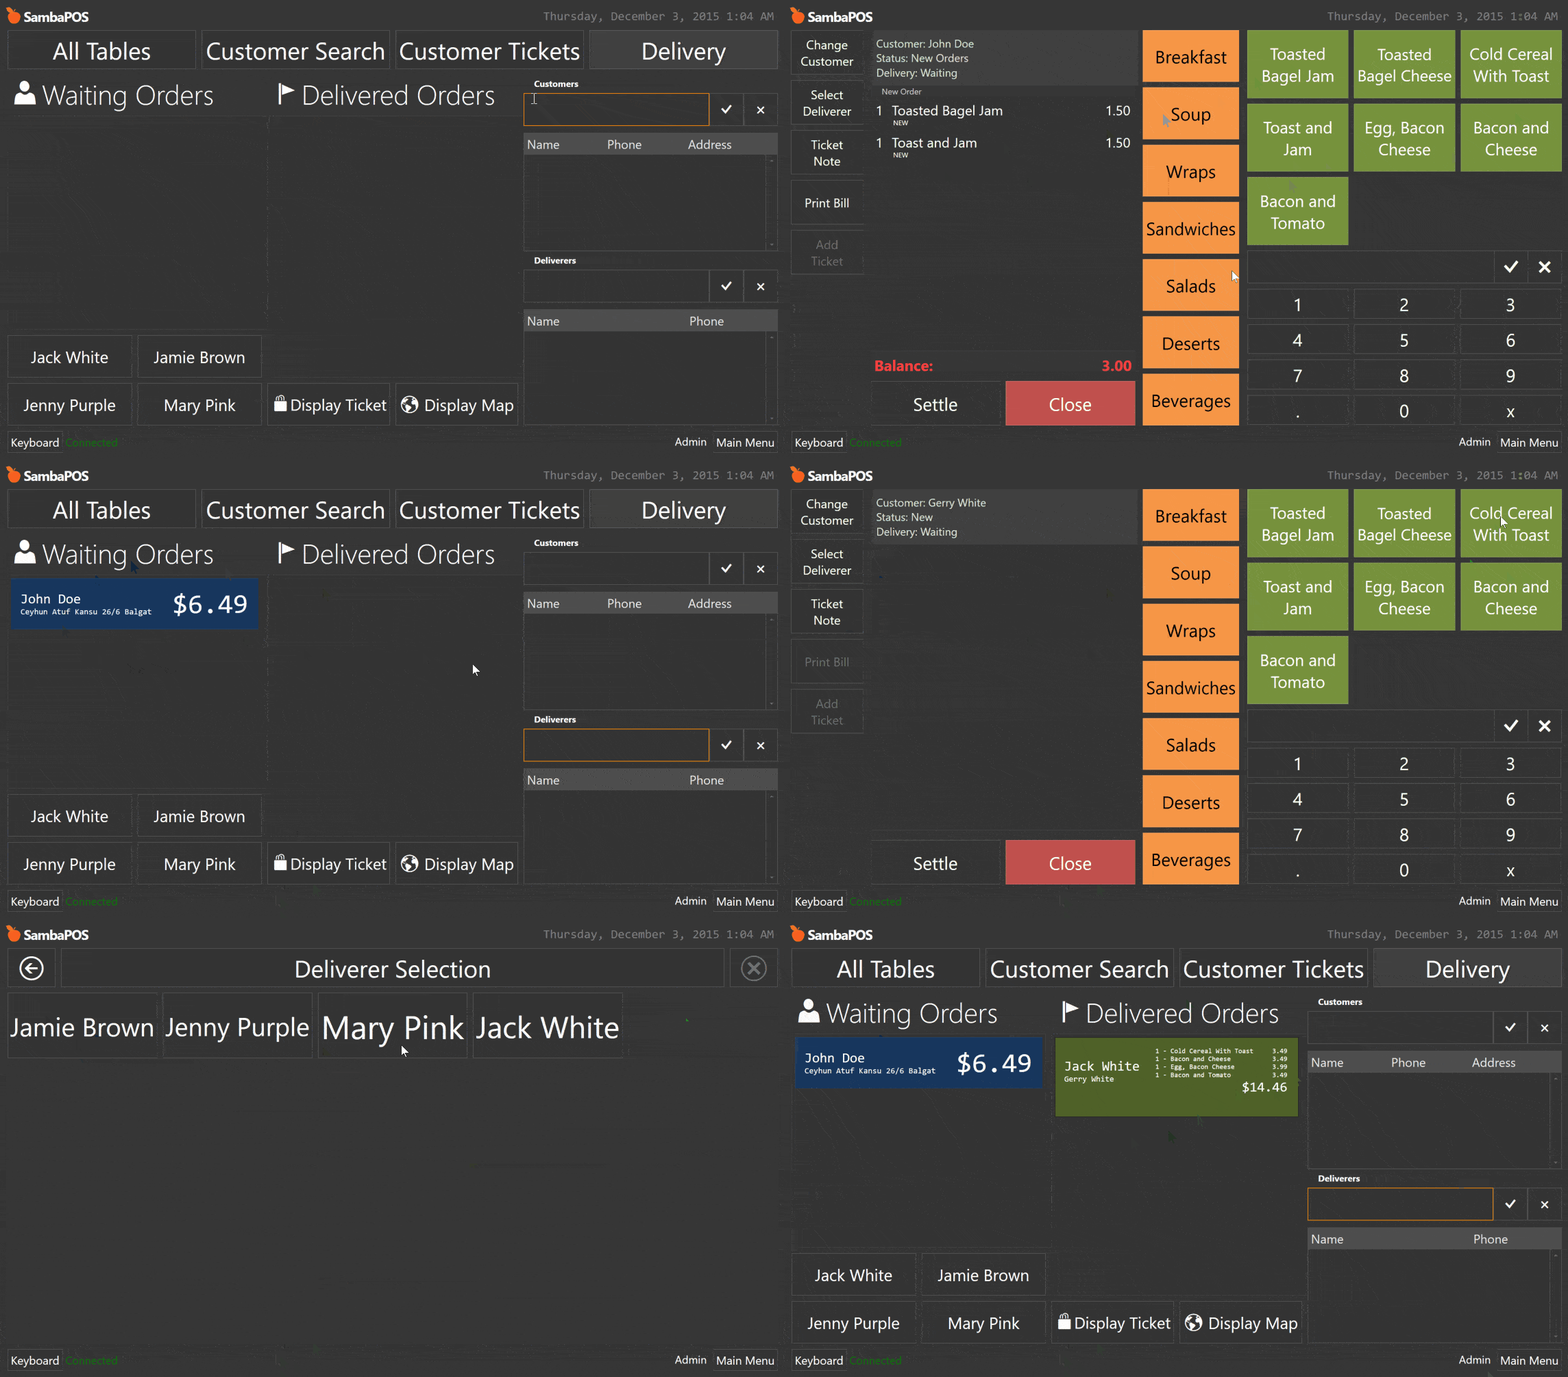
You’ll see waiting tickets on left and delivered tickets on right side of the screen.
###Better Deliverer Buttons
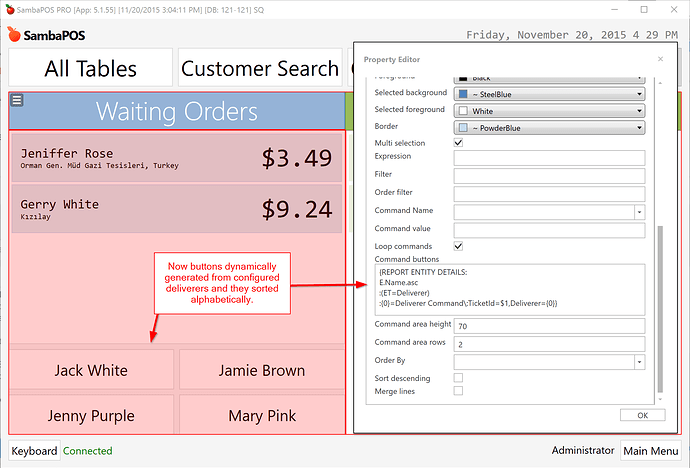
You probably didn’t like how we hardcoded deliverer names inside Ticket Lister Widget. When we create new deliverers or update existing ones we need to change widgets to reflect changes to our widgets. Instead of hardcoding deliverer names inside widget we can use a Custom Report feature to dynamically generate Deliverer buttons.
Edit Ticket Lister setting and change Command Buttons section with that reporting tag.
{REPORT ENTITY DETAILS:
E.Name.asc
:(ET=Deliverer)
:{0}=Deliverer Command\:TicketId=$1,Deliverer={0}}
This report tag generates exact hardcoded button format dynamically.
###Displaying Tickets
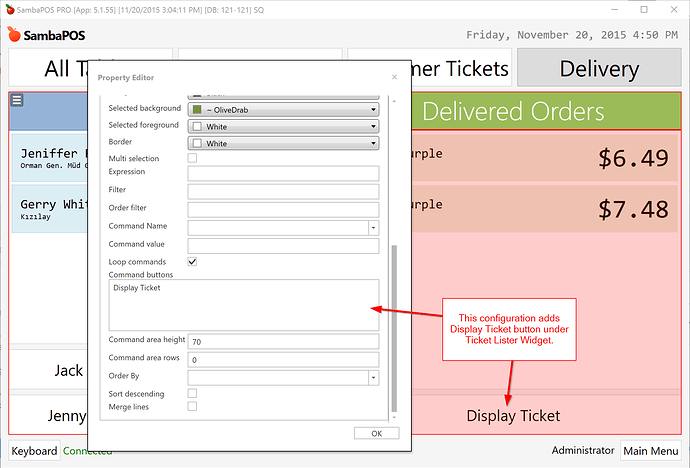
On this step we’ll add Display Ticket button under second ticket lister so when we select a ticket and click this button it displays selected ticket.
Edit Widget Settings and add Display Ticket button inside Command Buttons area.
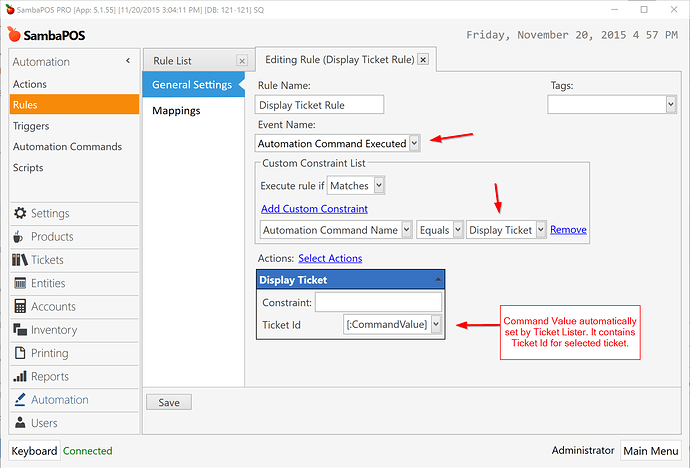
When you configure no parameter for a command Ticket Lister automatically adds Ticket Id as command parameter. So without needing further button configuration we can add a rule that handles button click and displays ticket.
Create a new rule that handles Display Ticket Command and add Display Ticket action.
After creating this rule clicking on Display Ticket button should display selected ticket.

###Displaying Map
We’ll add another button under second ticket lister to display a google map route for customer address.
https://maps.google.com/maps?saddr=<your address>&daddr={ENTITY DATA:Customer:Address}&hl=en
Before updating Ticket Lister we need to configure Google Maps url properly. saddr parameter (source) should be your business address and daddr parameter (destination) should be Customer’s delivery address. We’ll read customer address with {ENTITY DATA:Customer:Address} printer tag so the only thing you need to do for is replacing your address with <your address> part or the URL.
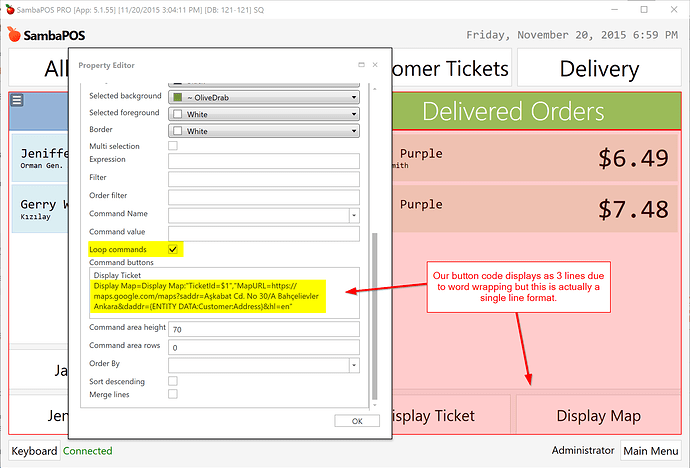
After constructing google maps URL we can add button code inside Ticket Lister.
Display Map=Display Map:"TicketId=$1","MapURL=https://maps.google.com/maps?saddr=Aşkabat Cd. No 30/A Bahçelievler Ankara&daddr={ENTITY DATA:Customer:Address}&hl=en"
Edit Ticket lister settings and add this line under Display Ticket command button.
Don’t forget enabling
Loop Commandssetting.
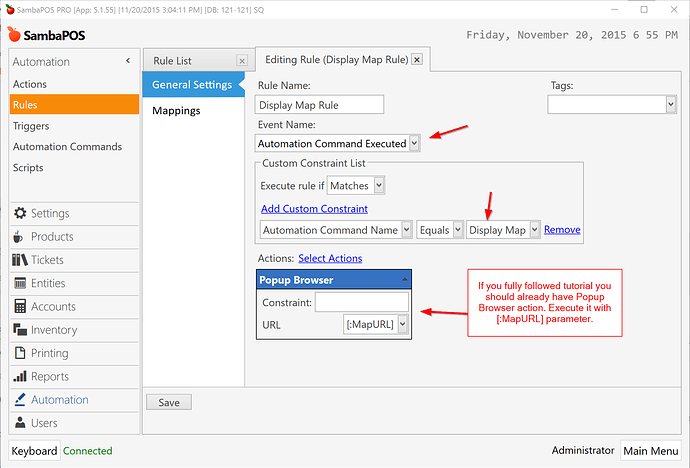
Our command button executes Display Map command with MapURL parameter. We need to create a rule to handle that button.
Now when you select a ticket and click Display Map button you should see the map.
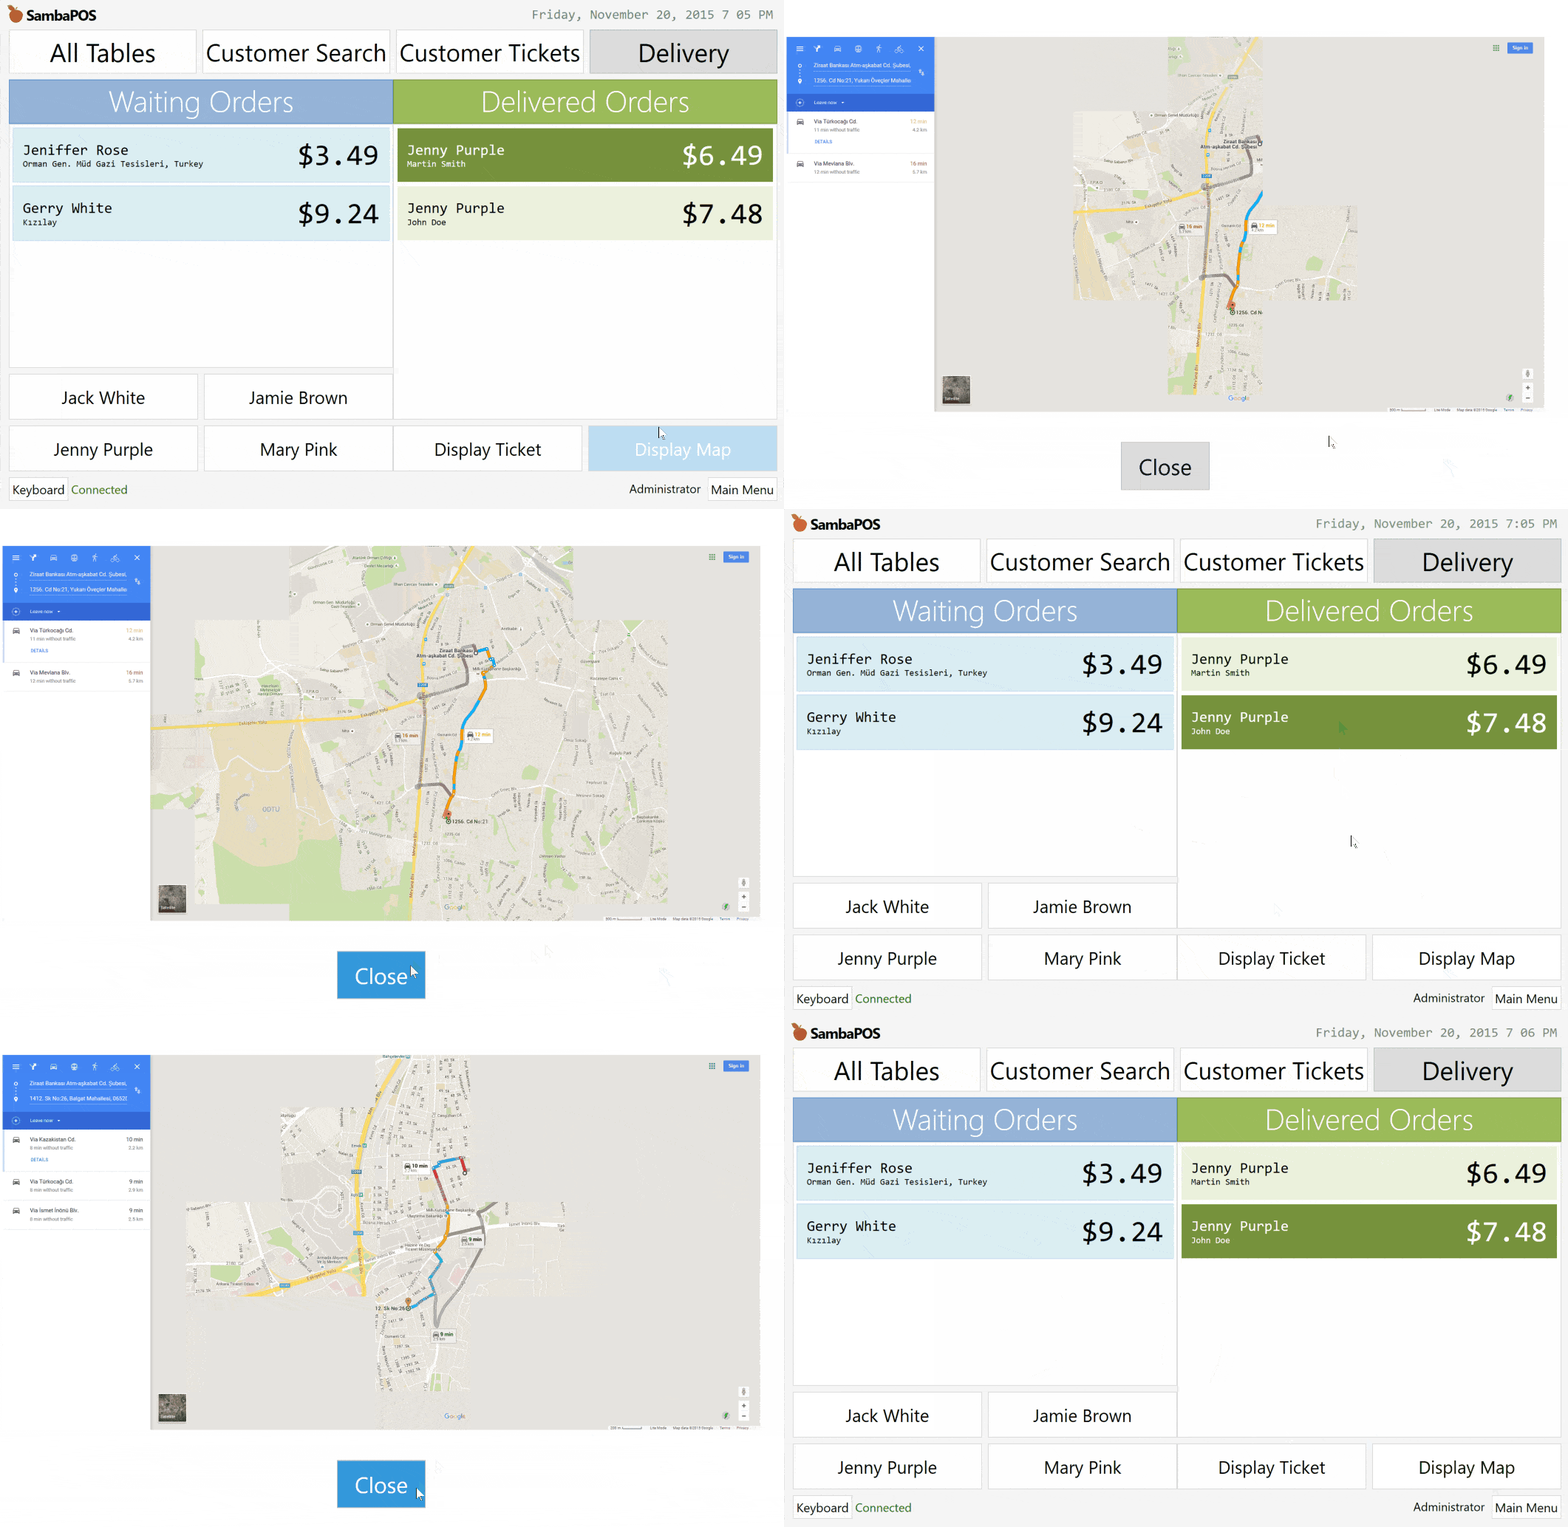
###Removing Tickets
We already implemented it. Settling a ticket should remove ticket from Delivered Orders list.
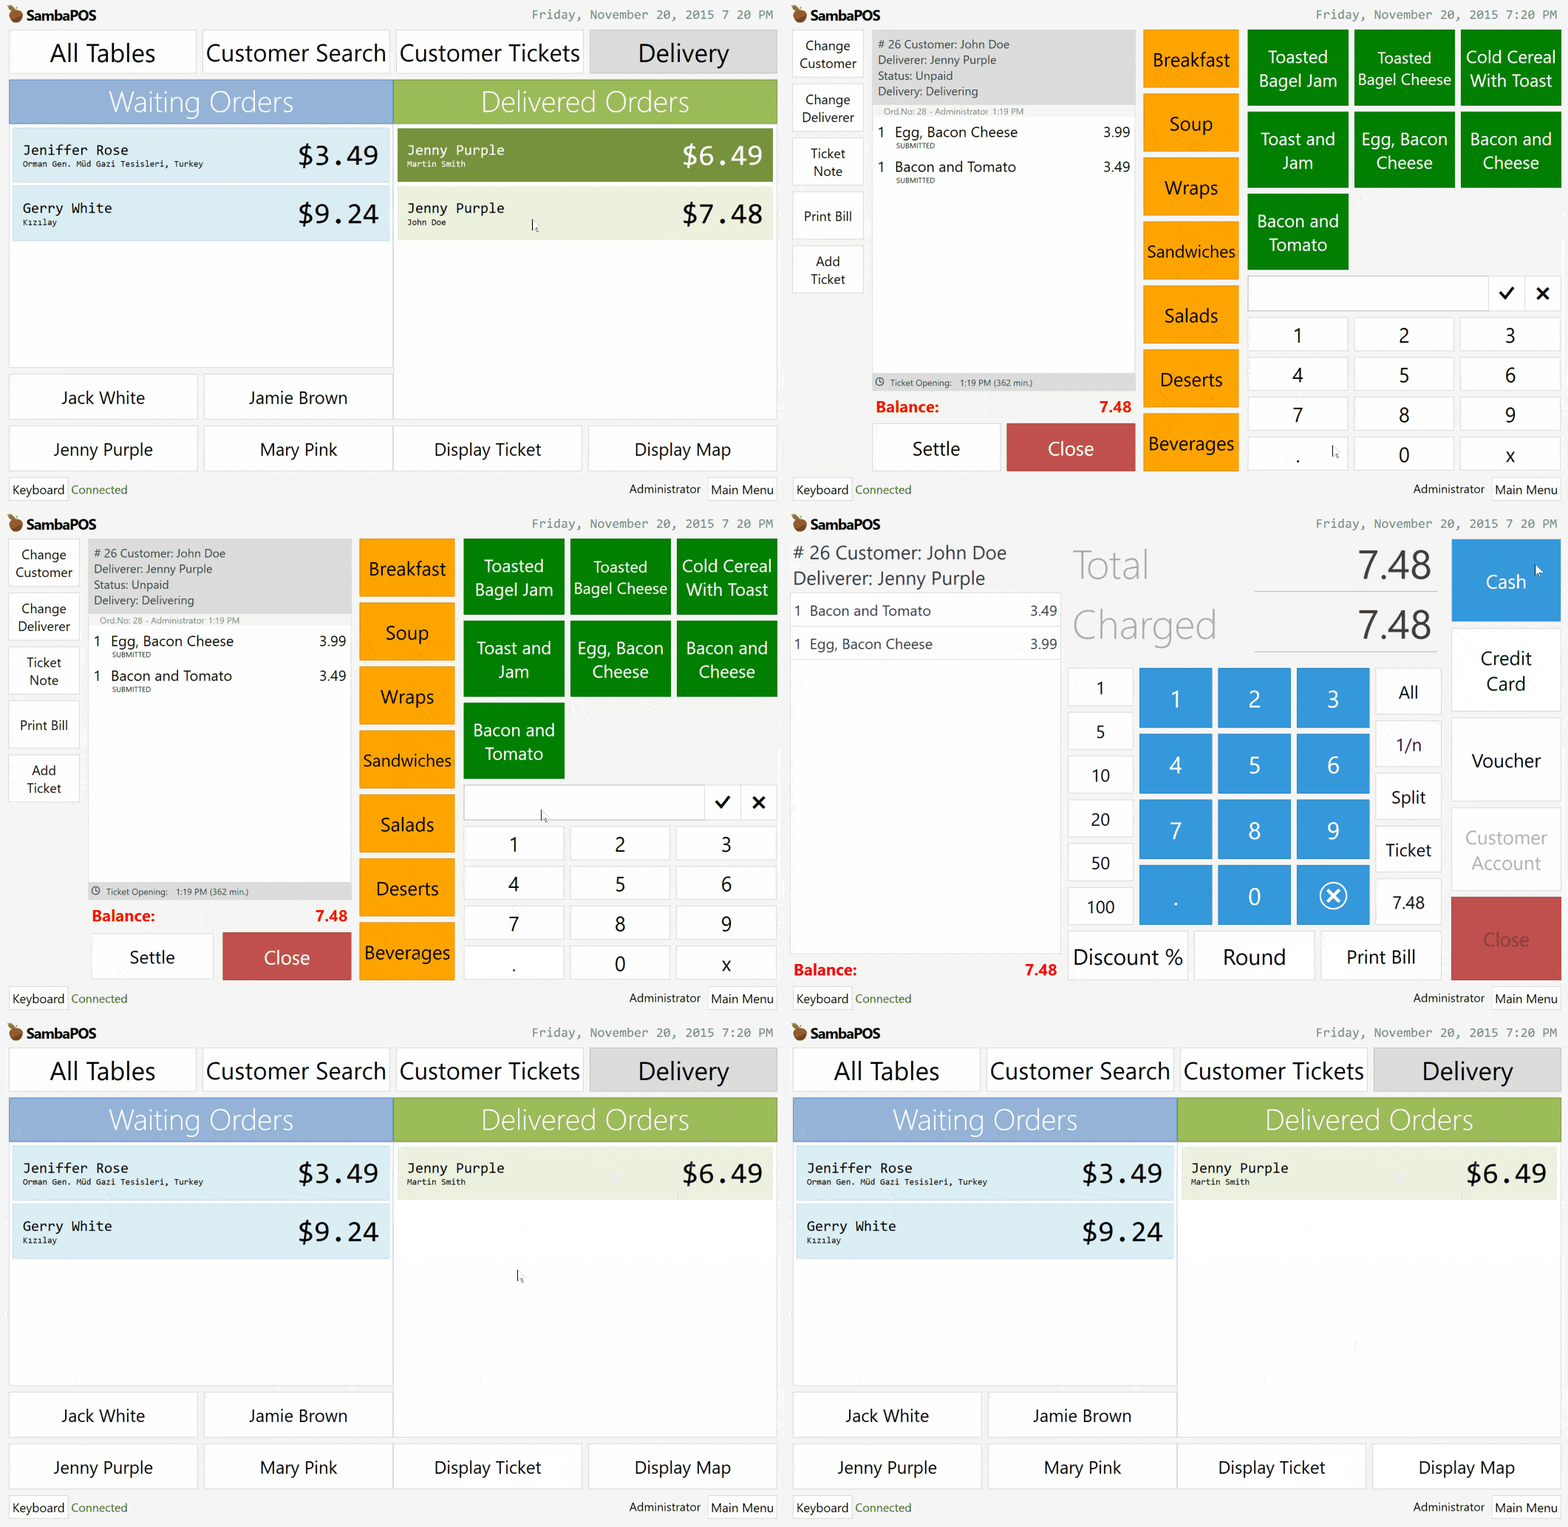
##Further Improvements
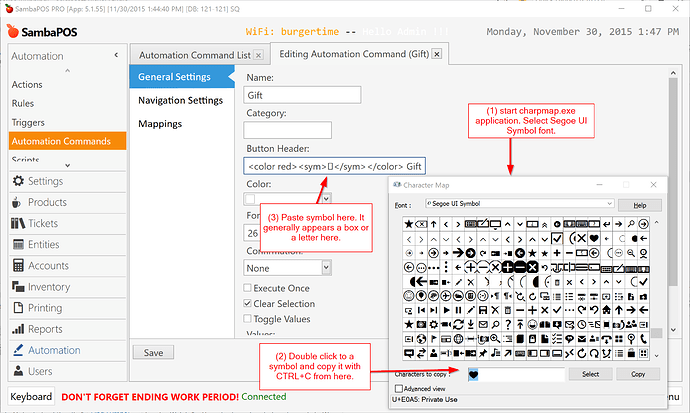
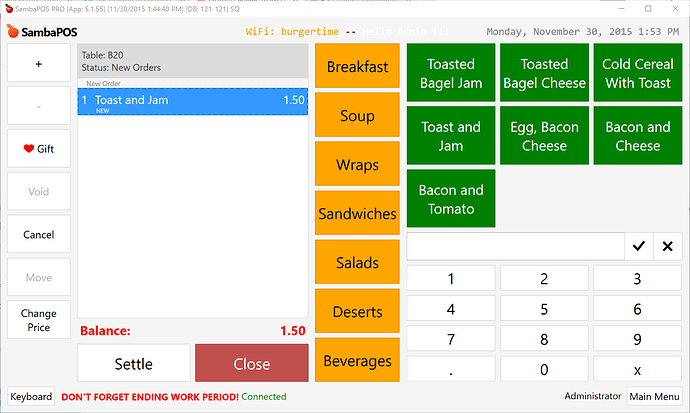
This is the end of this tutorial. Depending on your needs you can add Entity Search Widgets for Customers or Deliverers to be able to search them directly on this screen or add some icons in front of command buttons with <sym> tag to beautify your screen. Please share your ideas with us.
 , how about tutorials for fixing
 .
.
 , it works.
