Ok I managed to get the LED8 display I have working! I have it set up similar as you requested, except I added within the logic I already have (as I have a different customer display so I just added on the execute print job actions to those existing rules I had).
With the model I got, I ran into a few problems, one is the baud rate which I posted separately, still unresolved so this could be a problem, I might have a workaround for that but rather wait to see what others come back with on that separate issue. That aside, this display for some reason will only take one line command per print job, i.e. I cannot clear the display AND add the ticket total, I must do it in 2 separate print jobs. If you add multiple lines in the template it just ignores all but the last line. Therefore, I created multiple additional print templates, print jobs and actions and they must be added in order, e.g.
- Clear Customer Display
- Update Customer Display (ticket total, change, etc)
- (optional) Turn on price / total / collect / change light
This is the only way I could do it, tried other ways to no success.
My basic logic / flow for customer display, amended for this LED8:
- Create / open existing ticket - display shows total with total light
- Add order to ticket - display shows individual item price and quantity separated by “-”. Note this display will ignore any space character, and only other character I can use other than number is “-”. You can change this how you want if you don’t want quantity shown or if you want to show order total * quantity. I felt adding quantity was a nice touch but there is not a lot you can do with the limitations of this display.
- Go to Settle / payment screen - display shows total with total light
- Add part payment (skipped if only one payment type used) - display shows amount paid with collect light
- After payment made - display shows change and change light
- Close ticket / logout - clears display
So here is a video of it working:
Quick Overview Guide
Ok so I am not going to explain here the various rules you have to set up to use a customer display, as this is explained in detail in this tutorial by @QMcKay , which I suggest you read through first. I will also try to keep this short with regards to steps you will have learnt in the tutorial, and will go into more detail about dealing with this specific type of customer display.
There are a few quirks I have had with this LED8 customer display, such as:
- Baud rate defaults to 2400 baud, but because SambaPOS appears to expect 9600 baud, it won’t work immediately unless there is another fix for this later on, However I have a workaround for this that I will post at the end.
- This display only supports numeric characters, the “-” character and decimal point “.”. It does not appear to support the space character, so any spacing would require use of commands. One quirk is that although the display is 8 characters x 1 line, the decimal point is not considered one of those 8 characters (just like on a typical calculator), so this may cause issues with long numbers - I have not tested that.
- Display will only take 1 line of commands / text per print job. So, you have to have separate print jobs for each command you want to send (more below).
- Display ignores all formatting tags. I cannot get
<R>to work to right align the numbers (likely because it doesn’t support the space character). Also,<J>to justify (e.g.<J>|10.00) throws an error. You could try using some calculation or JScript function (in V5) but likely you will run into problems due to point 2 and 3 above if tried.
I’ve used this manual I found online for reference of the command codes for this display. The manual is not for the model I have, but it worked. Likely it will work with yours too, but no guarantee! ![]()
Ok so here goes…
Create Printer
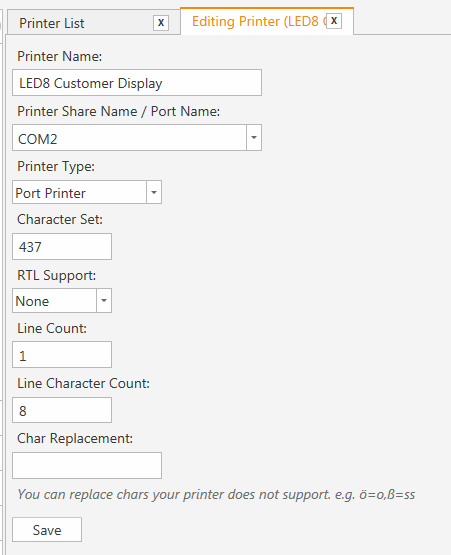
Change COM port to whichever one you connect to. Set line count to 1 and line character count to 8.

Create Printer Templates for Commands
You will need to create a few Printer Templates for printer commands:

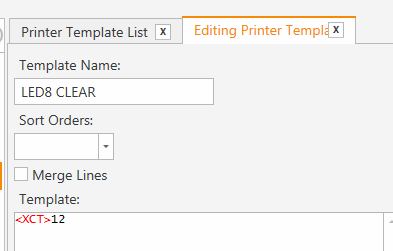
LED8 Clear (to clear the display)
<XCT>12
LED8 Light ON (create one each for Price / Total / Collect / Change)
<XCT>27,115,49 - Price
<XCT>27,115,50 - Total
<XCT>27,115,51 - Collect
<XCT>27,115,52 - Change
There is also a command to turn off all lights, however it is not needed as the Clear command does this too. For clarification, I am referring to the “lights” as these 4 text lights that appear below the digits:

Create Print Jobs & Actions for Commands
You need to create a Print Job and an associated Execute Print Job Action for each of the above Printer Templates. Refer to the tutorial I referenced above if you need full instructions on how to do this.
Printer Templates suggested for the LED8 customer display
If you follow the tutorial referenced above, you will create a number of Printer Templates to display on your customer display. Here are my suggestions for this model:
LED8 Items - to display item price & quantity
{ORDERS}

[ORDERS]
{TOTAL}-{QUANTITY}
LED8 Total - to display ticket total
{TICKET TOTAL}
LED8 Payment - to display payments made in payment screen
{PAYMENTS}

[PAYMENTS]
{TENDERED}
LED8 Paid - to display change
{CHANGE TOTAL}
Additional Actions when creating Rules for displaying on customer display
When you create your Rules to display various output to the customer display, you must add additional Actions on the Rule to send commands as well.
Example 1: Displaying Item price / quantity
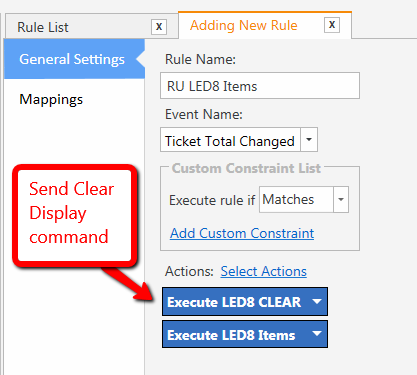
For any Rule where you send text to the customer display, you must first clear the display. You do this by adding your “LED8 Clear” action first before your action to send the text.

Example 2: Displaying Total
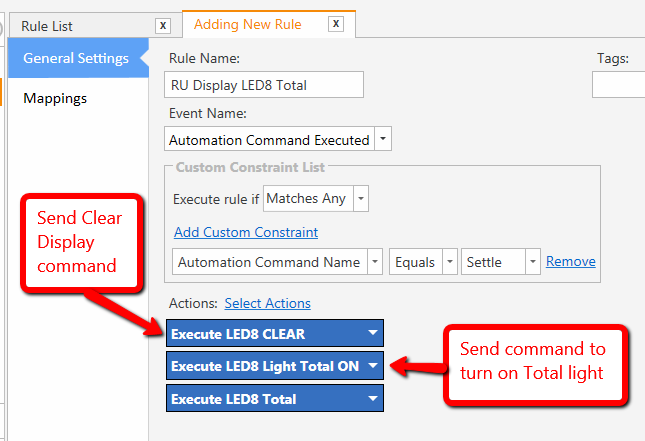
If you also want to turn on one of the lights under the digits, you must in addition add the relevant action AFTER your clear action (if you add it before the clear, the clear action will turn off the light).

So with the above combined with the main tutorial, you should have your LED8 customer display working with SambaPOS! ![]()
Workaround for Baud Rate Issue
For dealing with the issue where it appears not possible to get SambaPOS to use 2400 baud (the default setting on my LED8 customer display) regardless of the Windows setting for the COM port, I have devised a workaround to set the customer display to work on 9600 baud mode. The model I have resets back to 2400 baud each time it is turned on or reset, so typically you will need to repeat this process each time you restart your system. I recommend putting commands into a .bat file then setting to run on startup.
For those who just want the solution quickly, I have put together a batch script along with 2 text files that contain the control codes to send to the customer display to change the baud rate and to clear the display. You can download it here:
init_led8.zip (450 Bytes)
You just need to edit the “init_led8.bat” file to change the COM port to the one you have connected your customer display to. For example, if you have connected to COM3, change all references of COM2 to COM3.
For those who want more information on how this works, here goes:
- You need to be able to send control codes to the customer display from the command prompt. You cannot type these codes directly on your keyboard, however you can use the MSDOS based Edit command (included in all versions of Windows) to create a text file containing these control codes. You can read a full guide here on how to do this, but basically from command prompt you just run “Edit”, then you will be presented with the editor tool. For example, to create the control code to clear the display (ASCII code in decimal - 12), press Ctrl+P, then hold down Alt and type 12, then release the Alt key. You will then see a single character / symbol appear. Save this file with whatever name you wish. You will need 2 of these files - one to set the baud rate to 9600 and another to clear the display. Refer to the PDF manual link above for the control codes I used.
- I suggest you create a batch file and add all commands there (available in the download above). But I will detail the steps here you can follow manually to learn how it works.
From command prompt, type:MODE COM2 2400, N, 8,1
(replace COM2 with the COM port you have connected the customer display to).
This will set the COM port to match the current baud rate (2400) of the customer display. If you don’t do this, you cannot communicate with the device. - Type
copy /b set9600.dat COM2:- this copies the file you created in step 1 (here namedset9600.dat) to send the control code to set the device to 9600 baud. My customer display then shows a confirmation message like this:
- As you have now changed the baud rate of the device, you must also change the baud rate of the COM port to match that of the device, so you can continue communicating with the device. Type
MODE COM2 9600, N, 8,1to set the COM port to 9600 baud
(replace COM2 with the COM port you have connected the customer display to). - Finally, type
copy /b clr.dat COM2:- this copies the other file you created in step 1 (here namedclr.dat) to send the control code to clear the display. This step isn’t mandatory, but is good to clear off any confirmation message left on the customer display after step 3. If no such message is shown on your device, you can skip this step.
That’s it! ![]()
Thanks @Thala for the original question ![]() I’ve been meaning to try out the LED8 customer display I bought on a whim when visiting a supplier in China a couple years back. Hope this guide is useful to others as well!
I’ve been meaning to try out the LED8 customer display I bought on a whim when visiting a supplier in China a couple years back. Hope this guide is useful to others as well! ![]()
