So super simple, youll wonder why you never set this up before!
2 Likes
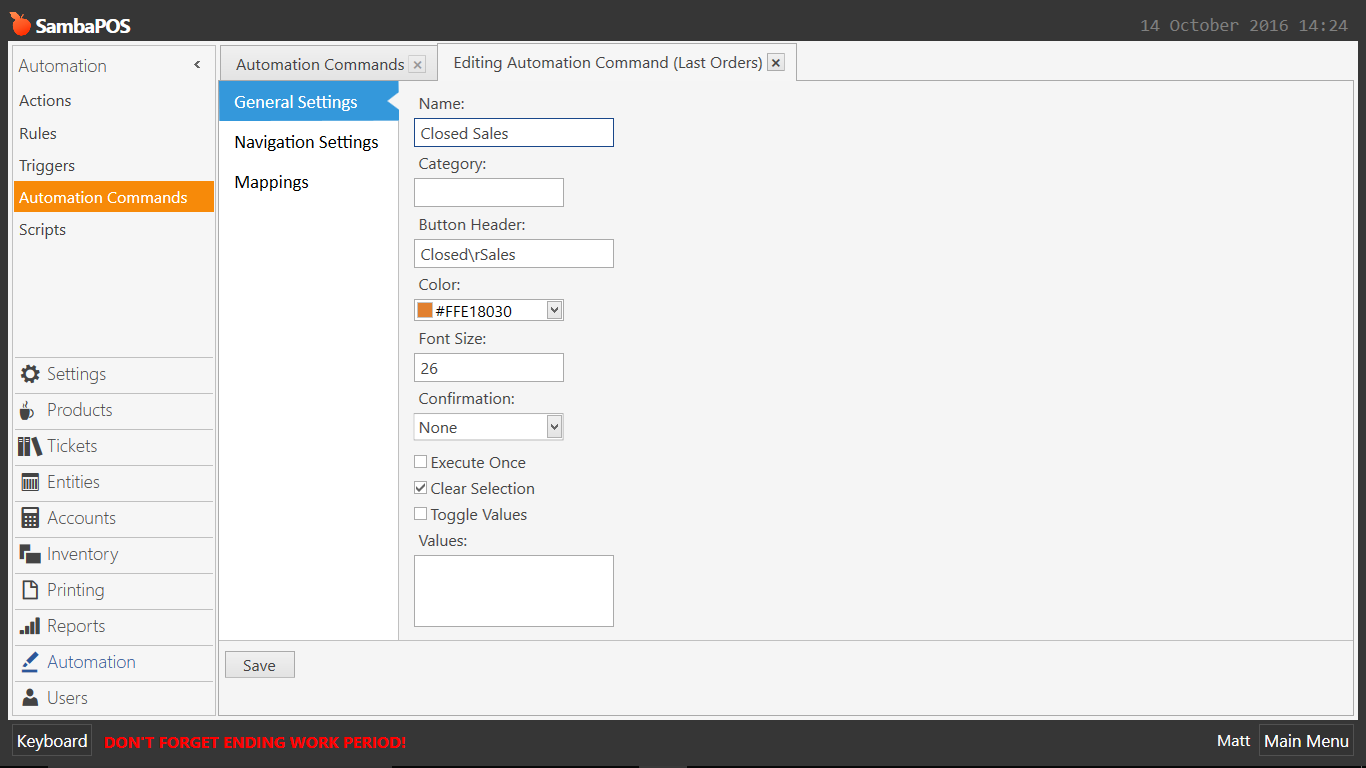
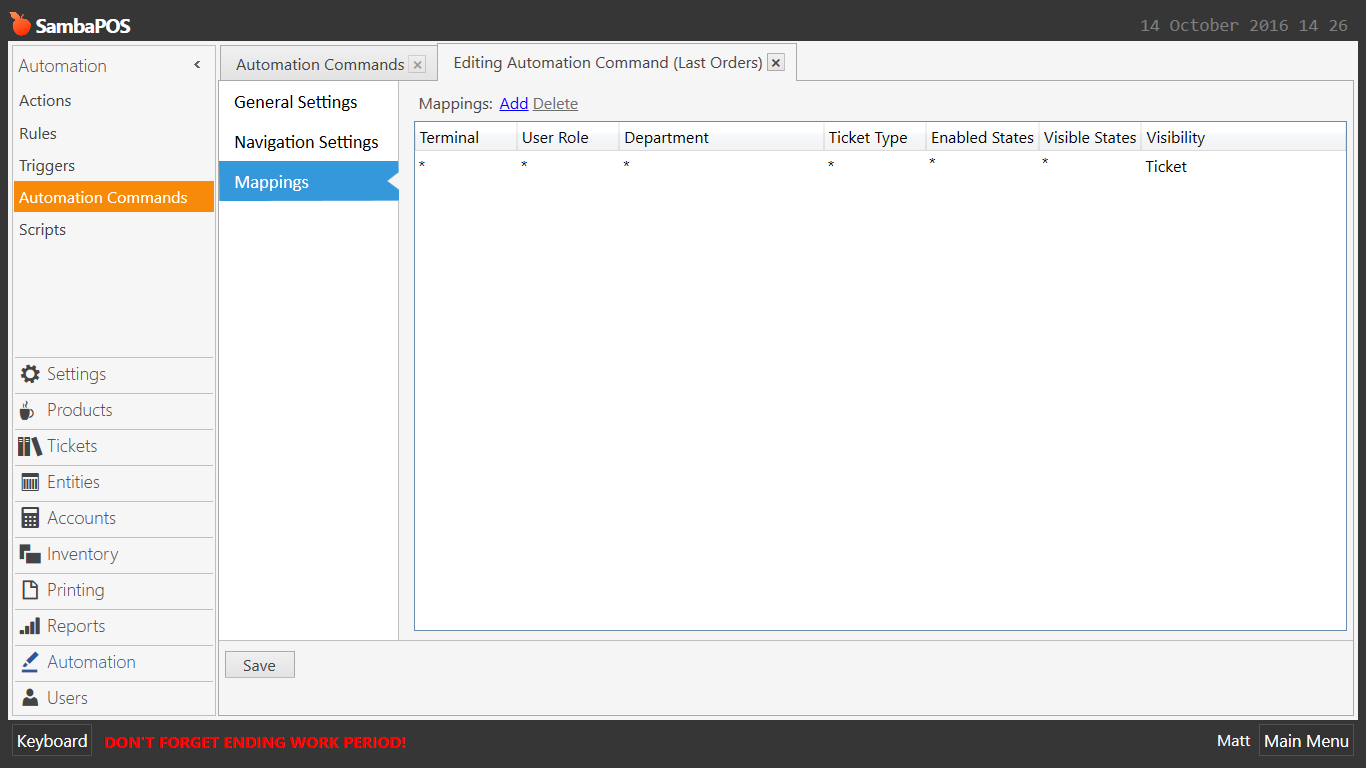
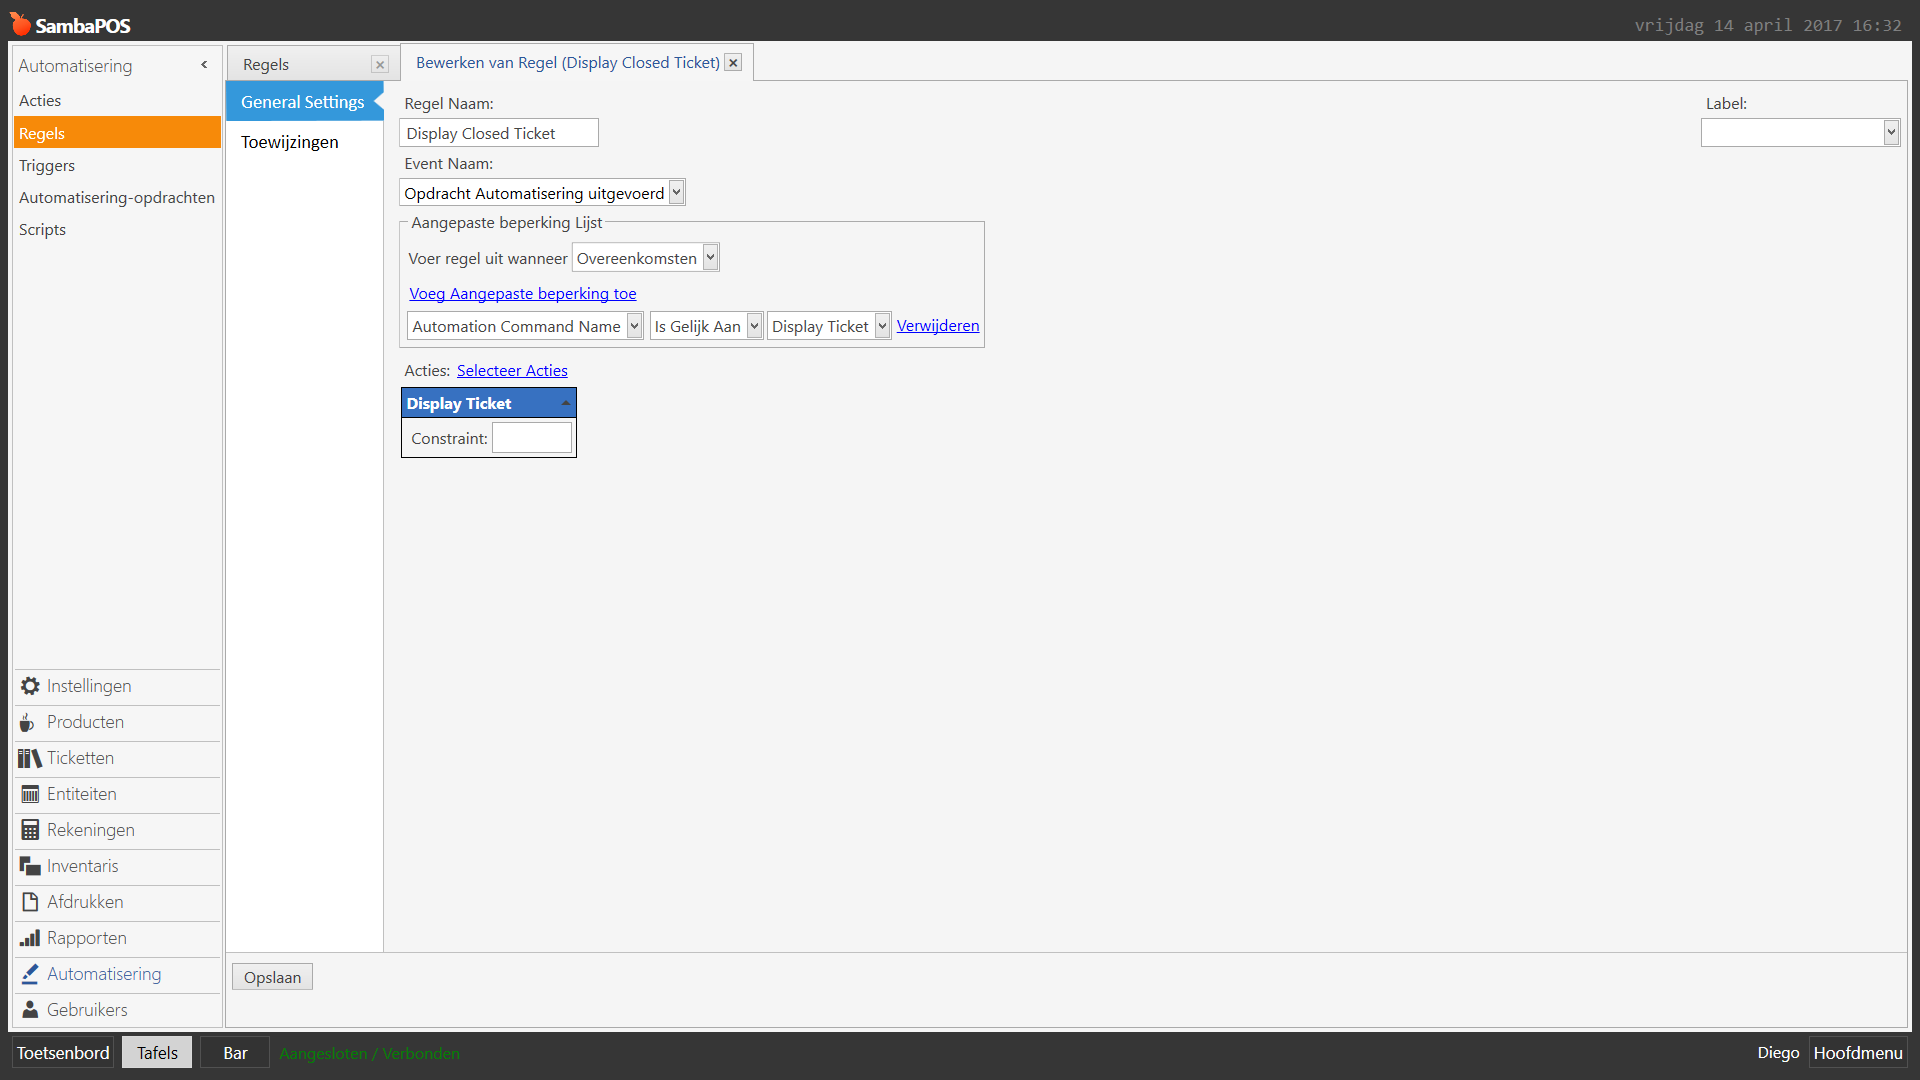
Create an Automation Command
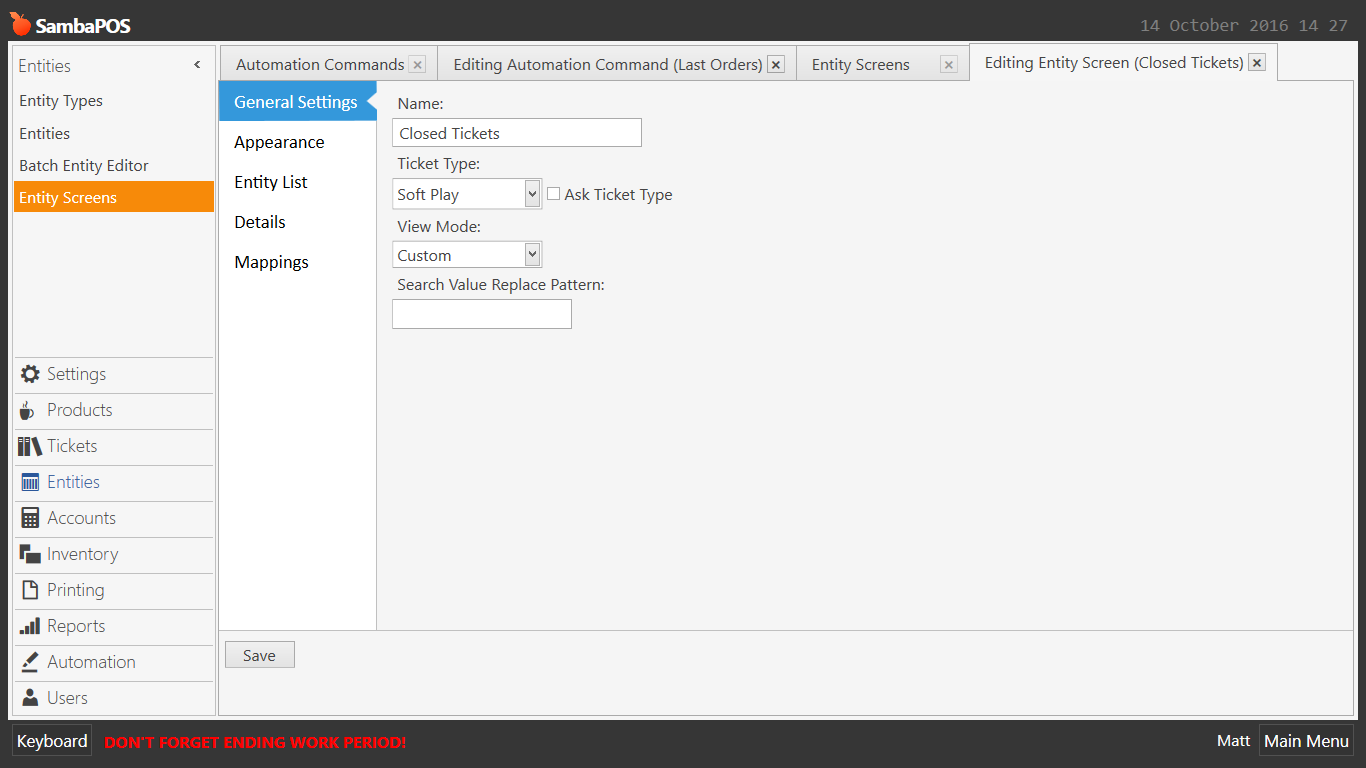
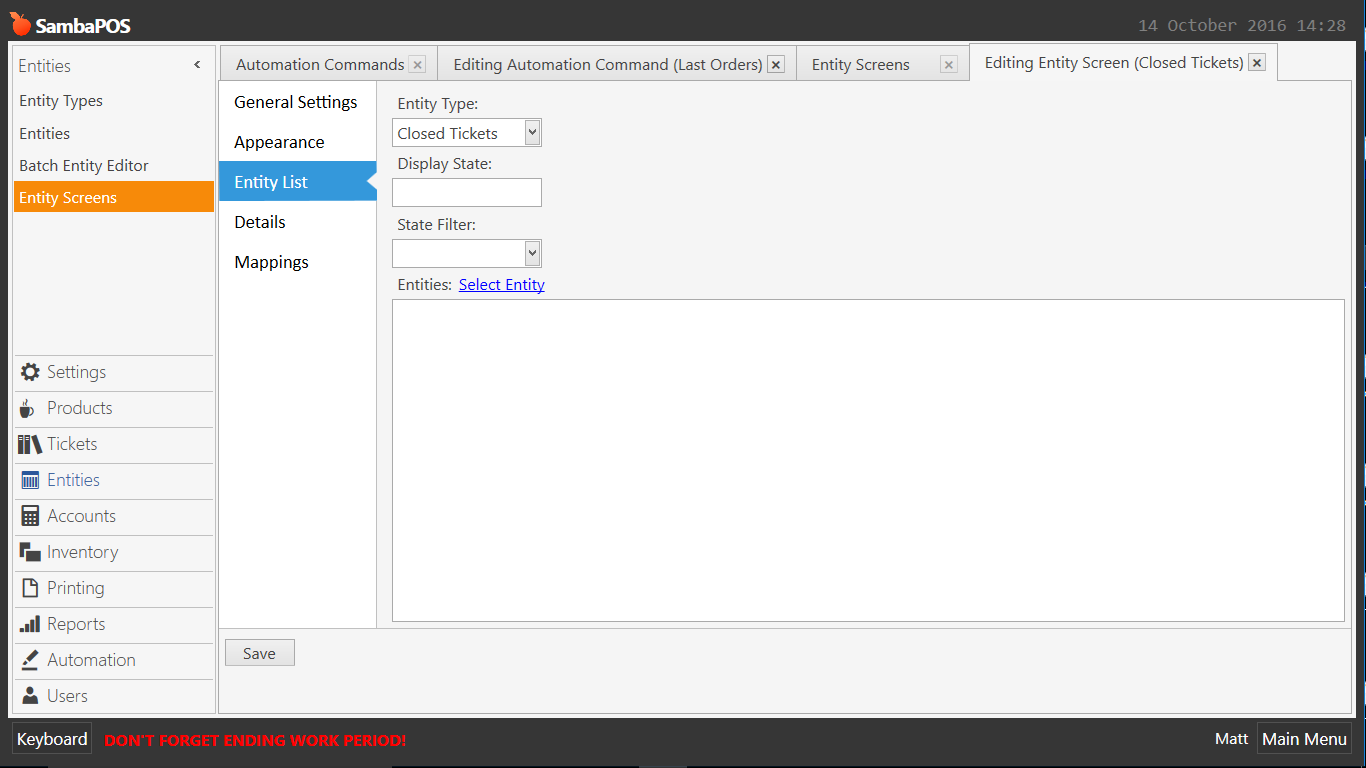
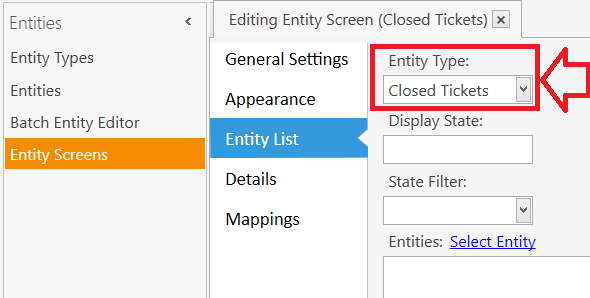
Create an entity screen

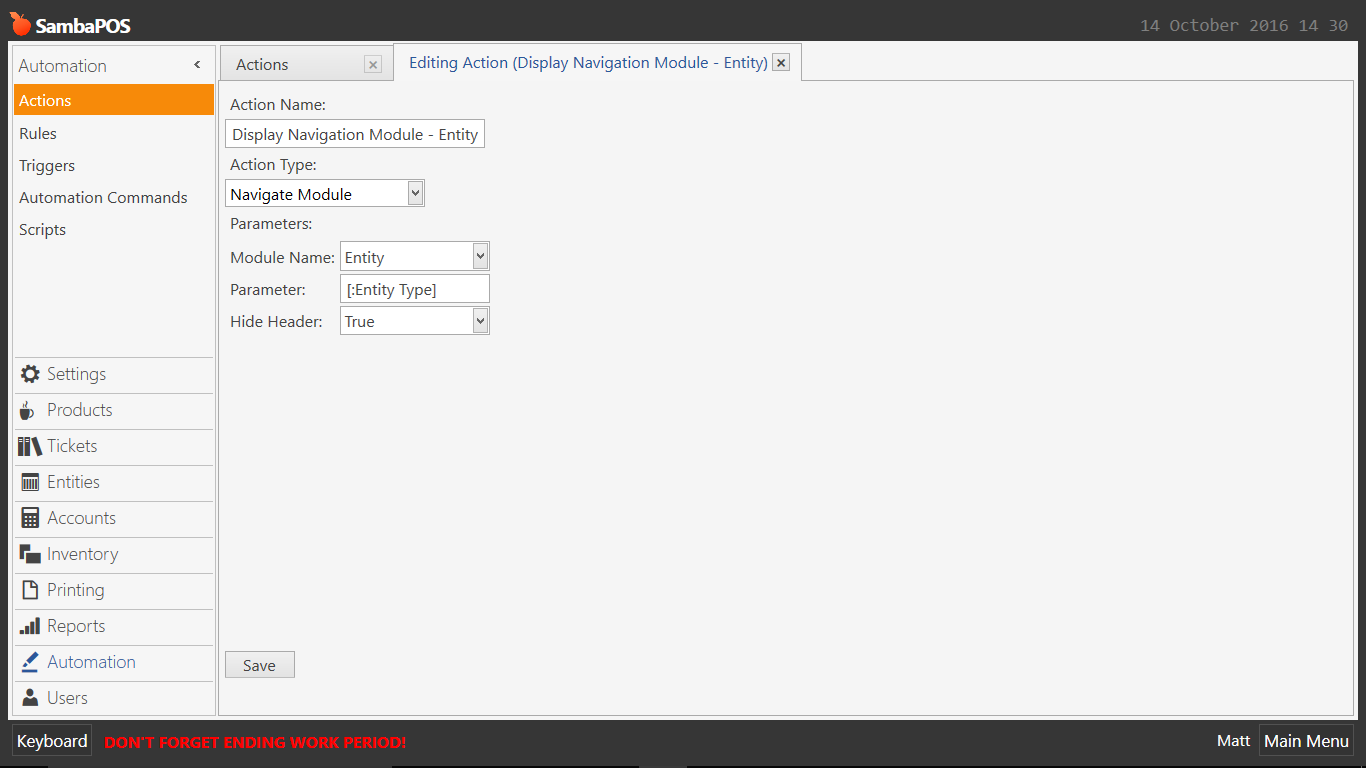
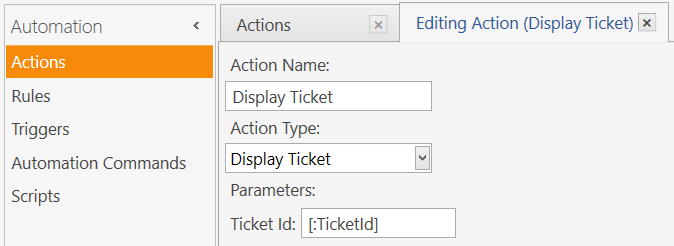
Create an action
and rule to fire that action, and show the entity screen

Now, ive shown you screen shots of what to do because the above is pretty simple…
The next is a little tricky. Its all about setting it up so it lists properly.
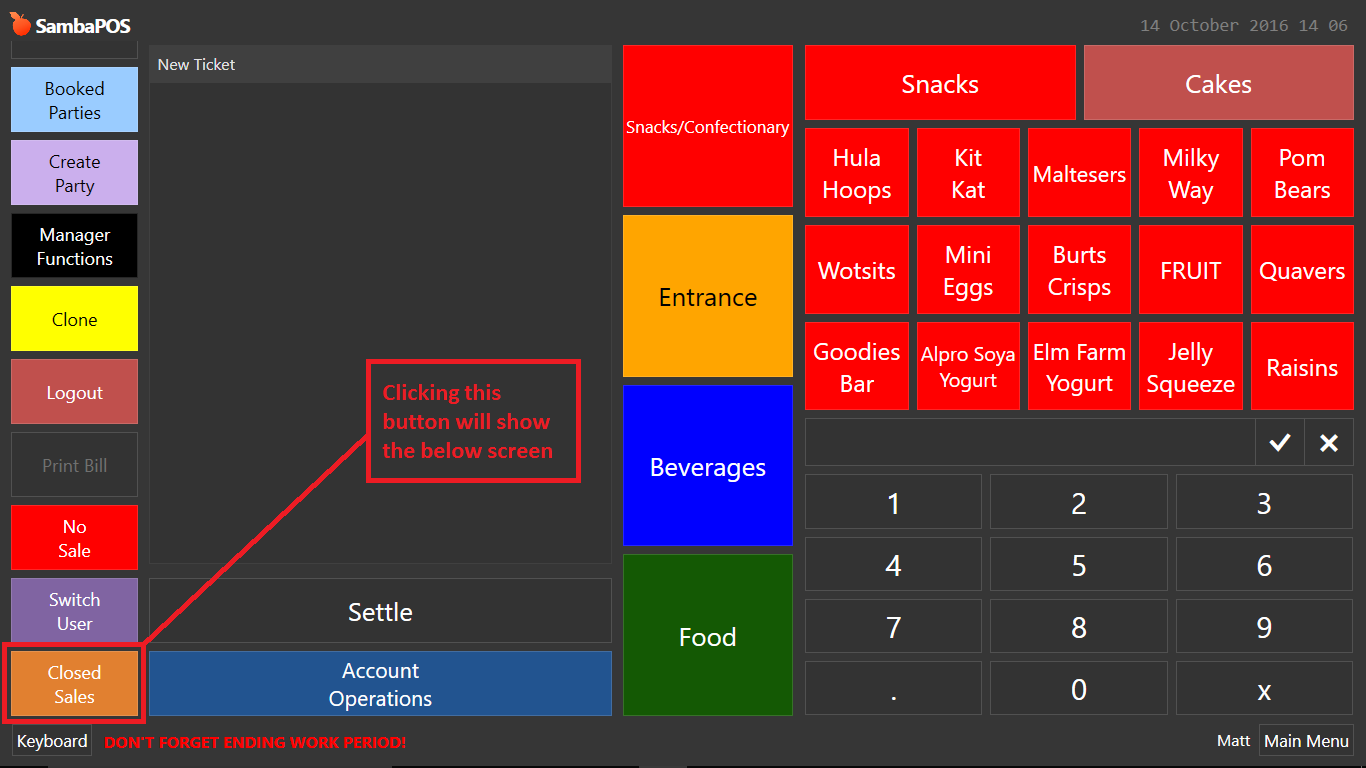
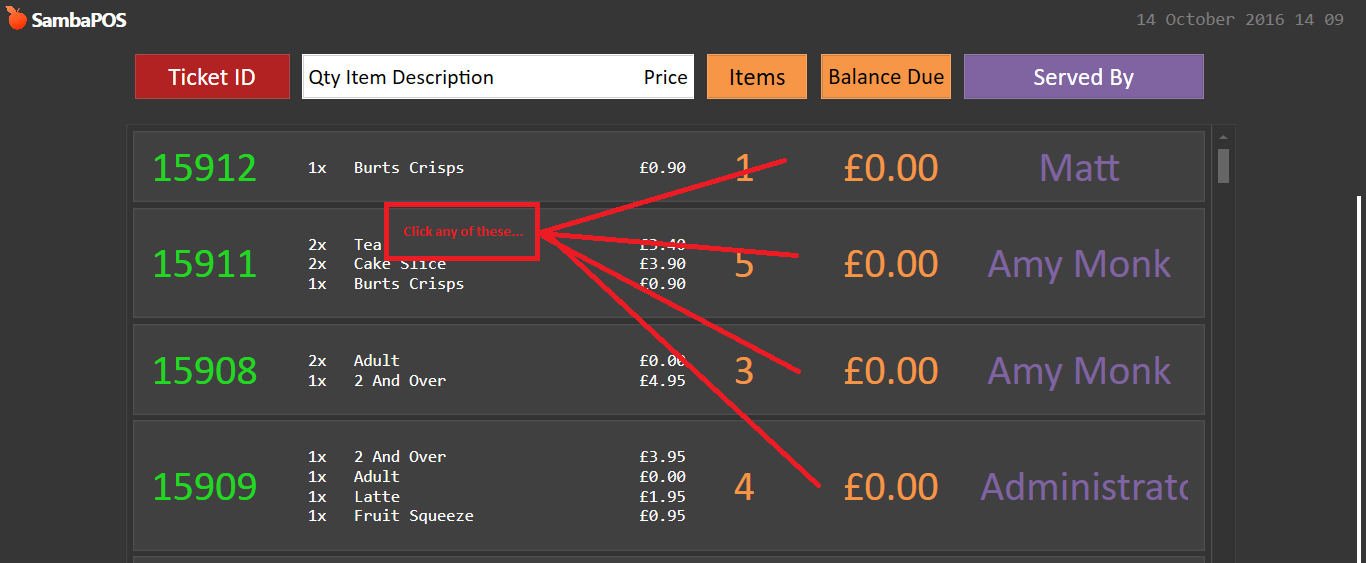
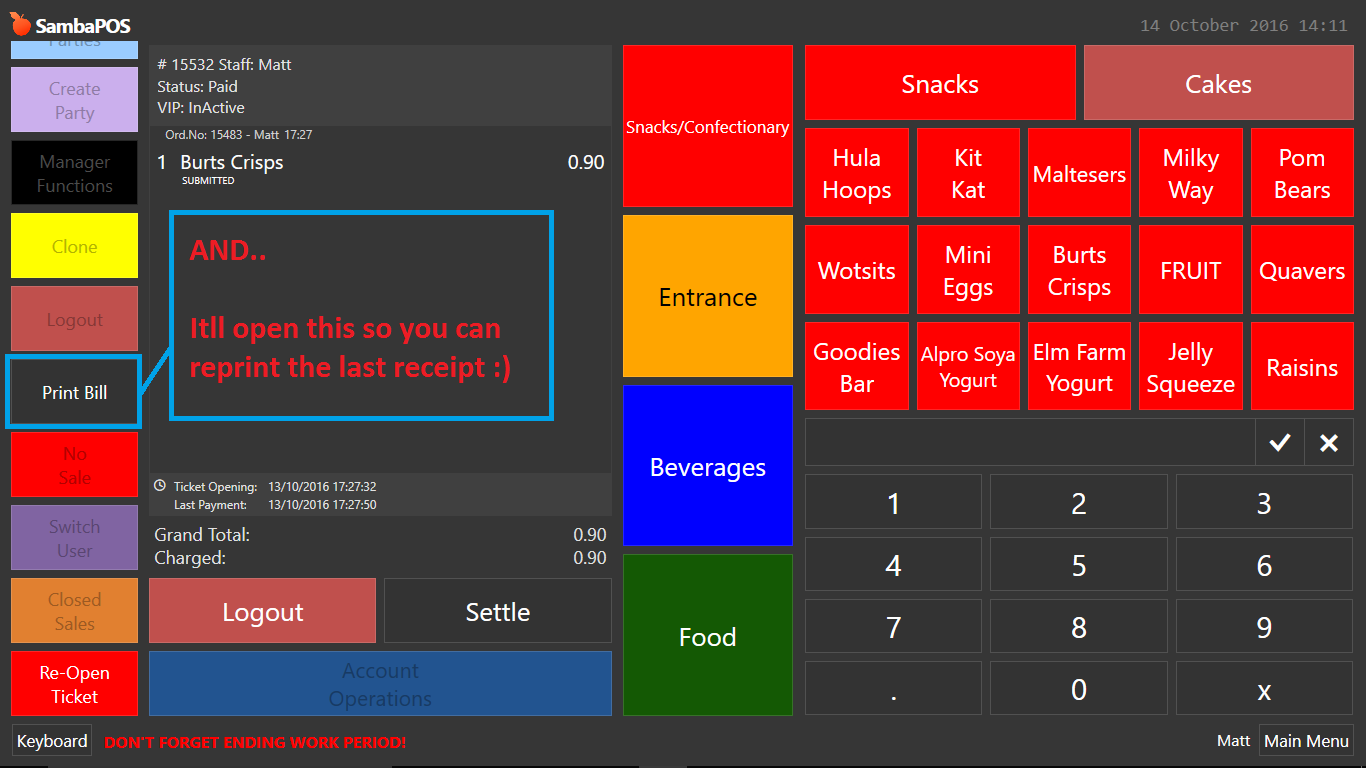
Go to your POS screen and click the ‘Closed Sales’ button we just created, and itll take you to the entity screen we also created.
Right click and you should see ‘Design Mode’, click that.
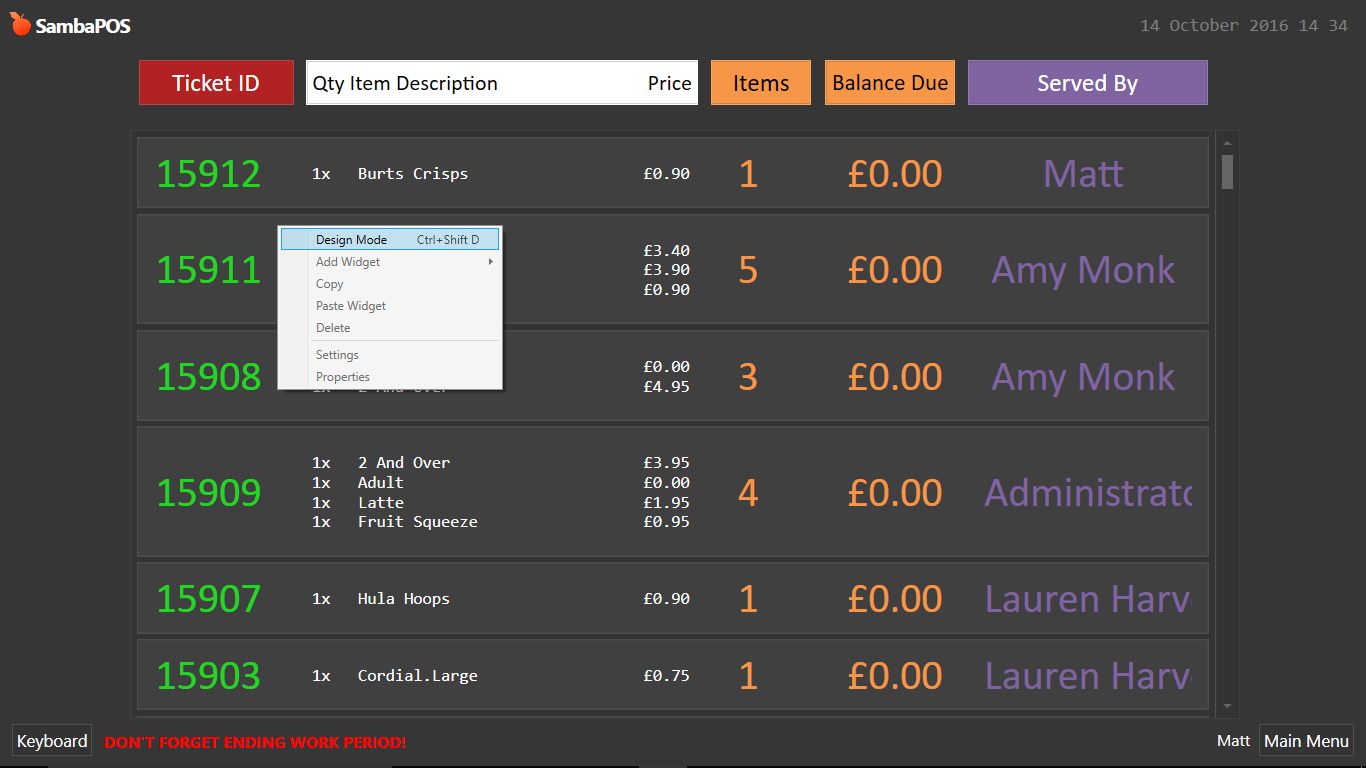
Right click, add widget > ticket lister
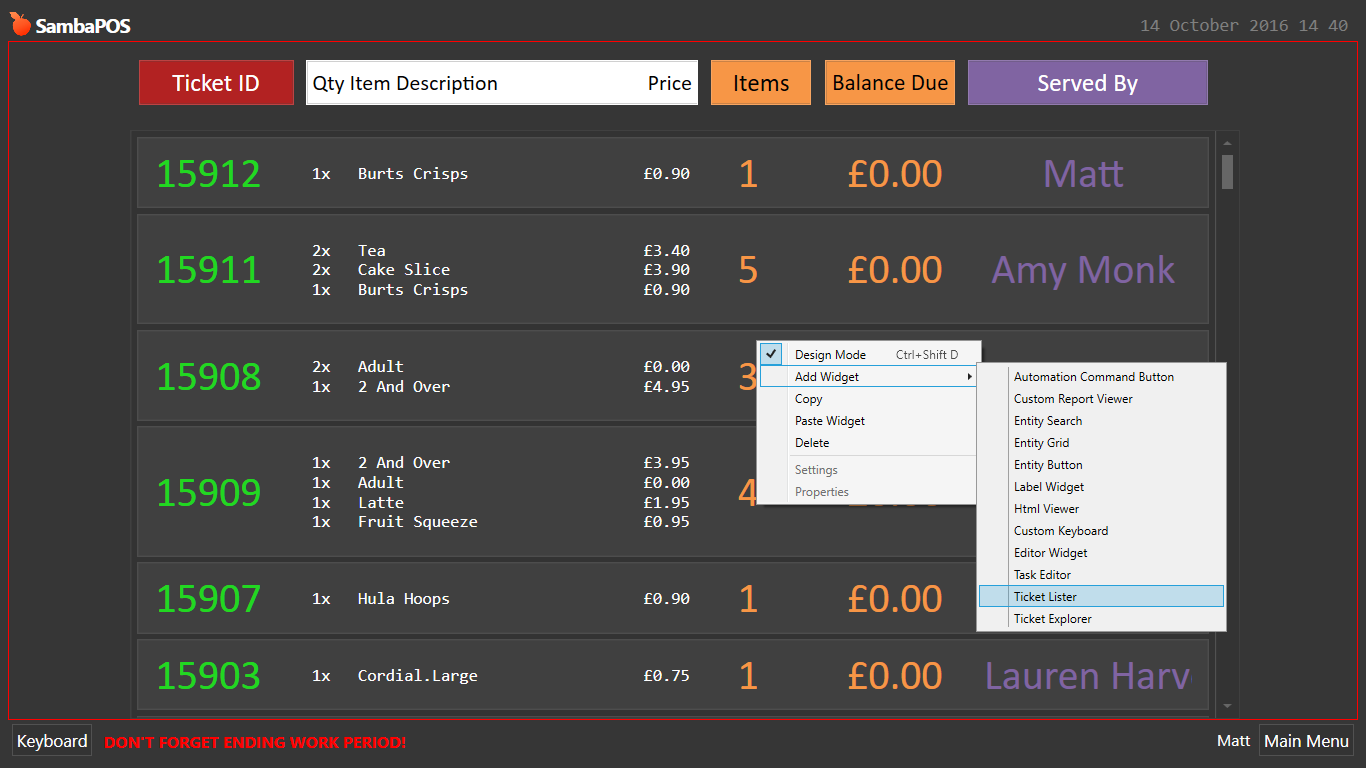
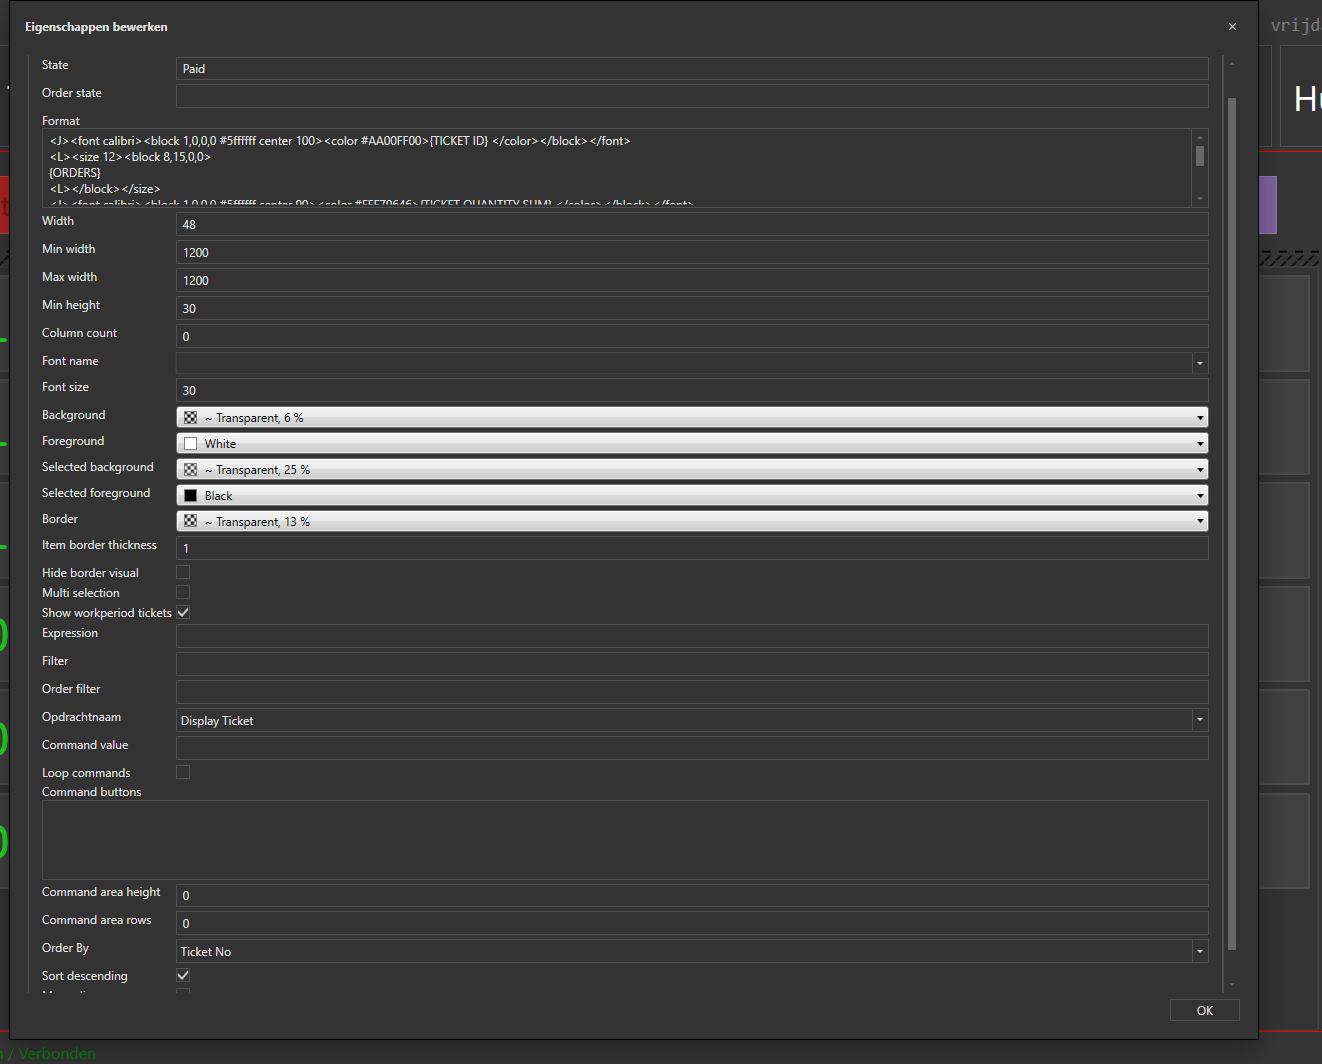
Right click over that widget and go to settings, you will see this:
State: Paid
Format:
<J><font calibri><block 1,0,0,0 #5ffffff center 100><color #AA00FF00>{TICKET ID} </color></block></font>
<L><size 12><block 8,15,0,0>
{ORDERS}
<L></block></size>
<J><font calibri><block 1,0,0,0 #5ffffff center 90><color #FFF79646>{TICKET QUANTITY SUM} </color></block></font>
<J><font calibri><block 1,0,0,0 #5ffffff center 120><color #FFF79646>£{REMAINING TOTAL} </color></block></font>
<J><font calibri><block 1,0,0,0 #5ffffff center 150><color #FF8064A2>{USER NAME} </color></block></font>

[ORDERS]
<J>  [=('{QUANTITY}x' + "    ").substring(0, 4)] {NAME}|£{TOTAL AMOUNT}<br/>
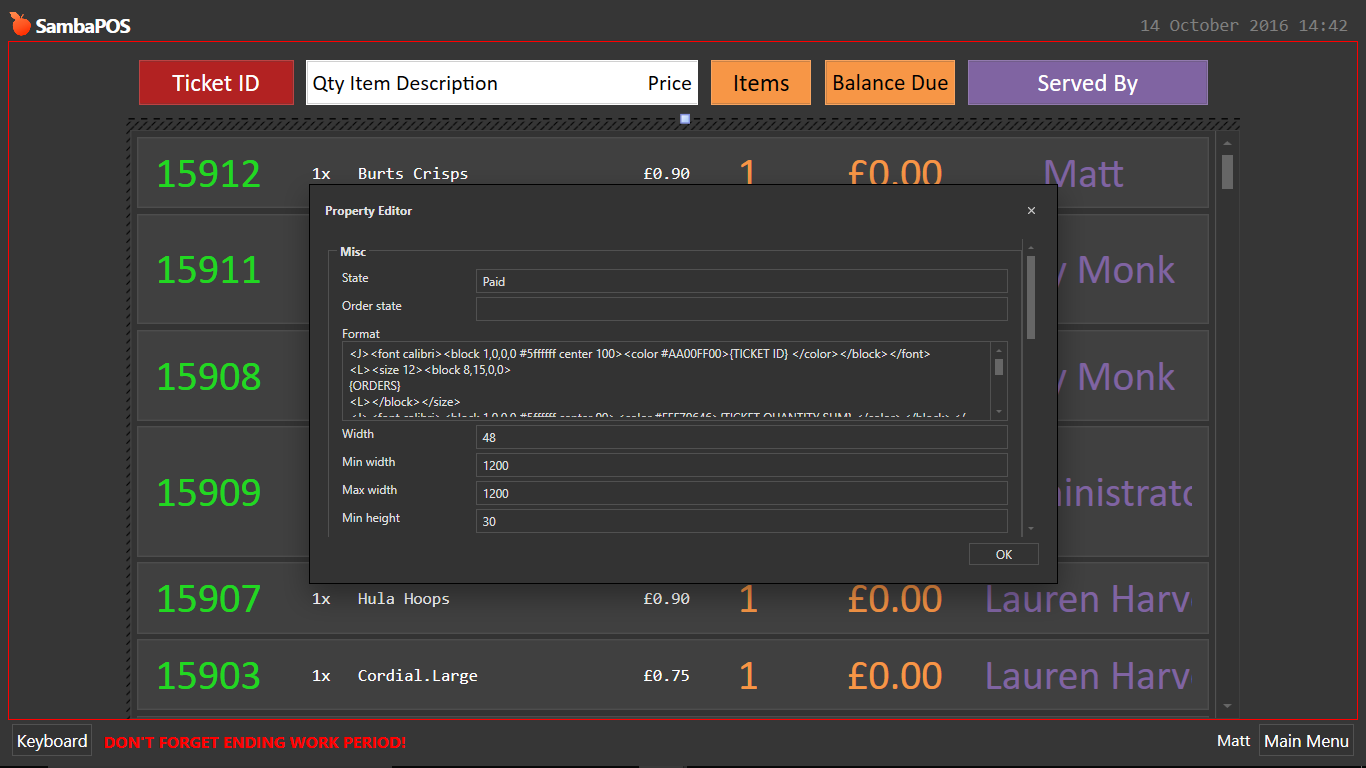
Width: 48
Min Width: 1200
Max Width: 1200
Min Height: 30
Font Size: 30
check the box Show Workperiod Tickets
Command Name: Display Ticket
Order By: Ticket No
and check Sort Descending
click OK
Now right click and go to ‘Properties’
X = 3
Y = 63
Height = 422
Width = 795
Scale = 1
Check ‘Auto Refresh’
Click OK.
Right click and go to ‘Add Widget’ and select ‘Automation Command Button’
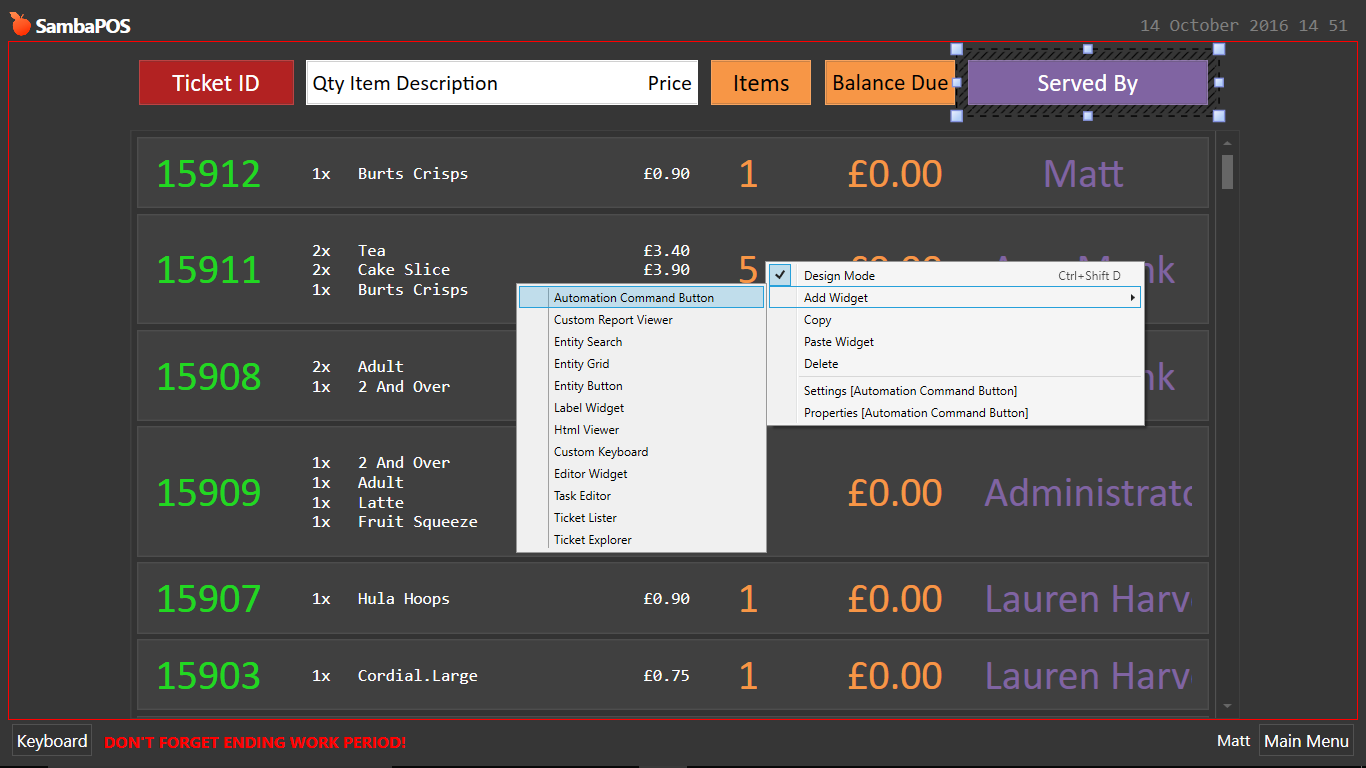
right click that button:
Settings:
Caption <font calibri>Served By</font>
Button Color SlateGray
Font Size 18
Properties:
X = 603
Y = 13
Height = 32
Width = 172
OK
Create another Automation Command Button:
Settings:
Caption: <font calibri>Balance Due</font>
Color: Coral
Font Size: 18
Properties:
X = 501
Y = 13
Height = 32
Width = 93
OK
New Automation Command Button:
Settings:
Caption: <font calibri>Items</font>
Color: Coral
Font Size 18
Properties:
X = 419
Y = 13
Height = 32
Width = 72
Another Automation Command Button:
Settings:
Caption: <font calibri>Qty Item Description Price</font>
^^ include the spaces, this will make a difference^^
Button Color: White
Font Size: 18
Properties:
X = 129
Y = 13
Height = 32
Width = 281
OK
Another Automation Command Button:
Settings:
Caption: <font calibri>Ticket ID</font>
Color: FireBrick
Font Size: 18
Properties:
X = 9
Y = 13
Height = 32
Width = 111
OK
Right click and select ‘Design Mode’ again and itll save changes!
You should now see your tickets being listed 
1 Like
Export File:
ClosedSales.zip (1.8 KB)
Simple you say  lol…
lol…
its only the entity screen that’s a bit of a pain, but the rest is simple enough… 1 action, 1 rule, 1 automation command, 1 entity screen… how much more simpler do you want it!!!
LOL!
nice tutorial…however I just tried to add a date filter to mine as it only showed sales for the day not for other days …more or less like a report.(thumbs up mate)
1 Like
It’s only really meant as a quick solution for those annoying customers that come back 10 minutes later and ask for a receipt. If it’s next day it would be simpler to go and search it the usual way 
loool you dont know how many people do that everytime but at least it helped you think of a solution.
@emre sa iyi çalışmlar samba 5 forumu yeni takip etmeye başladım malesef tr forumda bu gibi konular paylaşımlar yok ufak bi sorum olucak format kısmında bahsedilen TICKED ID - ORDERS - TICKET QUANTITY SUM vs. gibi kelimeleri türkçeye çevirmeme gerek varmı bunu tüm konular için soruyorum kolay gelsin
<block 1,0,0,0 #5ffffff center 100><color #AA00FF00>{TICKET ID}
<size 12><block 8,15,0,0>
{ORDERS}
<block 1,0,0,0 #5ffffff center 90><color #FFF79646>{TICKET QUANTITY SUM}
<block 1,0,0,0 #5ffffff center 120><color #FFF79646>£{REMAINING TOTAL}
<block 1,0,0,0 #5ffffff center 150><color #FF8064A2>{USER NAME}
[ORDERS]
[=(’{QUANTITY}x’ + " ").substring(0, 4)] {NAME}|£{TOTAL AMOUNT}
I know it’s been forever since you posted this, but oh my god is it going to be useful in my systems. Thanks so much for the easy explanation, everything works apart from one tiny detail.
When clicking anywhere on the ticket I want to print, it opens a fresh new ticket, instead of showing me the previously paid ticket. I figure it’s either in my Display Ticket Rule, or in the setting of the ticket widget. I’ve attached screenshots of both.
Rule
Widget settings
There is something missing in the Tutorial/Setup.
The Entity Screen uses an Entity Type called “Closed Tickets” …
Where is the setup for that Entity Type?
How does the “Closed Tickets” Entity Type get assigned to Tickets in the first place? It probably does not I suppose, since it isn’t really necessary?
Where is the Rule for “Display Ticket” ? What Actions are in that Rule? Where is the definition for the Action(s) in that Rule?
This should work for the Action and Rule:

1 Like
It’s an age since I did it.
As far as I’m aware everything is set correctly unless updates have broken it, but I doubt that as I use it daily.
When I get back to work Tuesday I’ll have a proper gander and get back to you
Matt
Correcting the Display Ticket rule fixed it. It previously opened a new ticket, but now it opens the corresponding ticket on the closed lister. Thanks man!
1 Like