Simple Shopping List using Tasks
For our shopping list we are going to need to go shopping for a few items from SambaPOS Endless Isles of Options Emporium
We are going to need:
- 1 Entity Screen
- 8 Widgets
- 1 Automation Command
- 1 Task Type
- 7 Rules
- 8 Actions
- 2 Reports
Optional:
Caffeinated Beverage of your choice
Step 1
- Preheat caffeinated beverage to desired temperature.
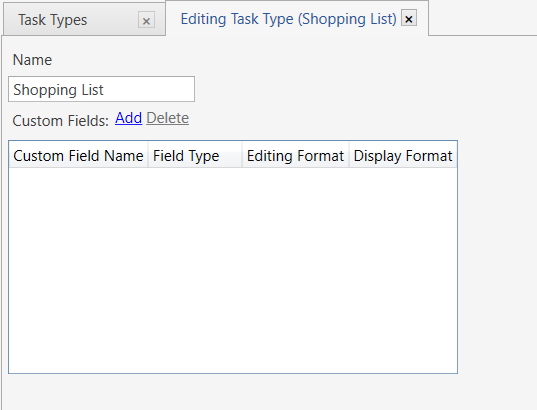
Task Type
Manage->Settings->Task Types->Add Task Type
|
|
| Name: |
Shopping List |
| Custom Fields: |
(blank)* |
* We will be defining fields in Actions.
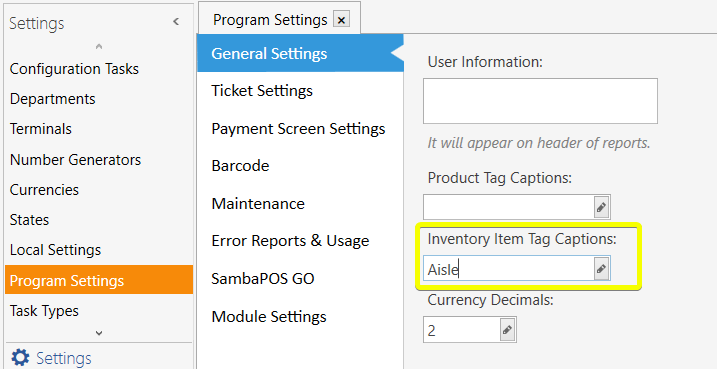
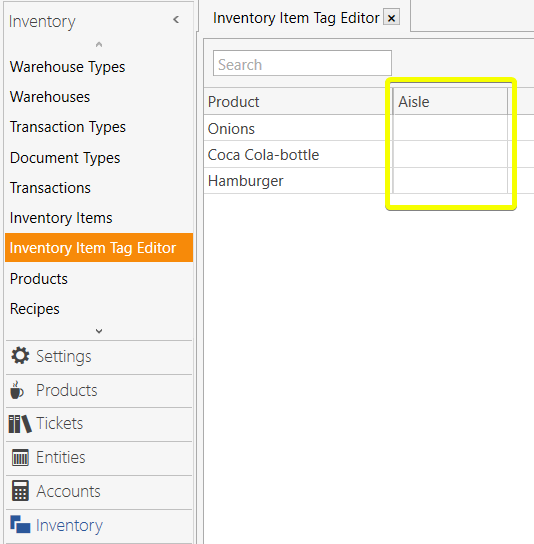
(Optional) Inventory Item Tag
Manage->Settings->Program Setting->General Settings:Inventory Item Tag Caption
If you define Inventory Item Tag, it will be available thru the Inventory section:
Manage->Inventory->Inventory Items (Individually)
or batch through:
Manage->Inventory->Inventory Item Tag Editor
Entity Screen
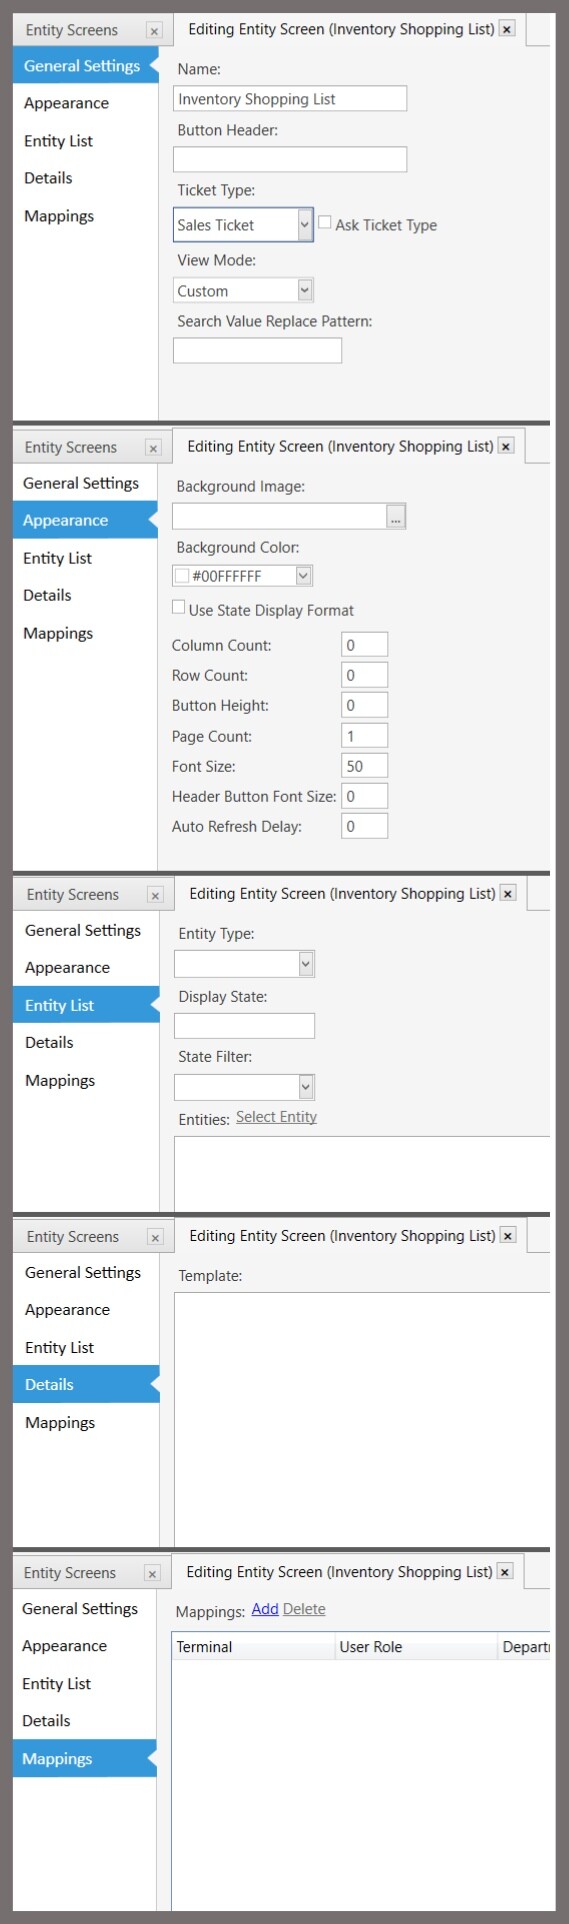
Manage->Entities->Entity Screens->Add Entity Screen
| General Settings Tab |
|
| Name: |
Inventory Shopping List |
| Button Header: |
(blank) |
| Ticket Type: |
<your default Ticket Type> |
| View Mode: |
Custom |
| Search Value Replacement Pattern: |
(blank) |
| Appearance Tab, Entity List, |
Details & Mappings Tab |
| All other fields: |
Leave as default |
Reports
Inventory Report (1 of 2)
Manage->Reports->Reports->Add Report
|
|
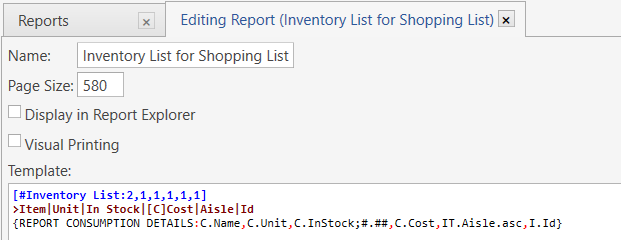
| Name: |
Inventory List for Shopping List |
| Page Size: |
580 (your size may vary) |
| Display in Report Explorer: |
unchecked |
| Visual Printing: |
unchecked |
| Template: |
(see below) |
The first report we need is a list of inventory. In addition to a list of inventory we can also add additional fields to con-inside with inventory list (example cost, warehouse, groupcode, etc). It is a good idea to give some thought to what fields would best fit your needs. I will try to provide enough information to design the system that best fits your needs.
A Normal report that is used with this tutorial looks this:
[Inventory List:2,1,1,1,1,1]
>Item|Unit|In Stock|[C]Cost|Aisle|Id
{REPORT CONSUMPTION DETAILS:C.Name,C.Unit,C.InStock;#.##,C.Cost,IT.Aisle.asc,I.Id}
However, SambaPOS a feature that we can use to make this (or any report) a powerful tool. To access this tool we need all we need to do is add a # before the report table name:
[#Inventory List:2,1,1,1,1,1]
>Item|Unit|In Stock|[C]Cost|Aisle|Id
{REPORT CONSUMPTION DETAILS:C.Name,C.Unit,C.InStock;#.##,C.Cost,IT.Aisle.asc,I.Id}
! Cost numbers will only show up when an item has been sold. That is how the Consumption report works.
This will turn our simple report into a Table View report. This is like a spreadsheet type grid, that we can select rows, search within report, adjust column sizes, sort columns while viewing, hide column and many other features.
You will notice that the field C.InStock;#.## looks different than a normal field tag. The ;#.## will format the field to show whole numbers and only decimal number if they are present. (Makes it easier to read)
! Note: Table View reports need to be saved once in order to view the results. Any changes to the report, after the initial save, can be viewed with Preview.
The Cost header is written as [C]Cost. The [C] will denote the column as Currency.
| Other useful fields for Report |
|
I.GroupCode |
GroupCode of Item |
| `I.Barcode’ |
Barcode of inventory product |
IT.<inventory item tag> |
User created Item Tag |
! Inventory Item Tag fields could be used to save the location of the item of the store you are shopping at, such as aisle, department or section.
Define the Inventory Item Tag column header at:
Manage->Settings->Program Settings:Inventory Item Tag Caption
Setting each item store location can set at:
Manage->Inventory->Inventory Item Tag Editor
or at:
Manage->Inventory->Inventory Items->select each individual item
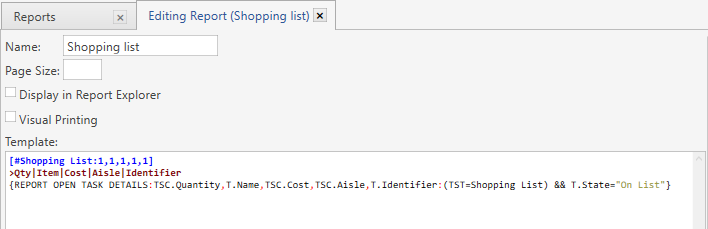
Shopping list Report (2 0f 2)
We will be using Tasks to create our shopping list. To view the list, we will need to use a Task report. (Normally this report will need to be created after the fields have been defined in Actions.)
Name: Shopping List
Page Size: (blank)
Display in Report Explorer: unchecked
Visual Printing: unchecked
[#Shopping List:1,1,1,1,1]
>Qty|Item|Cost|Aisle|Identifier
{REPORT OPEN TASK DETAILS:TSC.Quantity,T.Name,TSC.Cost,TSC.Aisle,T.Identifier:(TST=Shopping List) && T.State="On List"}
If you have a different inventory report from above, you may need to create this report later or adjust the fields after creating the fields in Actions.
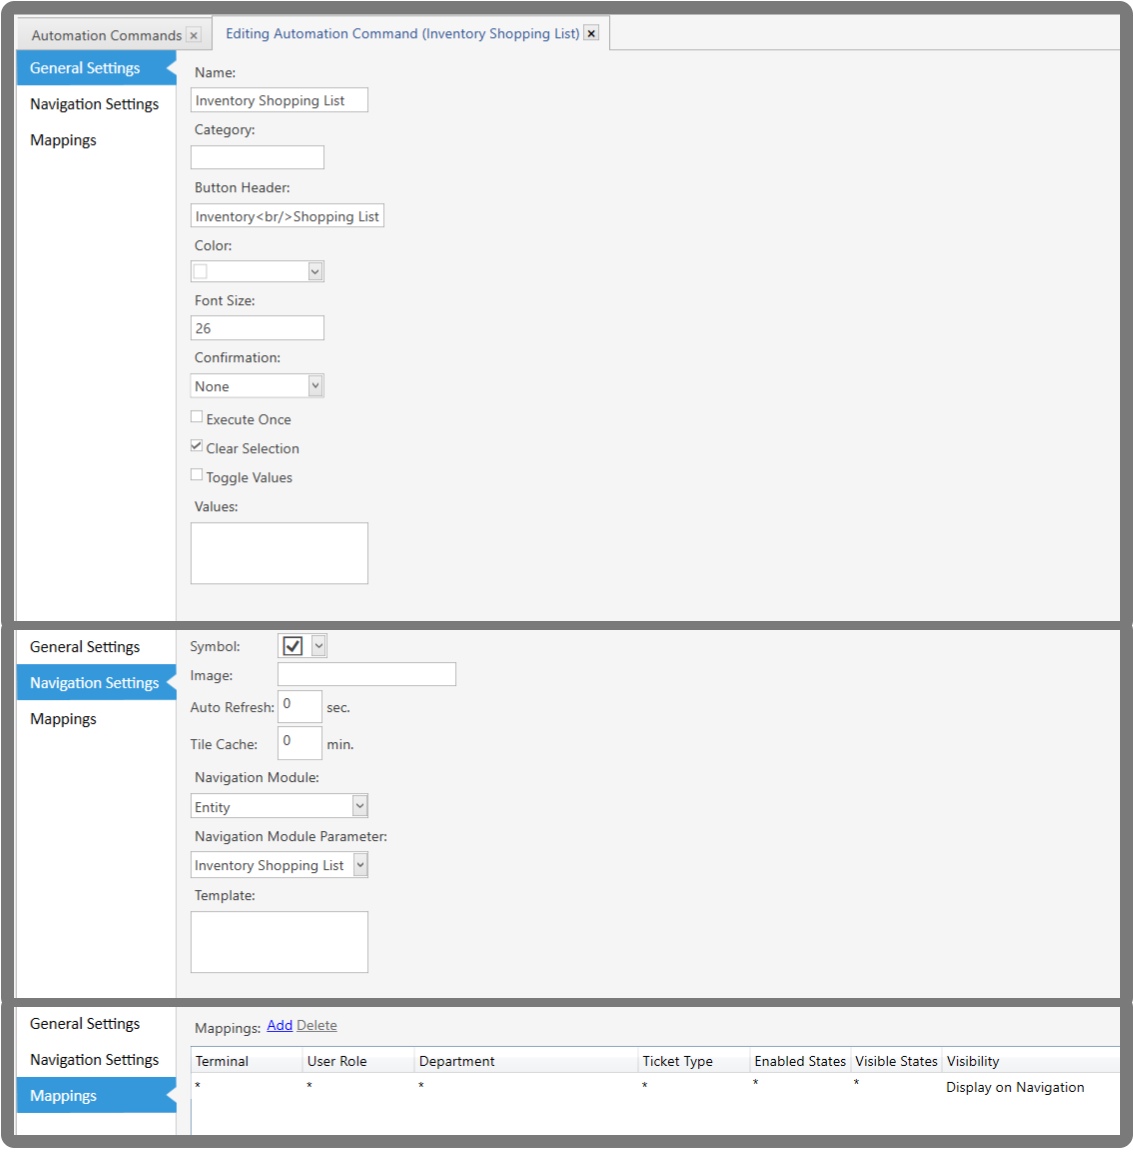
Automation Commands
Manage->Automation->Automation Commands->Add Automation Command
|
General Settings Tab |
| Name: |
Inventory Shopping List |
| Category: |
(blank) |
| Button Header: |
Inventory<br/>Shopping List |
| Color: |
default |
| Font Size: |
default |
| Confirmation: |
default |
| Execute Once: |
unchecked |
| Clear Selection: |
checked |
| Toggle Values: |
unchecked |
| Values: |
(blank) |
|
Navigation Settings Tab |
| Symbol: |
checkmark in square (or you choice) |
| Image: |
(blank) |
| Auto Refresh: |
(blank) |
| Title Cache: |
(blank) |
| Navigation Module: |
Entity |
| Navigation Module Parameters: |
Inventory Shopping List |
| Template: |
(blank) |
Mappings Tab
| Termial |
User Role |
Department |
Ticket Type |
Enabled State |
Visible State |
Visibility |
* |
* |
* |
* |
* |
* |
Display on Navigation |
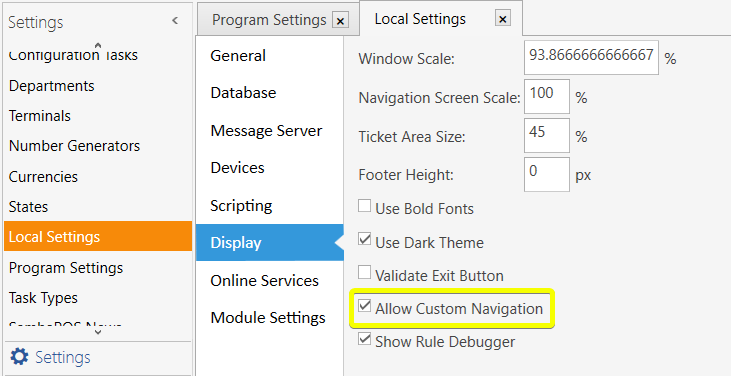
You may need to make sure Custom Navigation is enabled.
Manage->Settings->Local Settings->Display->Allow Custom Navigation
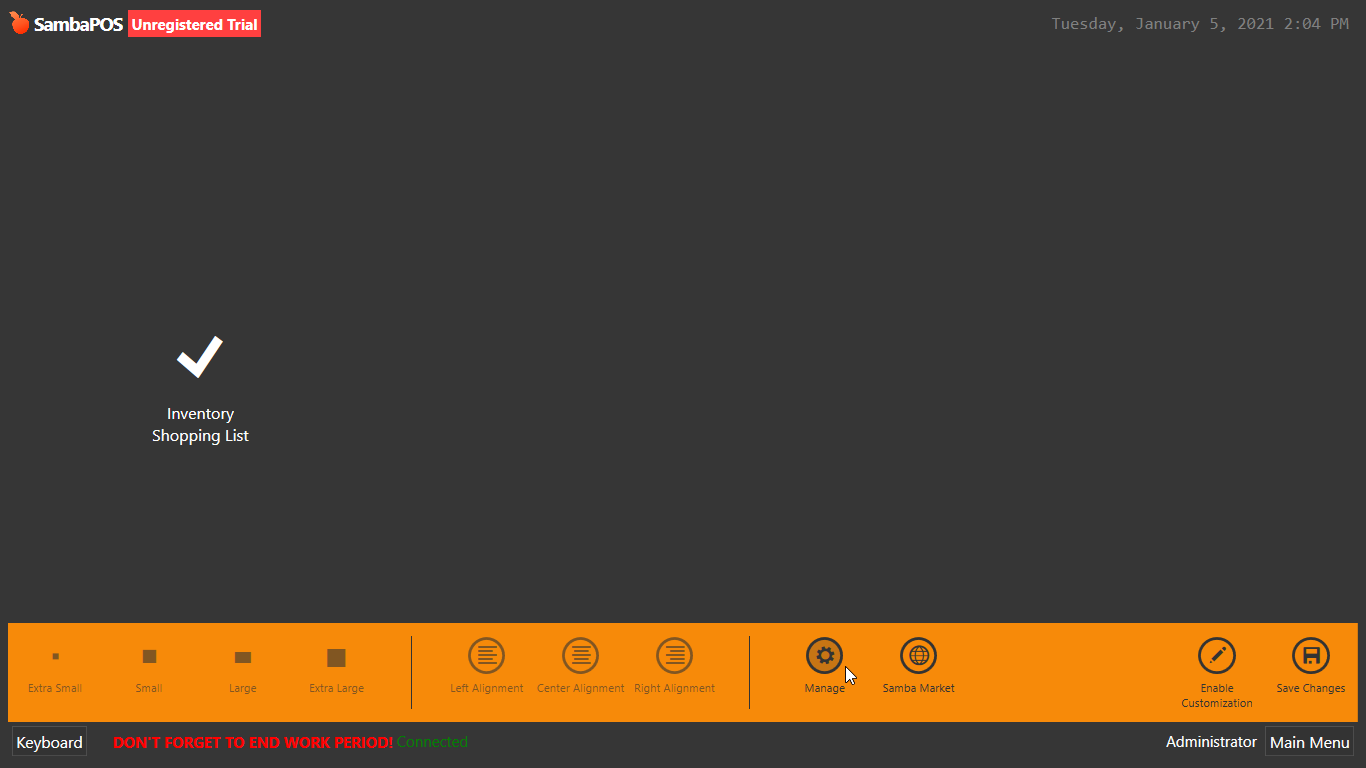
Also, your Navigation may only show the newly created Inventory Shopping List screen button. If it does, right click anywhere on the screen, an orange menu will appear from the bottom. Select “Manage”.
Navigate to:
Manage->Settings->Program Settings->Maintenance->Create Default Navigation Buttons
You should now have all your buttons back.
Inventory Shopping List Screen
Main Menu->Inventory Shopping List
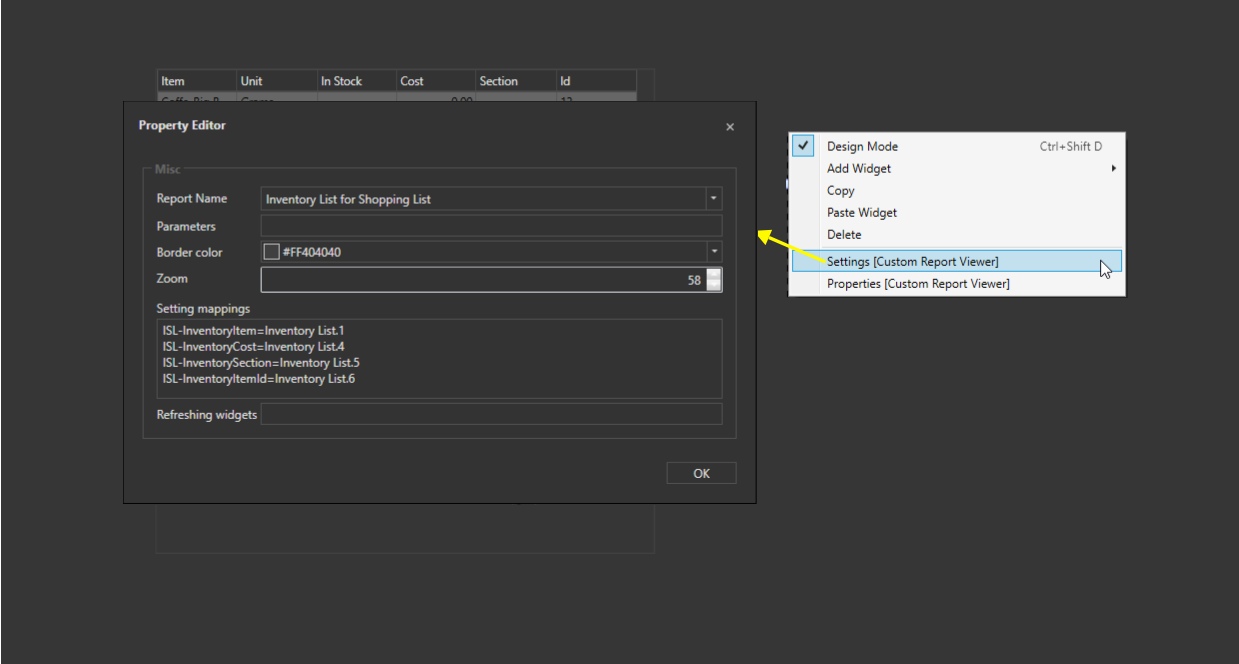
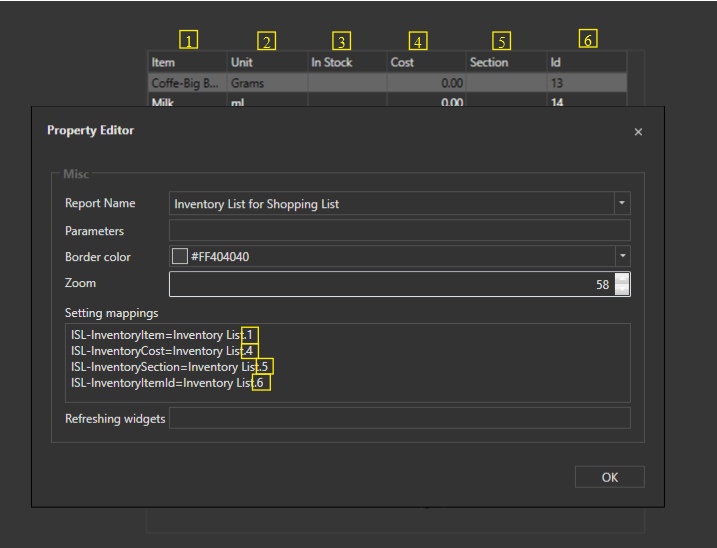
Report Viewer Widget (1 of 2)
You should be presented with a blank screen. Right click anywhere on the screen and select “Design Mode” from the pop up menu. You will notice a red line outlined the screen. This is an indication that you are in Design Mode. Right click again and choose “Add Widget”->“Custom Report Viewer”. A small square will appear in the upper left hand screen with the text “Report Viewer”.
Right click again, and select “Settings [Custom Report Viewer]”
|
Settings Editor |
| Report Name |
Inventory List for Shopping List |
| Parameters |
(blank) |
| Border Color |
default |
| Zoom |
58 |
| Settings mappings |
ISL-InventoryItem=Inventory List.1 |
|
ISL-InventoryCost=Inventory List.4 |
|
ISL-InventorySection=Inventory List.5 |
|
ISL-InventoryItemId=Inventory List.6 |
Settings Mappings Configuration Explanation
The format for this field is: <local program setting name>=<report table name>.<column number>
-
<local program setting> can be any name you come up with. To access the setting, use {LOCAL SETTING:<local program setting name>}
-
<report table name> is the name of the report table, not the report name, found within the square brackets.
-
<column number> is the column number counting from 1. Columns in table view reports can be re-arranged and hidden, the column numbers will always refer to the original column numbering.
|
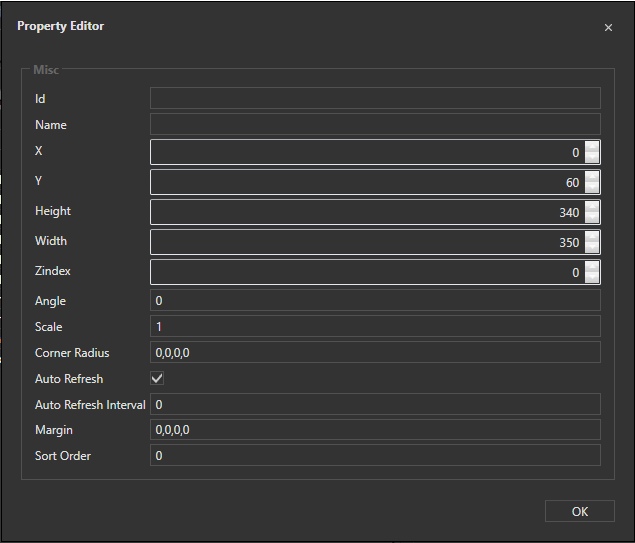
Properties Editor |
| Id |
{blank) |
| Name |
ISL_Report |
| X |
0 |
| Y |
60 |
| Height |
340 |
| Width |
350 |
| Zindex |
0 |
| Angle |
0 |
| Scale |
1 |
| Corner Radius |
0,0,0,0 |
| Auto Refresh |
checked |
| Auto Refresh Interval |
0 |
| Margin |
0,0,0,0 |
| Sort Order |
0 |
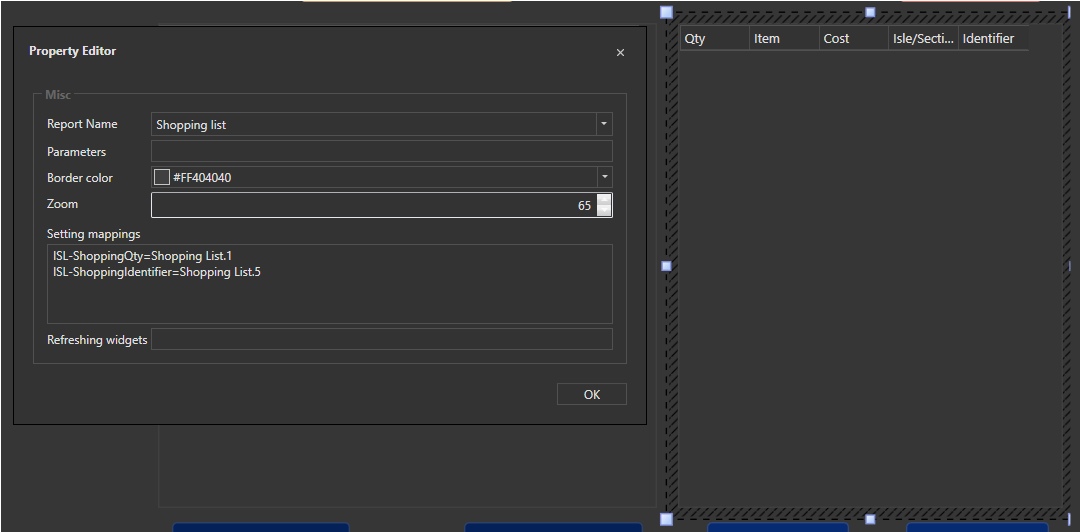
Report Viewer Widget (2 of 2)
Create another Report Viewer Widget
|
Settings Editor |
| Report Name |
Shopping List |
| Parameters |
(blank) |
| Border Color |
default |
| Zooom |
65 |
| Settings mappings |
ISL-ShoppingQty=Shopping List.1 |
|
ISL-ShoppingIdentifier=Shopping List.5 |
|
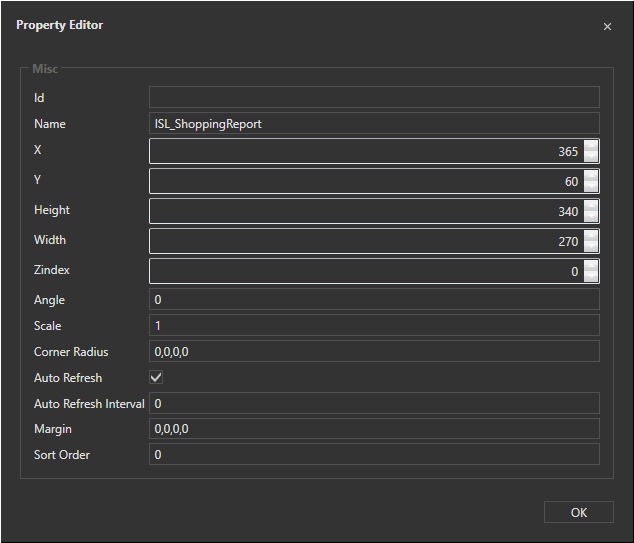
Properties Editor |
| Id |
{blank) |
| Name |
ISL-ShoppingReport |
| X |
365 |
| Y |
60 |
| Height |
340 |
| Width |
270 |
| Zindex |
0 |
| Angle |
0 |
| Scale |
1 |
| Corner Radius |
0,0,0,0 |
| Auto Refresh |
checked |
| Auto Refresh Interval |
0 |
| Margin |
0,0,0,0 |
| Sort Order |
0 |
Automation Command Buttons
Vendor Button (1 of 6)
|
Settings Editor |
| Command Name |
ISL Select Vendor |
| Value |
(blank) |
| Caption |
Vendor:<bold><size 14><br/>{LOCAL SETTING:ISL-Vendor}</size></bold> |
| Button color |
#FFBF8845 (access ‘More Colors’ from th dropdown) |
| Highlight color |
default |
| Font size |
0 |
| Image path |
(blank) |
| Validation |
(blank) |
| Keyboard map |
(blank) |
| Focusable |
unchecked |
| Async |
unchecked |
|
Properties Editor |
| Id |
(blank) |
| Name |
ISL_Vendor |
| X |
115 |
| Y |
5 |
| Height |
40 |
| Width |
150 |
| Zindex |
0 |
| Scale |
1 |
| Corner Radius |
3,3,3,3 |
| Auto Refresh |
checked |
| Auto Refresh Interval |
0 |
| Margin |
0,0,0,0 |
| Sort Order |
0 |
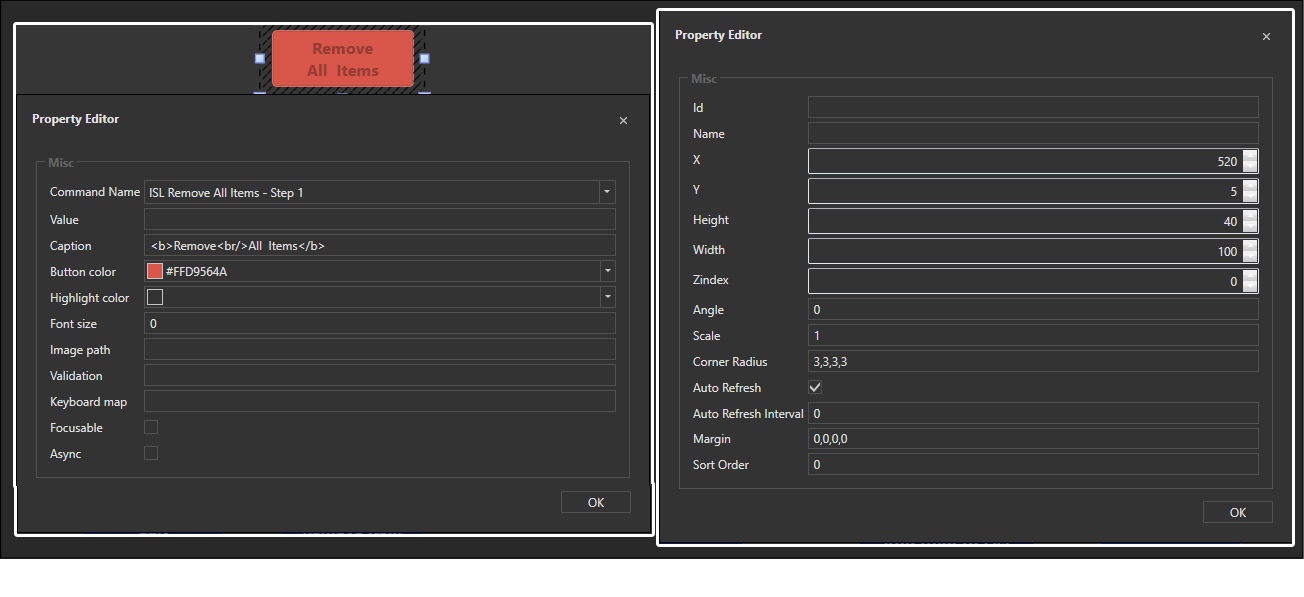
Remove All Items Button (2 of 6)
|
Settings Editor |
| Command Name |
ISL Remove All Items - Step 1 |
| Value |
(blank) |
| Caption |
<b>Remove<br/>All Items</b> |
| Button color |
#FFD9564A |
| Highlight color |
default |
| Font size |
0 |
| Image path |
(blank) |
| Validation |
(blank) |
| Keyboard map |
(blank) |
| Focusable |
unchecked |
| Async |
unchecked |
|
Properties Editor |
| Id |
(blank) |
| Name |
(blank) |
| X |
520 |
| Y |
5 |
| Height |
40 |
| Width |
100 |
| Zindex |
0 |
| Scale |
1 |
| Corner Radius |
3,3,3,3 |
| Auto Refresh |
checked |
| Auto Refresh Interval |
0 |
| Margin |
0,0,0,0 |
| Sort Order |
0 |
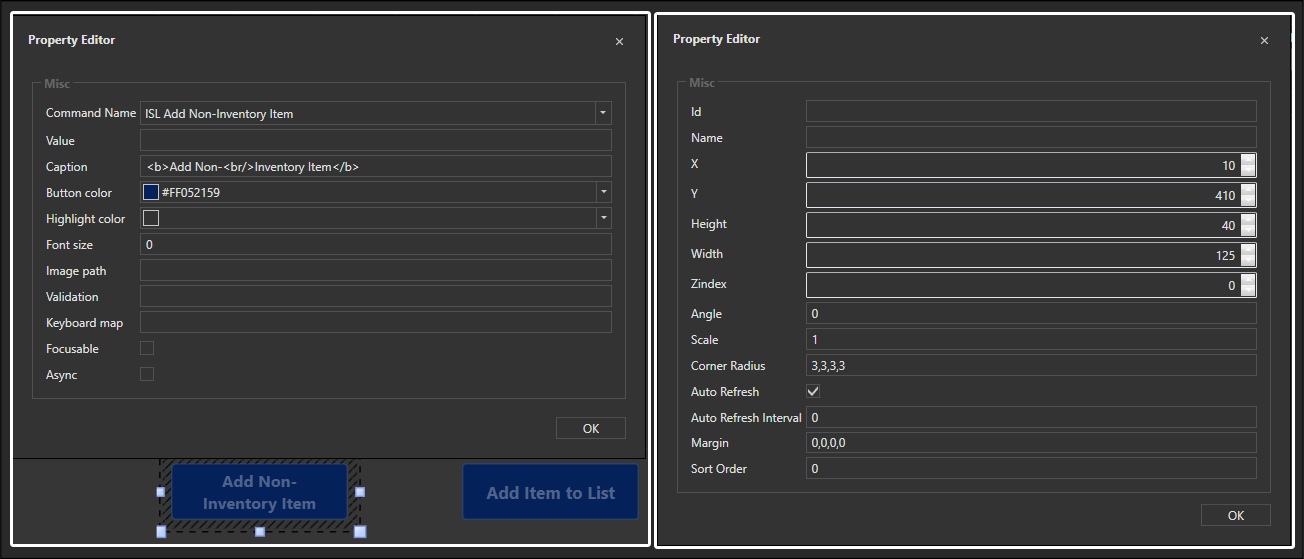
Add Non-Inventory Item (3 of 6)
|
Settings Editor |
| Command Name |
ISL Add Non-Inventory Item |
| Value |
(blank) |
| Caption |
<b>Add Non-<br/>Inventory Item</b> |
| Button color |
#FF052159 |
| Highlight color |
default |
| Font size |
0 |
| Image path |
(blank) |
| Validation |
(blank) |
| Keyboard map |
(blank) |
| Focusable |
unchecked |
| Async |
unchecked |
|
Properties Editor |
| Id |
(blank) |
| Name |
(blank) |
| X |
10 |
| Y |
410 |
| Height |
40 |
| Width |
125 |
| Zindex |
0 |
| Scale |
1 |
| Corner Radius |
3,3,3,3 |
| Auto Refresh |
checked |
| Auto Refresh Interval |
0 |
| Margin |
0,0,0,0 |
| Sort Order |
0 |
Add Item to List (4 of 6)
|
Settings Editor |
| Command Name |
ISL Add Item to List |
| Value |
(blank) |
| Caption |
<b>Add Item to List</b> |
| Button color |
#FF052159 |
| Highlight color |
default |
| Font size |
0 |
| Image path |
(blank) |
| Validation |
(blank) |
| Keyboard map |
(blank) |
| Focusable |
unchecked |
| Async |
unchecked |
|
Properties Editor |
| Id |
(blank) |
| Name |
(blank) |
| X |
215 |
| Y |
410 |
| Height |
40 |
| Width |
125 |
| Zindex |
0 |
| Scale |
1 |
| Corner Radius |
3,3,3,3 |
| Auto Refresh |
checked |
| Auto Refresh Interval |
0 |
| Margin |
0,0,0,0 |
| Sort Order |
0 |
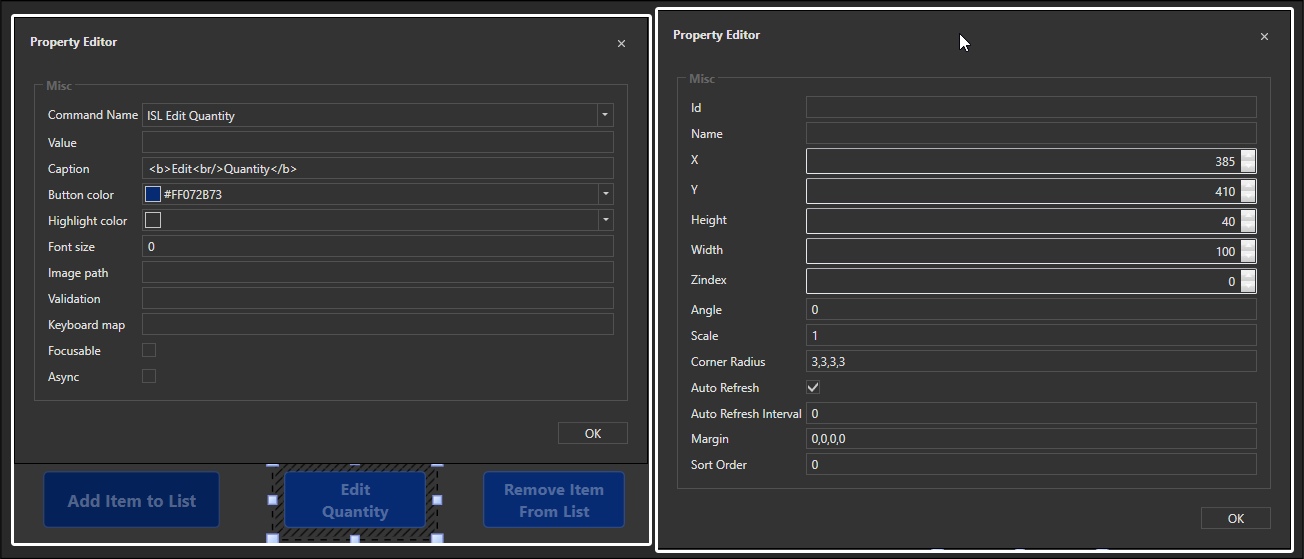
Edit Quantity (5 of 6)
|
Settings Editor |
| Command Name |
ISL Edit Quantity |
| Value |
(blank) |
| Caption |
<b>Edit<br/>Quantity</b> |
| Button color |
#FF072B73 |
| Highlight color |
default |
| Font size |
0 |
| Image path |
(blank) |
| Validation |
(blank) |
| Keyboard map |
(blank) |
| Focusable |
unchecked |
| Async |
unchecked |
|
Properties Editor |
| Id |
(blank) |
| Name |
(blank) |
| X |
385 |
| Y |
410 |
| Height |
40 |
| Width |
100 |
| Zindex |
0 |
| Scale |
1 |
| Corner Radius |
3,3,3,3 |
| Auto Refresh |
checked |
| Auto Refresh Interval |
0 |
| Margin |
0,0,0,0 |
| Sort Order |
0 |
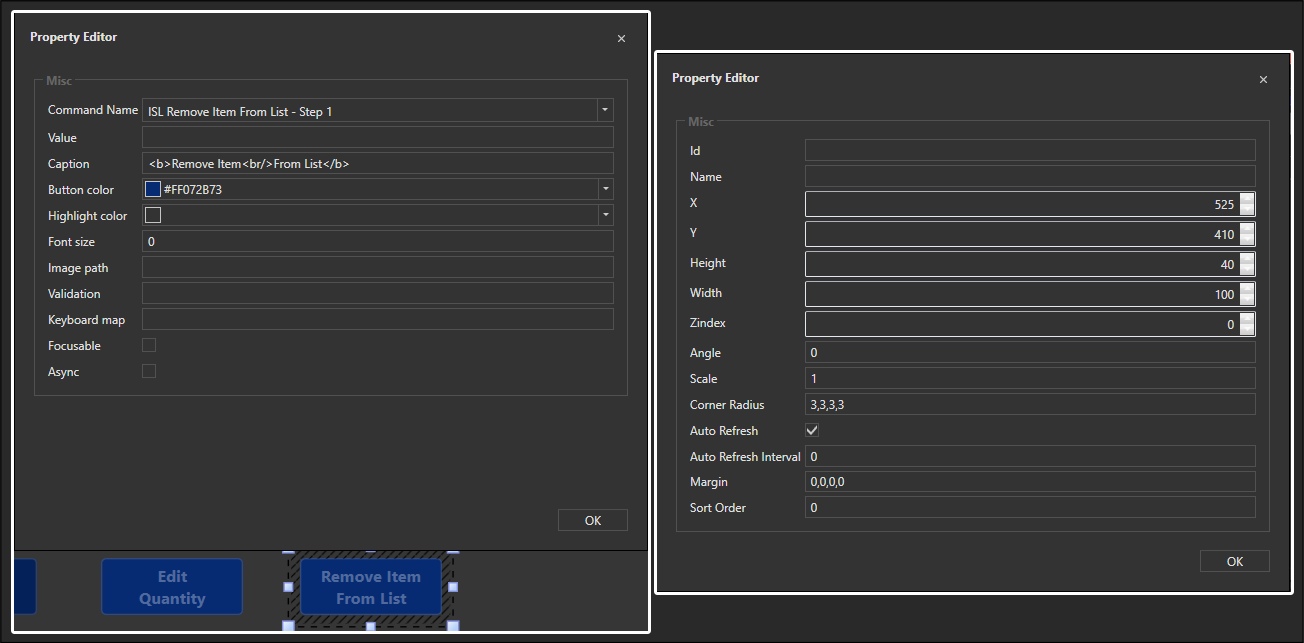
Remove Item From List (6 of 6)
|
Settings Editor |
| Command Name |
ISL Remove Item From List |
| Value |
(blank) |
| Caption |
<b>Remove Item<br/>From List</b> |
| Button color |
#FF072B73 |
| Highlight color |
default |
| Font size |
0 |
| Image path |
(blank) |
| Validation |
(blank) |
| Keyboard map |
(blank) |
| Focusable |
unchecked |
| Async |
unchecked |
|
Properties Editor |
| Id |
(blank) |
| Name |
(blank) |
| X |
525 |
| Y |
410 |
| Height |
40 |
| Width |
100 |
| Zindex |
0 |
| Scale |
1 |
| Corner Radius |
3,3,3,3 |
| Auto Refresh |
checked |
| Auto Refresh Interval |
0 |
| Margin |
0,0,0,0 |
| Sort Order |
0 |
Actions (8 total)
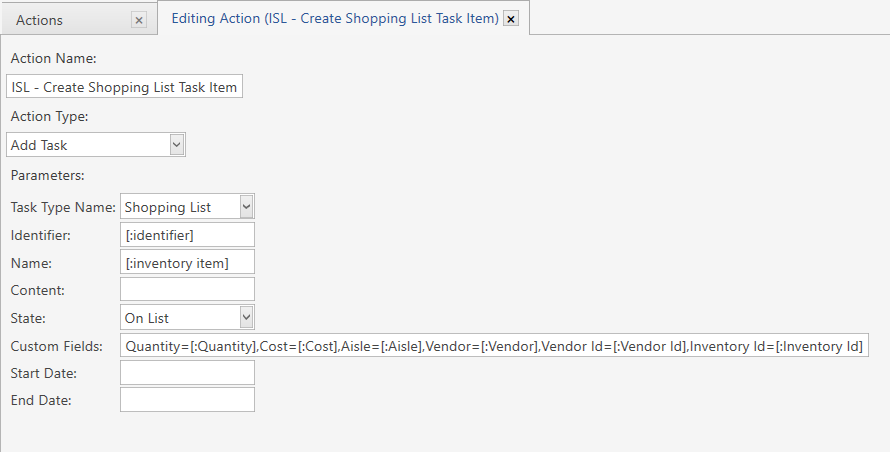
ISL - Create Shopping List Task Item (1 of 8)
|
|
| Action Name: |
ISL - Create Shopping List Task Item |
| Action Type: |
Add Task |
| Task Type Name: |
Shopping List |
| Identifier |
[:identifier] |
| Name: |
[:inventory item] |
| Content: |
(blank) |
| State: |
On List |
| Custom Fields: |
Quantity=[:Quantity],Cost=[:Cost],Aisle=[:Aisle],Vendor=[:Vendor],Vendor Id=[:Vendor Id],Inventory Id=[:Inventory Id] |
| Start Date: |
(blank) |
| End Date: |
(blank) |
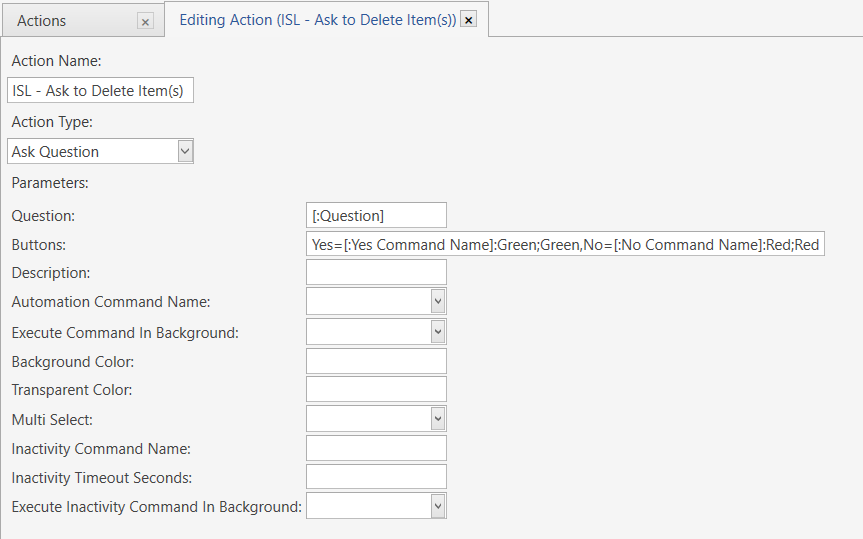
ISL - Ask to Delete All Items (2 of 8)
|
|
| Name: |
ISL - Ask to Delete Item(s) |
| Action Type: |
Ask Question |
| Question: |
[:Question] |
| Buttons: |
Yes=[:Yes Command Name]:Green;Green,No=[:No Command Name]:Red;Red |
| Description: |
(blank) |
| Automation Command Name: |
(blank) |
| Execute Command in Background: |
(blank) |
| Background Color: |
(blank) |
| Transparent Color: |
(blank) |
| Multi Select: |
(blank) |
| Inactivity Command Name: |
(blank) |
| Inactivity Timeout Seconds: |
(blank) |
| Execute Inactivity Command in Background: |
(blank) |
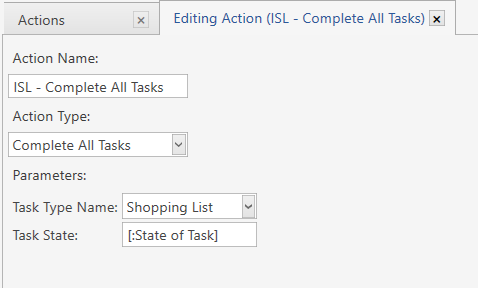
ISL - Complete All Tasks (3 of 8)
|
|
| Name: |
ISL - Complete All Tasks |
| Action Type: |
Complete All Tasks |
| Task Type Name: |
Shopping List |
| Task State: |
[:State of Task] |
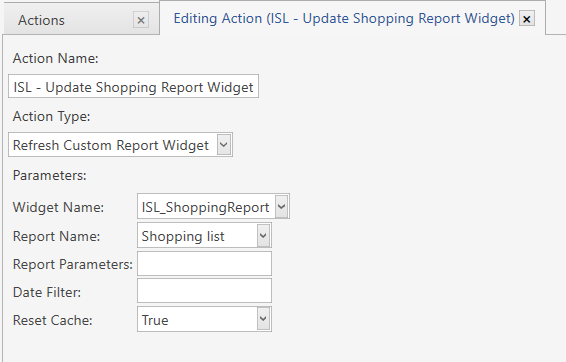
ISL - Update Shopping Report Widget (4 of 8)
|
|
| Name: |
ISL - Update Shopping Report Widget |
| Action Type: |
Refresh Custom Report Widget |
| Widget Name: |
ISL-ShoppingReport |
| Report Name: |
Shopping list |
| Report Parameters: |
(blank) |
| Date Filter: |
(blank) |
| Reset Cache: |
True |
ISL - Refresh Widget(s) (5 of 8)

|
|
| Name: |
ISL - Refresh Widget(s) |
| Action Type: |
Refresh Widgets |
| Widget Name: |
[:Widget Name(s)] |
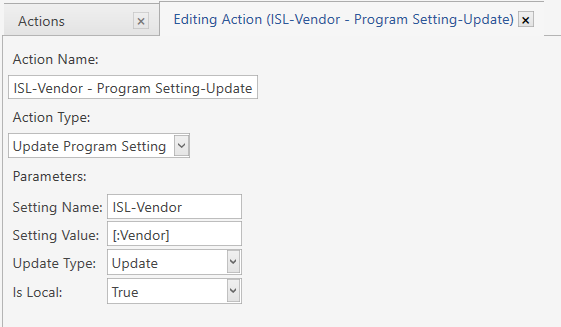
ISL-Vendor - Program Setting-Update (6 of 8)
|
|
| Action Name: |
ISL-Vendor - Program Setting-Update |
| Action Type: |
Update Program Setting |
| Setting Name: |
ISL-Vendor |
| Setting Value: |
[:Vendor] |
| Update Type: |
Update |
| Is Local: |
True |
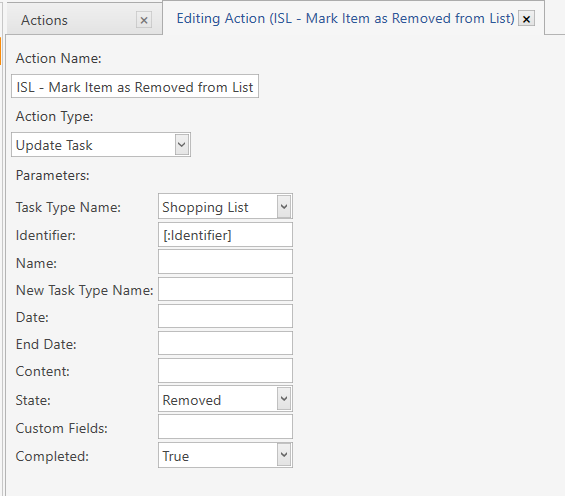
ISL - Mark Item as Removed from List (7 of 8)
|
|
| Name: |
ISL - Mark Item as Removed from List |
| Action Type: |
Update Task |
| Task Type Name: |
Shopping List |
| Identifier: |
[:Identifier] |
| Name: |
(blank) |
| New Task Type Name: |
(blank) |
| Date: |
(blank) |
| End Date: |
(blank) |
| Content: |
(blank) |
| State: |
Removed |
| Custom Fields: |
(blank) |
| Completed: |
True |
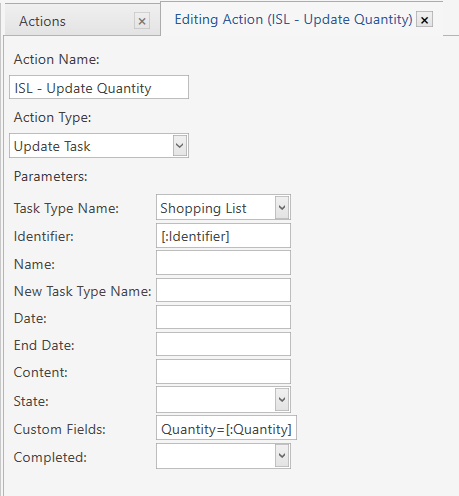
ISL - Update Quantity (8 of 8)
|
|
| Name: |
ISL - Update Quantity |
| Action Type: |
Update Task |
| Identifier: |
[:Identifier] |
| Name: |
(blank) |
| New Task Type Name: |
(blank) |
| Date: |
(blank) |
| End Date: |
(blank) |
| Content: |
(blank) |
| State: |
(blank) |
| Custom Fields: |
Quantity=[:Quantity] |
| Completed: |
(blank) |
Rules (8 Total)
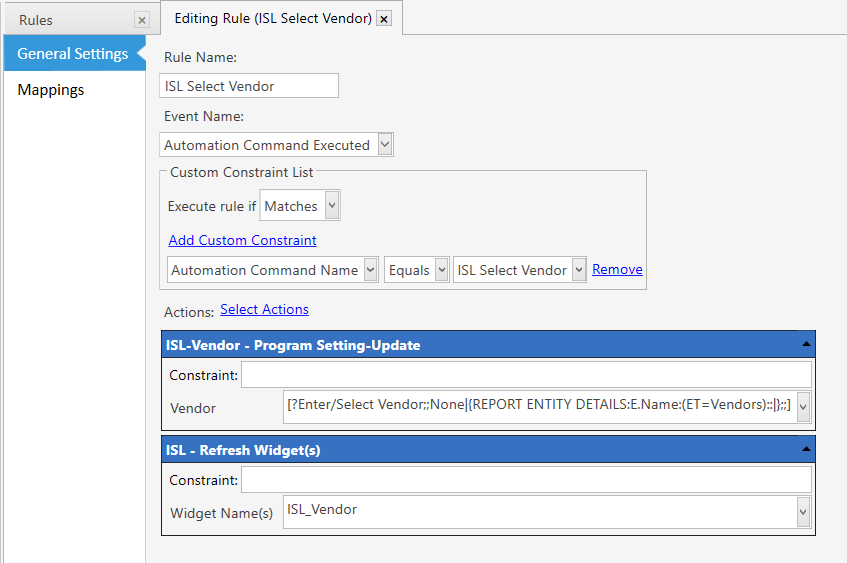
ISL Select Vendor (1 of 8)
|
|
| Rule Name: |
ISL Select Vendor |
| Event Name: |
Automation Command Executed |
Custom Constraint List
|
|
|
| Execute Rule If: |
Matches |
|
| Automation Command Name |
Equals |
ISL Select Vendor |
---- Actions ----
| Action (1 of 2): |
ISL-Vendor - Program Setting-Update |
| Constraint: |
(blank) |
|
Vendor:1
|
[?Enter/Select Vendor;;None|{REPORT ENTITY DETAILS:E.Name:(ET=Vendors)::|};;] |
| Action (2 of 2): |
ISL - Refresh Widget(s) |
| Constraint |
(blank) |
| Widget Name(s) |
ISL_Vendor |
1 We are using a report in this prompt to give us a list of current entity Vendors. If you do not use entity Vendors, you can keep the report tag in the prompt. It will not cause any issues. Vendors can also be typed in the pop-up/prompt.
We will use None to fill in our program setting. In the next rule, we have a constraint to ask for a vendor if one is not present in the program settings.
ISL Add Item to List (2 of 8)
|
|
| Rule Name: |
ISL Add Item to List |
| Event Name: |
Automation Command Executed |
Custom Constraint List
|
|
|
| Execute Rule If: |
Matches |
|
| Automation Command Name |
Equals |
ISL Add Item to List |
---- Actions ----
| Action (1 of 4): |
ISL-Vendor - Program Setting-Update |
| Constraint: |
'{LOCAL SETTING:ISL-Vendor}' == '' |
| Vendor: |
[?Enter/Select Vendor;;None|{REPORT ENTITY DETAILS:E.Name:(ET=Vendors)::|};;] |
| Action (2 of 4): |
ISL - Refresh Widget(s) |
| Constraint |
'{LOCAL SETTING:ISL-Vendor}' == '' |
| Widget Name(s) |
ISL_Vendor |
| Action (3 of 4): |
ISL - Create Shopping List Task Item |
| Constraint: |
|
| Identifier: |
{RANDOM} |
| inventory item |
{LOCAL SETTING:ISL-InventoryItem} |
| Quantity |
[?Quantity;;;OCN;] |
| Cost |
{LOCAL SETTING:ISL-InventoryCost} |
| Aisle |
{LOCAL SETTING:ISL-InventorySection} |
| Vendor |
{LOCAL SETTING:ISL-Vendor} |
|
Vendor Id2
|
{REPORT ENTITY DETAILS:E.Id:(EN={LOCAL SETTING:ISL-Vendor})} |
|
Inventory Id2
|
{LOCAL SETTING:ISL-InventoryId} |
| Action (4 of 4): |
ISL - Update Shopping Report Widget |
| Constraint |
(blank) |
2 These fields are not necessary. I put this fields in to do a little foward-thinking. If, in the future, a report wants to be written of items or vendors that were put on the shopping list, these fields will be available. In the event a Vendor name or Item name needs to be corrected or changed, the report will not include the previous name. Vendor Id and Item Id overcome this limitation. The Id’s do not change, these fields should be used to create reports.
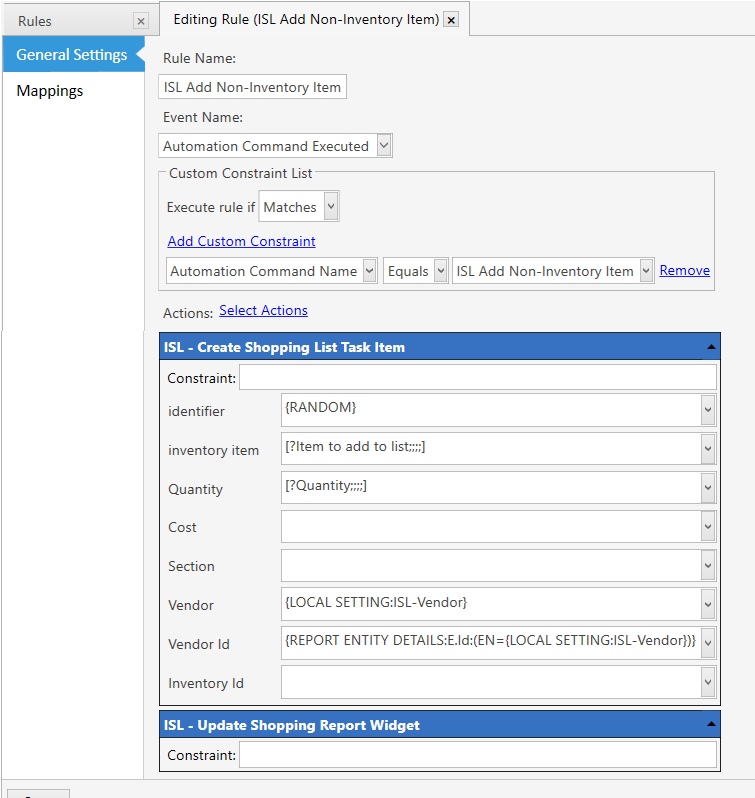
ISL Add Non-Inventory Item (3 of 8)
|
|
| Rule Name: |
ISL Add Non-Inventory Item |
| Event Name: |
Automation Command Executed |
Custom Constraint List
|
|
|
| Execute Rule If: |
Matches |
|
| Automation Command Name |
Equals |
ISL Add Non-Inventory Item |
---- Actions ----
| Action (1 of 2): |
ISL - Create Shopping List Task Item |
| Constraint: |
|
| Identifier: |
{RANDOM} |
| inventory item |
[?Item to add to list;;;;] |
| Quantity |
[?Quantity;;;;] |
| Cost |
(blank) |
| Aisle |
(blank) |
| Vendor |
{LOCAL SETTING:ISL-Vendor} |
| Vendor Id |
{REPORT ENTITY DETAILS:E.Id:(EN={LOCAL SETTING:ISL-Vendor})} |
| Inventory Id |
(blank) |
| Action (2 of 2): |
ISL - Update Shopping Report Widget |
| Constraint |
(blank) |
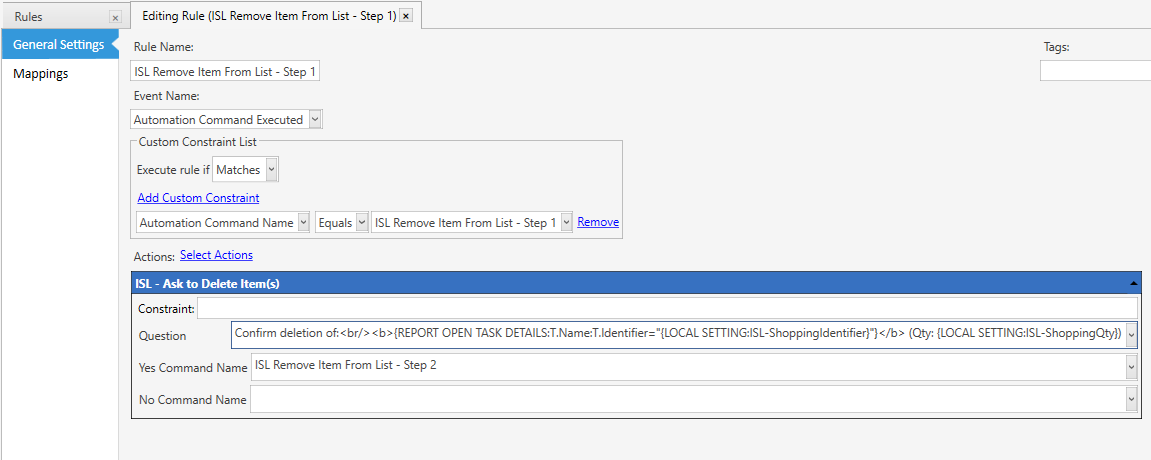
ISL Remove Item From List - Step 1 (4 of 8)
|
|
| Rule Name: |
ISL Remove Item From List - Step 1 |
| Event Name: |
Automation Command Executed |
Custom Constraint List
|
|
|
| Execute Rule If: |
Matches |
|
| Automation Command Name |
Equals |
ISL Remove Item From List - Step 1 |
---- Actions ----
| Action (1 of 1): |
ISL - Ask to Delete Item(s) |
| Constraint: |
(blank) |
| Question |
Confirm deletion of:<br/><b>{REPORT OPEN TASK DETAILS:T.Name:T.Identifier="{LOCAL SETTING:ISL-ShoppingIdentifier}"}</b> (Qty: {LOCAL SETTING:ISL-ShoppingQty}) |
| Yes Command Name |
ISL Remove Item From List - Step 2 |
| No Command Name |
(blank) |
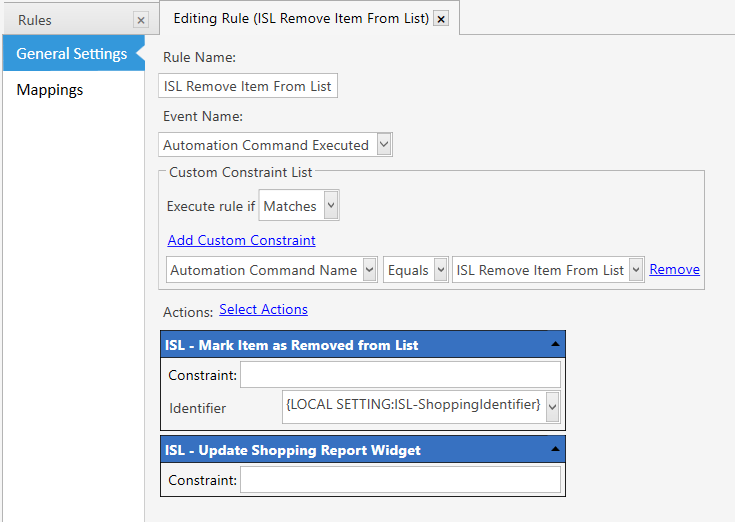
ISL Remove Item From List - Step 2 (5 of 8)
|
|
| Rule Name: |
ISL Remove Item From List - Step 2 |
| Event Name: |
Automation Command Executed |
Custom Constraint List
|
|
|
| Execute Rule If: |
Matches |
|
| Automation Command Name |
Equals |
ISL Remove Item From List - Step 2t |
---- Actions ----
| Action (1 of 2): |
ISL - Mark Item as Removed from List |
| Constraint: |
(blank) |
| Identifier: |
{LOCAL SETTING:ISL-ShoppingIdentifier} |
| Action (2 of 2): |
ISL - Update Shopping Report Widget |
| Constraint |
(blank) |
ISL Edit Quantity (6 of 8)
|
|
| Rule Name: |
ISL Edit Quantity |
| Event Name: |
Automation Command Executed |
Custom Constraint List
|
|
|
| Execute Rule If: |
Matches |
|
| Automation Command Name |
Equals |
ISL Edit Quantity |
---- Actions ----
| Action (1 of 2): |
ISL - Update Quantity |
| Constraint: |
(blank) |
| Identifier: |
{LOCAL SETTING:ISL-ShoppingIdentifier} |
| Quantity |
[?Update Quantity;;{LOCAL SETTING:ISL-ShoppingQty};OCN;] |
| Action (2 of 2): |
ISL - Update Shopping Report Widget |
| Constraint |
(blank) |
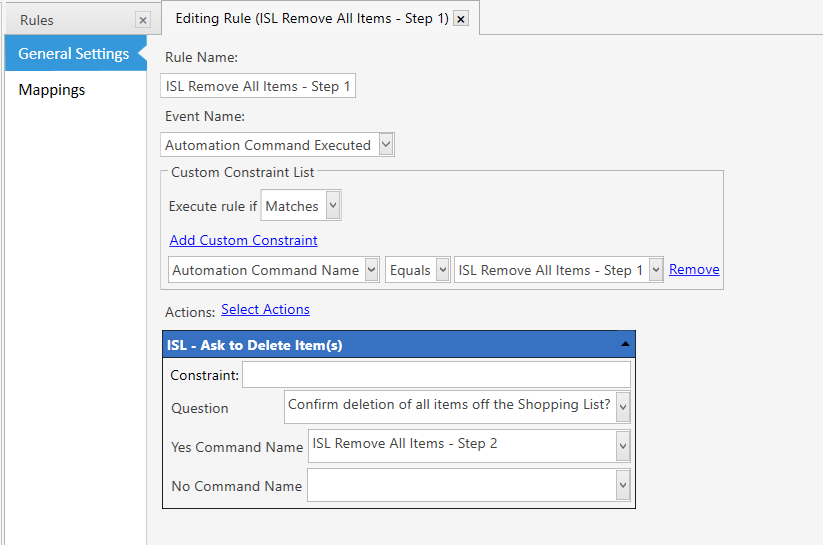
ISL Remove All Items - Step 1 (7 of 8)
|
|
| Rule Name: |
ISL Remove All Items - Step 1 |
| Event Name: |
Automation Command Executed |
Custom Constraint List
|
|
|
| Execute Rule If: |
Matches |
|
| Automation Command Name |
Equals |
ISL Remove All Items - Step 1 |
---- Actions ----
| Action (1 of 1): |
ISL - Ask to Delete All Items |
| Constraint: |
(blank) |
| Question |
Confirm deletion of all items off the Shopping List? |
| Yes Command Name |
ISL Remove All Items - Step 2 |
| No Command Name |
(blank) |
ISL Remove All Items - Step 2 (8 of 8)
|
|
| Rule Name: |
ISL Remove All Items - Step 2 |
| Event Name: |
Automation Command Executed |
Custom Constraint List
|
|
|
| Execute Rule If: |
Matches |
|
| Automation Command Name |
Equals |
ISL Remove All Items - Step 2 |
---- Actions ----
| Action (1 of 2): |
ISL - Complete All Tasks |
| Constraint: |
(blank) |
| State of Task |
On List |
| Action (2 of 2): |
ISL - Update Shopping Report Widget |
| Constraint |
(blank) |
Cleaning up the Shopping List Screen
Head back to the Shopping List screen.
Test to make sure everything works.
Hiding columns
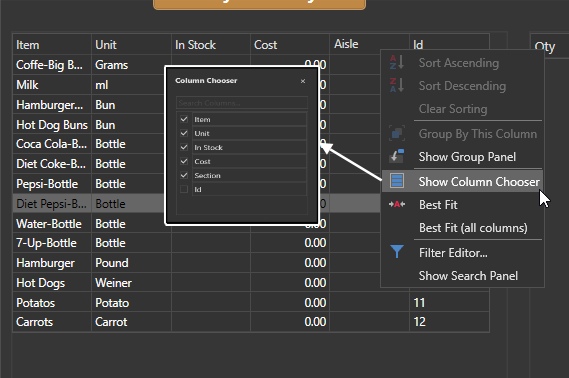
Right click on any column header.
In the pop-up choose “Show Column Chooser”
Uncheck any column you do not want to see.
Resize column widths by dragging the width.
- You may have to adjust the Report (under manage) Page size. 4
- Or adjust the Zoom (in Design Mode under Settings). 4
4 Before entering into Design Mode or exiting the screen you may want to Save Changes by right clicking on the grid area and choosing “Save Changes”. The Shopping List widget will need at least one item on the list to access the pop-up menu.
- If you need to start over from scratch, you can right click in the grid area and select “Reset Layout”. Exit out of the Shopping List screen and re-enter the screen.
Show Search Panel
Right click on any column header.
Choose “Show Search Panel”
- Search will only work on visible columns.
Print Shopping List
When you have all the items added to your list, right click on the Shopping List report and select “Print Preview”.