Custom Delivery System for V4

The Custom Package Delivery System was originally designed for use in SambaPOS V3, and an enhanced version using new features was redesigned for V5. However, for those who continue to use V4, there is no Tutorial available for that SambaPOS version. This Topic presents the Setup as it would apply to V4. It is the same as V3, but the screenshots are different in many cases. I simply copied most of the Tutorial text written by @emre from the V3 Tutorial and captured new screenshots from a V4 installation (v4.1.82).

These are the the links to the Setup for V3 and V5:

Custom Delivery System for V3

Custom Delivery System for V5

##Quick Links


This is the Delivery Screen when the Setup is complete:

2 Likes

#Deliverer Entities

##Deliverer Entity Type

Create a Deliverer Entity Type for Deliverers so that we can assign them to Tickets like we assign Customers or Tables.

##Deliverers

Create Entities for your Deliverer personnel.


##Customer Entity Regions

If you have different Regions in your Delivery Area, you could create a Custom Data Field for the Customer Entity Type named “Regions”, which could be used to help determine which Deliverer should be used for delivering, as follows:

Then you can edit your Customer Entities to select the Region where they reside …

1 Like

#Delivery Ticket Type and Department

##Delivery Ticket Type

We’ll need different ticket type for delivery department. We’ll use same menu for delivery and table service departments but you can create different menu with different prices for delivery department if you need. The main reason we need different ticket type is we can differ delivery sales on reports and make finer configuration. While creating this ticket type we’ll assign “Customers” and “Deliverers” entity types to this ticket type. This also means we won’t use tables with these tickets. Not in the scope of this document but as a side note you can create custom Transaction Type for this ticket type and differ delivery sales accounts.


Delivery Department

On this step we’ll create Delivery Department. We’ll choose “Delivery Ticket” as Ticket type so tickets created from Delivery Department will use this Ticket Type.

1 Like

#Entity Screens

We’ll use two screens for the Delivery Department. One of them is selecting Customers and the other one is for managing Tickets.

##Delivery Customers Entity Screen

We’ll create customer selection screen first. View mode of this screen is “Search” so instead of clicking buttons we’ll find Customers by typing their Name or Phone number.

On the Entity List page we’ll choose Entity Type of this screen. Since we select Customers here that means we’ll find Customers through this screen.

Finally we’ll map this screen to Delivery Department. That means this screen is visible only for Delivery Department. On default configuration Table selection screen is visible to all (*) Departments. Since we don’t need Table selection on Delivery Department you can open “All Tables” screen and map it to “Restaurant” Department.


##Delivery Entity Screen

Second Entity Screen is the custom delivery screen we’ll configure. We’ll add widgets and buttons on this screen like we configure a custom Table screen so View Mode should be “Custom”.

On the Entity List Page we’ll select Entity Type as “Deliverers”. That means we’ll work with Deliverers on this screen. Add previously created delivery personnel to the list and set Display State to “Status” so you can use Entity Grid widget on this screen.

Map it to Delivery Department and select the Delivery Ticket Type.


When we click “Delivery” Department button on the bottom we should see two buttons for two screens we recently created. If you see more screens here it means these screens mapped to all (*) Departments. You can remove them from display by mapping these unneeded screens to Restaurant department.

1 Like

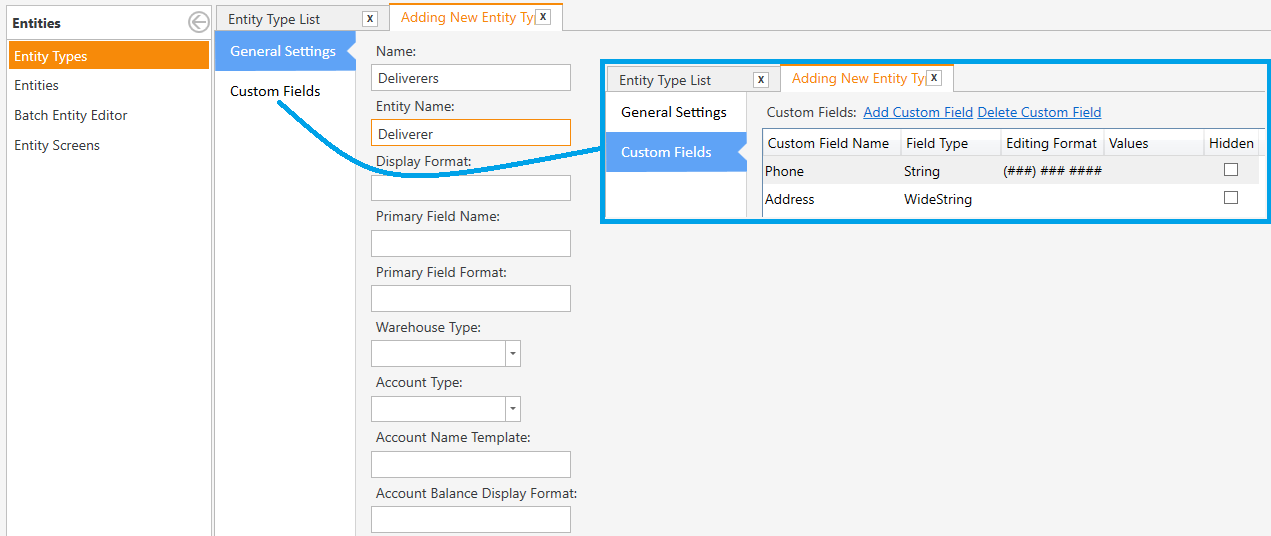
#Delivery Entity Screen Widgets

##Entity Search Widget - Deliverer Search

  1. Switch to Design Mode (right click on Entity Screen and select Design Mode).

  2. Add Entity Search Widget (right click, select Add Widget, then select Entity Search), and drag the Widget to the right side of the Screen.

  3. Set Entity Search Widget Properties (right click on Widget and select Properties). You can name the Widget and adjust the size and position.

  4. Set Entity Search Widget Settings (right click on Widget and select Settings). Name the Widget and set the parameters as shown.


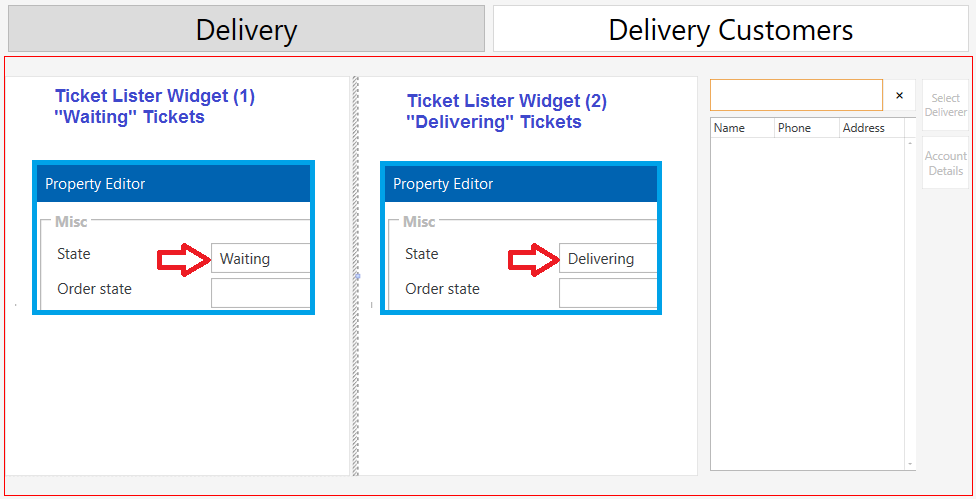
#Ticket Lister Widgets

Add two Ticket Lister widgets to the screen and position them as displayed here. Ticket Lister Widget is a special widget to list tickets filtered by it’s State. Ticket Lister 1 will display “Waiting” tickets and Ticket Lister 2 will display “Delivering” tickets.


##Ticket Lister Widget (1) - “Waiting” Tickets

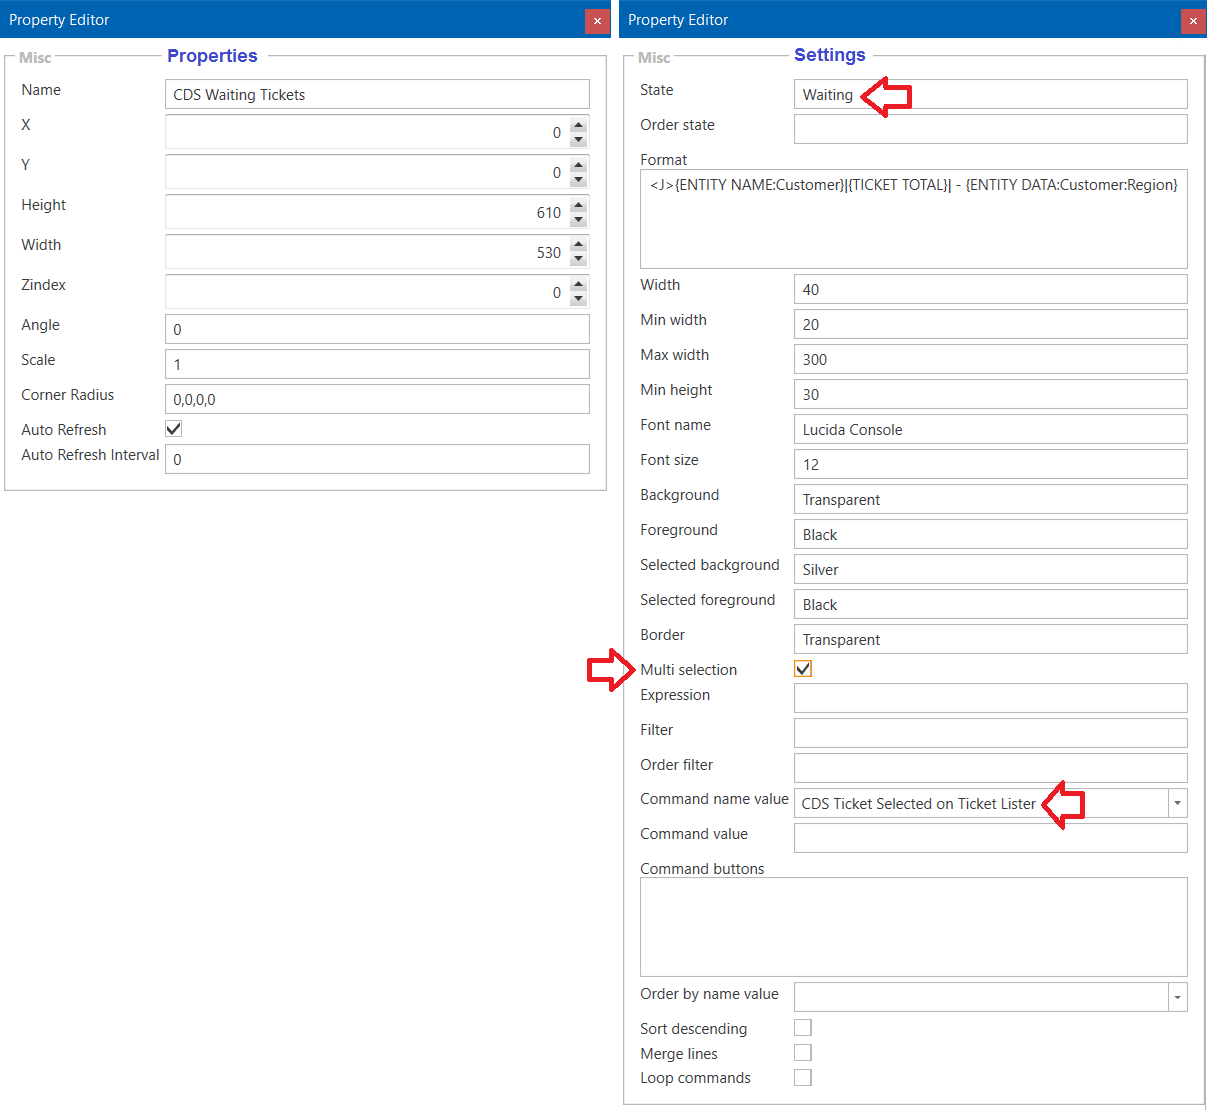
Properties and Settings for Ticket Lister 1. When a Ticket is clicked on this Widget, it will execute the command CDS Ticket Selected on Ticket Lister and pass with it the Ticket Id as the Command Value.

Name: CDS Waiting Tickets
State: Waiting
Multi selection: Checked
Command name value: CDS Ticket Selected on Ticket Lister

Format: use Printer Template Formatting Tags in this section to determine what is displayed on the Tickets.

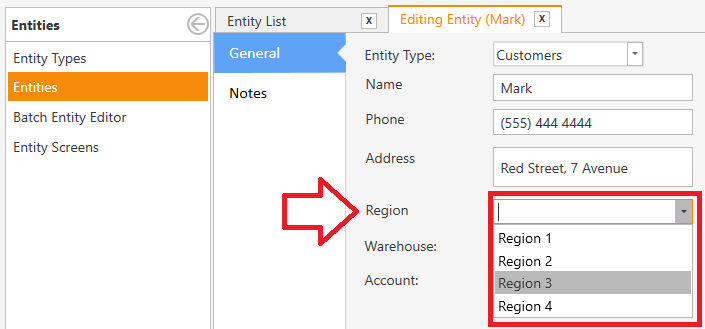
<J>{ENTITY NAME:Customer}|{TICKET TOTAL}| - {ENTITY DATA:Customer:Region}


##Ticket Lister Widget (2) - “Delivering” Tickets

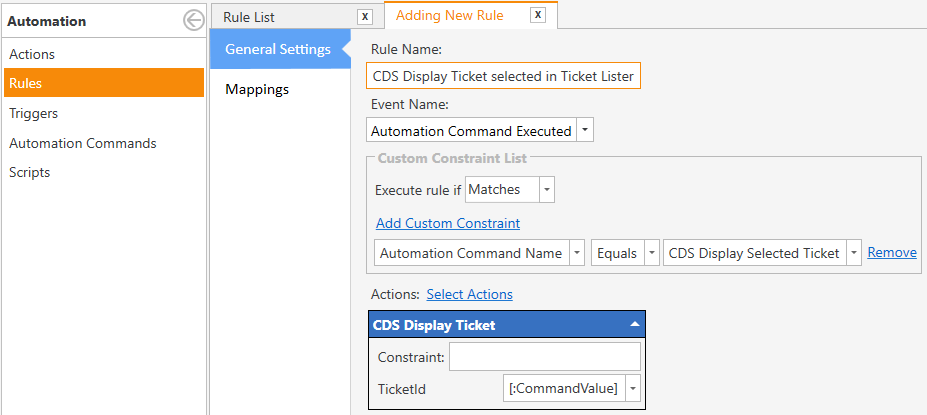
Properties and Settings for Ticket Lister 2. When a Ticket is clicked on this Widget, it will execute the command CDS Display Selected Ticket and pass with it the Ticket Id as the Command Value.

Name: CDS Delivering Tickets
State: Delivering
Command name value: CDS Display Selected Ticket

Format: use Printer Template Formatting Tags in this section to determine what is displayed on the Tickets.

<F>*
<J>{ENTITY NAME:Customer}|{TICKET TOTAL}| - {ENTITY NAME:Deliverer}


#Entity Grid Widget - Deliverer Buttons

Add an Entity Grid Widget and position it at the bottom of the screen.

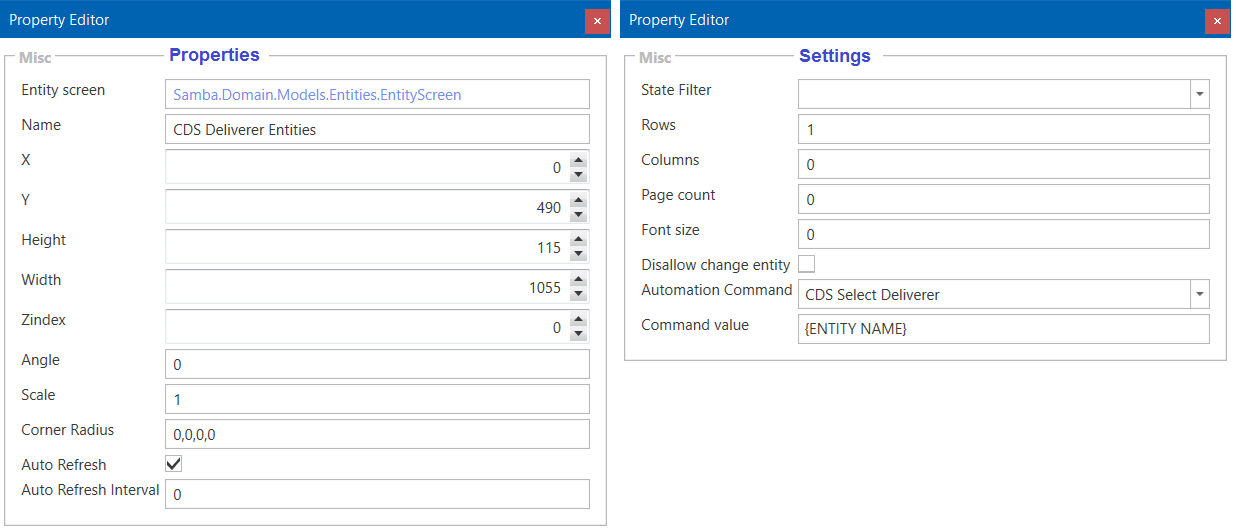
###Properties and Settings for Deliverer Entity Grid Widget

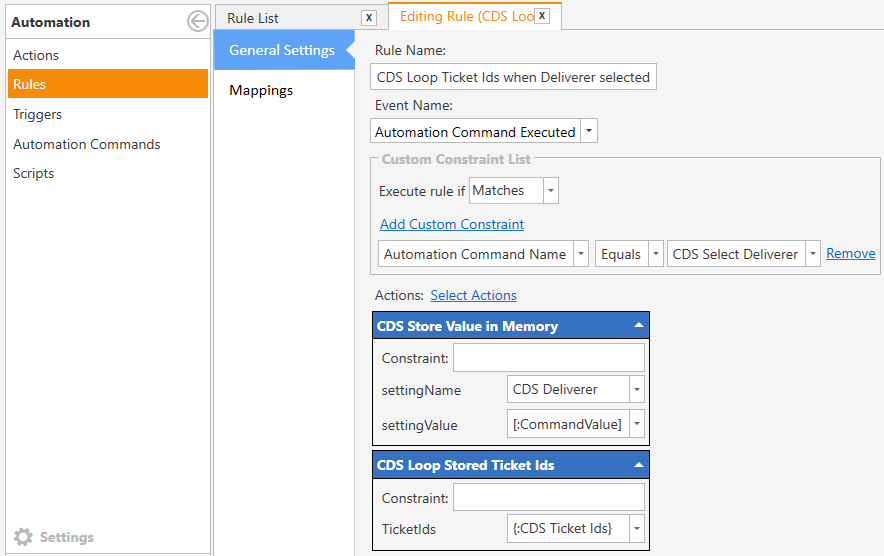
When a Deliverer Entity button is clicked, it will executed the command CDS Select Deliverer and pass with it the Entity Name as the Command Value.

Name: CDS Deliverer Entities
Automation Command: CDS Select Deliverer
Command value: {ENTITY NAME}

1 Like

#Automation Commands

##CDS Ticket Selected on Ticket Lister

This Automation Command will be used to trigger Rules when we click on a Ticket from Ticket Lister 1. No Mapping is required for this Automation Command because we don’t need it to appear on the POS/Ticket/Orders screen; it will only be used on our Custom Entity Screen.


##CDS Display Selected Ticket

This Automation Command will be used to trigger Rules when we click on a Ticket from Ticket Lister 2. No Mapping is required for this Automation Command because we don’t need it to appear on the POS/Ticket/Orders screen; it will only be used on our Custom Entity Screen.


##CDS Select Deliverer

This Automation Command will be used to trigger Rules when we click on a Deliverer Entity Button. No Mapping is required for this Automation Command because we don’t need it to appear on the POS/Ticket/Orders screen; it will only be used on our Custom Entity Screen.

1 Like

#Actions

We’ll need some rules and actions in order to update states of Delivery Tickets properly. We’ll start by creating an action for updating Delivery Status of the Ticket.

##CDS Update Delivery Ticket Status


##CDS Store Value in Memory

We need to store selected Ticket Id’s and Deliverer Names in program memory. This technique is useful to pass values from one widget to another. Ticket lister 1 Widget will write selected Ticket Ids to a Program Setting and when another Widget needs to know which tickets are selected it will read it from this Program Setting. The setting name we will use will be set in a Rule as a variable named CDS Ticket Ids and when we need to read selected ticket ids we can use {:CDS Ticket Ids} tag.

We will also store the Deliverer Name when we click on a Deliverer Entity button. In this case we will use a Rule to store a variable named CDS Deliverer and when we need to read selected Deliverer Name we can use {:CDS Deliverer} tag.


##CDS Loop Stored Ticket Ids

This awesome action does looping actions. It reads a value and triggers “Value Looped” Rule multiple times with supplied values. For example, we can read selected Tickets Ids from {:CDS Ticket Ids} tag. When we write a value in {:curly brackets} it reads it’s value from Program Settings (memory). If you remember we will store selected Ticket Ids to CDS Ticket Ids setting with “CDS Store Value in Memory” Action. Within a Rule it will read this setting, for example if stored Ids are 101,105,109 it will split these values and loop these values. In this case it will loop 3 times.


##CDS Update Ticket Deliverer

We’ll store selected Deliverer Name when we click a Deliverer button on the Delivery Screen in Program Setting (memory) and in a Rule we can read that value with {:CDS Deliverer} tag and supply that value to this Action for the [:Deliverer] parameter variable.


##CDS Load Ticket

This action Loads a ticket and keeps it in memory. It is useful to use this action for Ticket-related operations. For example when we Assign a Ticket Deliverer Entity, we need to have that Ticket loaded. We’ll send “Ticket Id” parameter from within a Rule so we’ll configure that Action Parameter as a variable by typing it in [:square brackets] as [:TicketId].


##CDS Display Ticket

This action displays a Ticket on the POS/Ticket Screen when we pass the [:TicketId] to the action as a parameter.

1 Like

#Rules

:exclamation: NOTE: Unless otherwise specified, all Rules should be mapped to the Delivery Department and Delivery Ticket Type.


##CDS Update New Delivery Ticket Status

This rule executes “Update Delivery Ticket Status” action with “Waiting” value as soon as a Ticket first Created. That means when we create a Ticket it’s Delivery State becomes “Waiting”


##CDS Update Ticket Delivery Status when Deliverer Selected

This Rule changes Ticket Delivery State to “Delivering” when we assign a Deliverer Entity to the Ticket. This rule activates when Ticket Entity Changes and if Entity Type Name equals “Deliverers” it changes Ticket Delivery State to “Delivering”. You can add more actions here. For example you can print “Delivery Ticket” with Deliverer Name and Customer Address.


##CDS Update Ticket Delivery Status when Ticket Paid

This Rule changes Ticket Delivery State to “Delivered” when we Settle (Pay) the Ticket.


##CDS Ticket Selected on Ticket Lister

This Rule is triggered when Ticket(s) are selected from Ticket Lister 1 and it stores selected Ticket Ids in a Program Setting (memory) as a comma-separated list.


##CDS Loop Ticket Ids when Deliverer selected

This Rule is triggered when we click on a Deliverer Entity button on our Delivery Screen. It will store Deliverer Name in memory as “CDS Deliverer” and start looping stored Ticket Ids which were stored in Program Setting named {:CDS Ticket Ids} when we selected Tickets from Ticket Lister 1.


##CDS Load Ticket and update Deliverer

This Rule is the place where all pieces used together. Like I’ve mentioned before “Loop Values” action triggers “Value Looped” Rule multiple times. For example if we choose 4 tickets on Ticket Lister 1, this Rule will execute 4 times and on each step it will send next Ticket Id in the [:LoopValue] parameter.

It will first load a ticket with Load Ticket action. We pass Ticket Id with [:LoopValue] parameter. On next step it will change Ticket’s Deliverer Entity. If you remember this action reads selected deliverer from “{:CDS Deliverer}” Program Setting. On the last step it Closes (saves) ticket.


##CDS Display Ticket selected in Ticket Lister

This Rule is triggered when we select a Ticket on Ticket Lister 2, and it fires the Action to Display the Ticket.

1 Like

#Database Tools Import Files

##Automation Commands, Actions, Rules

CDS_Automation.zip (1.3 KB)

If you import this file and the system does not work, verify that all the Rules (prefixed with “CDS” have a proper mapping for your Delivery Department and Delivery Ticket Type.


4 Likes

… reserved for updates …

… reserved for updates …

1 Like