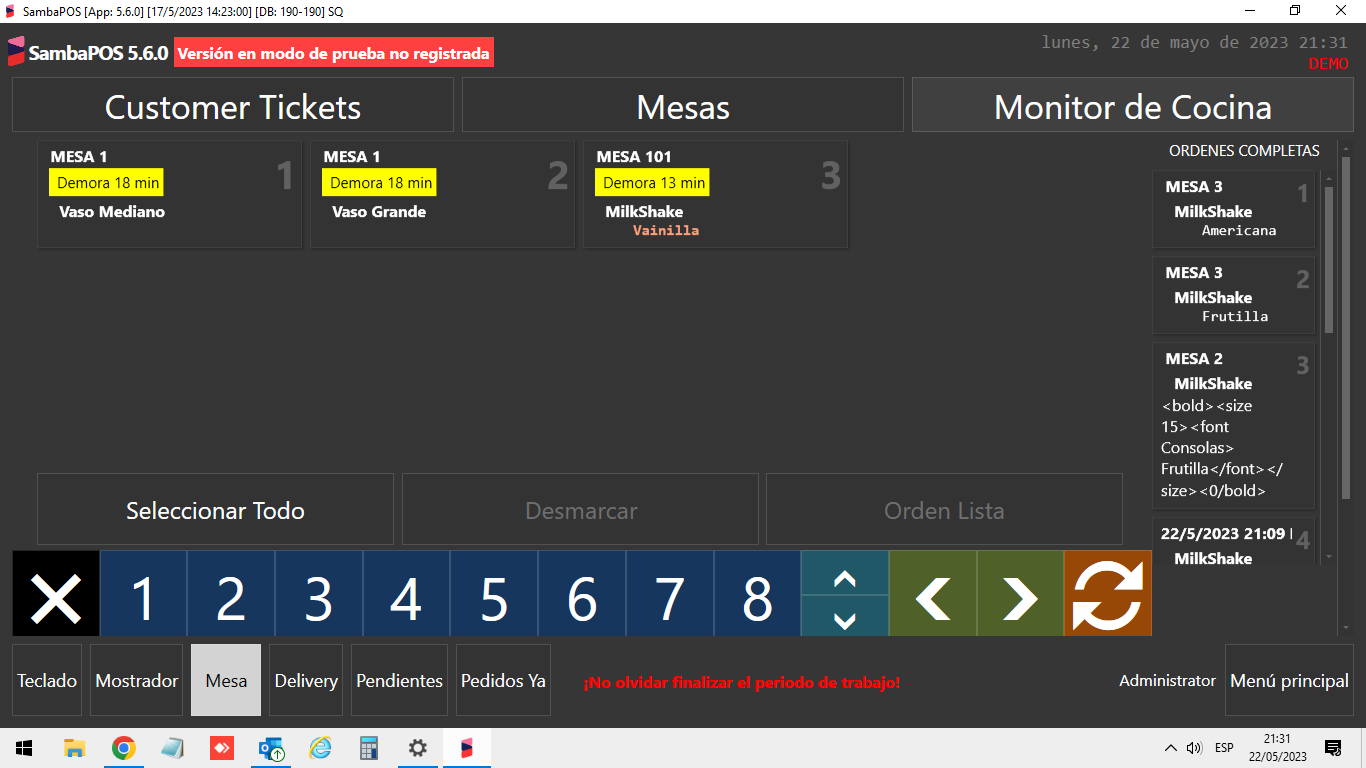
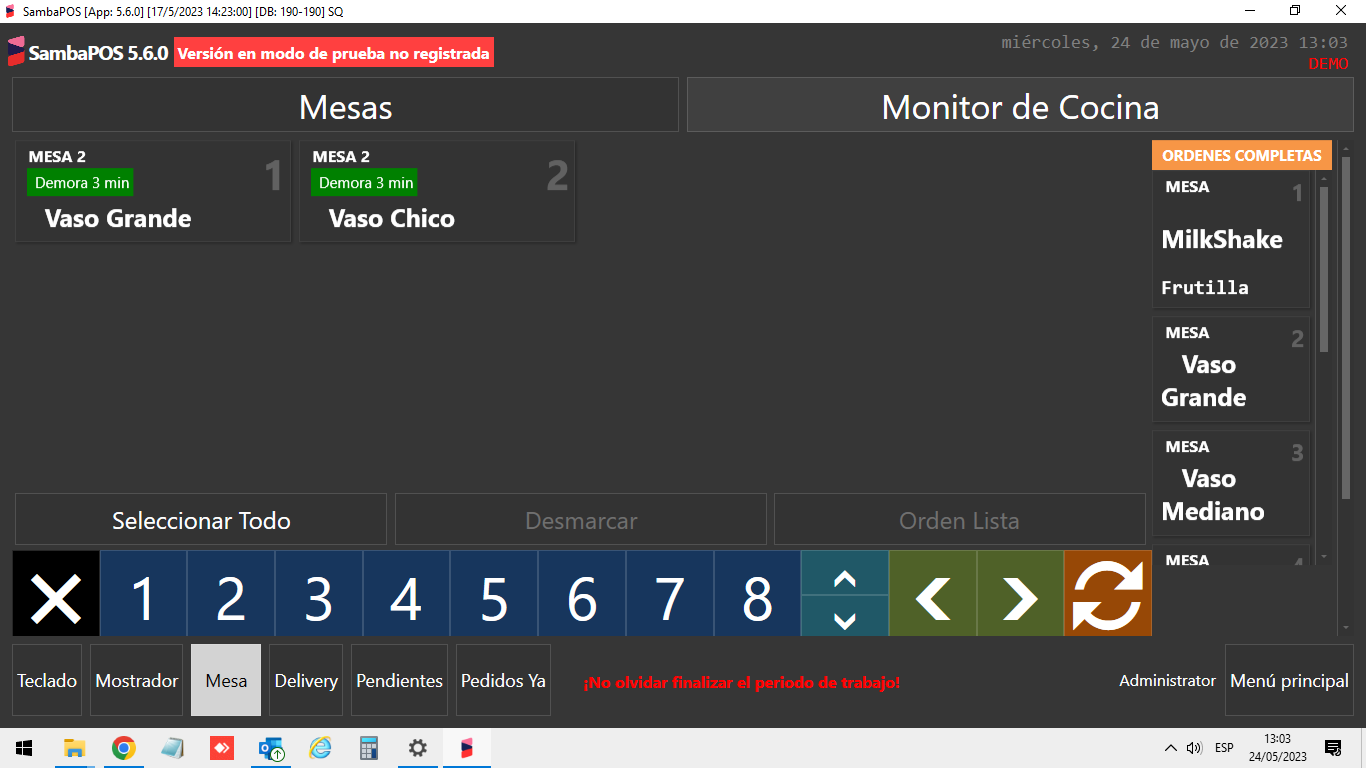
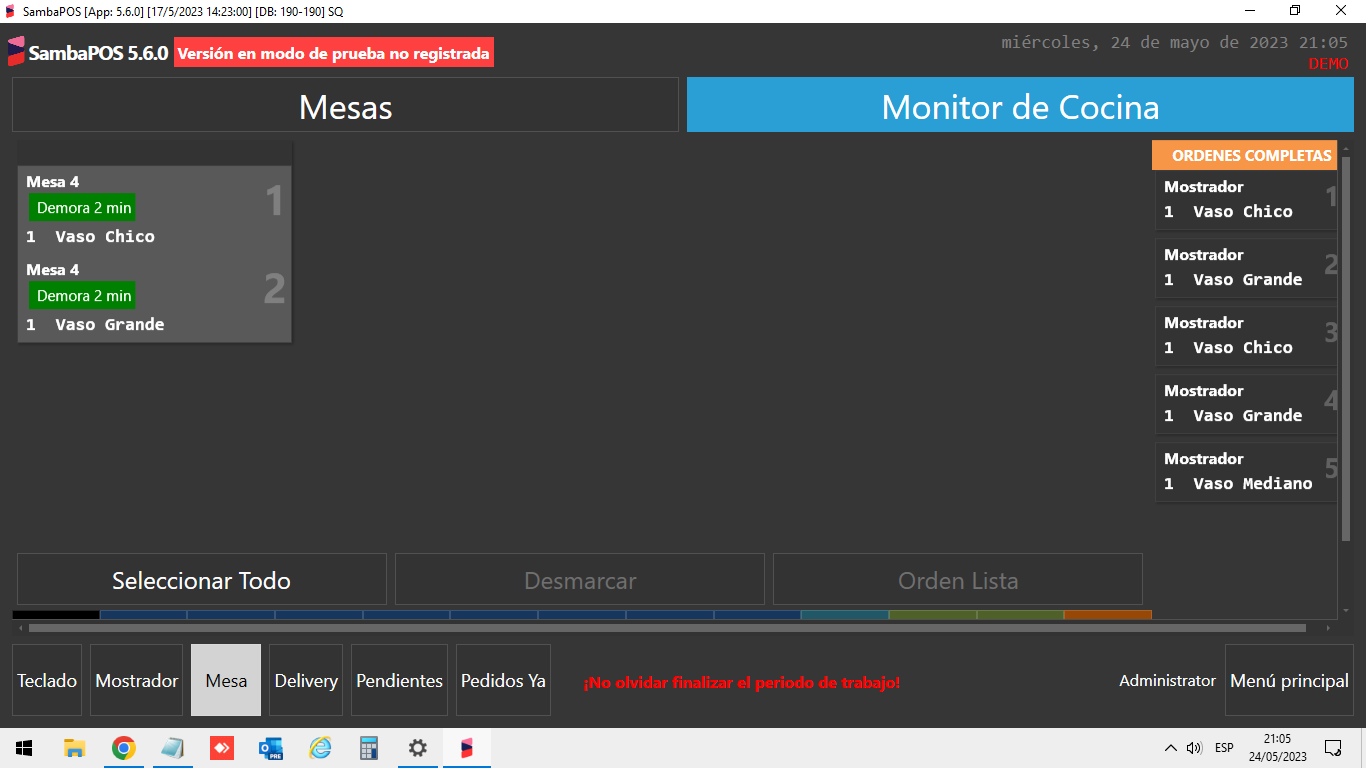
Hello everyone! I’m just starting with Samba and I have a very silly question but I can’t find the solution. Where is the option to group orders by entity? For example, I have two items on a table that, although I marked them together, appear separately on the kitchen monitor. Thank you so much
I don’t have access to a Sambapos install now, but I’m almost sure there is an option somewhere there to combine multiple items.
That’s in the printer template I believe.
I think so, but I can’t find where to set it up.
I still can’t find a way to fix it. Maybe I don’t explain it well. When, for example, I open a table, and mark two items, they are shown separately on the kitchen monitor. The idea is that everything is displayed in the same box. Any suggestions where to set this up? Thank you so much!
Food and drink on the same screen?
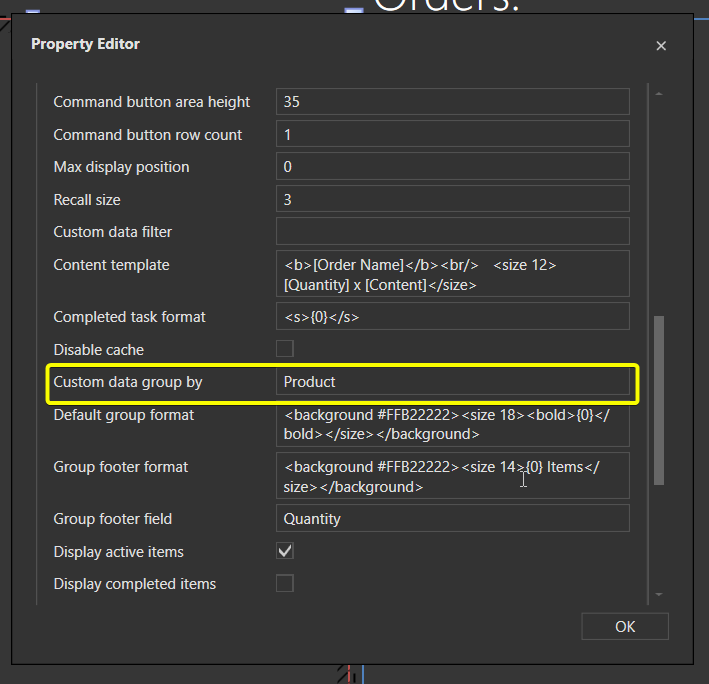
In you Entity Screen, edit the Task Editor widget field Custom data group by field to your entity name. You will have to make sure you the entity name and custom task field setup in the printer template.
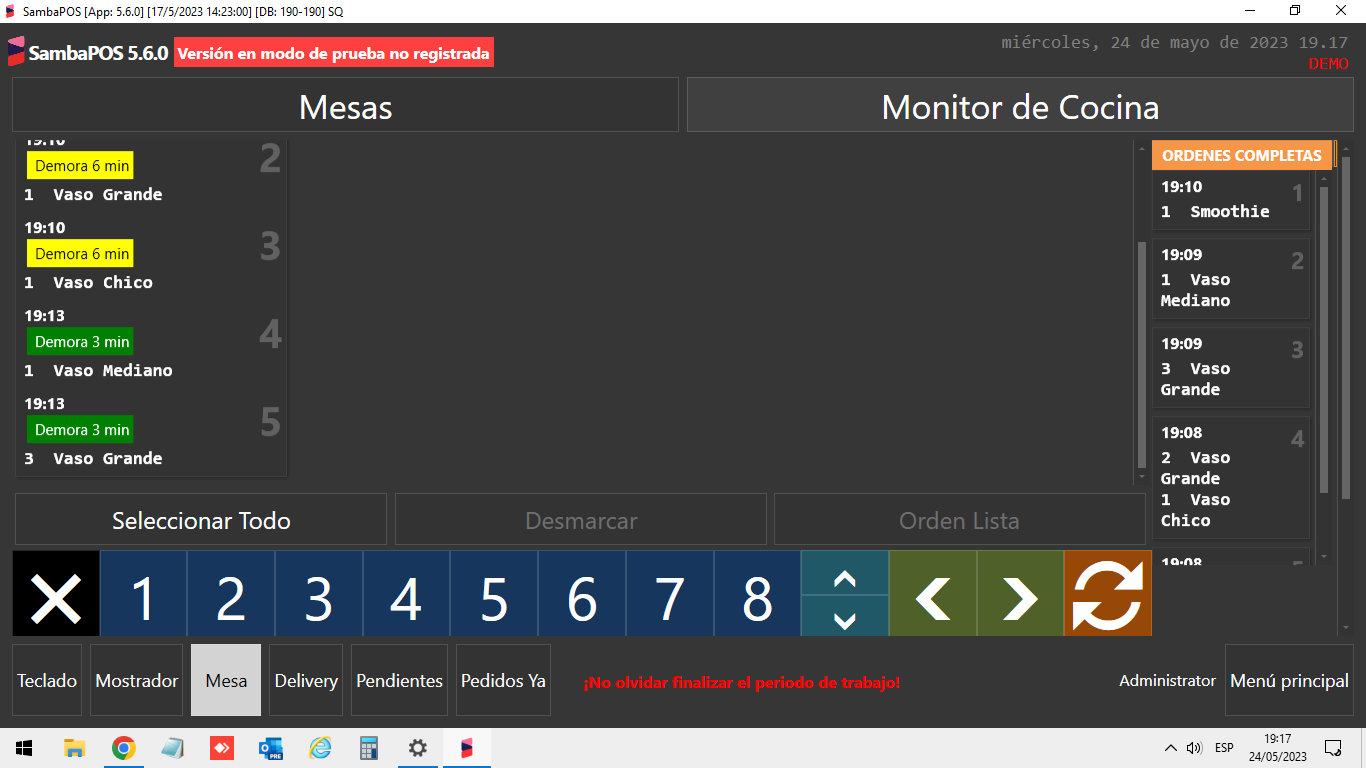
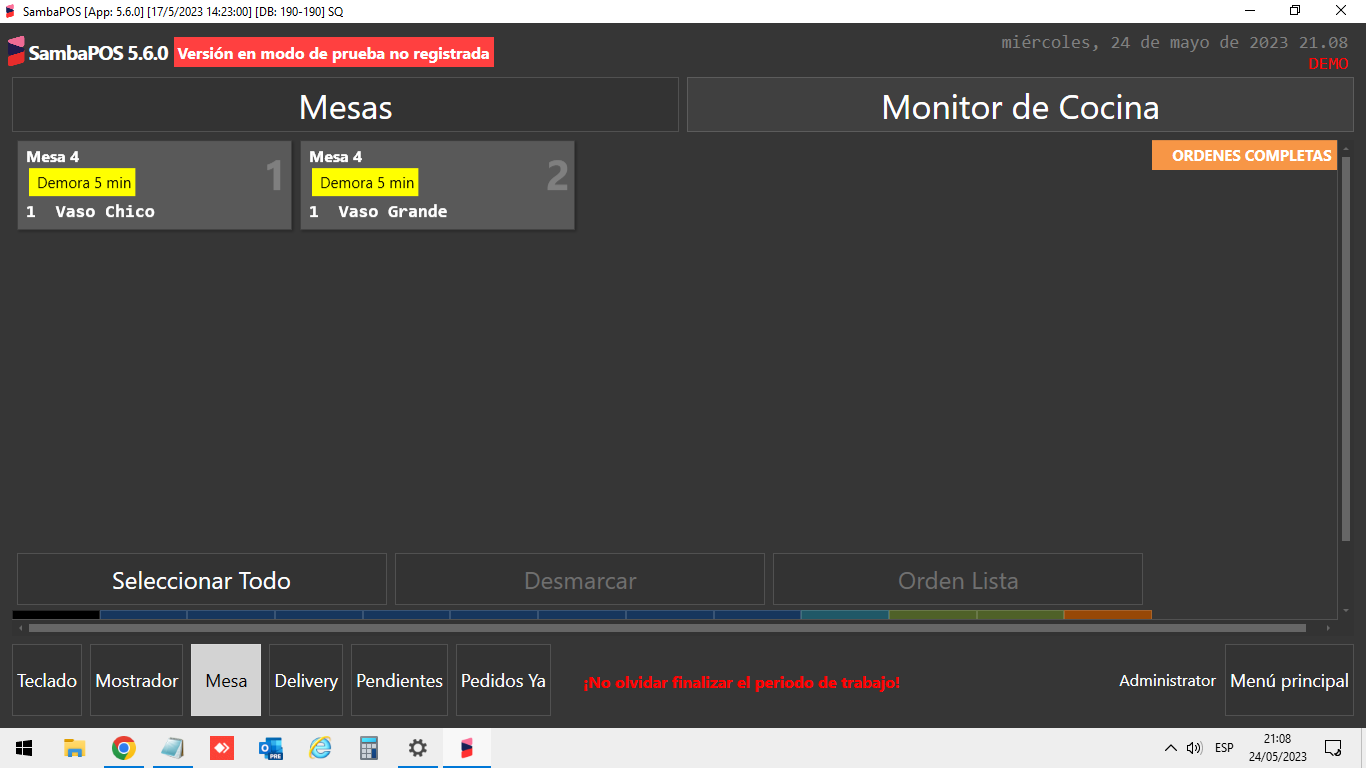
@Bob_be We are closer. Now if I group the products of the same order, but the cards were misplaced and they all appear in the same column.
Any suggestions where to look?


Your printer template should have a line similar to this: (Table={ENTITY NAME:Table})
The Custom data group by should be Table, the same name as the (Table={ENTITY NAME:Table})
I am really confused with this. I already read all the tutorials I found and I’ve been trying different configurations for several days. In the preview of the print job everything appears together, but in the kitchen monitor it appears as two separate cards, even though the entire order is entered together.
When using a Printer Templates for Task items, the printer templates do not preform as a printed out template. The Printer Template creates a Task item for each order (not ticket). Instead of using an action called “Add Task” and filling in the fields,
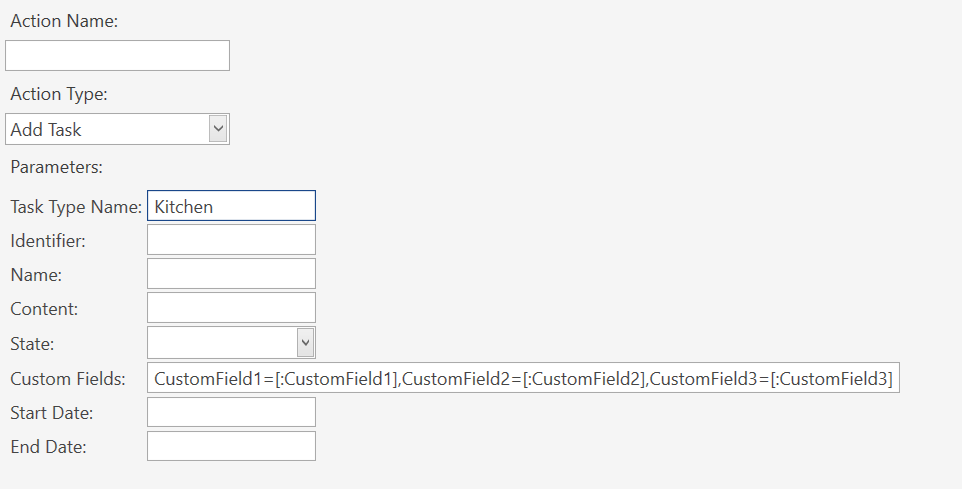
the printer template does automatically.
The Custom Fields, in the image above, the Task Printer Template is creating most of them in the template. That is why in the Printer Template you want to use this format:
(CustomField1={<some ticket value>})
(CustomField2={<some ticket value>})
Anything not contained within the () will be placed in the Content field of the task. That part will preform just like a normal printer template…just for each order not the whole ticket. I believe this is what most of the tutorials are using for the orders section.
The Task Widget is using the Task Fields to arrange the display.
I hope I explained this correctly and that it makes sense.
Thank you very much for your explanation, but I think I’m at a much earlier level than understanding that. The strange thing is that if I use the “reprint order” command, the items grouped by table appear. So I’m looking at and comparing those actions to see if I can achieve the same result as sending the table to kitchen screen directly.

Is that using the same printer template?
Did you put the (Table={ENTITY NAME:Table}) in your template? Or the equivalent in your own language.
Is that using the same printer template?
I think so.
If I put (Table={ENTITY NAME:Table}) nothing chages.
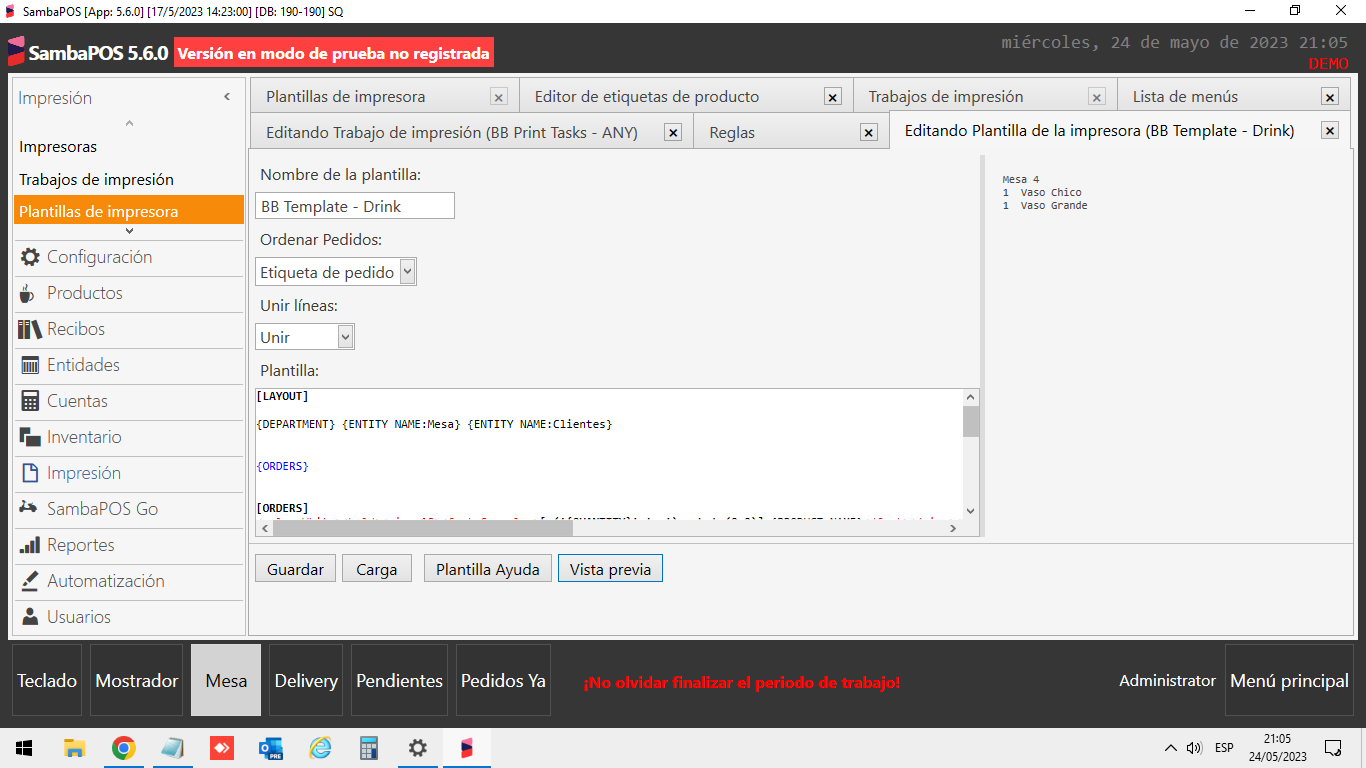
This is the printer template
[LAYOUT]
{DEPARTMENT} {ENTITY NAME:Mesa} {ENTITY NAME:Clientes}
{ORDERS}
[ORDERS]
<size 18>[=(‘{QUANTITY}’+’ ‘).substr(0,2)] {PRODUCT NAME}[=’{PORTION}‘==’’ ? ‘’ : ‘ <color #FF55FF33><size 14>{PORTION}’]
{SORTED ORDER TAGS}
[ORDERS:Gift]
<size 16>[=(‘{QUANTITY}’+’ ‘).substr(0,2)] {PRODUCT NAME}[=’{PORTION}‘==’’ ? ‘’ : ‘ <color #FF55FF33><size 14>{PORTION}’] FREE
{SORTED ORDER TAGS}
[ORDERS:Void]
<size 16>[=(‘{QUANTITY}’+’ ‘).substr(0,2)] {PRODUCT NAME}[=’{PORTION}‘==’’ ? ‘’ : ‘ <color #FF55FF33><size 14>{PORTION}’] VOID
{SORTED ORDER TAGS}
[SORTED ORDER TAGS]
<size 18> [=(‘{ORDER TAG QUANTITY}’>1 ? {ORDER TAG QUANTITY} : ’ ')] {ORDER TAG NAME}
[SORTED ORDER TAGS:VIP Discount]
– do not print
[SORTED ORDER TAGS:Happy Hour Discount]
– do not print
I do not see (Table={ENTITY NAME:Table}) in the template. Are you submitting new orders to test. It will not work with previous submitted orders…before any changes.
Also the entity screen do you have Table listed for the Custom data group by field?
Look in your rules under “Automation Command Executed” section for anything that looks like your reprint button. In the actions list look for anything related to Execute Print Job. Note the action name and look for that action under the Actions (Main Menu → Manage → Automation → Actions). The Print Job Name field should list the print job.
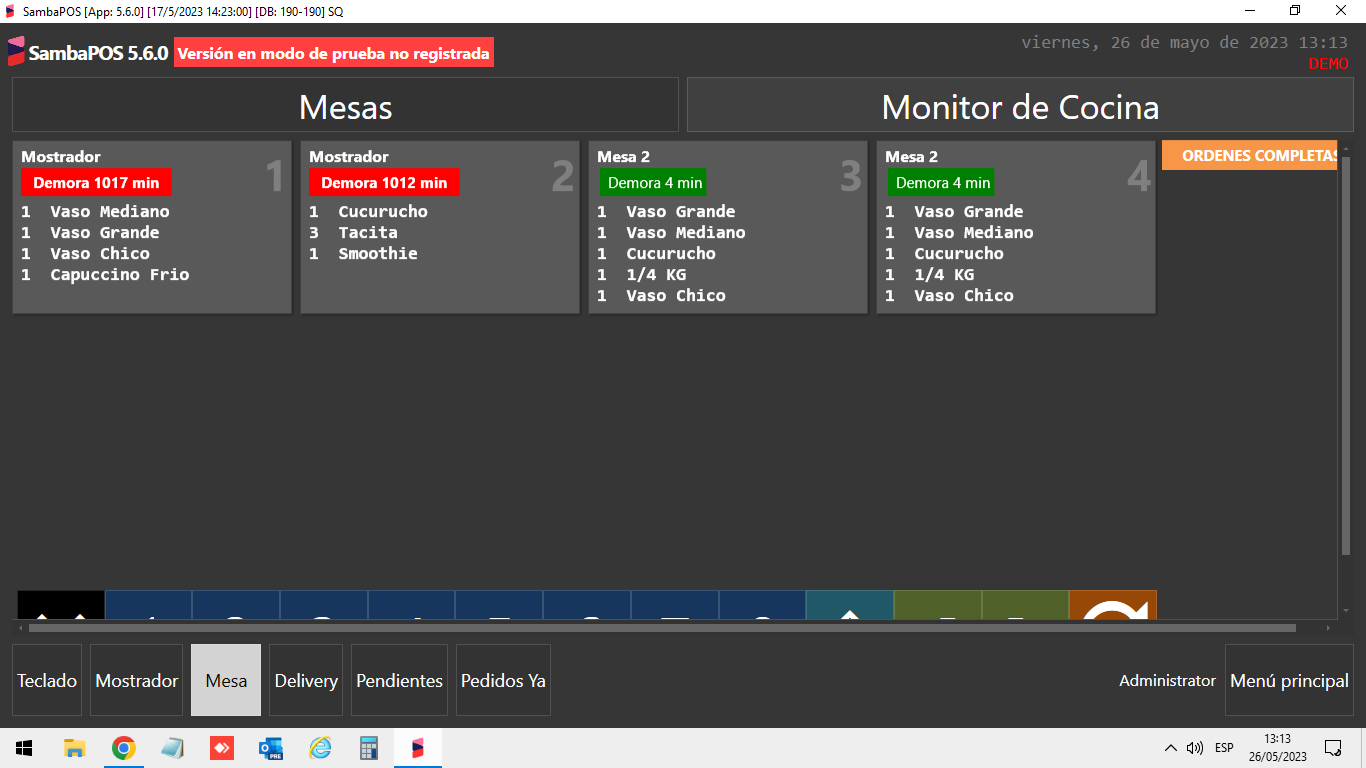
There I reviewed the rules and I was able (I don’t know exactly which one to modify) but I managed to get the entire order out on one card. Now what happens is that when I enter a table and press “close” the order reappears on the kitchen screen, or if it was already on the screen, that table is duplicated. Thank you very much for all your help we are moving forward.
If you are wanting entire tickets it would be best to use ticket lister and not tasks.
Yes, we are getting closer!
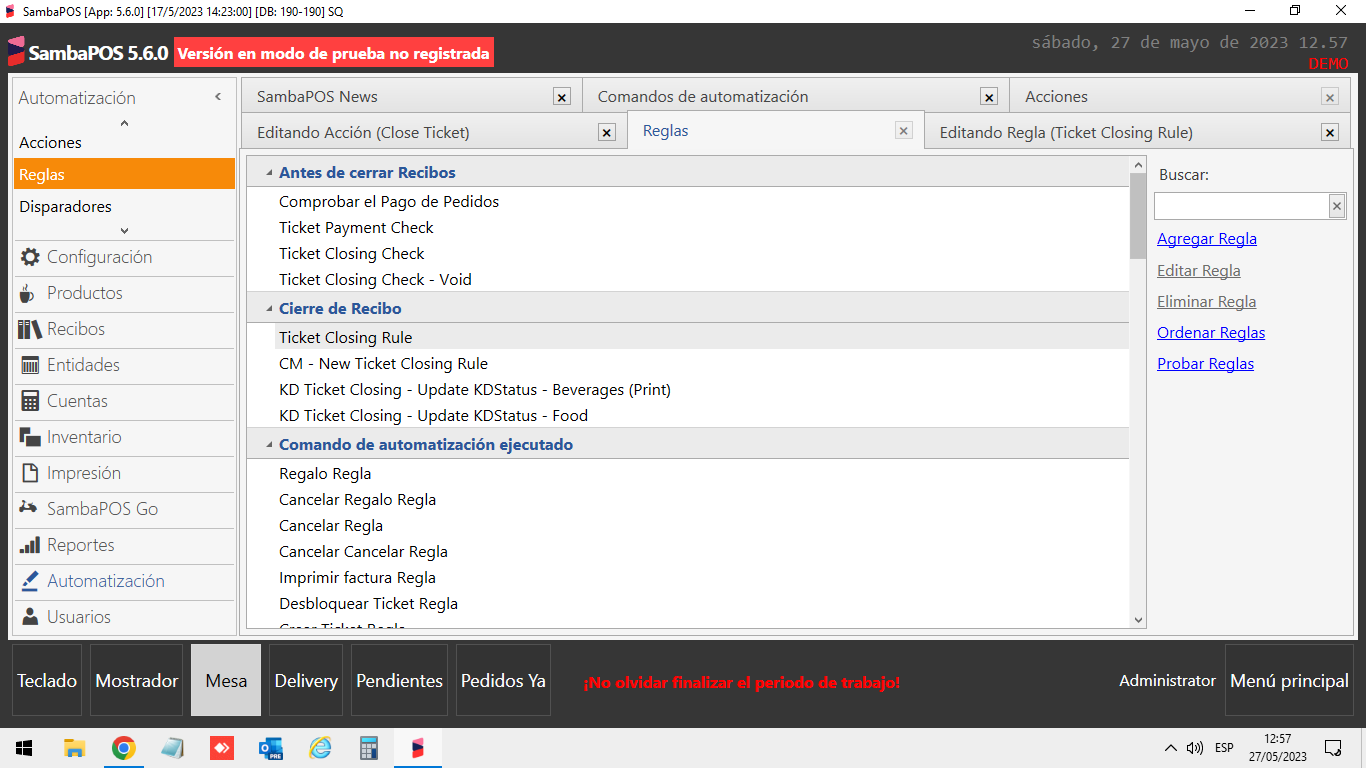
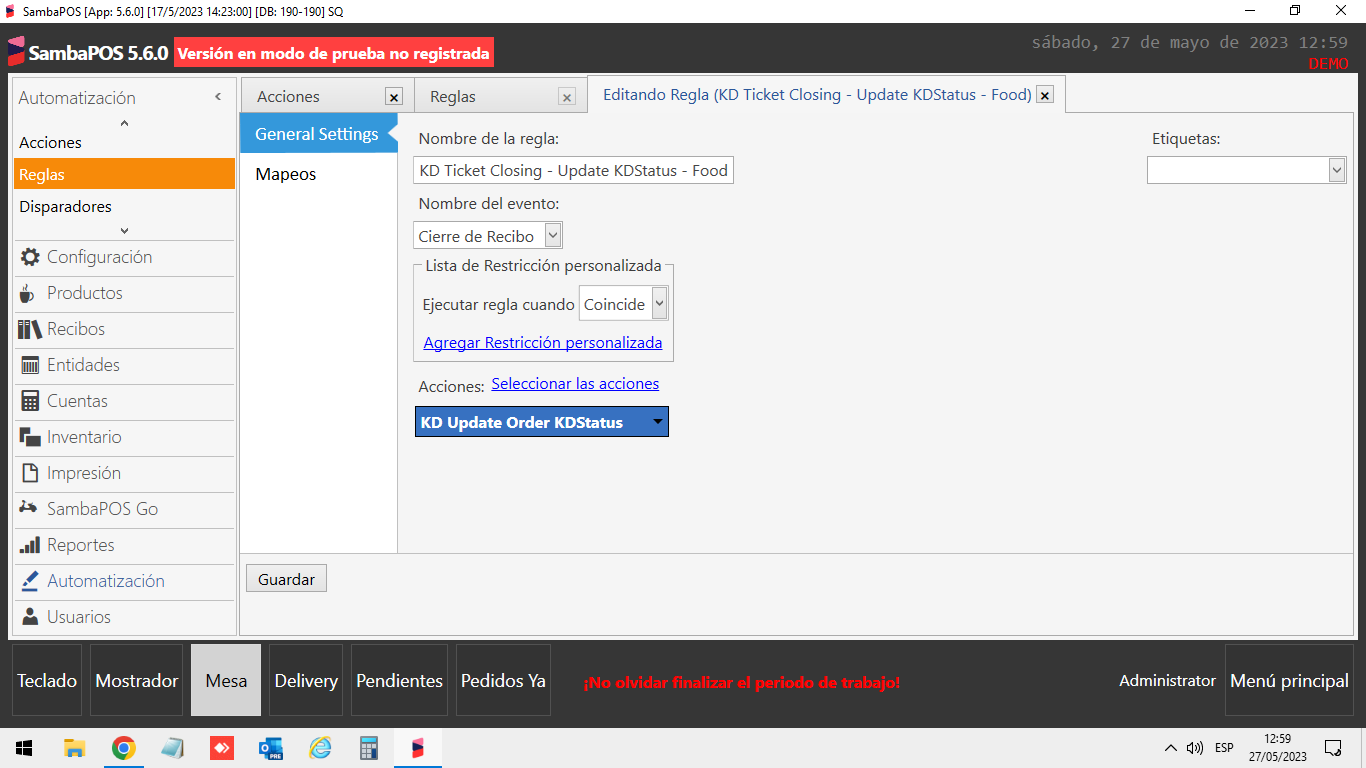
In your rules, you should have a Ticket Closing Rule.
- Show a screen shot of the opened rule with the actions expanded.
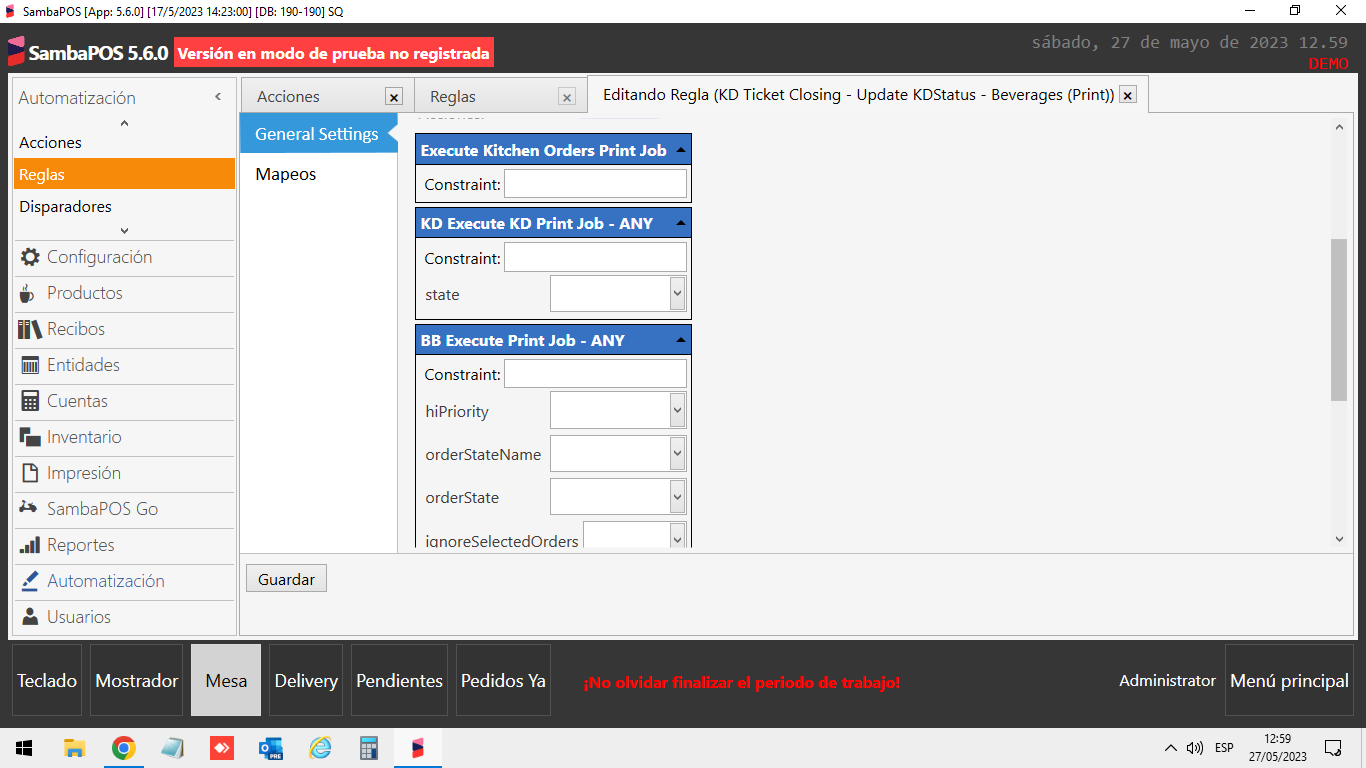
In that rule, in the Actions area, there should be an action called Execute Kitchen Orders Print Job (or something similar).
Look for that action under the Actions (Main Menu → Manage → Automation → Actions).
-
Open that an take a screen shot and post that as well.
-
Post a screen shot of a ticket with an order that has been added to a ticket and the ticket closed, reopened and 1 other item added to the ticket, but not closed. I want to see the 2 states of a submitted order and a new order.
-
Also post a screen shot of the print job (Manage → Printing → Print Jobs) that are references in the Ticket Closing Rule
1 Like
@Jesse
Can I achieve the same layout using “ticket lister”? because the idea is to use the “bump bar” with the numeric keypad.
@Bob_be I hope I helps. Once again, thank you very much for the help and the time spent to answer me!