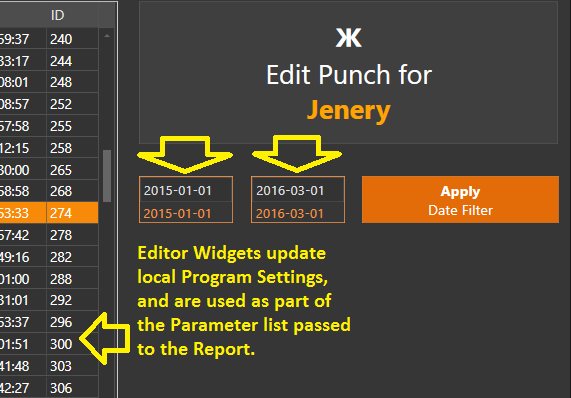
This is exactly the thing that I just did last week when I modified my Payroll screen to use a Start and End Date Range filter instead of This Month and Past Month. I found that I sometimes needed to look back into the past further than Past Month.

As a result, I ended up modifying all the Screens, Scripts, and Reports for everything to do with Time Clock: the Time Clock Screen, the Payroll Screen, and the Punch Editor Screen. By doing this, I was also able to reduce the number of required Reports significantly, and pull data from any date/time range that I want.
It used to be that I had a separate Report for each Employee, but when using parameters, this isn’t necessary.
In the case of the Payroll Screen, there are 3 Report Widgets, each linked to different Reports, and for each of those Reports, I had 4 Employees, so I was duplicating all of them depending on the Employee Name. So I had 12 Reports that were identical, except for the Employee Name. Now I have 3 Reports only.
In the case of the Time Clock Screen, there are 4 Report Widgets (1 for each Employee), which were linked to separate 4 Reports. Now they are all linked to a single Report, and the Employee Name is passed in as a Parameter.
In the case of the Punch Editor, there is 1 Report Widget, but I had 4 Reports that would be “switched in” via Update Widget Action. Now there is 1 Report, and the Employee is passed as a Parameter.
So in the end, where I used to need 20 Reports, I now only need 5. And if I hire a new employee, I had to create 5 Reports for that Employee. Now I create 0 Reports. None. The new Employee is simply a Parameter to the existing Reports.
Besides passing in the Employee Name, I also pass in the Start and End Date for the period that I want to filter, and I do it via Automation with Refresh Custom Report Viewer Action to modify the Parameter list dynamically.
To see how well this works, check my recent Tutorial for Punch Editor. Specifically, look at the Report and Script sections of the Tutorial, as well as the Rule that fires the Refresh Report Action.
This is the Parameter list in the Action:
Employee,{SETTING:PEEntity},{SETTING:PEDateFilterBEG},{SETTING:PEDateFilterEND}
This is the Report:
[#Punch Editor:1,1, 1,48,48, 1]
>Date|Day|Hours|START|END|ID
@@EmployeeHoursDailyPE:$1,$2,$3,$4,$5
The parameter mapping passed from the list in the Action to the Report:
$1 : Entity Type (Employees)
$2 : Entity Name (name of Employee)
$3 : Date Filter Start (shows punch data after this date)
$4 : Date Filter End (shows punch data before this date)
$5 : unused
You could do a similar thing for the Terminal Workperiod Report.
Use an Editor Widget to receive the Terminal Name or Id, which updates a Program Setting, which becomes a Parameter for the Report, and you then use the Refresh Report Widget Action.
Or put Automation Command buttons on the Screen with the name of each Terminal, which when clicked, update a Program Setting, and Refresh the Report Widget.
Or create Terminal Entities, and put an Entity Grid on the Screen, which when switched from 1 Terminal Entity to another, you update a Program Setting, and Refresh the Report. Then if you add or Remove a Terminal, you just need to adjust the Entity Screen for current Terminal Entities listed, and the Grid will follow.