Individual Work Period Report Per Till

I mean basically I created my own report tag expression helper :stuck_out_tongue: I think I just coined that term lol

PS: If there was a tag for CURRENTTERMINALID I wouldnt needed the script at all lol. But I love the fact that if there isnt a tag for something we need, we can just make one our-self, we dont have to wait for the developer to develop it.

Looking at your Report @Jesse - would it be more efficient to save the {CALL:x} to a Variable in the Report (at the beginning) so you only Call it once and just refer to the variable? I would like to see how that is done I assume using the “@” symbol?

This is what I was trying to describe what I would like to do when I come across “helper” not available to the {REPORT tag} command.

Of course it is exaggerated here a little due to the size of the Report


That only works for each template. There are multiple templates in WP report. When using multiple templates like that you can’t define a global @parameter.

But yes that’s a good idea and it could be used to reduce a few lines.

That’s awesome :). Appreciate all the help. I’m glad its benefiting others also. haven’t had a chance to implement this but will update you as soon as I do get around.

TERMINOLOGY:
So @Jesse when you say Template you mean:
{REPORT TICKET TYPES:x} = Template

Not the full report, correct?

Ok so we can use {SETTING:x} in a report so for your Report above we {CALL:x} save to a {SETTING:x} then run with that?

[Sales:1,1,1] is a template start for example.

1 Like

Ok sorry so “@” parameters are bound within the Template [Report Something:1,1] - very handy to know


This is exactly the thing that I just did last week when I modified my Payroll screen to use a Start and End Date Range filter instead of This Month and Past Month. I found that I sometimes needed to look back into the past further than Past Month.

As a result, I ended up modifying all the Screens, Scripts, and Reports for everything to do with Time Clock: the Time Clock Screen, the Payroll Screen, and the Punch Editor Screen. By doing this, I was also able to reduce the number of required Reports significantly, and pull data from any date/time range that I want.

It used to be that I had a separate Report for each Employee, but when using parameters, this isn’t necessary.

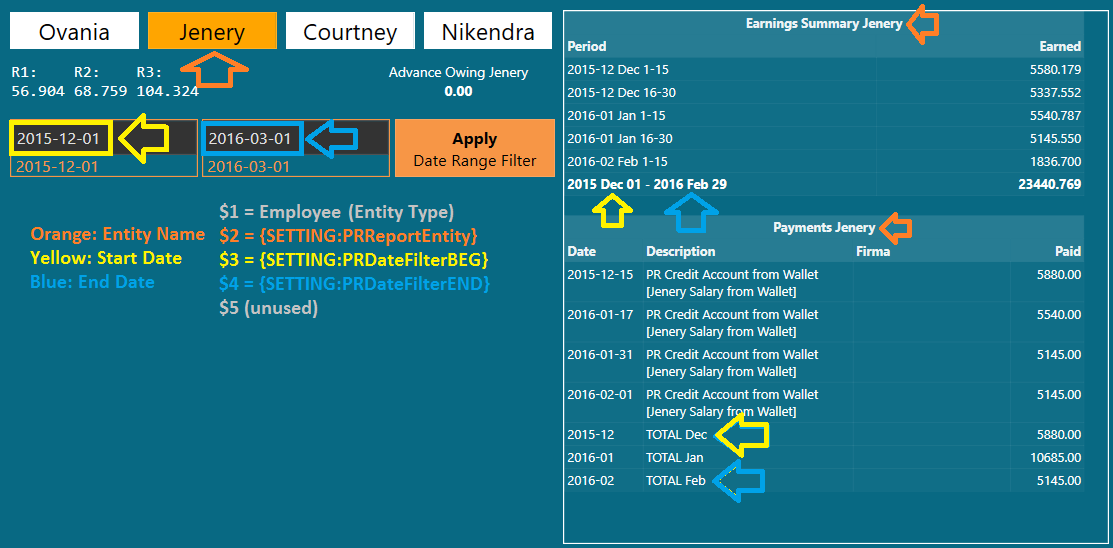
In the case of the Payroll Screen, there are 3 Report Widgets, each linked to different Reports, and for each of those Reports, I had 4 Employees, so I was duplicating all of them depending on the Employee Name. So I had 12 Reports that were identical, except for the Employee Name. Now I have 3 Reports only.

In the case of the Time Clock Screen, there are 4 Report Widgets (1 for each Employee), which were linked to separate 4 Reports. Now they are all linked to a single Report, and the Employee Name is passed in as a Parameter.

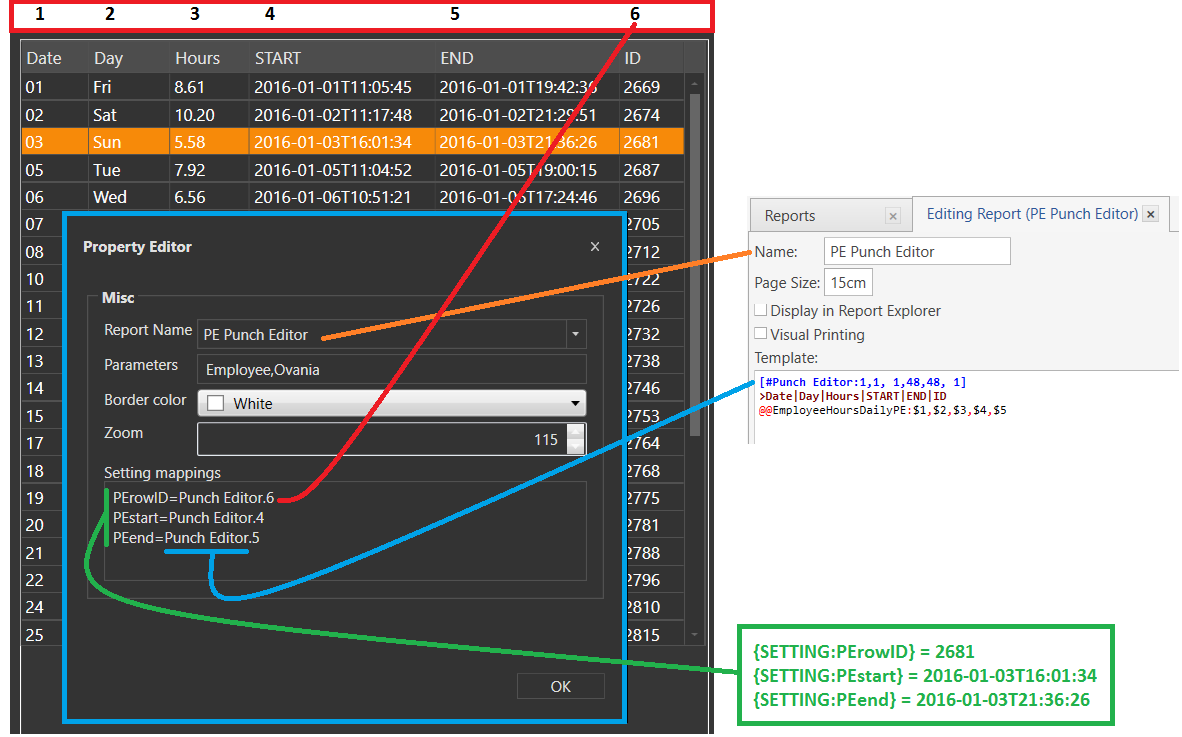
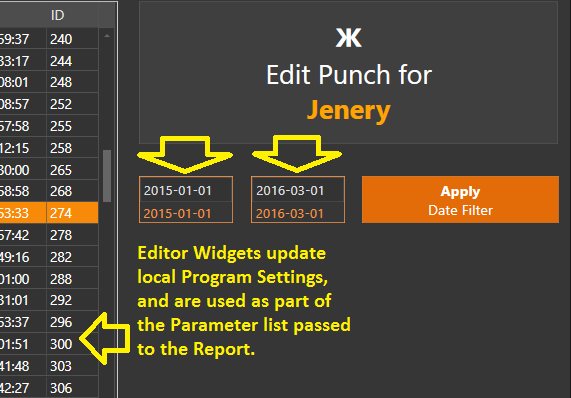
In the case of the Punch Editor, there is 1 Report Widget, but I had 4 Reports that would be “switched in” via Update Widget Action. Now there is 1 Report, and the Employee is passed as a Parameter.

So in the end, where I used to need 20 Reports, I now only need 5. And if I hire a new employee, I had to create 5 Reports for that Employee. Now I create 0 Reports. None. The new Employee is simply a Parameter to the existing Reports.

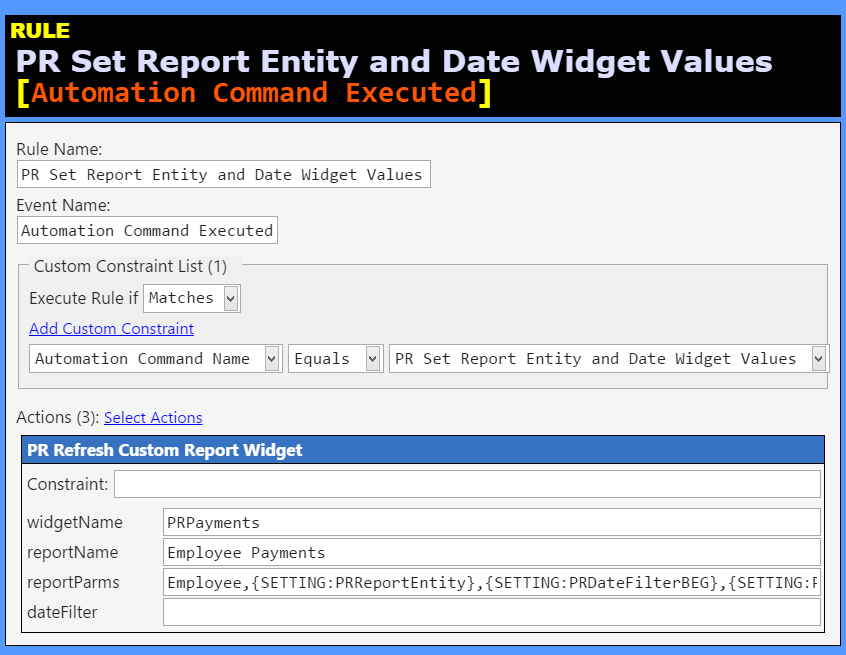
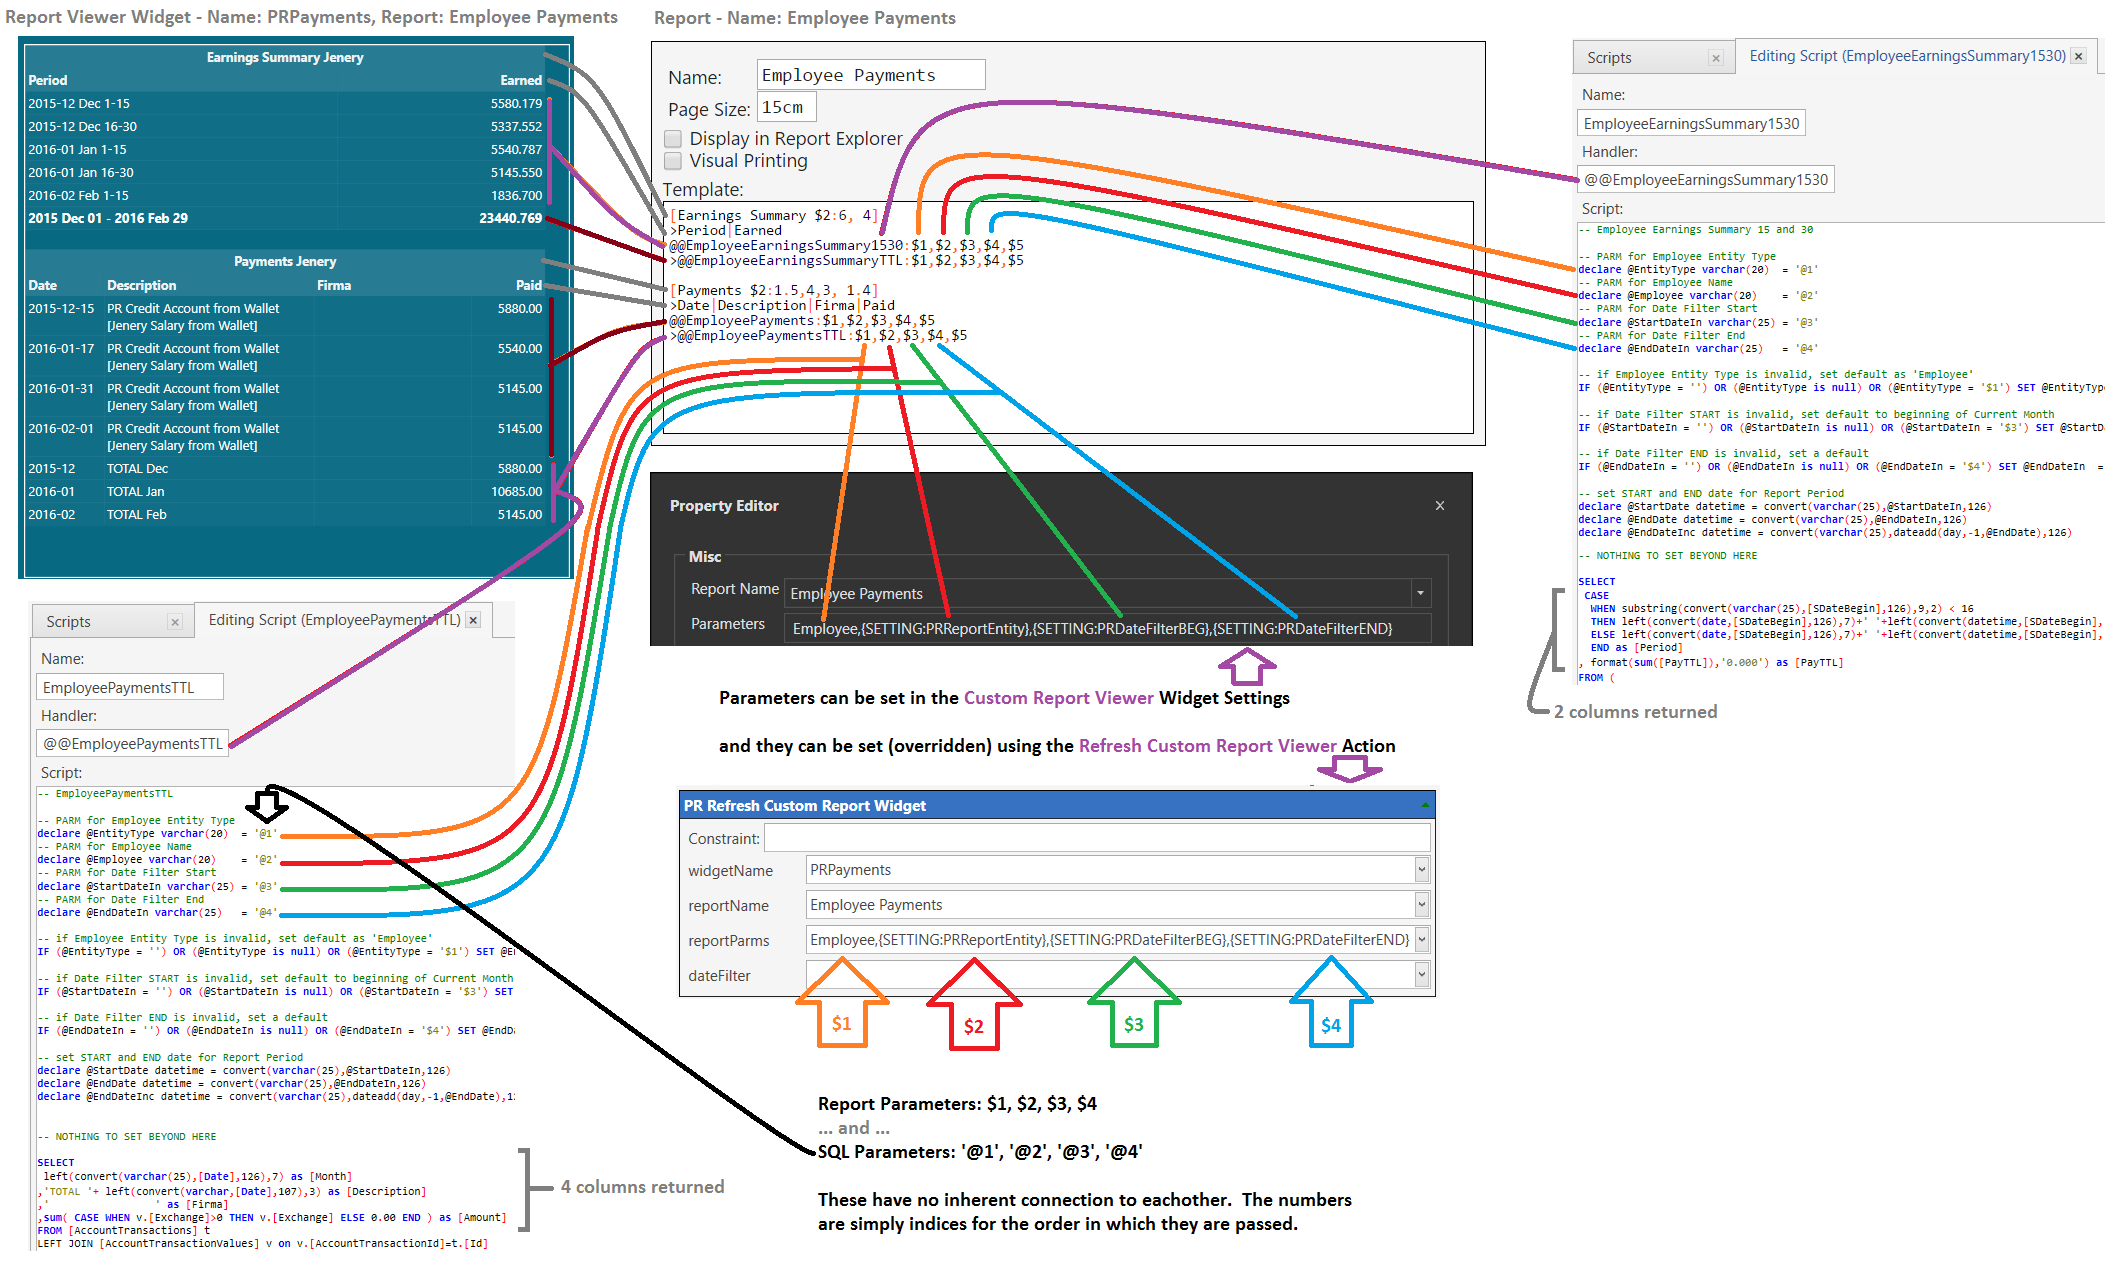
Besides passing in the Employee Name, I also pass in the Start and End Date for the period that I want to filter, and I do it via Automation with Refresh Custom Report Viewer Action to modify the Parameter list dynamically.

To see how well this works, check my recent Tutorial for Punch Editor. Specifically, look at the Report and Script sections of the Tutorial, as well as the Rule that fires the Refresh Report Action.

This is the Parameter list in the Action:

Employee,{SETTING:PEEntity},{SETTING:PEDateFilterBEG},{SETTING:PEDateFilterEND}
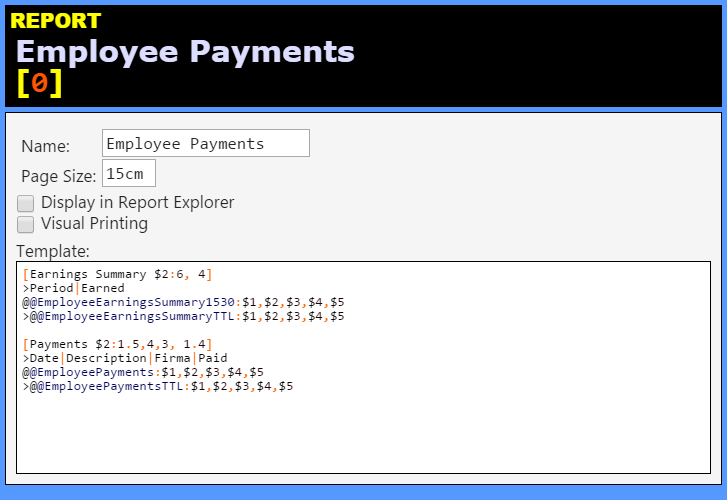
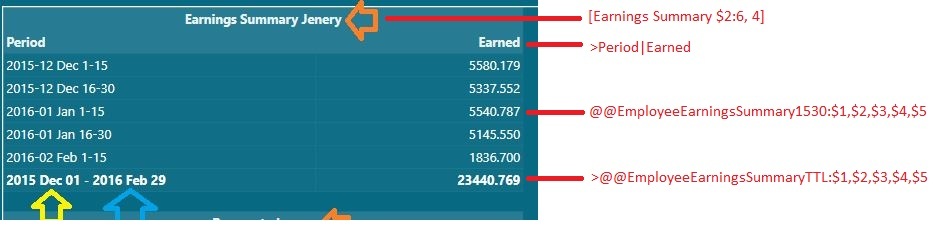
This is the Report:

[#Punch Editor:1,1, 1,48,48, 1]
>Date|Day|Hours|START|END|ID
@@EmployeeHoursDailyPE:$1,$2,$3,$4,$5

The parameter mapping passed from the list in the Action to the Report:

$1 : Entity Type (Employees)
$2 : Entity Name (name of Employee)
$3 : Date Filter Start (shows punch data after this date)
$4 : Date Filter End (shows punch data before this date)
$5 : unused

You could do a similar thing for the Terminal Workperiod Report.

Use an Editor Widget to receive the Terminal Name or Id, which updates a Program Setting, which becomes a Parameter for the Report, and you then use the Refresh Report Widget Action.

Or put Automation Command buttons on the Screen with the name of each Terminal, which when clicked, update a Program Setting, and Refresh the Report Widget.

Or create Terminal Entities, and put an Entity Grid on the Screen, which when switched from 1 Terminal Entity to another, you update a Program Setting, and Refresh the Report. Then if you add or Remove a Terminal, you just need to adjust the Entity Screen for current Terminal Entities listed, and the Grid will follow.

This is another good reason to use a Custom Entity Screen with a Report Viewer Widget and the Refresh Custom Report Viewer Action while passing a Parameter list.

Consider this Report from my Payroll Screen that has more than 1 Template


[Earnings Summary $2:6, 4]
>Period|Earned
@@EmployeeEarningsSummary1530:$1,$2,$3,$4,$5
>@@EmployeeEarningsSummaryTTL:$1,$2,$3,$4,$5

[Payments $2:1.5,4,3, 1.4]
>Date|Description|Firma|Paid
@@EmployeePayments:$1,$2,$3,$4,$5
>@@EmployeePaymentsTTL:$1,$2,$3,$4,$5

A Rule fires the Refresh Custom Report Viewer Action while passing a list of Parameters:


The result is that we can update multiple “Templates” that are part of the same Report using the same Parameter list, and use only the Parameters that are valid to that “Template”


1 Like

Feels like I am watching an artist when I seem your work Q!
You have ID NO. 274 highlighted in your image above (partly obscured). How have you done that as I thought that was a report widget, Display Only, whereas it looks like a Result Grid?

[#Punch Editor:1,1, 1,48,48, 1]
 ^ the # symbol turns the Report into a result grid, so we can select individual lines

When we have a #Report, we can select an individual Row and then access individual Cells within that Row using the Setting Mappings in the Custom Report Viewer Widget Settings.

1 Like

So we could call an Update Action for an Individual Line or Cell i.e. Toggle On or Off a value?
(Can’t tell you guys how excited I am getting here with these tools! Like "#" - did not pick that up from my reading)

I know it must be getting late for your so sorry for being a pest.

I understand almost all of this stuff but little confused with this picture and syntax:

So it seems you have listed 5 parameters as you have shown above (fantastic) but there are only 2 colums defined in the template [Earnings Summary $2:6, 4].

How is the 2 lines after the "@@" evaluated to get the output in the image, like how does it know to place which "$parms" and the Data syntax changes? :confused:

Way back when Custom Reports first came to be, Emre mentioned it, but it gets passed over because it isn’t often used. It wasn’t until we started to hash out the idea of the Punch Editor that Emre reminded me. I was building this crazy looking “Report” using a bunch of Command Buttons at first, but Emre “solved” that insanity by bringing up the #Grid feature and the Setting Mappings usage and syntax.

I don’t understand what you are asking. This is still a Report (results produced by @@SQL script). We cannot directly edit the data in it.

Yes I do not want to edit the data as displayed in the Report BUT I wish to update the source data coming from an Entity and then refresh the Report Grid?

For instance maybe the Report used a EXPRESSION:x=y and through an Update we change “Y” so therefore when we refresh the report that Grid Line is no longer shown. Or it could be more simple that we just change some field data like Name = “Bill” -> Name now equals “Billy”.

That is exactly what the Punch Editor does. It passes data into {SETTING:x} variables, then Automation executes SQL UPDATE Statements directly to the DB based on the ID field in [EntityStateLogs] to change the Start and/or End Date/Time. Then it refreshes the Grid.

That is theoretically possible I believe. You would just use a $variableParameter as in:

{REPORT TAG:Fields:(TT=$1)}
1 Like

Ah @QMcKay it is passing 5 variables to a @@SQL script - :relieved:? The script is only returning 2 values?
My thirst for Samb knowledge is growing out of control here!

Reports (Formatted Informative Data) is one of the most important and useful parts of any IT System so sorry I place a significant weighting on Reports


[EDIT]
Questions answered in Punch Editor tutorial - very, very nice work.

2 posts were merged into an existing topic: Punch Editor for Timeclock

Sorry, I was composing this reply and lost internet access for the rest of the day/night.

It is magic. :stuck_out_tongue_winking_eye:

@@blahblah calls a SQL Script. It is not the same as @var1,var2,var3 which is a variable parameter list. I am not using lists here as Kendash demonstrates, but I am using $variableParamters which are passed in from the Widget or the Action that Refreshes the Widget.

Since my internet was down, I had lots of time so I could create this beauty


4 Likes

OMG! - Leonardo da Vinci!

Yes that sneaky Rule - thanks for taking the time, I am sure many posters will enjoy that schematic :smile:
Leonardo was an Engineer
 :grin:
(@QMcKay - hope no offense taken, just having a little fun)

2 Likes