Shivan's Tutorial 1 - Adding a Order tag to any product, ON THE FLY-

Description: Applying ‘custom’ Order tags on the fly.

Ok so here goes my first ever tutorial. I thought I’d start with something simple to get the hang of making tutorials.
I will use GIFS in the steps to show how it’s done.

There are many ways in which a user can apply comments onto an order, or even specific item in order. One common way is the use of Order Tags to apply comments to a individual items. You can even set up Free Tagging and Save Tags with order tags so you can add comments on the flight with prices!. This particular method isn’t better but it is an alternative method for on the fly order taking.

The Other is by simply using Ticket Note to apply a comment globally. Or even Ticket Tags which can be also used to print comments on order dockets.

I’m using the Order Tag Method.

By default when you want to apply a comment to an item using order tags, you’d have to highlight the item, then the tag options become available. From there you if you have free tagging enabled, then you would click on the box which appears, bring up your keyboard, type the comment you want and press the + to apply it.
Such as shown below

Intended Purpose:

To press a button, which tags the highlighted/selected order with a custom order tag.

Seeing It In Action:

++++++++++++++++++++++++++++++++++++++++

Step 1 Create Order Tag

**

  • Create An Order Tag Named "Order Comment
  • Click Free Tagging
  • Press Save

**"

Step 2 Create The Auto Command Button

Step 3: Create The Action

  • Create A New Action and Name It OC_ Add Order Comment
  • Under Order Tag Name choose Order Comment
  • Under Order Tag Value put a custom constraint [:Enter Comment]
  • Press Save

Step 4 Create The Rule

  • Go To Rules under Automation
  • Press Rules
  • On the right press Add Rule
  • Name it: OC_Add Order Comment
  • Event Name: Automation Command Executed
  • Press Add Custom Constraint then insert the following
  • Automation Command NameEqualsOrder Comments
  • Press Select Action
  • In the left hand column, Search for OC_Add Order Comment and Press the >> to put it in the right hand column and press ok
  • Under the Action where it says Enter Comment put the following
  • [?Enter Item Description;;;;]
  • Press Save

    ++++++++++++++++++++++++++++++++++++++++++++++++++++
    The Result?? On the fly order level comments :smiley:

I hope you guys found this tutorial easy to follow and useful.

If you have any comments or suggestions regarding my tutorial please let me know, I always am looking at ways to improve.

7 Likes

LOL I did similar to this the other day and was going to do a tutorial hehe, glad I didnt get to it yet :slight_smile:

What would be nice is if the free tag could still show on the order tag screen without mapping if it has been manually added with custom automation.
The issue I had was could only remove with more automation which made using more than one free tag very tricky while keeping ability to remove…
I say this because without any tags you can just use potions and autoselect to prompt for portion and it unselect when choosing a portion, if you map free tag you then need to click close, this was the reason I did similar to yours but would be tidy if a custom automation added tag then shows on order tag screen as if it was mapped.
@emre any thoughts on that? if it doesnt make sense I will sort some screenshots to better explain.

1 Like

If you don’t mind posting some screenshots to get a better understanding of it.

reading what you wrote, I’m thinking use save free tagging and parse that info into somewhere, then make a button to remove tags, which brings up the saved tags for the current item and we could remove it?

I’m aware of portions and having auto select to pop the portion/tags window on an item, which then a user can just press on the desired portion and or tag and or even a custom made tag without a price. This functionality is more or less already in built, But what I found annoying with auto select is that maybe not all the time you would need to have the tag/portion window open, therefore if it is always open, you would have to press close all the time to insert the next item.
You can take auto select off, and then just highlight an item to select a tag.

What you stated about been also able to remove a tag after applying one with the ON THE FLY comment button, would definitely be ideal! because then it can act like a ticket note specific to an item then global ticket.

I’m gonna look a little further into this, but if you have something I can work off, that would be great, maybe we can put something together.

This isn’t a huge deal of a thing since the inbuilt comments and tags work perfectly fine and are quite adjustable and customizeable, but to me, this was just an Alternative Method of doing the same thing.

The close bit is what I’m referring to, if something has portions I always either make multiple buttons for popular items like pints and halfs or use autoselect to prompt on things like wine.
I wanted to allow free tag on everything just encase for use with kitchen and bar printer.
If you just have autoselect and portions like on wine, when you select a portion it automatically closes the portion/tag screen.
However if you have free tag mapped on everything it requires pressing close all the time like you said.
This methods gets arround that yes.

What I was suggesting is that is you add a free tag to a order which does not have free tag mapped to it it doesn’t show on the orders portion/tag screen, this is what I was suggesting, this would make handeling multiple free tags and removing information them allot easier and allow for better efficient use, also could be expanded beyond free tags further down the line.

Yep I get ya. currently for a few clients, I’ve set up a free order tag for each category/group, this way at least if comments are inserted, they are specific to that group which is easier to control.

My only issue with this is that the more free tags you save, the more space it takes. And if you have multiple type of order tags applied to an item, then there’s a lot on the screen which can be confusing.

So in other words, have like a popup menu of tags?

E.g.
A user highlights an order, presses Order Comment then a window pops up with current selected tags, which then we can add or remove?

Sorry just to clarify I mean I tag not delete free tag…
I never use save free tag myself.

I find save free tag very powerful, as it’s an alternative way which a user can add misc items on the go, or save notes that a person could use multiple of times without typing again. There are many reasons for it, the only thing I’d love for that part is the ability to also remove the free tags from the tag screen, instead of going to Order tag, finding which group it’s related to, then remove them manually and save.

I think it’s awesome we can use save free tagging to tag orders and the next time you go to a different item, what you typed before is there to use again. If only we could also have the - next to the + in free tagging section, this could save time removing tags on the go!

UPDATE **23-09-2017

  • Added Remove/Untag Order Comment On the fly

Ok so it’s been a while since I last updated this thread but i thought I’d share some progress on the ON THE FLY order tagging/commenting.
In the beginning we could add comments as tags on the go. Now we can also remove them on the go :smiley:

NOTE: Removing a comment as of now only applies to any comment added using the “ORDER COMMENT” button


Seeing it In Action

2017-09-23_03-58-37
++++++++++++++++++++++++++++++++++++++++

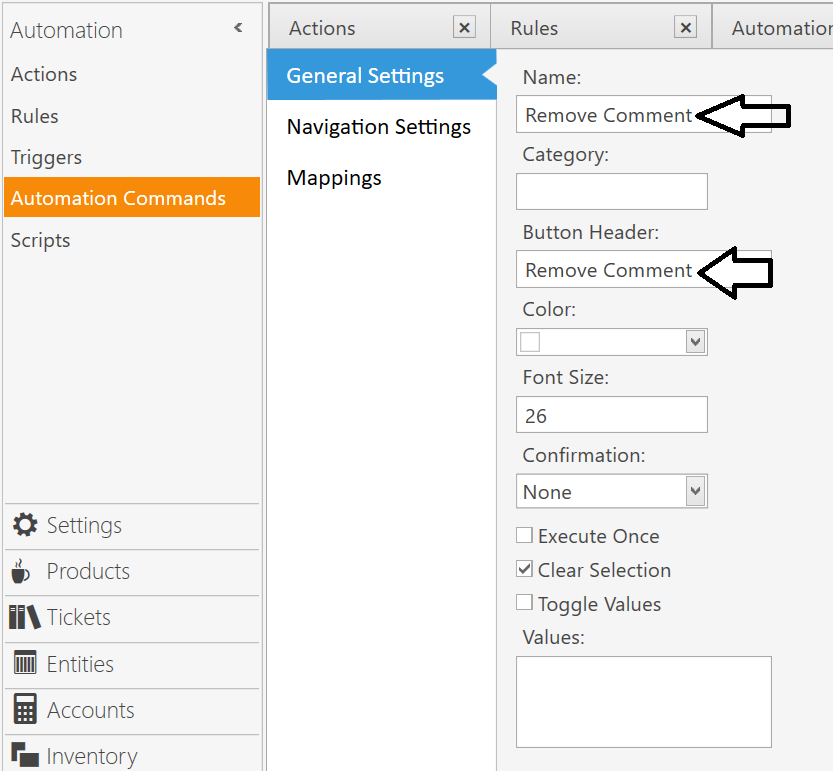
Step 1 Create Auto Command Button: Remove Comment

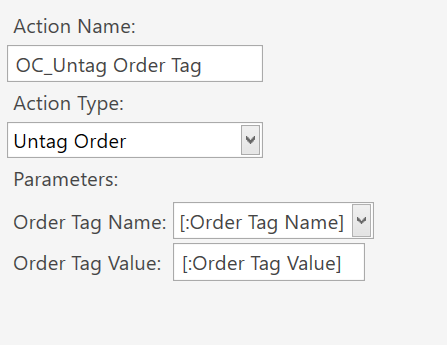
Step 2 Create Action: OC_Untag Order Tag

  • Create another action and name it OC_Untag Order Tag
  • Under Action Type Choose Untag Order
  • Under Order Tag Name put [:Order Tag Name]
  • Under Order Tag Value put [:Order Tag Value]
    image

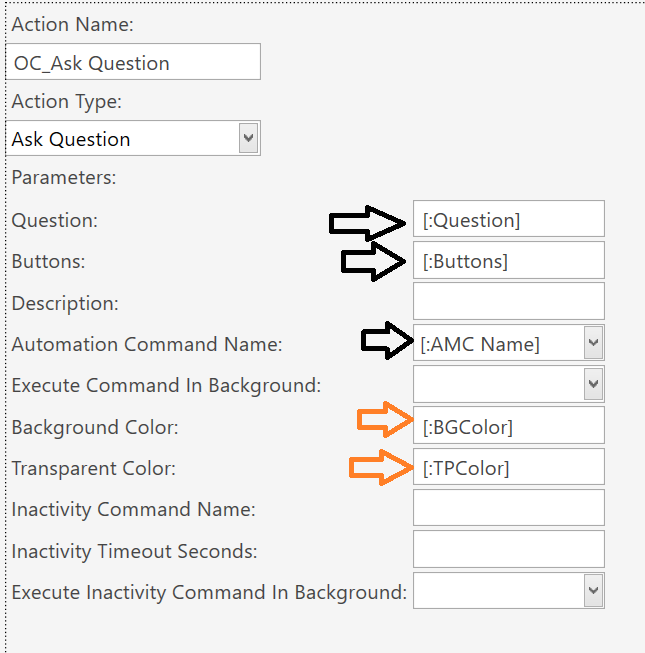
Step 3 Create Action: OC_Ask Question

  • Create a new action and name it OC_Ask Question
  • Under Action Type Choose Ask Question
  • Under Question put [:Question]
  • Under Buttons put [:Buttons]
  • Under Automation Command Name put [:AMC Name]
    The next two parameters are optional should you wish to customize the color of the popup box
    * Under Background Color put [:BGColor]
    * Under Transparent Color put [:TPColor]
    image

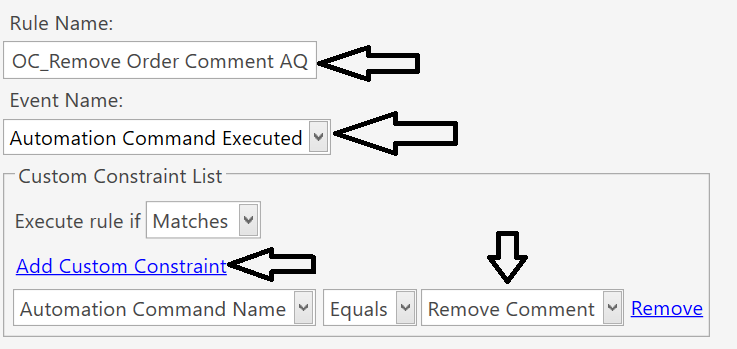
Step 4 Create Rule: OC_Remove Order Comment AQ

  • Go to Rules under Automation.
  • Press Rules.
  • On the right press Add Rule.
  • Name it: OC_Remove Order Comment AQ.
  • Under Event Name select : Automation Command Executed.
  • Press Add Custom Constraint then insert the following
    Automation Command name–Equals–Remove Comment.
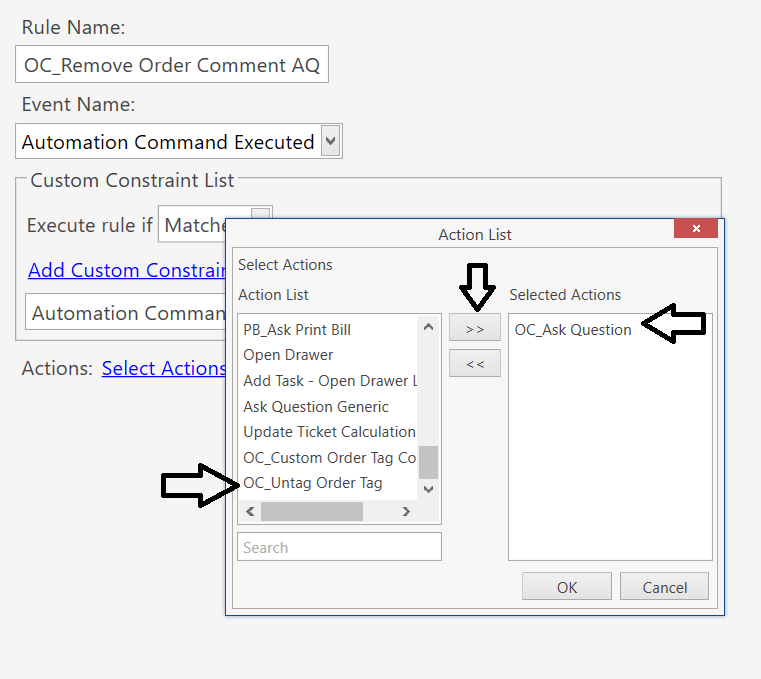
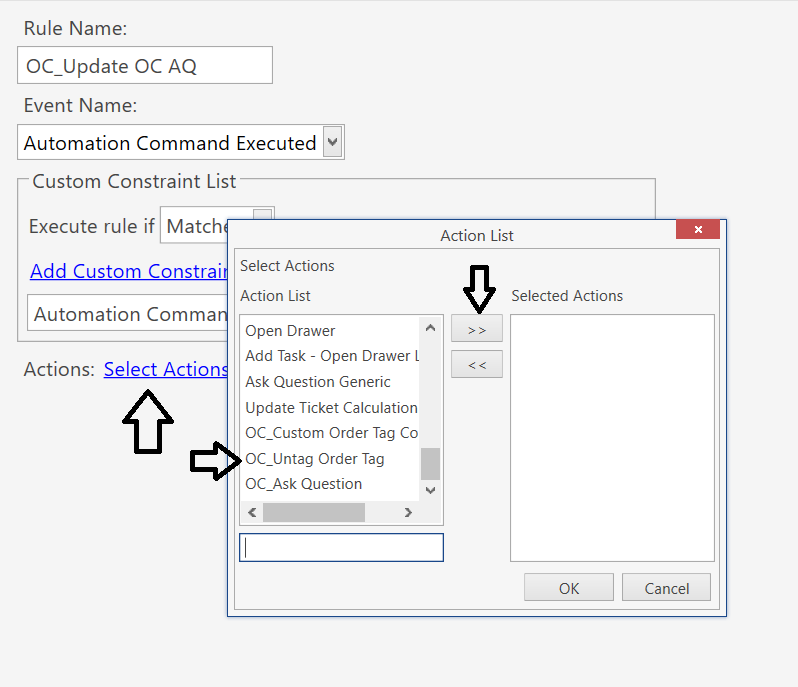
  • Press Select Action. In the left hand column, search for OC_Ask Question and press >> to put it in the right hand column and press OK
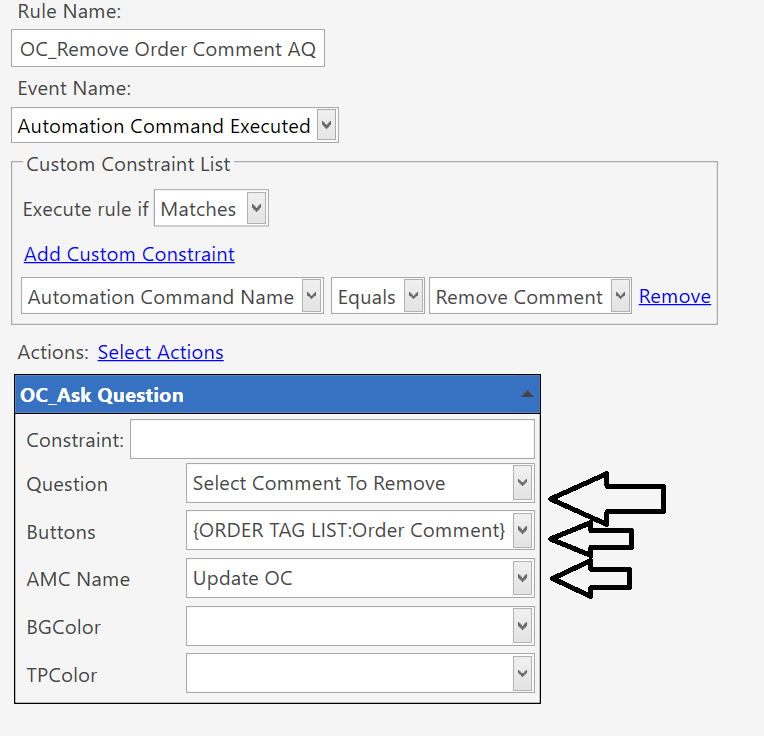
  • In the action, under Question parameter type Select Comment To Remove.
  • In the action, under Buttons type {ORDER TAG LIST:Order Comment}.
  • In the action, under AMC Name type Update OC.
  • Press Save

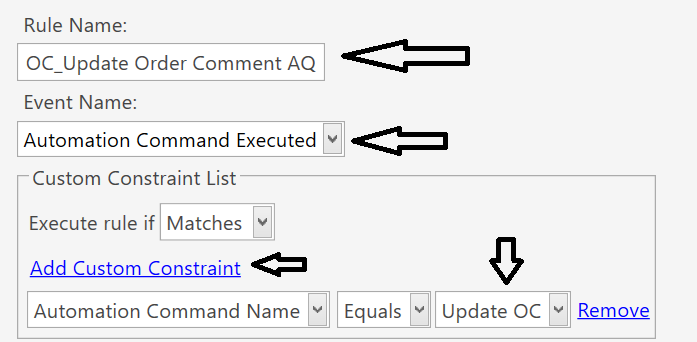
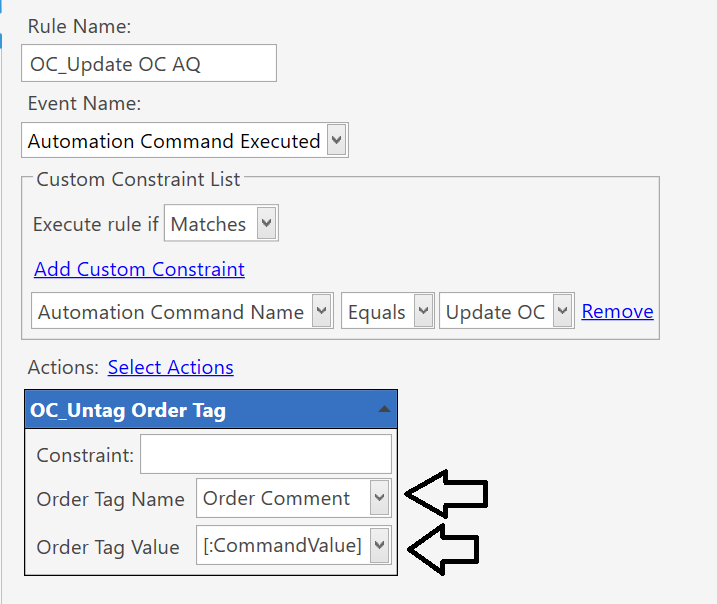
Step 5 Create Rule:OC_Update Order Comment AQ

  • Create a new rule name OC_Update Order Comment AQ
  • Under Event Name select : Automation Command Executed.
    *Press Add Custom Constraint then insert the following
    Automation Command name–Equals–Update OC.
  • Press Select Action. In the left hand column, search for OC_Untag Order Tag and press >> to put it in the right hand column and press OK
  • In the action, under Order Tag Name parameter, type Order Comment
  • In the action, under Order Tag Value parameter, type [:CommandValue]
  • Press Save
    The result? On the fly Order Comment Adding and now REMOVING!

Database Import File

I’m hoping for some this tutorial was easy to follow… However in the case that it wasn’t and you really want to implement this feature , I have attached the file which includes all the rules, actions and buttons outlined in this tutorial. So all you have to do is download it, and import it into your SambaPOS database. Once imported you can use it straight away.
OC_Custom Order Comments Module.zip (1.4 KB)
If you don’t know how to import this file please follow the link below

I intend to keep improving on this tool and future tools as well. Any suggestions and feedback is highly appreciated and taken into consideration. Any issues just let me know.

Regards

Shivan

2 Likes

This is hopefully the next step I’ll explore, maybe we could use a script?