Just right click the widget choose properties and set the height and width to what you want.
Thanks kendash! I can’t believe I missed something so obvious. I am working on a customer loyalty program which integrates with an Android app FYI – I am paying for development and also working with my own team (we own a tech firm). Once we finish I will be sharing the code – maybe useful for friends on here.
Thanks everyone!
2 Likes
Hi there, i was tracking diferent threads about custom kitchen display until i found this one, i loved your order level screen, tried to play around with Task Editor, Task Printer as you recomend but unfortunately i dont have developed the skills yet to achieve such succes, is there any way you could help us mortals with a bit of experience and post a simple tutorial. Running on V5 5.1.54, bought the license 1 week ago and loving it. Thanks in advance.
1 Like
I don’t know if anyone has actually built the Task Editor solution out to the potential demonstrated in that screenshot. That came from Emre as an example of what could be done, but there are hardly any implementation details that I know of… and Kendash is taking a little break (well deserved).
That said, I fully expect to design this exact type of Kitchen Display myself, and soon, but I haven’t even begun looking into it yet. Thanks for reminding me… it may take a little while, but I hope to share details myself, if someone doesn’t beat me to it (hint/wink RickH, JTRTech).
The thing is, we all have our own places to manage, so sometimes time is limited with what we can help with, what we can implement, and what we can share, but I think more and more people are stepping up and pitching in to help and demonstrate, which is fantastic.
1 Like
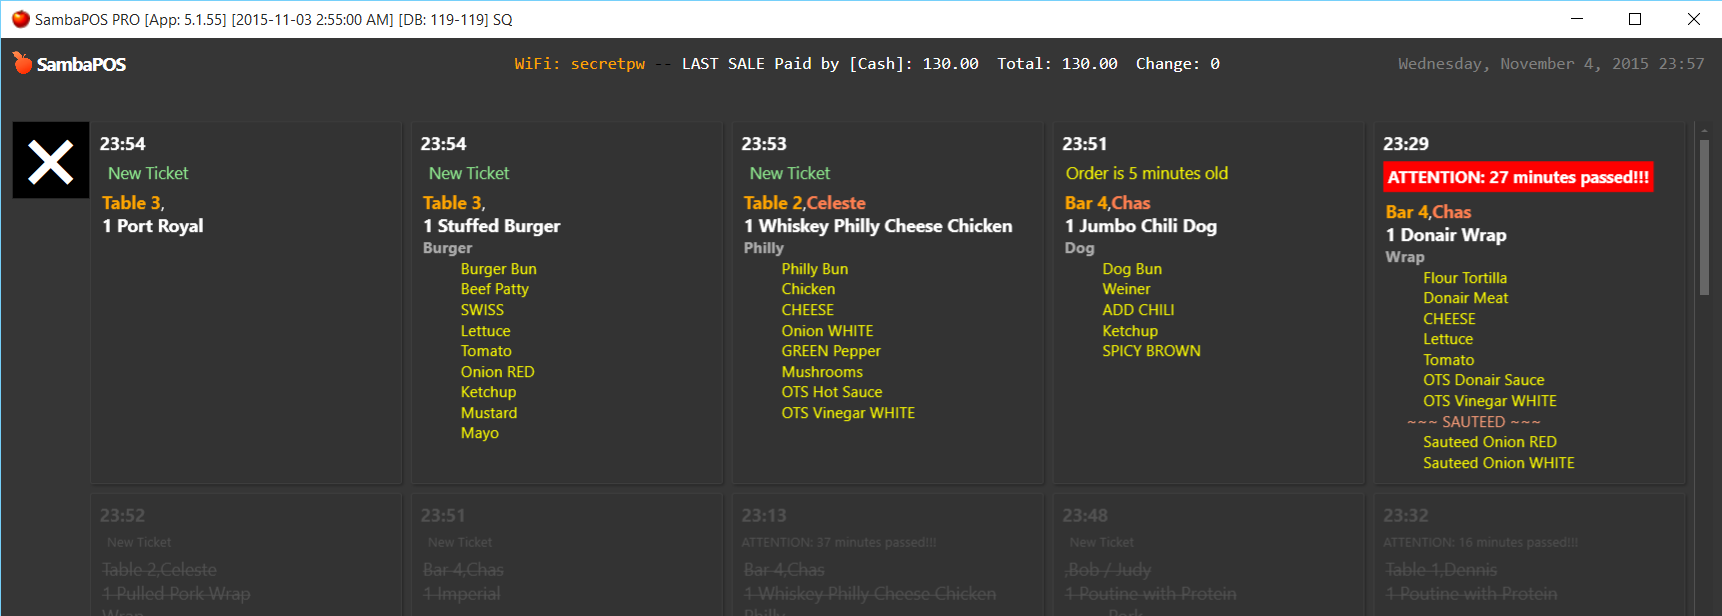
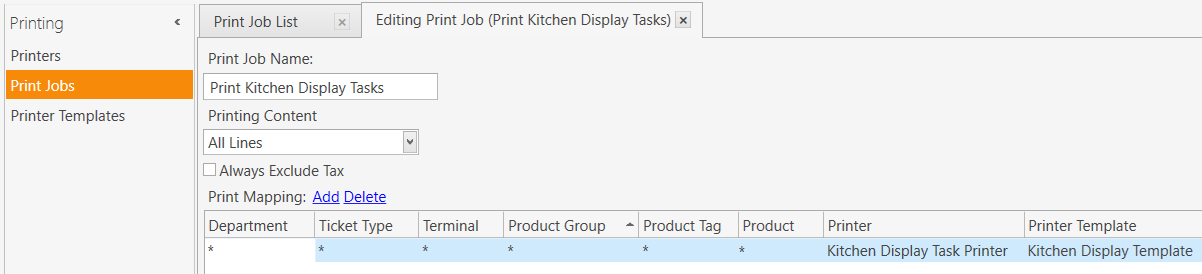
##Task Editor Widget with Task Printer Setup
I got this all working on the Order Level and it looks fairly good.
Some of the formatting options are not yet working as you might expect, so if you try something out and you are getting strange results, this is why. We can look forward to improvements in the future, but this already works fairly well if you keep it simple.
This is what it looks like …
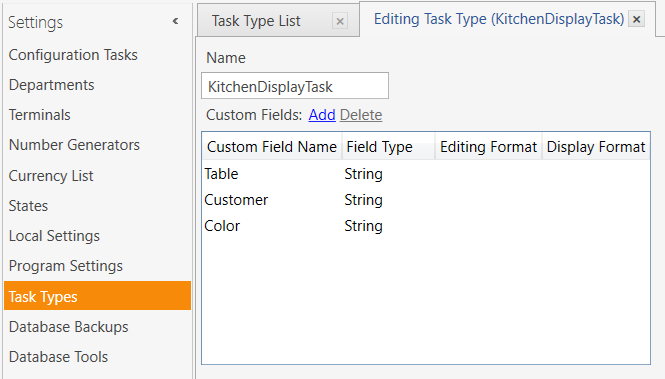
###Create Task Type
We will use this Task Type to control the Task Editor Widget. If we define Custom Fields for the Task, we can assign values to them in the Printer Template. In the previous screenshot, values have been assign to the Custom fields for Customer and Table.
You don’t need to create these fields, but we may be able to use them as Automation Command parameters.
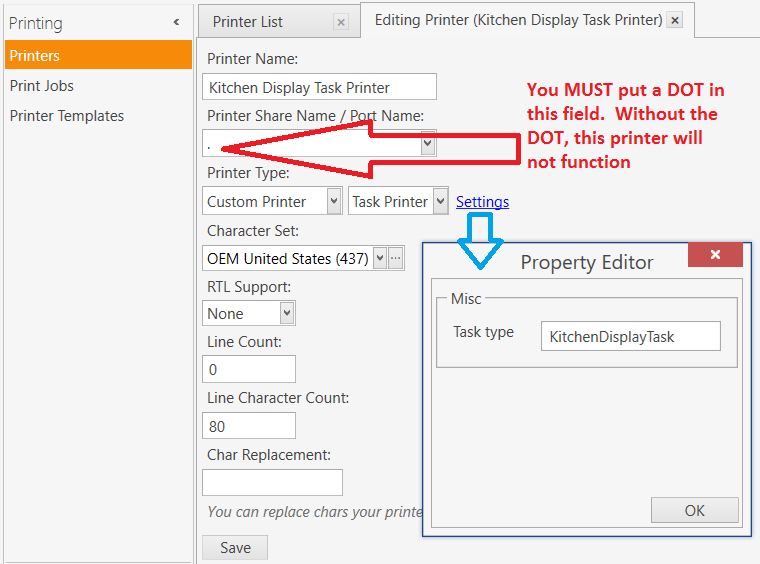
###Create a Task Printer
Printer Share Name / Port Namefield, or this printer will not function!
Click the Settings link and set the Task Type to the same name as the Task you previously defined in the step above.
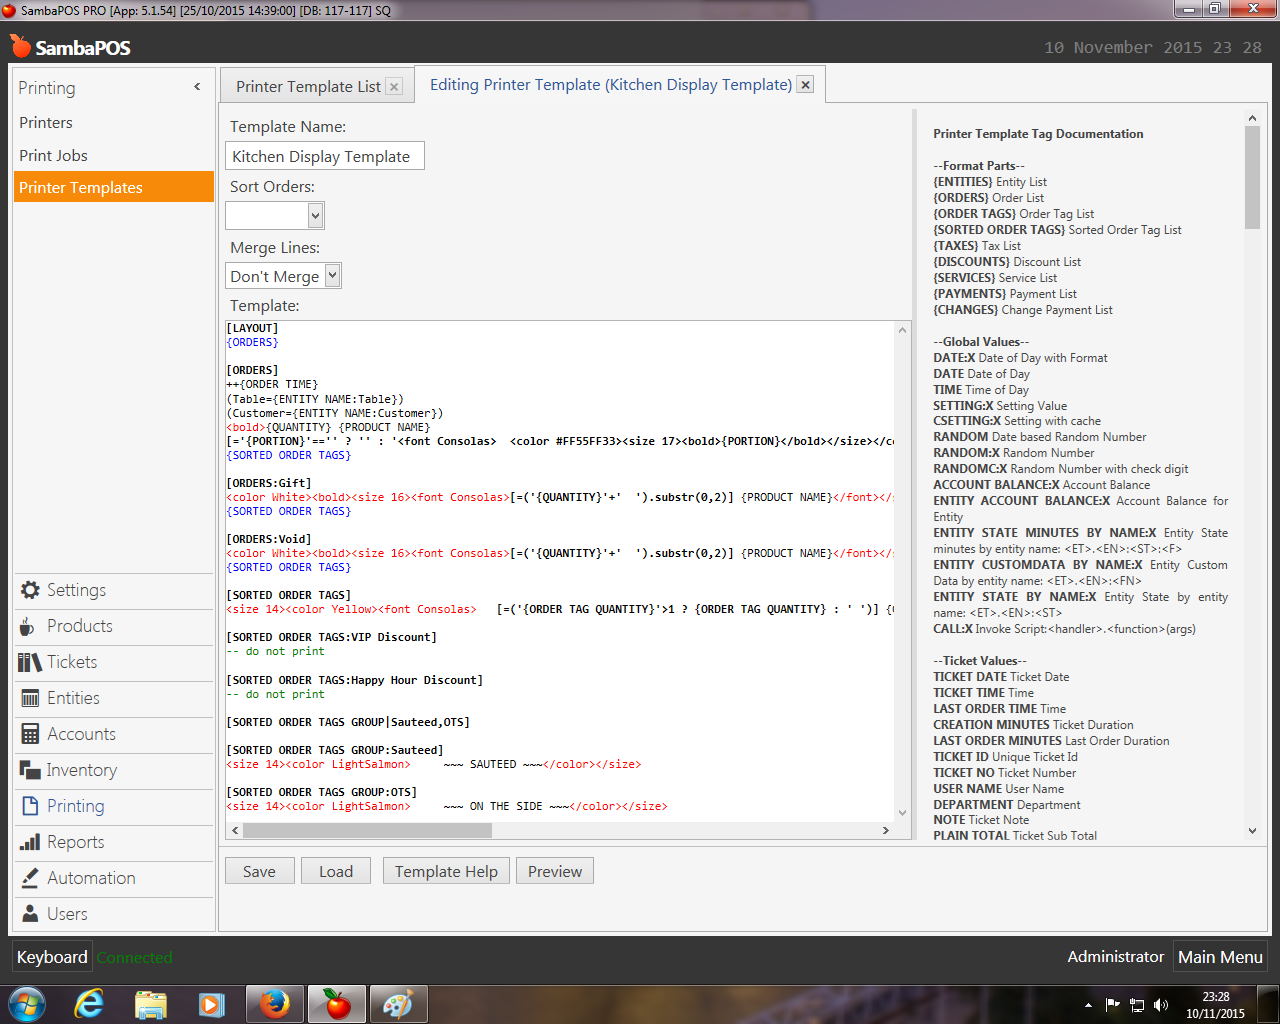
###Create a Printer Template
This is where you may find that some types of Printer Template or Formatting Tags behave a bit strange. Don’t worry about it too much - formatting support should improve in future releases.

This is the Template that I used… modify it to suit your needs:
[LAYOUT]
{ORDERS}

[ORDERS]
++{ORDER TIME}
(Table={ENTITY NAME:Table})
(Customer={ENTITY NAME:Customer})
<bold>{QUANTITY} {PRODUCT NAME}
[='{PORTION}'=='' ? '' : '<font Consolas>  <color #FF55FF33><size 17><bold>{PORTION}</bold></size></color></font>']
{SORTED ORDER TAGS}

[ORDERS:Gift]
<color White><bold><size 16><font Consolas>[=('{QUANTITY}'+'  ').substr(0,2)] {PRODUCT NAME}</font></size></bold></color>[='{PORTION}'=='' ? '' : '<font Consolas> <color #FF55FF33><size 14><italic>{PORTION}</italic></size></color></font>'] <bold> FREE</bold>
{SORTED ORDER TAGS}

[ORDERS:Void]
<color White><bold><size 16><font Consolas>[=('{QUANTITY}'+'  ').substr(0,2)] {PRODUCT NAME}</font></size></bold></color>[='{PORTION}'=='' ? '' : '<font Consolas> <color #FF55FF33><size 14><italic>{PORTION}</italic></size></color></font>'] <bold> VOID</bold>
{SORTED ORDER TAGS}

[SORTED ORDER TAGS]
<size 14><color Yellow><font Consolas>   [=('{ORDER TAG QUANTITY}'>1 ? {ORDER TAG QUANTITY} : ' ')] {ORDER TAG NAME}</font></color></size>

[SORTED ORDER TAGS:VIP Discount]
-- do not print

[SORTED ORDER TAGS:Happy Hour Discount]
-- do not print

[SORTED ORDER TAGS GROUP|Sauteed,OTS]

[SORTED ORDER TAGS GROUP:Sauteed]
<size 14><color LightSalmon>     ~~~ SAUTEED ~~~</color></size>

[SORTED ORDER TAGS GROUP:OTS]
<size 14><color LightSalmon>     ~~~ ON THE SIDE ~~~</color></size>
There are a couple things you may notice which are different in this Template. First we have this:
++{ORDER TIME}
The ++ prefix on this line will cause this line to be displayed as a header (bold).
Then we have these:
(Table={ENTITY NAME:Table})
(Customer={ENTITY NAME:Customer})
This special syntax sets the values for the Custom Fields that you originally defined in the Task Type. They are not completely necessary, and currently only suffice to change the way the Order displays this information. If we set these values here, we can use them later as Automation Command parameters.
###Create a Print Job
Standard procedure for setting up a Print Job. We need this for Automation purposes.
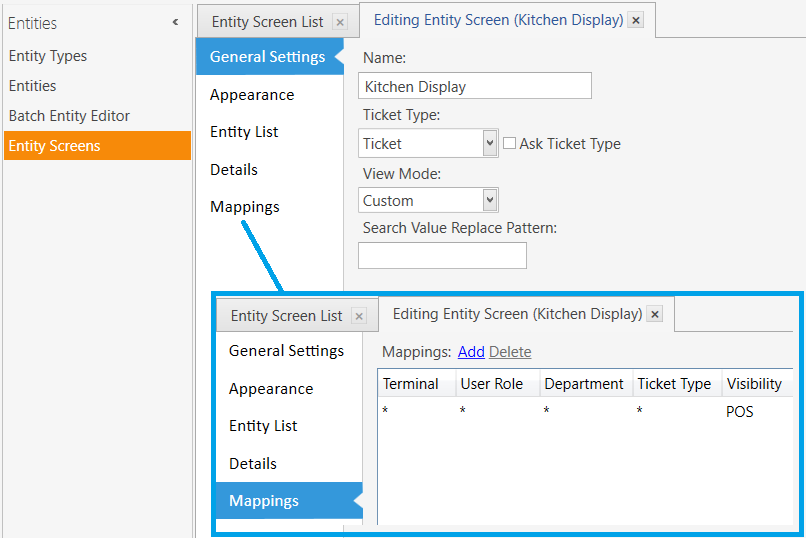
###Custom Entity Screen for our Task Editor Widget
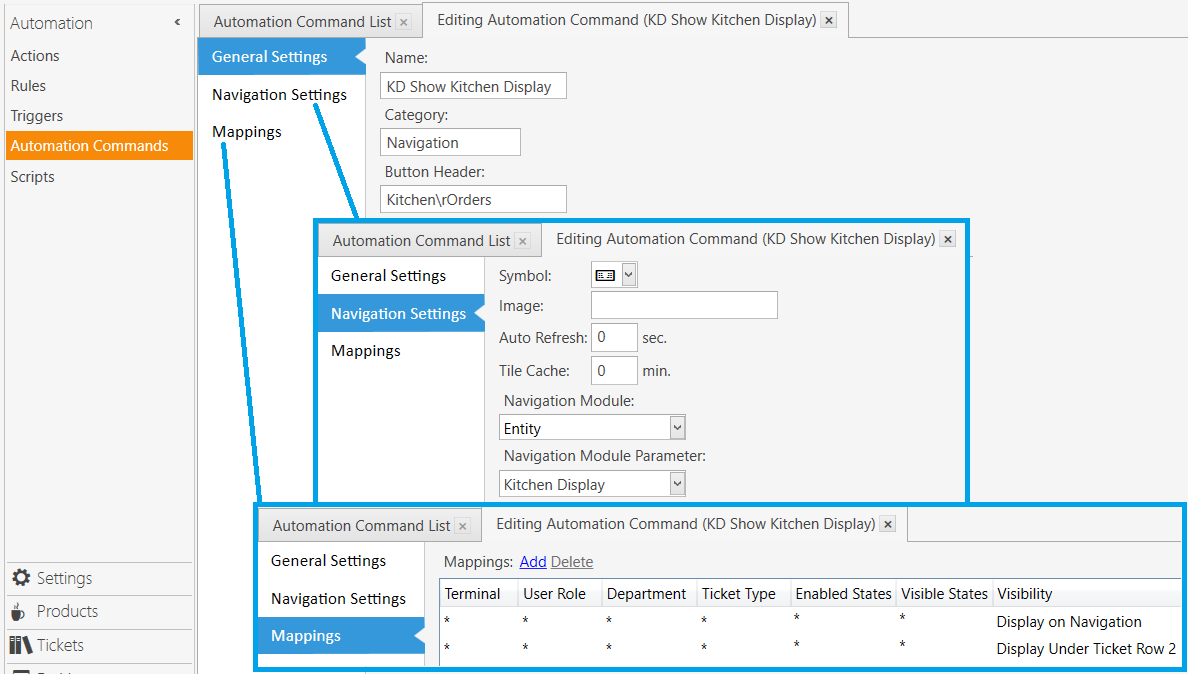
###Automation Command to access the Kitchen Display
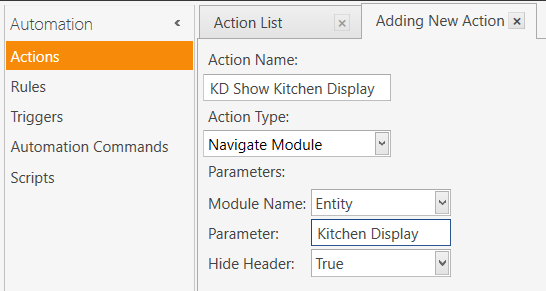
###Action - Navigate Module
This Action is used to display the Kitchen Display screen
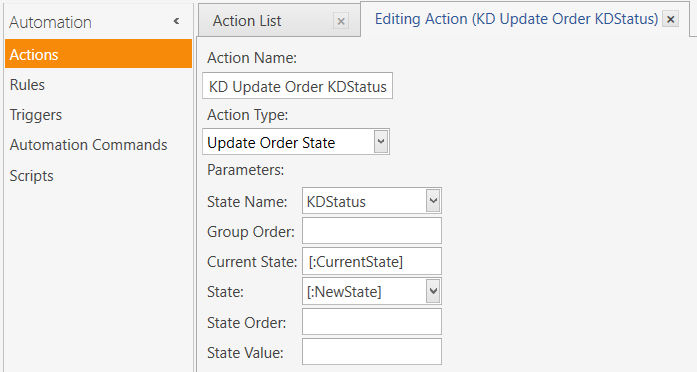
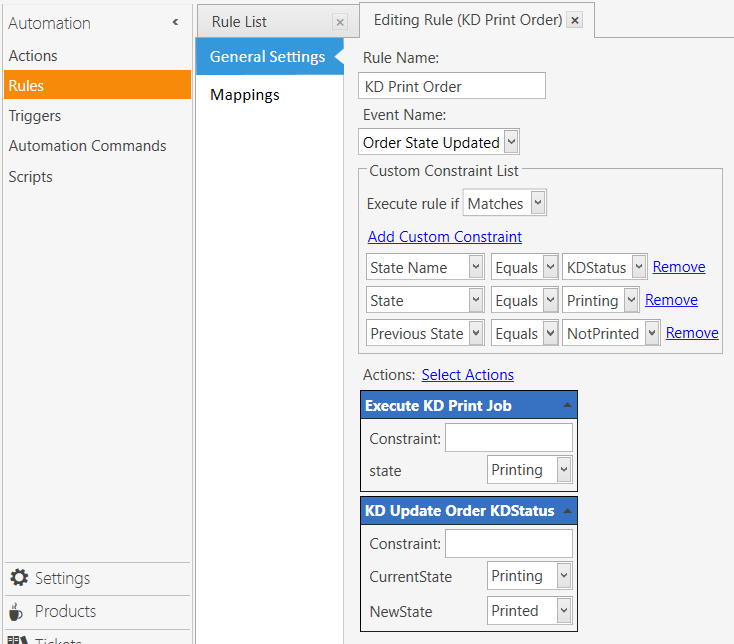
###Action to Update Order Status
We will use this Action to update the KDStatus of the Order. This helps to control when and what gets printed.
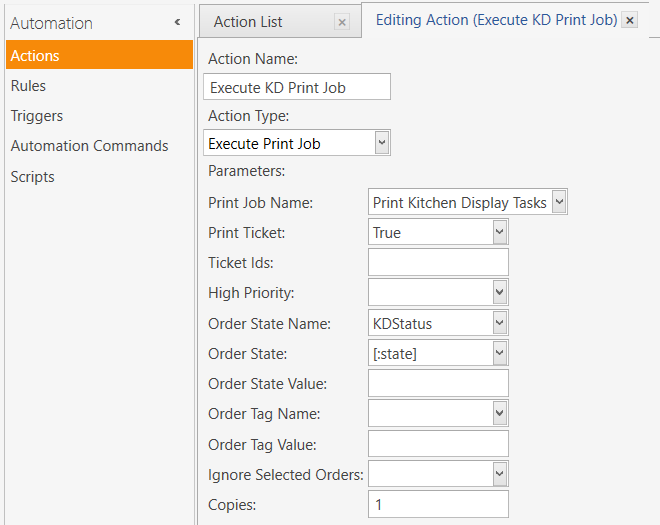
###Action to fire the Task Printer Print Job
We use this Action to execute the Task Printer Print Job, which effectively creates a new Task for the Task Editor Widget.
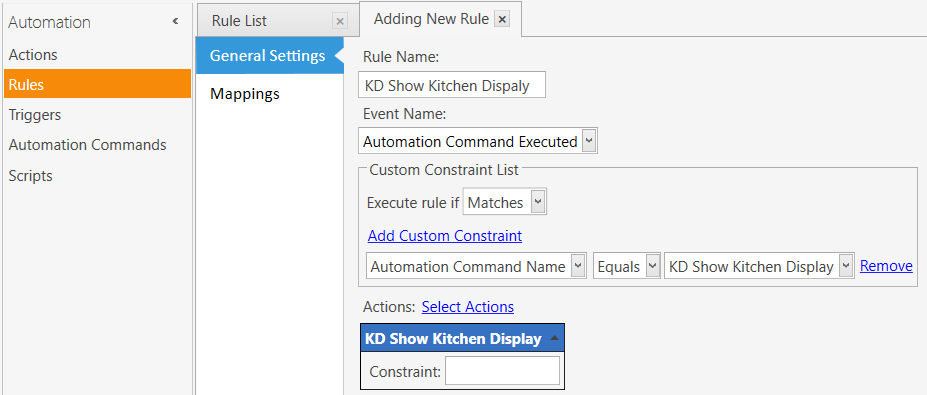
###Rule - Automation Command Executed
This Rule is used to bring up the Kitchen Display Screen
###Rule - Order Added to Ticket
This Rule will fire whenever an Order is added to the Ticket, and it calls upon the Action to update the KDStatus State. We do this to set an initial State for the Order.

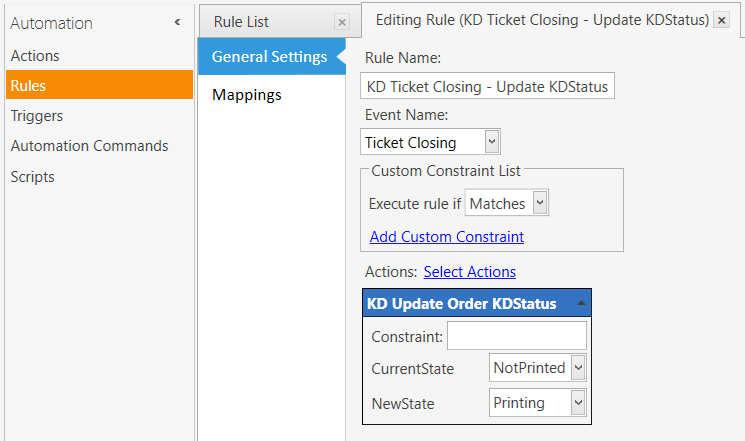
###Rule - Ticket Closing
We use this Rule to update the Order State for KDStatus when the Ticket is closed, effectively putting the State into a “Print-pending” status.
###Rule - Order State Updated
This Rule is responsible for firing the Task Printer Print Job, which creates a new Task in the Task Editor Widget.
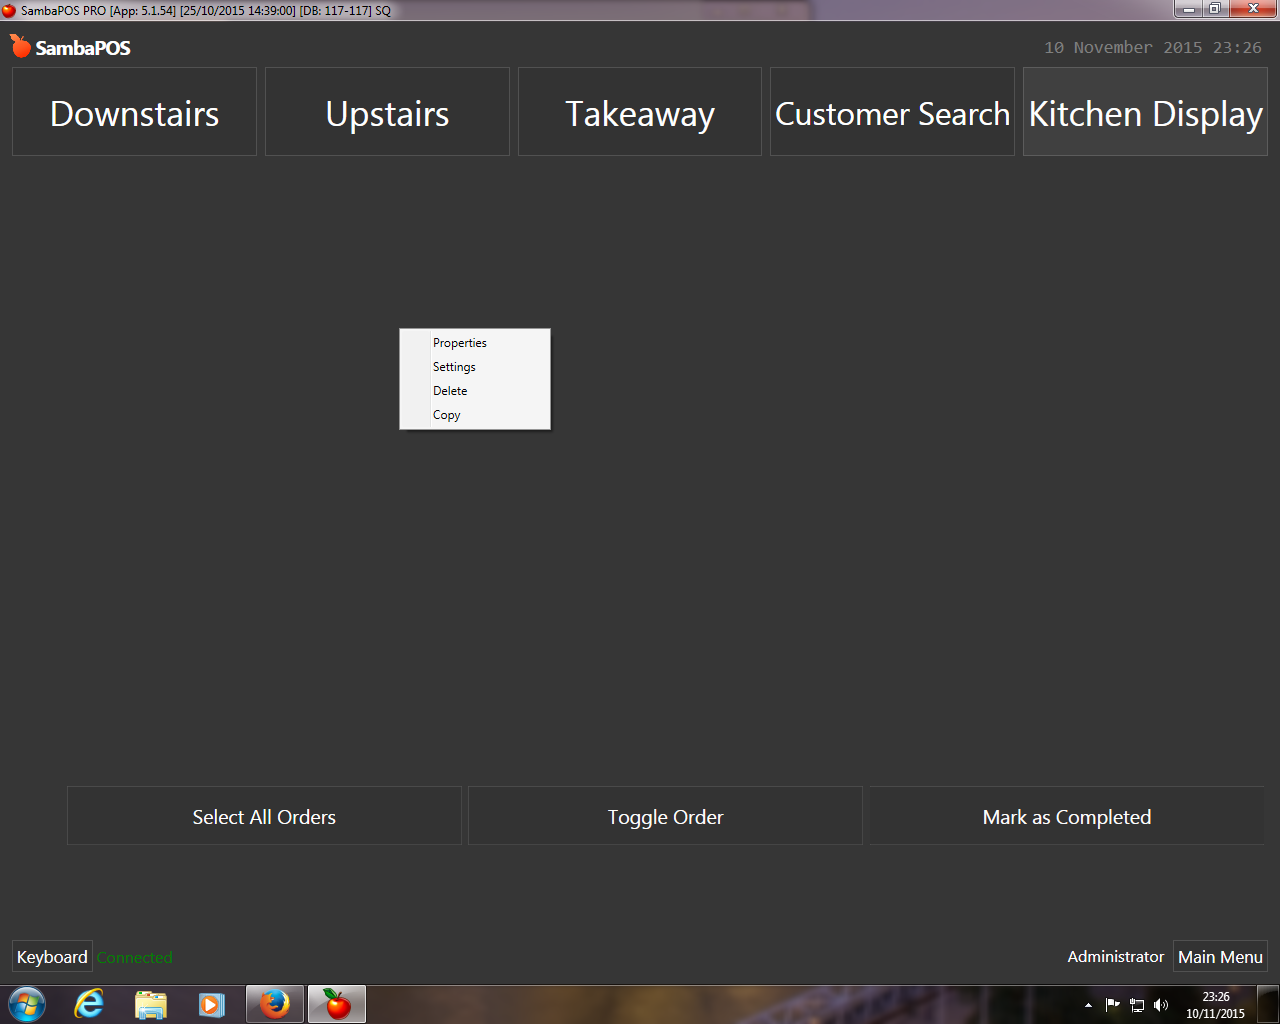
###Set up your Task Editor Widget
Access your Custom Entity Screen using the Automation Command(s).
Right-click and select Design Mode.
Right-click and select Add Task Editor Widget
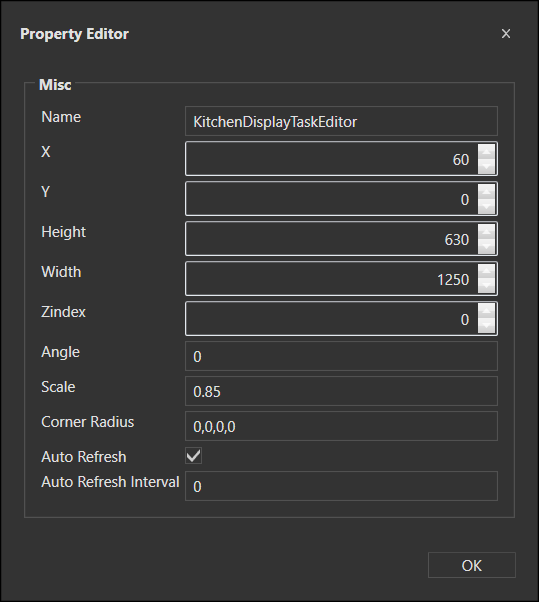
Right-click on the Task Editor Widget and select Properties. Set these values as you see fit:
Right-click on the Task Editor Widget and select Settings. Set these values as shown:
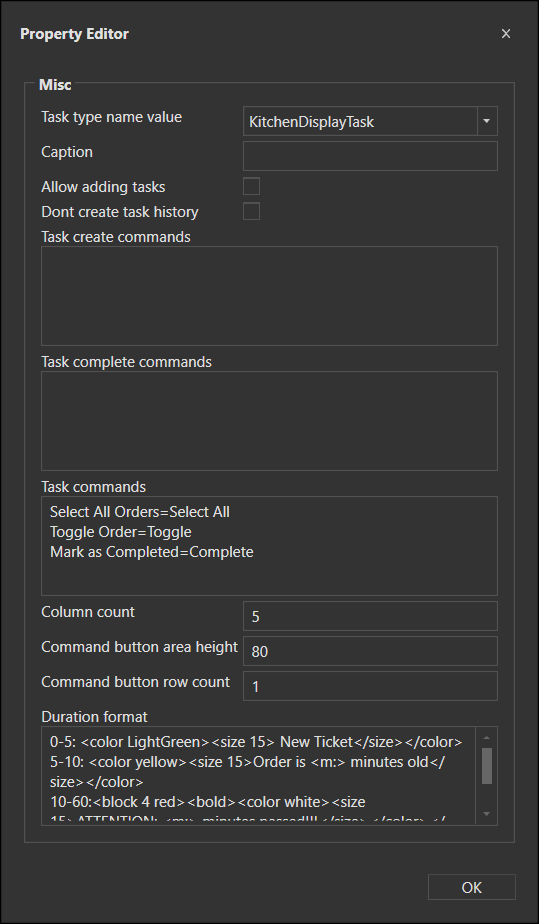
Task type name value: KitchenDisplayTask
Task Commands:
Select All Orders=Select All
Toggle Order=Toggle
Mark as Completed=Complete
Duration Format:
0-5: <color LightGreen><size 15> New Ticket</size></color>
5-10: <color yellow><size 15>Order is <m:> minutes old</size></color>
10-60:<block 4 red><bold><color white><size 15>ATTENTION: <m:> minutes passed!!!</size></color></bold></block>
60:<date:>
That’s it. Done.
Add an Order (or Orders) to a Ticket and submit it in the fashion that you are used to. In general, I add an Order or Orders, select a Table and/or Customer, then simply Close the Ticket… this should submit the Orders and create Tasks for you to view on your Kitchen Display.
.
1 Like
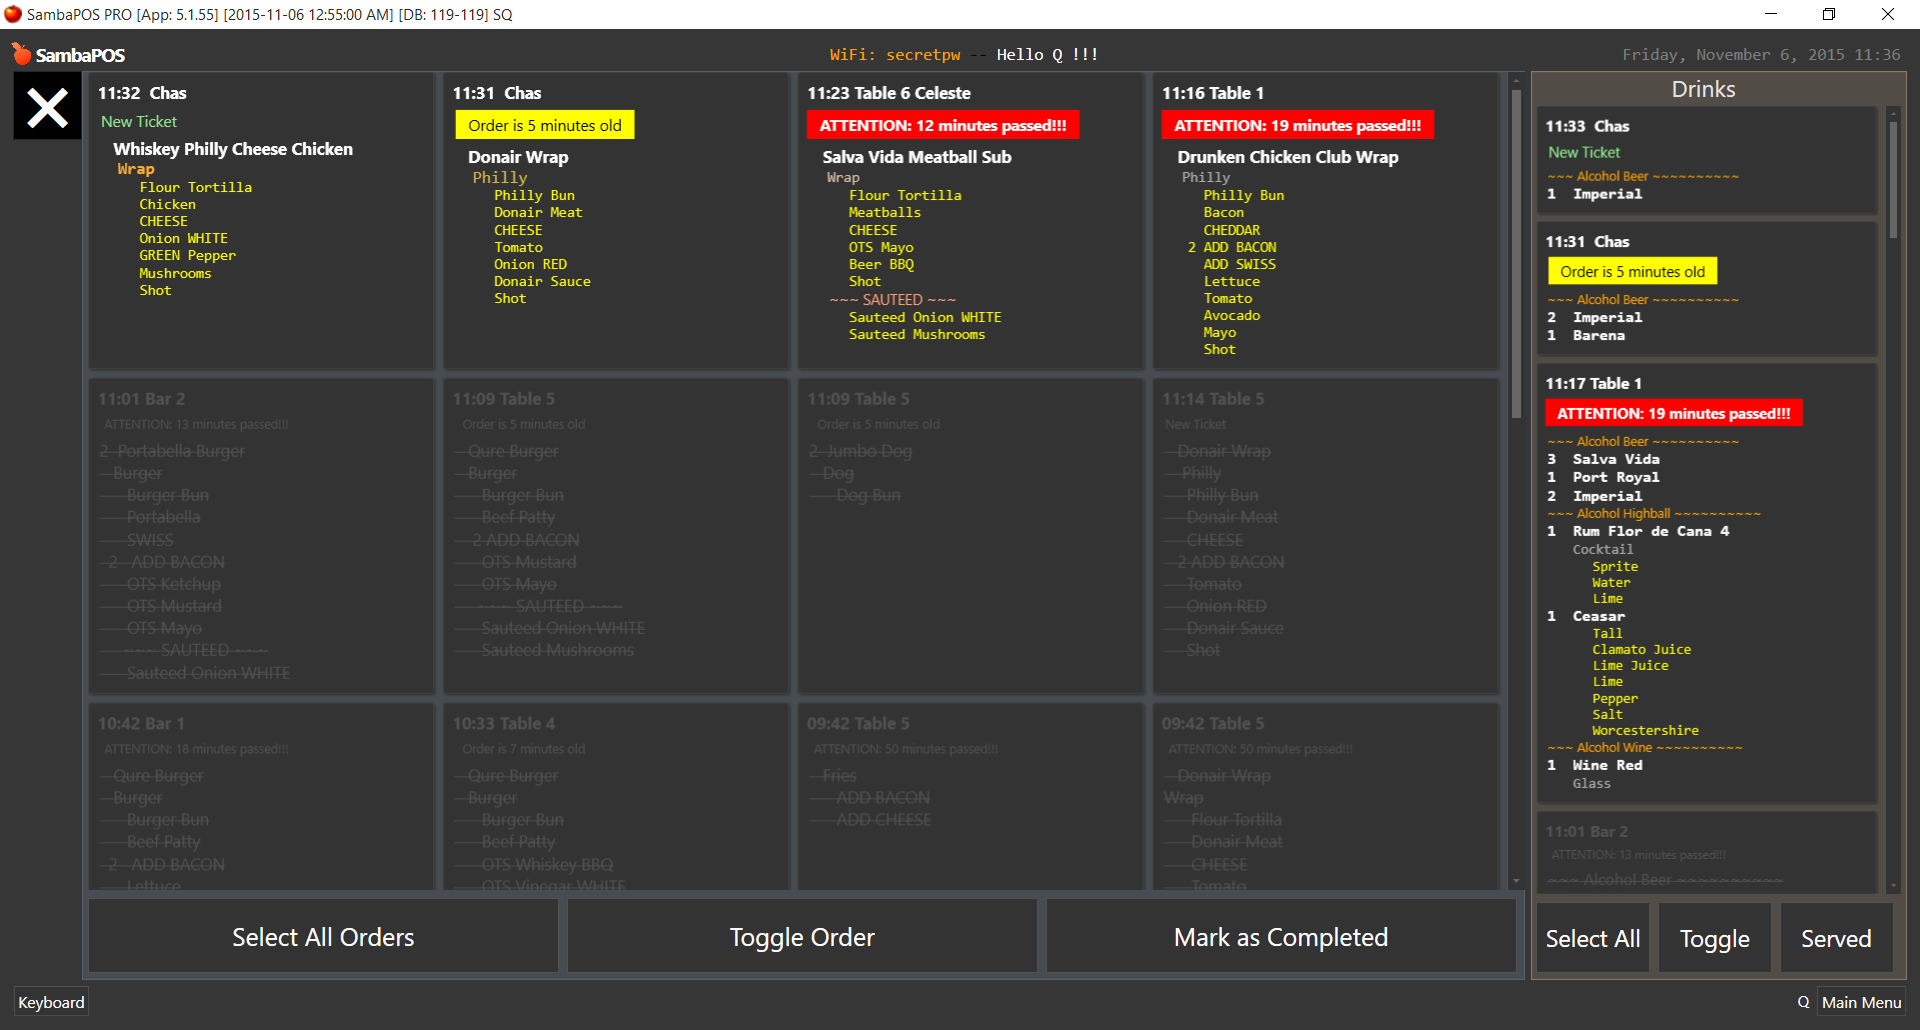
This is even better…
Food Orders are 1-per-card (Kitchen)
Drink Orders are grouped into a single card (Bar)…
This setup makes use of 2 Tasks, 2 Task Printers, 2 Templates, 2 Print Jobs.
It also uses the Product Group Code to separate Food from Drinks, but could be made to work with Product Tag, or Custom Product Tag for the same purpose of separation.
And even though I have 2 Task Editor Widgets on a single screen, they could be separated to show on their own different screens.
5 Likes
This looks great! It does raise some concerns for me though as an operator, I might be understanding the terms wrong but it seems like this is done by “printing” to a virtual queue which displays on screen. If this is correct, would the following be an issue:
- What happens if a waiter voids an item in a ticket after the initial order? Will it reflect in the kitchen?
- What happens if something is added after the initial ticket, will it reflect in the kitchen?
- What happens if an order is to go and paid for all at once, will it still display in the kitchen even if status is paid?
Thank you
That is correct.
No. It will not reflect in the Kitchen. Not yet anyway… working on that part, but need more features for Tasks to make that work. I am sure @emre will give us the tools we need - I have asked for them already, specifically because of Voids.
Yes. It doesn’t really care about Tickets per-say. The setup shown is only concerned with Orders. So if you add something to an existing Ticket, the added Order(s) get printed.
Yes. Again, it has nothing to do with Tickets, nor the Status/State of the Ticket. It operates solely on the Order-level.
Keep in mind, the setup shown is only 1 way to do this. It could be Ticket-based if you want. But I don’t really see the point, when it comes to using the Task Printer as a Kitchen Display mechanism. Kitchens are concerned with Orders, not entire Tickets, correct?
This could be used with Order Groups as well, so if you have “Set Meals” that have, say, Meat, Potatoes, Veggies, where each is an actual Order-line, you could group them, so they appear on a single Task Card instead of printing individually. It is just a matter of changing when and what you print, and the Template(s) you use.
If you want to use the Task Printer for another purpose - one which prints entire Tickets, you could do that as well. But the Ticket Lister Widget is more suited to that - it was designed for that purpose. People figured out some “clever hacks” to use as a Kitchen Display using States, etc., but the setup is really rather complex, as compared to using Task Printer. The Kitchen Display using Task Printer setup is really dead-simple by comparison.
I chose to configure this to print Food Orders individually, and Beverages combined (the setup steps shown do not do this). There are many other possibilities…
3 Likes
on which step of the line should i include this step? my necesity si to consolidate same orders in one print,
I have not posted the setup that includes all Orders in a single print.
If you need everything in 1 print, then there is no need for use of Group Code or otherwise.
Hi @QMcKay,
I followed his KD Tutorial usign tasks and it works great , but I want to change the way of sort them.
You know if it’s possible?
My idea is show old tasks first.
Pd. @QMcKay: Hablas español?
Thanks,
Rolbin
Newest Tasks are always listed first. @emre might be kind enough to give us an option to switch that behavior to our liking.
I speak “kindergarten spanish”, meaning, very little, and often conjugated incorrectly, but enough to understand and get my point across in conversation, if spoken slowly.
Ok. Thanks for your help @QMcKay.
…and with the spanish…no problem…is for me more easy explain my ideas in spanish…but…not problem.
Thanks again.
Rolbin
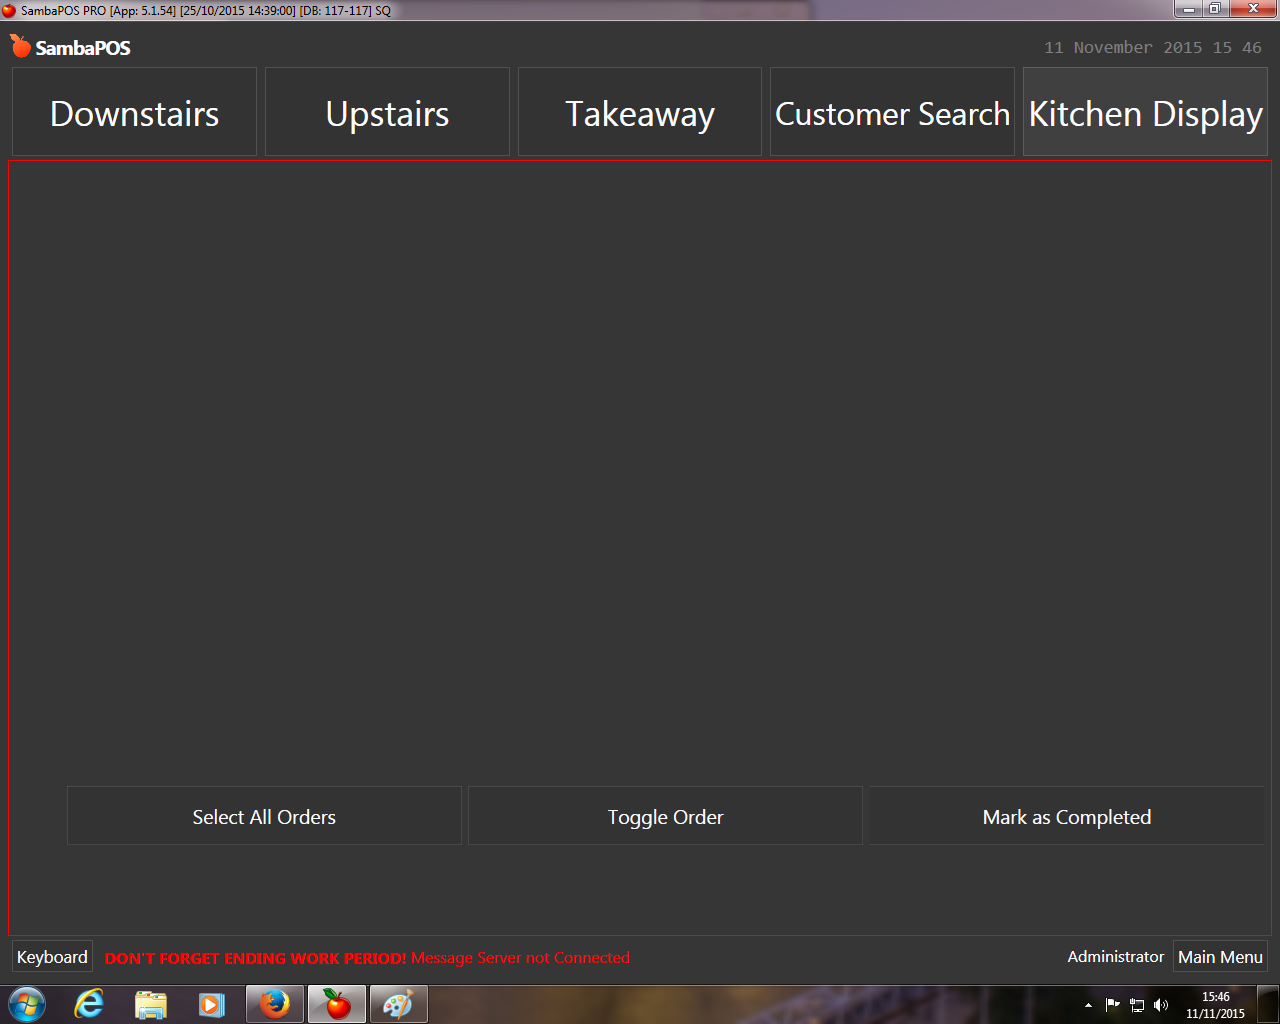
On my kitch screen its all black with the three buttons at the bottom, when I click right on the mouse I get options for property, setting etc but does not show the option box anymore.
WIll post my screens now, I think I have issues with my printer template too. New to printer templates so a little confused from tickets to orders.
Try right clicking below the buttons, am guessing your out of design mode, try right click off of the widget (below the buttons and see if design mode option shows.
Hi JTRTech, I am more interested in why the orders do not show, I guess it has something to do with my kitchen display printer template.
Has it worked yet and stopped working or new setup?
New setup from the above instructions
You need to right-click to go into Design Mode. When in this mode, there should be a red border around the screen.
Then right-click on Widget and select Settings. If the settings dialog does not appear, then you are not in Design mode.
Ensure the Widget has the proper Task Type assigned to it.
Also be sure you set up the Printer properly. It is a Custom Printer with type of Task Printer. Under the Settings link in the printer configuration, you need to type in the Task Type that you defined. You also need to ensure you have a DOT as the Printer Name.