SambaPOS 5.1.62 Release

Here you can find detailed release info for 5.1.62 version.

:arrow_down: Download: https://sambapos.com/?wpfb_dl=163

:warning: Don’t forget to create a backup before installing new releases. You’ll need a working backup if you need to rollback to previous version.

Translations

We have new language additions. Translations fully completed for Arabic, Dutch, French, German, Hebrew, Indonesian, Italian, Romanian, Spanish, Hungarian, Traditional Chinese, Brazilian Portuguese and Turkish languages. You can find more info about translations here.

##API Integration

We released a detailed guide for integrating third party applications / services to SambaPOS. We also demonstrated a sample integration for Gloria Food online ordering service. You can read more about it here.

https://forum.sambapos.com/t/integrators-graphql-api-guide/14047

##Task Editor Features

Task editor widget greatly improved to support different kitchen display layouts. Here are new updates.

  • Custom Data Filter setting added to Task Editor Widget to filter items by custom data values. It can be used to separate kitchen tasks by bar or kitchen.

  • Grouping feature added for Task Editor to group Kitchen Display orders by table number or product.

##Accounting

  • By this version we’ll store department information for account transactions. You can report account transactions by department by using DE filter.

{ACCOUNT TRANSACTION TOTAL:Payment Transaction:Cash:DE=Bar}

  • New reporting tags added.

{ACCOUNT TYPE BALANCE:X} {ACCOUNT TYPE DEBIT BALANCE:X} {ACCOUNT TYPE CREDIT BALANCE:X}. X will be a regular Account Report Tag expression.

REPORT ACCOUNT TRANSACTION DETAILS tag implemented. We’ll be able to use new custom report features for reporting account transactions.

[REPORT:1, 1]
{REPORT ACCOUNT TRANSACTION DETAILS:T.Target,T.Amount.Sum:(ATT=Payment Transaction)}

###GraphQL API

For this release there are lot’s of additions for GraphQL API. We’ll release more detailed tutorials for usage. Here are some new features.

  • All SambaPOS Automation moved under message server. This is a big infrastructural change to allow automation work for GraphQL API. That means if you create a ticket through GraphQL API all automation for handling orders, promotions, printing etc will work like Ticket created from SambaPOS.

  • New Authentication features added for GraphQL server. I’ll add a separate post on this topic for details.

  • {getCustomReport} query added to fetch custom reports. Here you can see an example of Item Sales Report.

  • postBroadcastMessage mutation can be used to share data between SambaPOS and JS Apps. Here we’re triggering a SambaPOS popup from GraphiQL.

  • executePrintJob mutation added to trigger ticket prints.

  • executeAutomationCommandForTerminalTicket mutation added to trigger Ticket Automation Comands by GraphQL API.

  • @QMcKay developed some great Javascript modules that works in web browsers. For example you can run reporting application on your tablet web browser to display reports.

You can find More information under this topic.

  • We have another reference JS POS implementation here. You can test these projects to see how GraphQL integration works.
  • GraphQL functions added for managing tasks. You can see how kitchen display updates when we place an order through PM-POS application.

  • You can also use Tasks, GraphQL API and Javascript to improve Kitchen & Waiter communication.

Database Functions

  • We’ll display an error message when a temporary connection issue occurs between SambaPOS and SQL Server. You can retry connection and when it restores you can keep going from where you left. Clicking Cancel button terminates SambaPOS, displays error dialog and logs the error for future reference. This message will not appear for issues that can’t be solved by retrying like sql server login issues.

##Payment Screen Improvements

  • If you use multiple currencies you can split change amount.

  • You can Credit all or Part of Change amount to Customer Account.

You can configure Change Payment Templates to implement that setup. There are also some new features regarding rounding foreign currency payments and printing them. You can find more details about it here.

  • If you have grouped Orders on your ticket payment screen orders will also display grouped.

  • Button header setting added for payment buttons to allow customizing button appearance.

  • It is possible to configure multiple rows for command buttons.

You can change it through Program Settings > Payment Screen Settings.

##Printer Templates

  • <W> formatting tag added to printer templates to fine tune column configuration of ticket templates. <W00:10,10,10>One|Two|Three will print each value padded by character counts. Column alignment can also be defined by adding a space char in front of sizes.

Here you can see what you can achieve with W tag. Especially helpful if you use multiple currencies.

You can use * character to set a column fill the remaining space. In this case it will automatically word wrap if it do not fit the area.

##Custom Entity Screen features

  • Sort Order setting added to widgets for defining tab orders of items.
  • Moving items with arrow keys In design mode.
  • When multiple widgets are selected Right Click > Delete command will remove all selected widgets.

##Other features

  • On POS screen it is possible to decrease Ticket Area width to have more rooms for product buttons. You can change it from Local Settings > Display > Ticket Area Size. By default it is %45 of the screen. When I change it to %35 it appears like that.

  • Mapping Calculation Types to terminals.

  • Logging automation issues in log file. When you complete your automation setup you can review log.txt file to ensure there is no silent issues. For example if you execute a non existing print job no visible error message appears but we’ll log it into log.txt file.

  • Rule Tester implemented to find possible issues in your rules that occurs due to renaming. Rules also gets validated when you try to save them.

  • Button Header setting added to Entity Screens so you can change entity screen button colors.

Here the button appears in red color.

  • By using Disable Portion Setting of Update Order action you can prevent changing portion for a specific order line. For example you can pevent portion from changing for a portion selection setup like this one.

When a time range added for report date filter, report will generate for the exact range.

  • Hiding ± buttons on ticket screen by using user role permissions.
  • Parameters setting added to Execute Print Job action so if you define $KEY=Value, $KEY values in printer template replaces with Value.
  • New rounding settings added to Add Service Calculation and Add Discount Calculation payment processors.
  • PIN Code Entered Rule implemented to allow you implement RFID based logins.
  • Management Permissions added to user roles. Now you can disable specific management sections for a user role.
  • Invert Exchange Rate setting added to Currencies. You can enable it if you want to enter cross currency rate instead of the main currency rate.
  • Printer templates that we create for POS displays may increase Ticket Number. You can disable updating ticket number on Execute Print Job action.
  • -notablet and -softrender switches helps disabling multi touch input or graphic card acceleration to resolve hardware driver incompatibility related issues. You can start samba.presention.exe file with these switches.
  • Alt key added to on screen keyboards.
  • User Name parameter added to Display Tickets Action. You can set {:CURRENTUSER} tag to display tickets for only currently logged in user.
  • Ticket Lister expressions will accept {:SETTING} tags so by applying LastModifiedUserName={:CURRENTUSER} expression ticket lister will display tickets for only current logged in user.
  • Entity Name parameter added to Load Ticket action to load last created ticket for that entity.
7 Likes

Server Side Expressions for Custom Reports

As you may already know SambaPOS fetches all tickets filtered by date when we create a report like this.

When we filter results SambaPOS still fetches all tickets from database (all workperiod tickets in this case) and applies filter on it.

SambaPOS does it for a good reason. If our report is a complex one like that it fetches all ticket at once and generates all parts of the report with that data.

This is the generated SQL script for that report. It only filters by date and applies ticket state filters while rendering the report.

As Custom Report features primarily built for reporting it works great.

However when we use this for non reporting cases that may fetch unnecessary data.

We can check @RickH’s post here.

That executes a report tag like that.

{REPORT TICKET COUNT:TS.Status=Hold) AND (TT.Hold=[:UserName])}

In fact we don’t need all tickets here. For example as these tickets are open tickets it will be better to fetch only open tickets.

I changed that tag a little bit and executed that.

{REPORT TICKET COUNT:(TS.Status=Unpaid) AND T.IsClosed=false}

That returns the correct result.

However it still fetches all work period tickets even I filter by IsClosed field.

I assume you already know you can filter by database table fields by using T.<fieldname> syntax. For open tickets IsClosed field becomes true so we can use T.IsClosed=true to list closed ticket.

How can we improve that?

If we can execute IsClosed=false expression on server side it will greatly improve report speed and decrease server traffic. I implemented a feature called “Server Side Expressions” for that. To execute an expression on server side you need to put the expression in single quotes.

This feature only works for expressions that works with database fields. For example we can’t execute (TT.Status=Paid) expression on server side as it works with JSON data and there is no direct SQL translation for it.

So when I change IsClosed=false part to a server side script by putting it in single quotes the generated SQL Script will slightly change. For server side expressions I’ll also remove T. prefix and just use the database field name.

{REPORT TICKET COUNT:(TS.Status=Unpaid) AND 'IsClosed=false'}

That still shows the same result but now less data fetched from server. You can see IsClosed expression added to SQL script.

We have some more features. For example we can optimize it a little more by adding a text search.

{REPORT TICKET COUNT:(TS.Status=Unpaid) AND 'TicketStates.Contains("Unpaid")' and 'IsClosed=false'}

You can see that expression translated to a LIKE select.

Of course this is not the correct way to filter by ticket status but when used with (TS=) expression that will help fetching less data.

I primarily implemented it for {REPORT XXX DETAILS} like reports and also works fine for them. The last example I saw was a COUNT report so I demonstrated it.

It is possible to do complex things like that.

[REPORT:1, 1]
{REPORT TICKET DETAILS:T.TicketNumber,T.TotalAmount:'Orders.Any(MenuItemName.Contains("Bacon"))'}
Count of Tickets|{REPORT TICKET COUNT:'Orders.Any(MenuItemName.Contains("Bacon"))'}

That reports tickets that have at least one product that contains Bacon keyword. It also displays count of them and does great job by executing both report tags (details and count) by executing a single SQL script.

This is the generated SQL Script in case you’re interested.

4 Likes

Virtual Workperiods

When virtual workperiods feature enabled SambaPOS creates work periods on the fly without the need for opening or closing work periods manually. However these work periods will not save to database until work period manually closes. This is still needed to recalculate inventory and reflect cost numbers but it is not required to trigger it daily.

You can enable it from Program Settings > Maintenance > Virtual Work Periods.

You’ll enter a default work period start time here. For this sample I entered 12PM there.

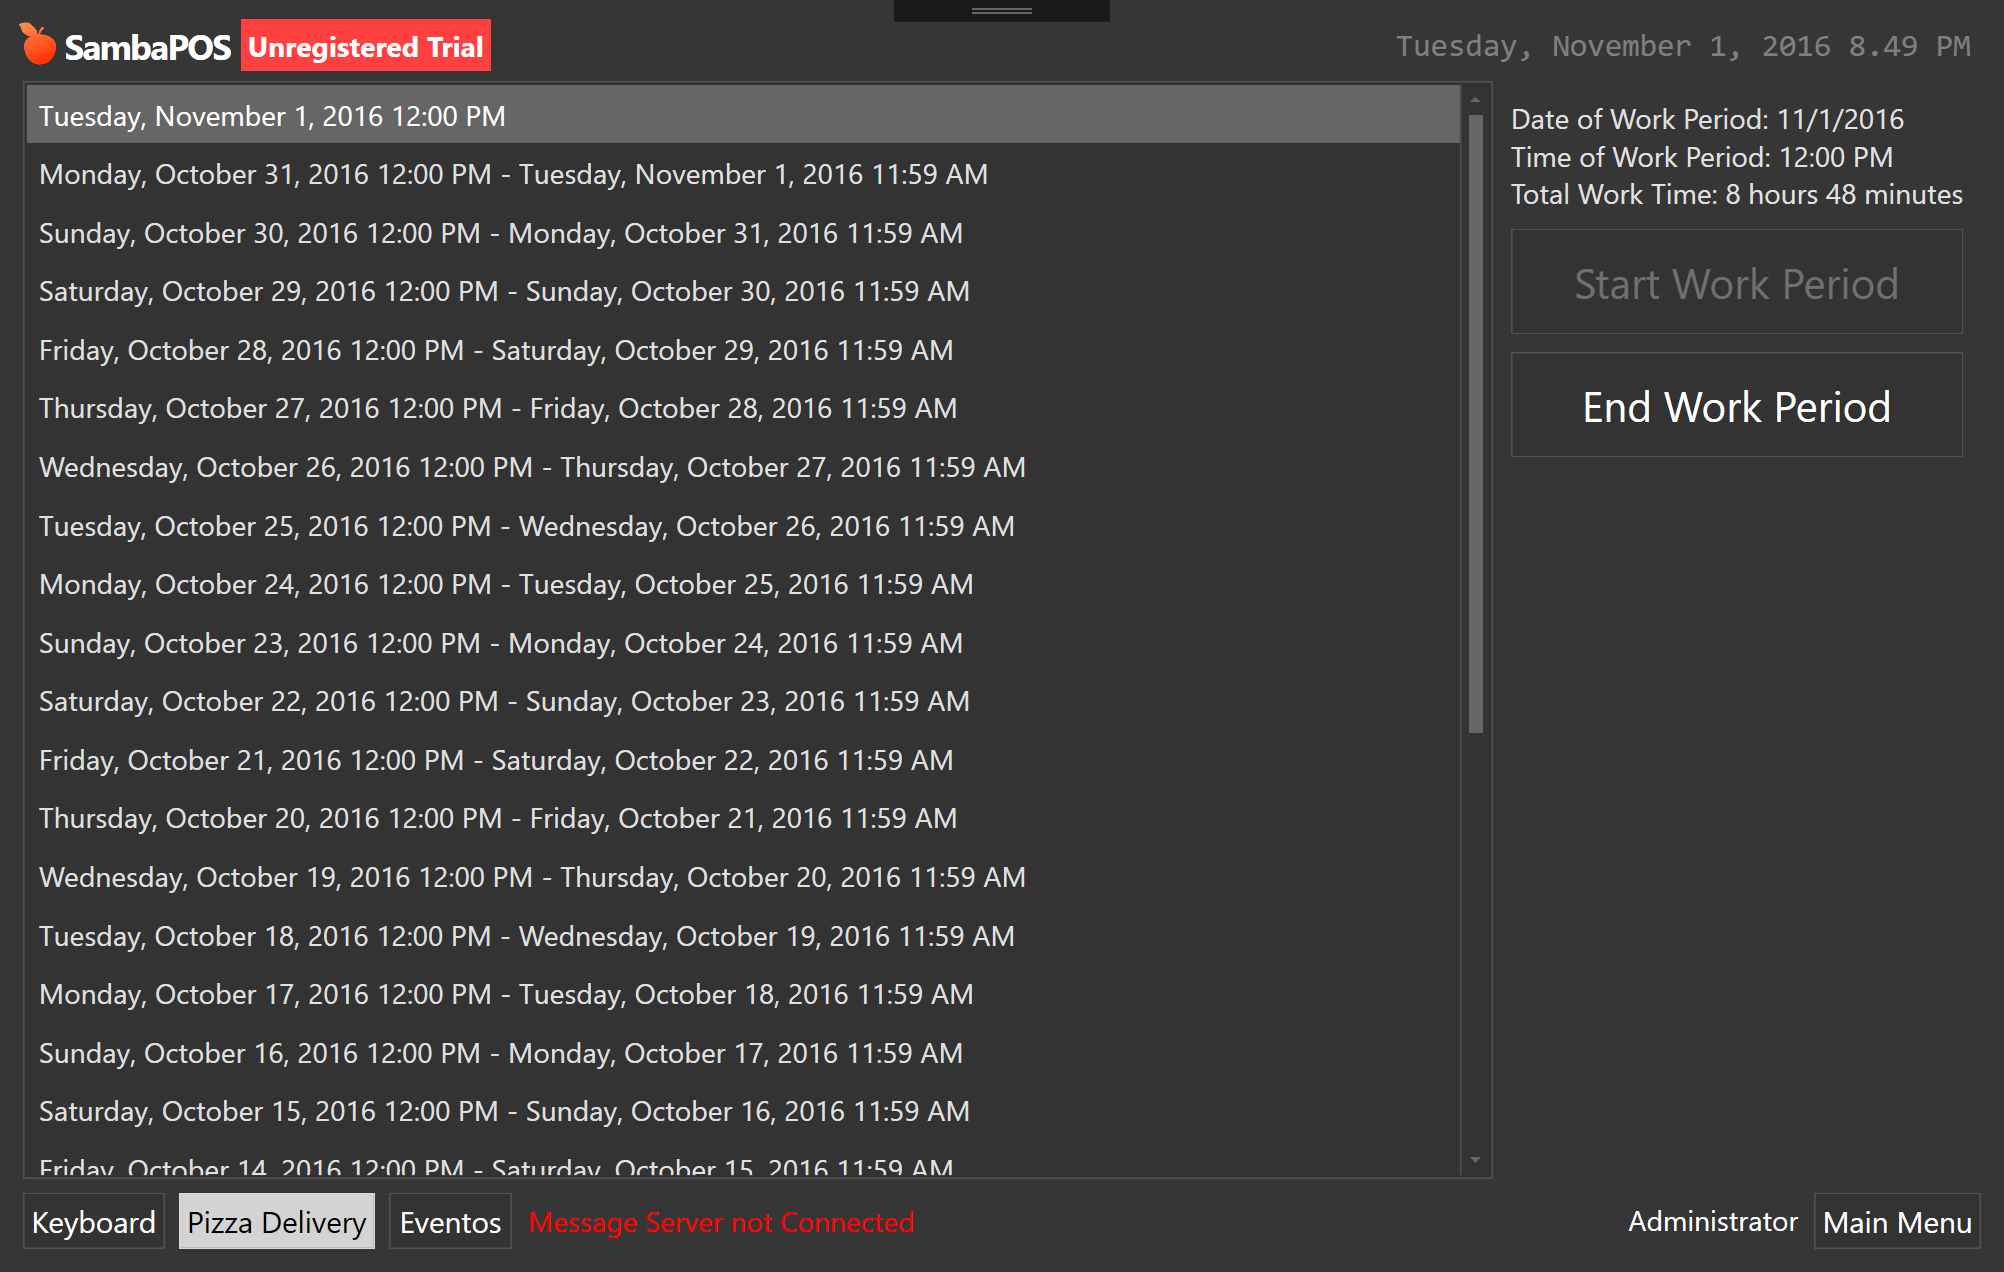
When enabled SambaPOS will auto generate work periods starting after last physical work period end.

Work periods starts at 12 PM and ends on next day at 11.59 PM. So there will be no closed work hours. Also no notifications to close work period appears.

When virtual work periods are enabled report ranges will start working differently. They’ll start at given time but ending time will taken from last ticket’s date that created in that work period. So work periods ending next day (11.59) will not confuse users.

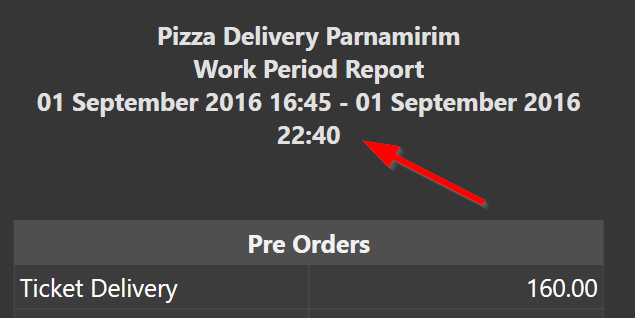
For example this screen shot taken from a physical work period so start time is when work period is started but ending time is last ticket date. For physical work periods we’ll use last ticket date too.

When you manually end the work period SambaPOS will create missing work period records in database and keep work period closed until next work period start time (12 PM next day). There is no need to start the work period. You can just start creating tickets on next day.

By physical work periods we mean work periods started manually or saved to database.

If inventory is tracked ending work periods is essential so we can properly create end of day records to reflect inventory and costs. Tallying inventory and ending work period at least once a week recommended. In this case waste costs will spread to all items that sold during that week.

Finally unpaid and left open tickets will stay open. However if a ticket gets paid on next work period payment amount will appear on next work period report. For this reason tracking payment amounts through payment accounts will be a better choice.

Finally if you start a work period manually it will keep open until you manually close it and virtual work periods feature temporarily disables. You’ll receive a notification on work periods screen if virtual workperiods are disabled.

3 Likes

Menu / Combo Setup

On this tutorial I’ll demonstrate how to setup combo deals.

The product shown in the screen shot is a regular Pizza Product. When sold individually it behaves as we know. All order tags have prices and we can select portions

When sold as a part of a deal it starts behaving differently.

  1. We can’t change portions.
  2. First two tag selections for each order group (dip & topping) are free.
  3. Next button appears on order tag screen to advance to next product tags.
  4. When min & max selections are made for all order tag groups it auto advances to next product.
  5. Prices does not appears on order lines, Total price appears on group header.
  6. Canceling an item cancels all items.
  7. There are few more fine tuning to optimize how order tag screen appears.

On this setup 2 pricing methods are supported. You can price one item and mark others as gift or distribute price to products manually.

I setup 3 price definitions for 3 separate deals so we can configure how a product is priced in a specific deal.

If a product does not have a deal specific price it will be a gift.

There is no Deal 2 price for Tea so it becomes free.

That makes no visual difference but changes how costs are calculated.

I used product tags to configure which product exists for a specific deal.

If a product exists in multiple deals we can configure it like that.

Toasted Bagel Cheese appears in both Deal2 and Deal3.

Custom buttons added to configure Deal Menu buttons.

So to add a new Deal we need to.

  1. Add a price definition for deal.
  2. Configure deal items with product tags.
  3. Add a custom button to menu.

As you’ve guessed there is a complex automation setup behind that. The case is already complex so some ruling is needed. I won’t dive into details but roughly:

I Created a Value Looper to add menu products to ticket.

It adds the menu item, updates quantity, portion and states, finally updates Order Group. It also disabled portion selection for these items.

This is how Value Looper Gets triggered when a deal button is clicked.

After adding menu items it triggers a Select Orders action to trigger auto selection for first item of the deal.

If the PRICE TAG is null for an order it updates it as free.

That makes first 2 order tags free.

This is how order groups are configured.

3 Likes

##Testing Payment Integrations

6 Likes

This topic was automatically closed 2 days after the last reply. New replies are no longer allowed.

Did we skipp .61 or merged .61 with .62 and made it officially. 62

Hello, how i can make a kitchen like you are showing @emre?
that would realy nice to have…

Thx for answers!

WELL… that is my one month hollidays will be spend… reading this POST, LOL!!!

GREAT!!! congartulation to @Emre and all that contribuite that much… I wish I cold help more… sorry…

CONRATULATIONS

G.

No wonder why Emre has been inactive lately. Lots of documents and features to prepare.

1 Like

Yes… 63 will be beta, 64 release, … and so

If you follow kitchen display tutorials based on task editor widget enabling grouping setting on widget settings will enable grouping. I’ll release detailed tutorial soon.

  • Uploaded a quick refresh to reflect latest database updates to database indexes. It is highly recommended to create a backup and reindex database by using Program Settings > Maintenance > Rebuild Indexes command.
  • Widget refreshes optimized to prevent circular updates when multiple tickets updates at once by using ticket lister widget.

https://sambapos.com/?wpfb_dl=163

ok thank you for your answer…