In this tutorial I will show you how to create a Retail/Bar/Quick Service POS Screen that doesnt use Samba’s standard categories. Instead I have combined multiple menus, using the custom product button feature to turn “product buttons” into automation commands which also allows a nice looking keypad to be created
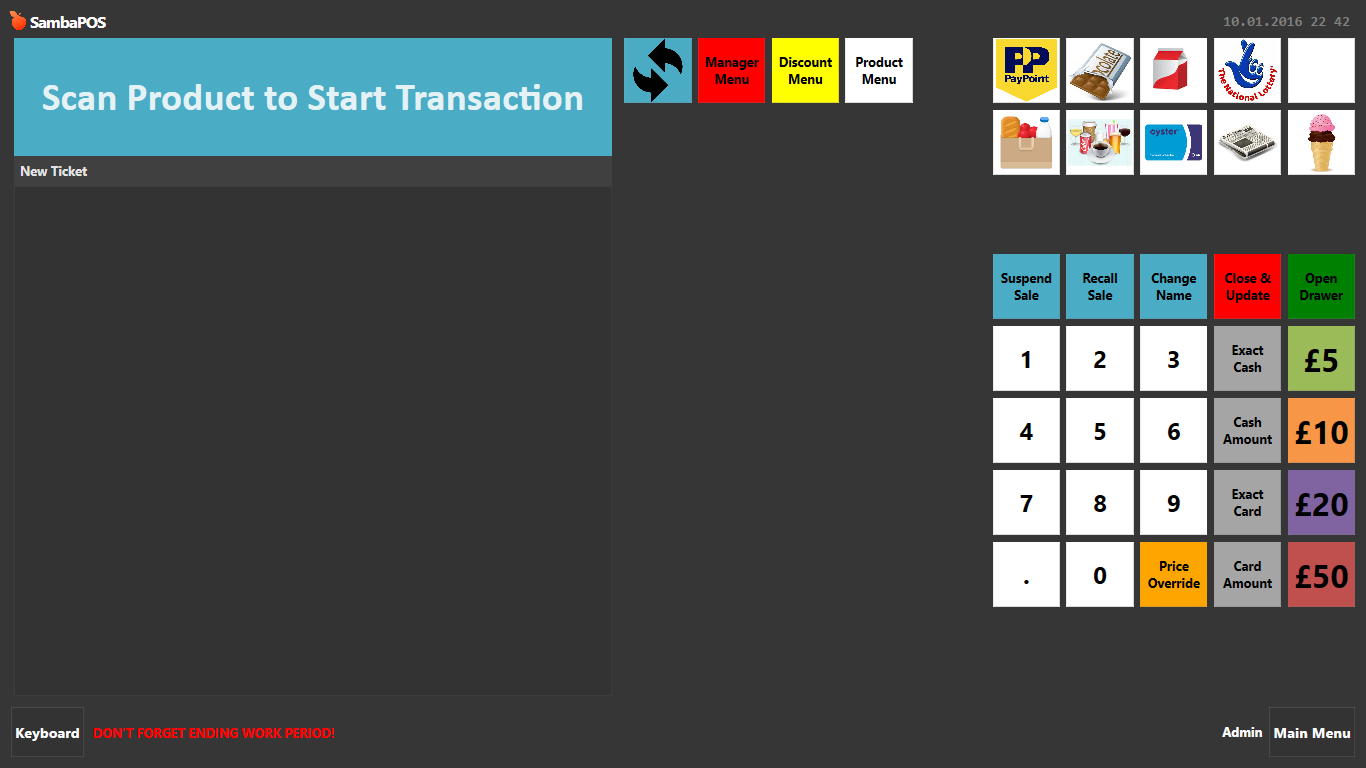
Here is what your screen could look like, I have created this for another forum user and I intend to use it as a bar setup where the screen is filled with Quick Service buttons for the most popular items and menu switching buttons to enter different categories that will contain the rest of the menu items (I will add to this tutorial when I have completed that setup)
Step 1 - Setup a Menu
Manage>Products>Menu List>Add Menu (or use default)
Step 2 - Ensure Menu is Assigned to Tickets and Departments
Manage>Tickets>Ticket Types>Select your ticket type and ensure Menu is selected under “POS Menu”
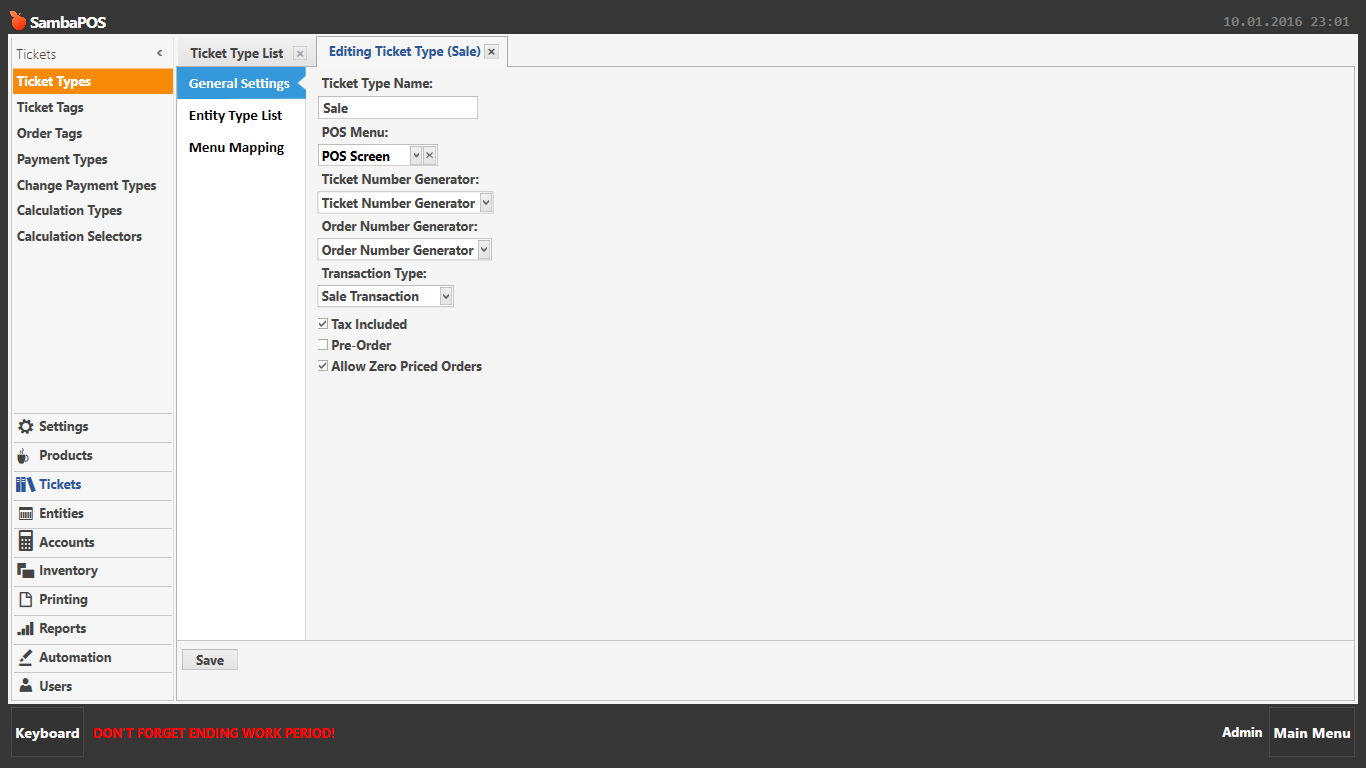
Manage>Settings>Department>Ensure default menu is set to your menu AND “Ticket Creation Method” is set to “Create Ticket”
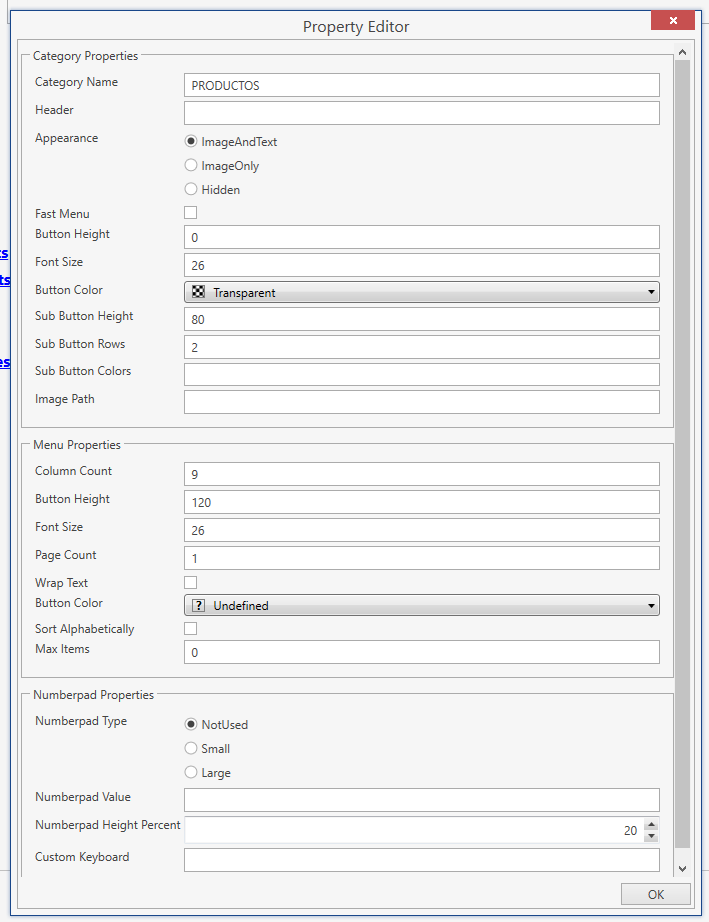
Step 3 - Setting the Number of Buttons on your POS Screen
Manage>Products>Menu List>Select your menu and press edit menu
Add a category if you done already have one, ive called mine Admin
Select the category and press “Edit Category”
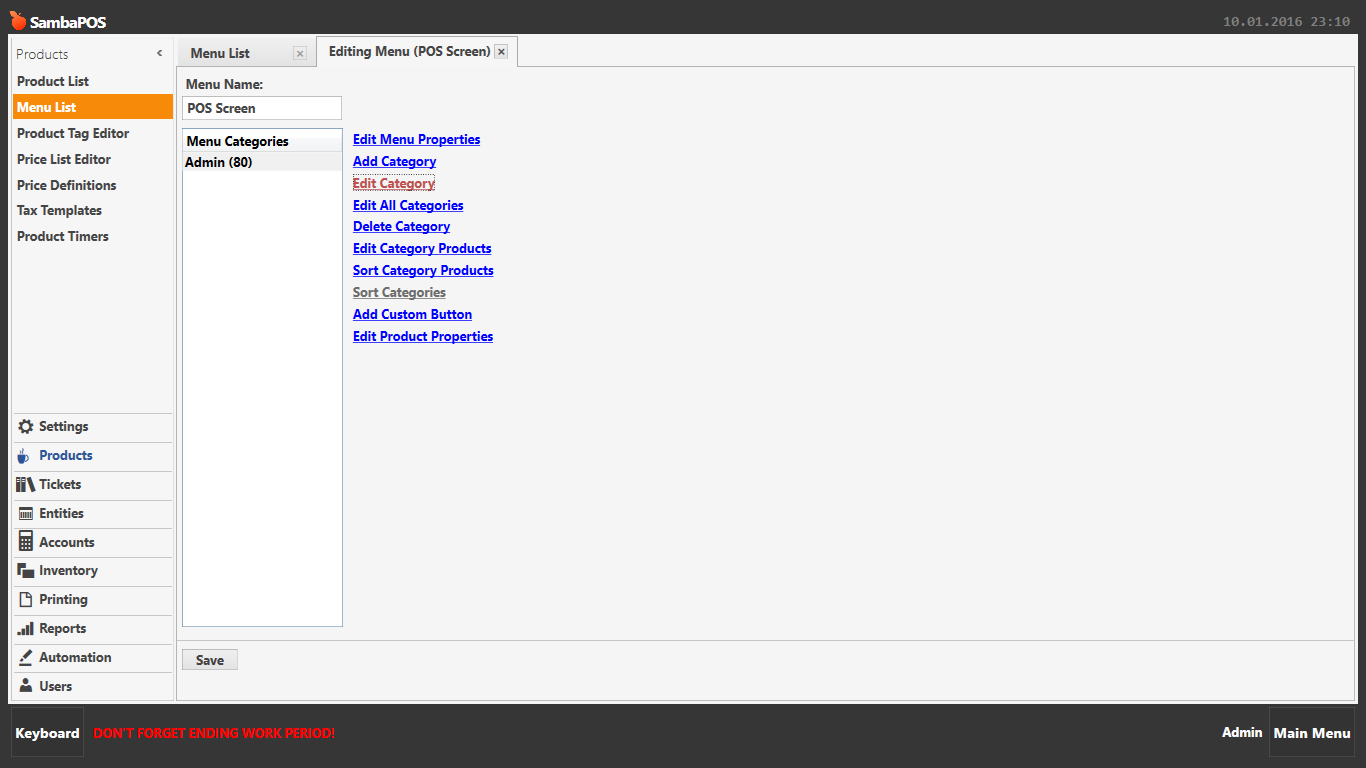
Scroll down to menu properties and set the number of buttons by changing the column count and button height. This will vary depending on your screen size and your preference for size of buttons etc. I have set mine to 10 columns which gives a screen with 10 buttons wide, and a height of 90 to give a square button.
Then in “Numberpad Properties” set the Numberpad Type to “Not Used”

Step 4 - Add buttons to your screen
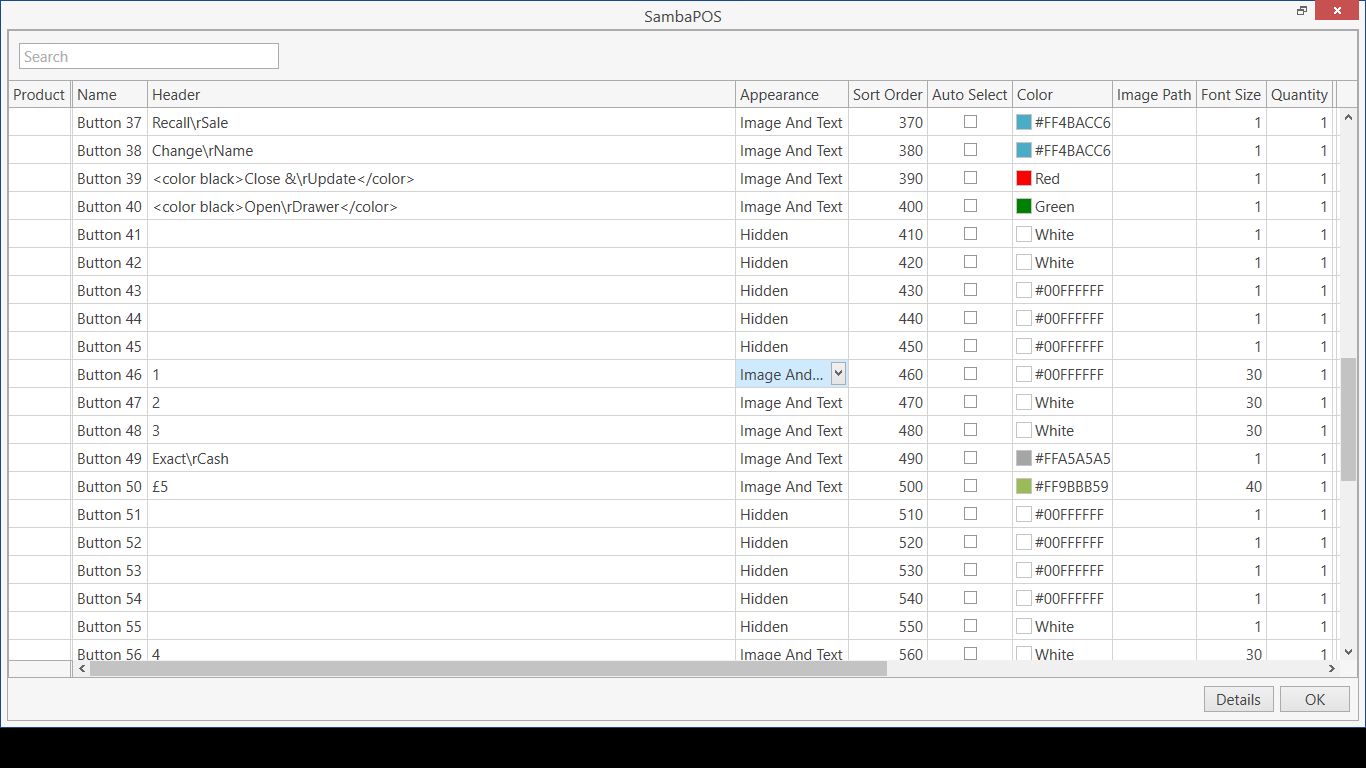
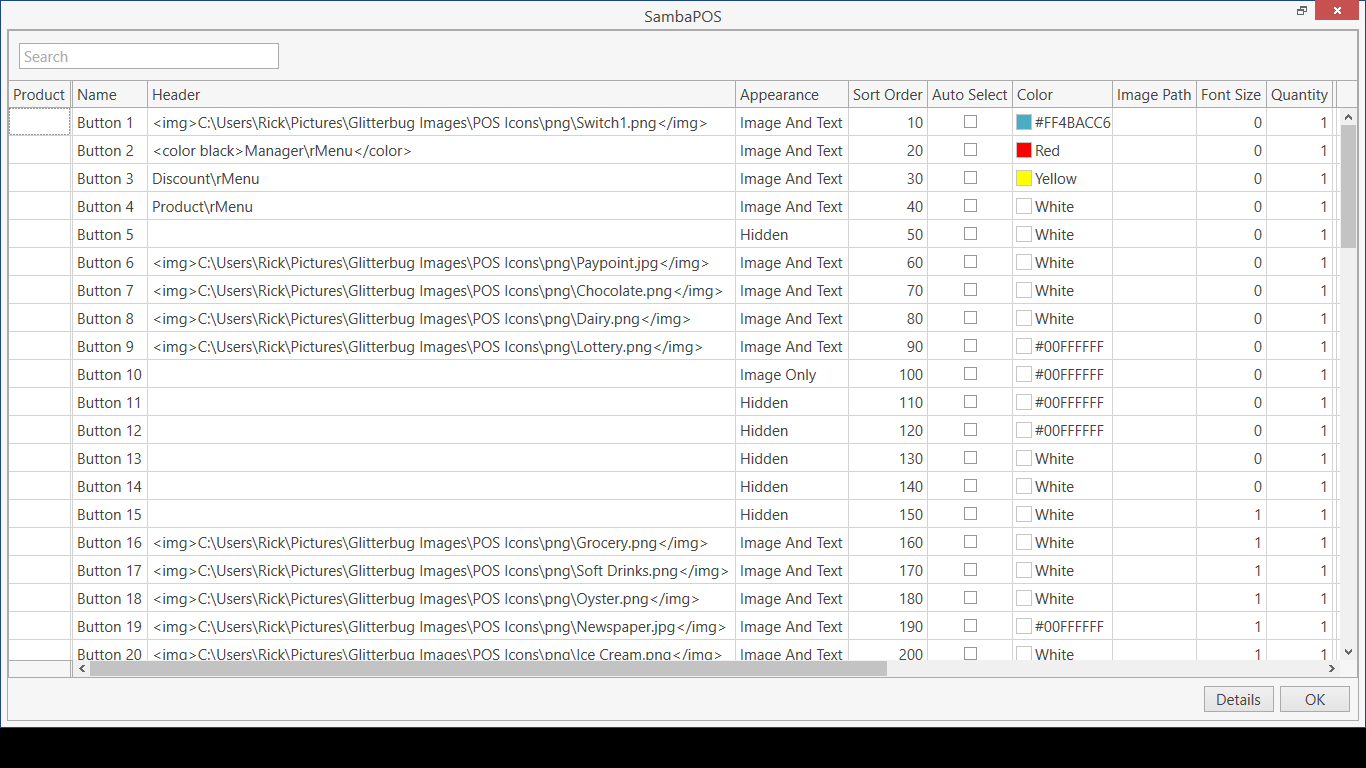
For my size of screen with 10 columns and a button height of 90 i can fit 80 buttons on the screen. To add your buttons press “Add Custom Button” and set your default buttons as Button 1 to Button 80 as shown below
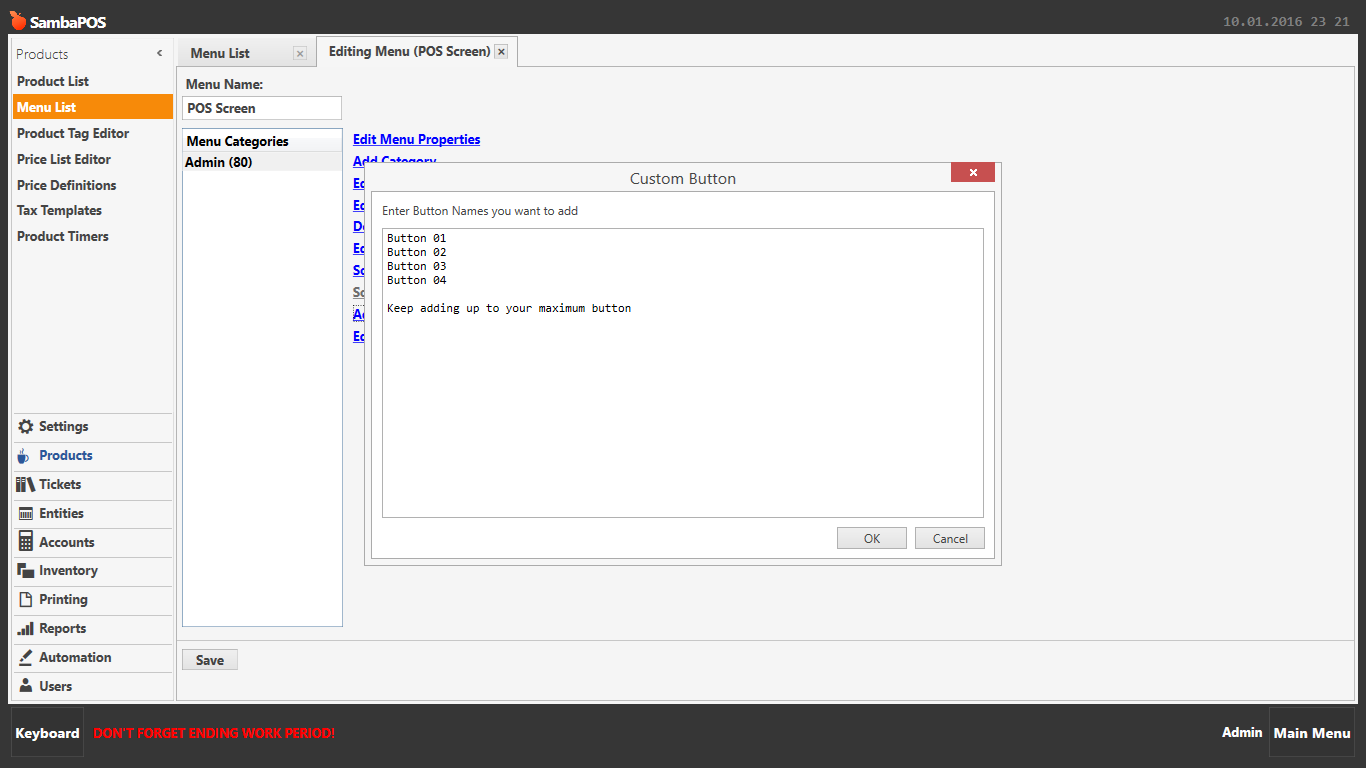
Press OK and then Save
Step 5 - customising your buttons
You will see i have a lot of blank space, these are where my buttons that are currently not in use and i have set them to hidden
Click “Edit Product Properties” to display settings screen where you can now configure your buttons
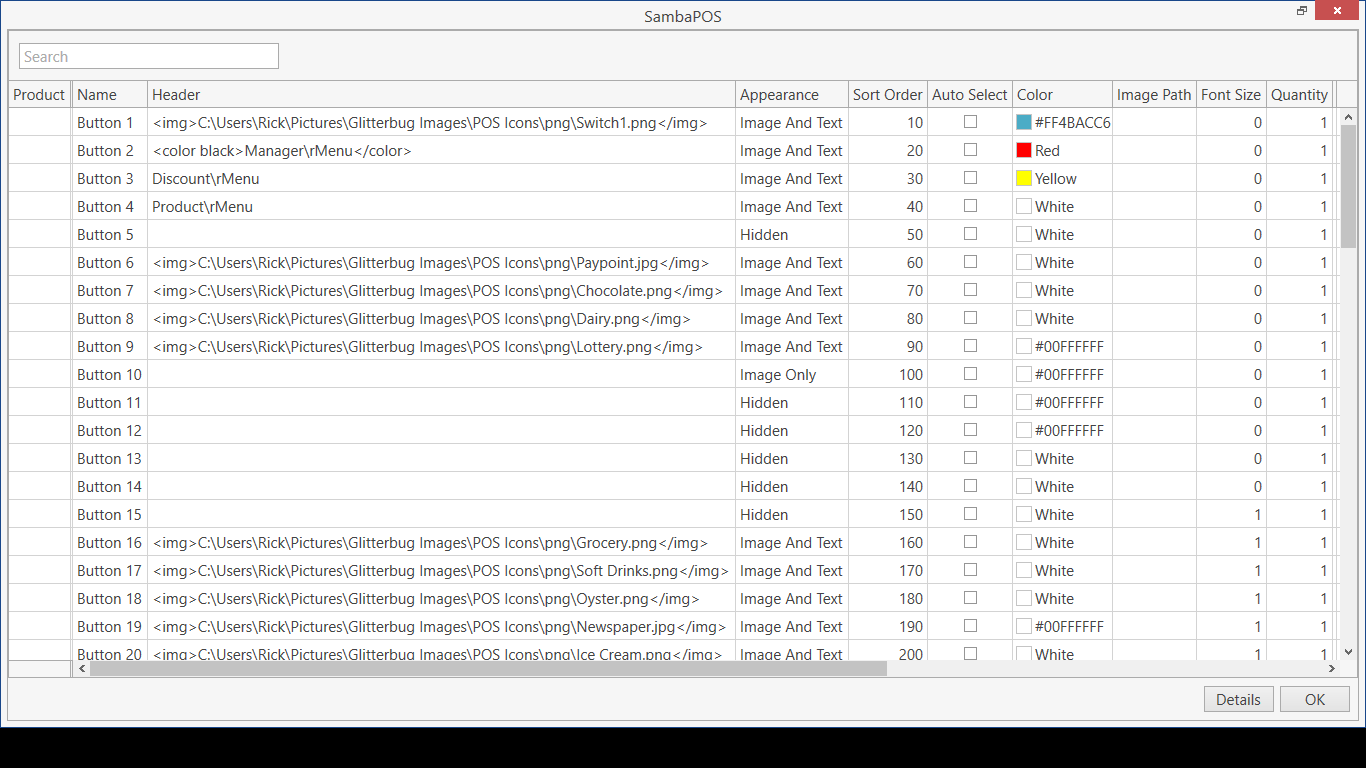
For any inactive buttons i have the Appearance column set to “Hidden”
The Header column is where you type the wording for your buttons, as you can see they also support images by tying the file location of the image you want to display on the button
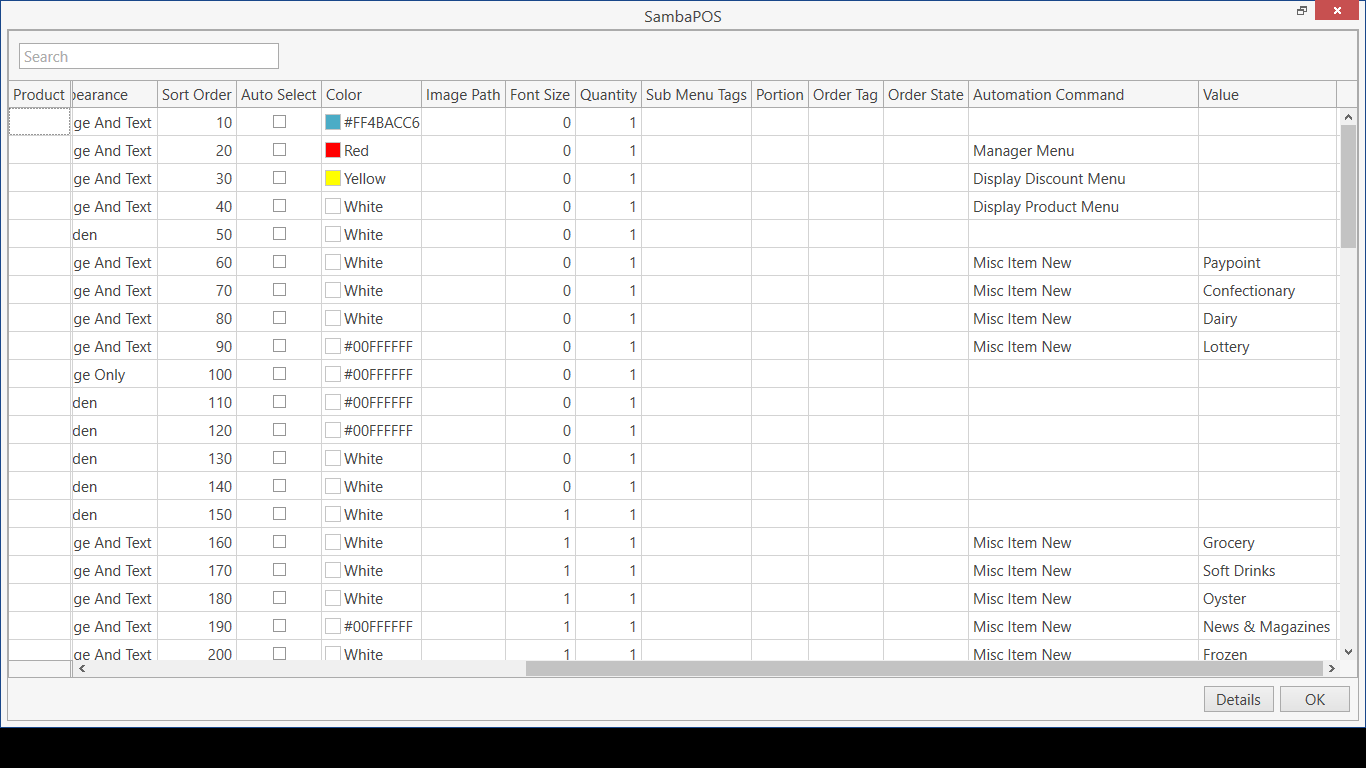
Scroll across to the right and you will see the Automation Command Column. If you want a button on your screen to perform a function then type the name of the automation command exactly in this box. For example my open drawer rule fires when my automation command button called Open Drawer is pressed, so by typing Open Drawer in the automation command column it turns the button into an automation command button which fires the rule to open my cash drawer

This is how to setup 1 menu and turn the main POS screen into a quick service screen with multiple button.
It is really simple to “de-activate” buttons just make them “hidden”.
You can restrict access to buttons by turning on Admin PIN required in the auto command settings
If you want to change the position of the button on screen its really easy, just move the position on the “Edit Product Properties” page
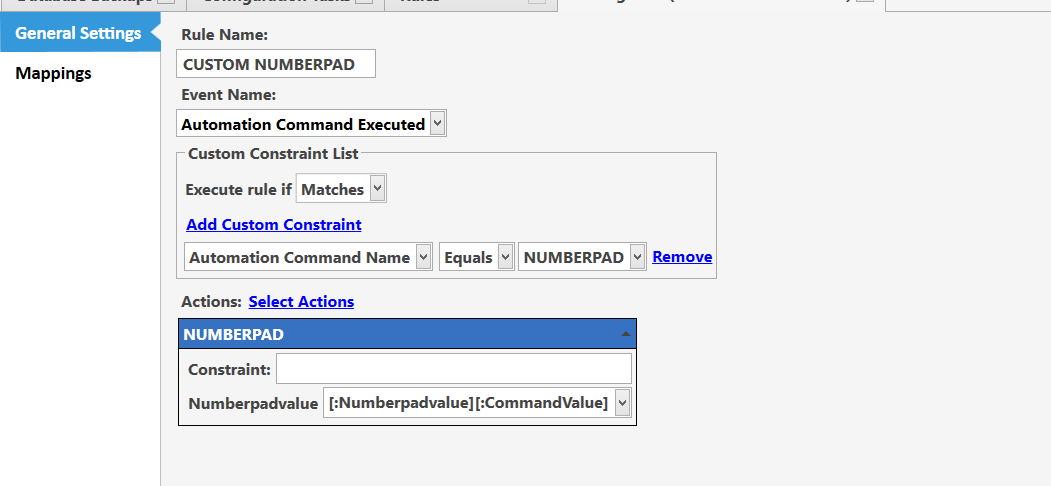
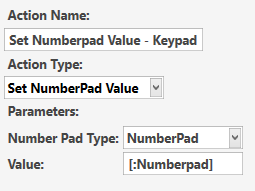
Step 6 - Creating the number pad
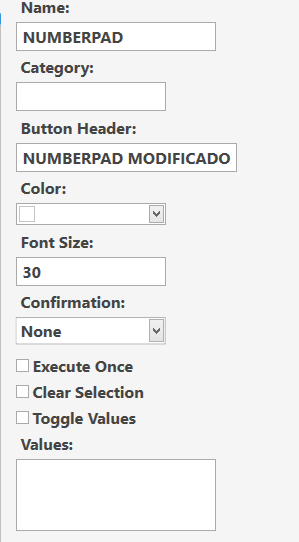
Create the Automation Command
Manage>Automation>Automation Commands>Add Automation Command
Set as below
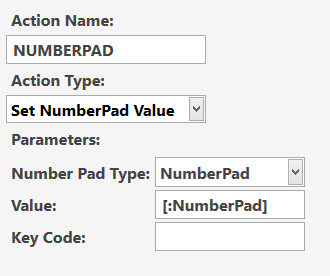
Create the Action
Manage>Automation>Actions>Add Action
Set as below
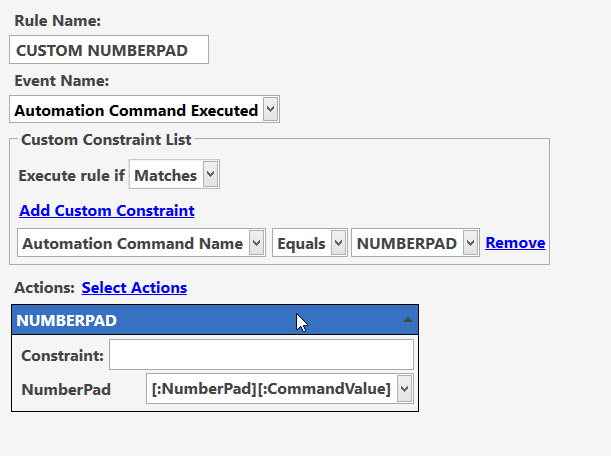
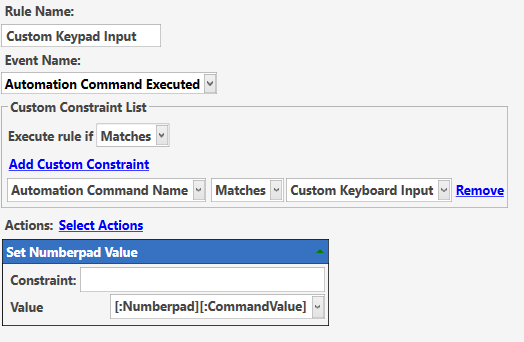
Create the Rule
Manage>Automation>Rules>Add Rule
Set as below
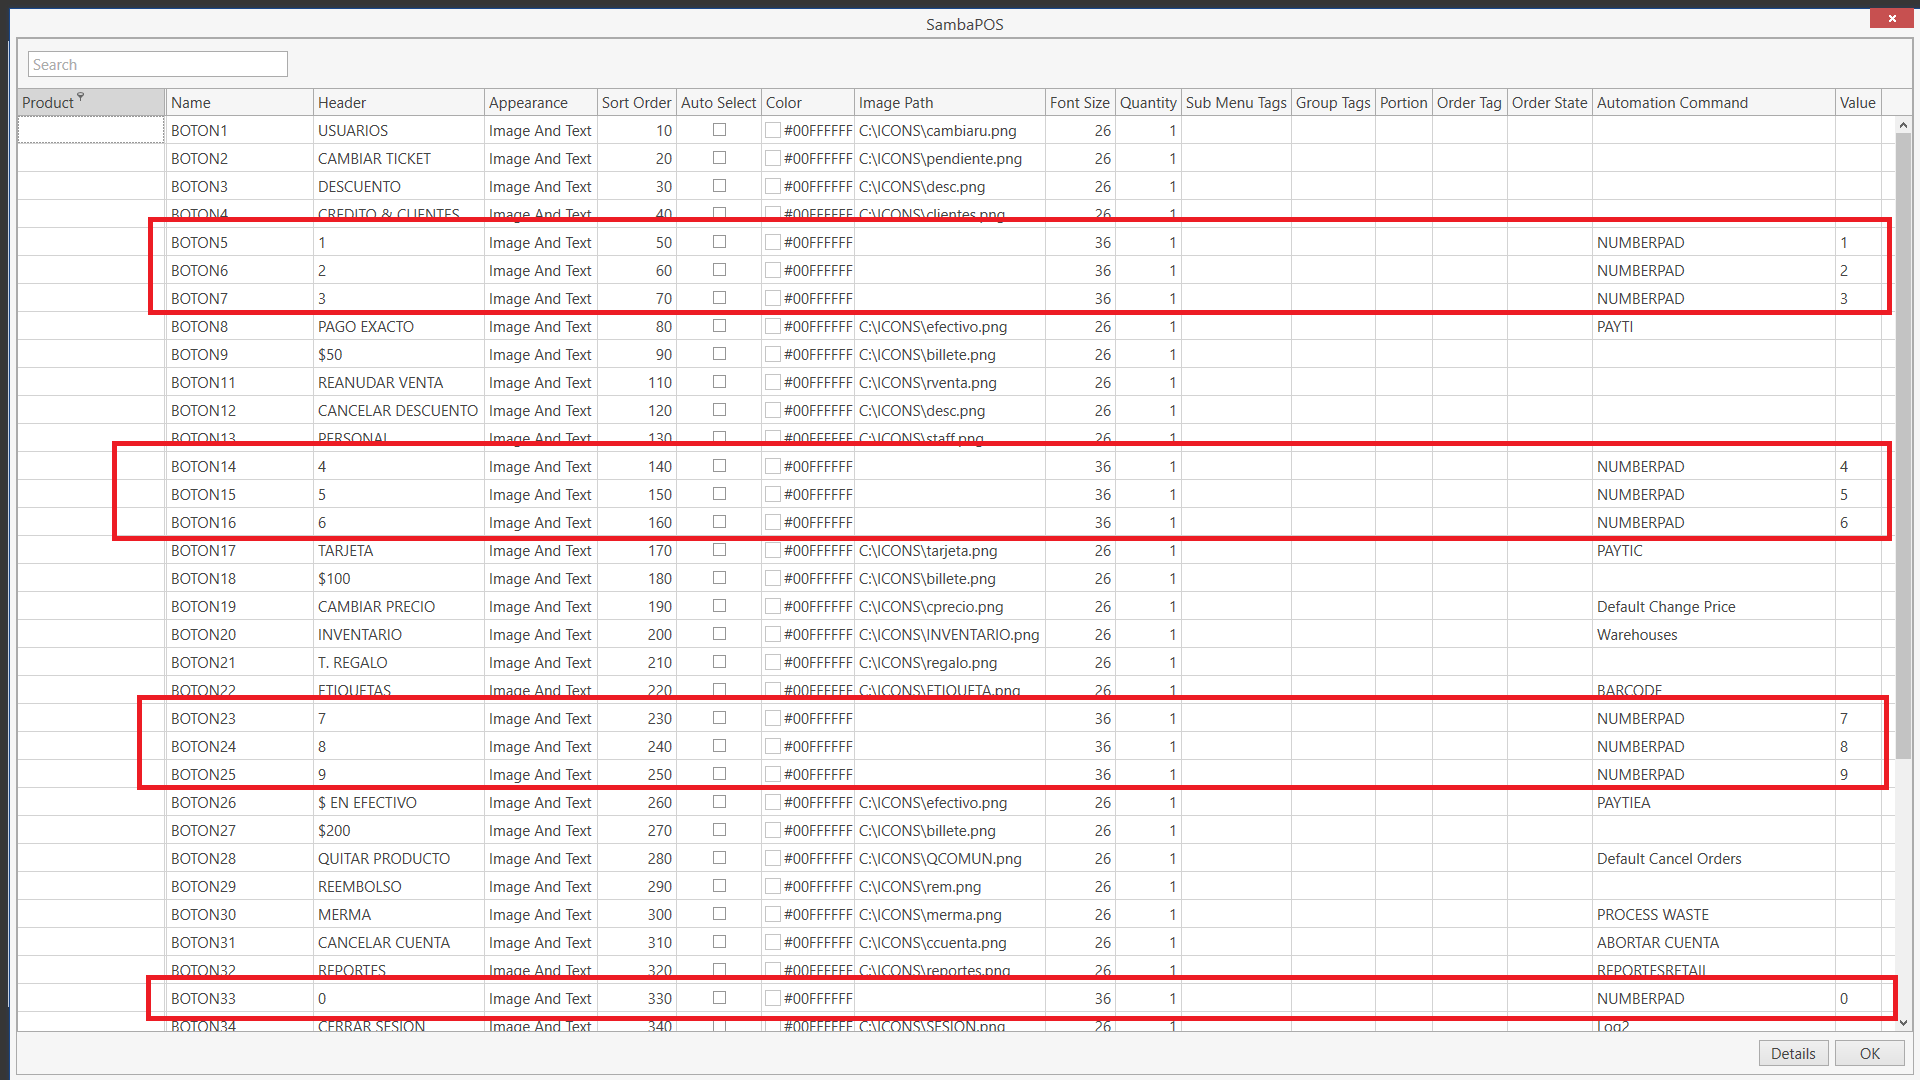
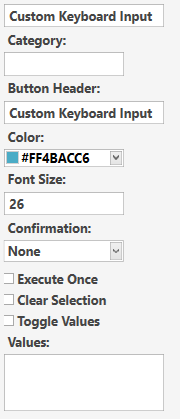
To make the buttons work on the POS screen go back into “Edit Product Properties” decide where you want each of the numbered buttons to be and setup as below
I have used buttons 46,47,48 to be my keypad buttons 1,2,3, so in the header column type 1,2,3 to make this show on the buttons on screen. Ensure the appearance is set to Image and Text and change the colour to your choosing.
Now in the automation command column type the name of the automation command we created above “Custom Keyboard Input” and enter the value you want to appear when the button is pressed eg 1 for 1, 2 for 2 etc in the value column
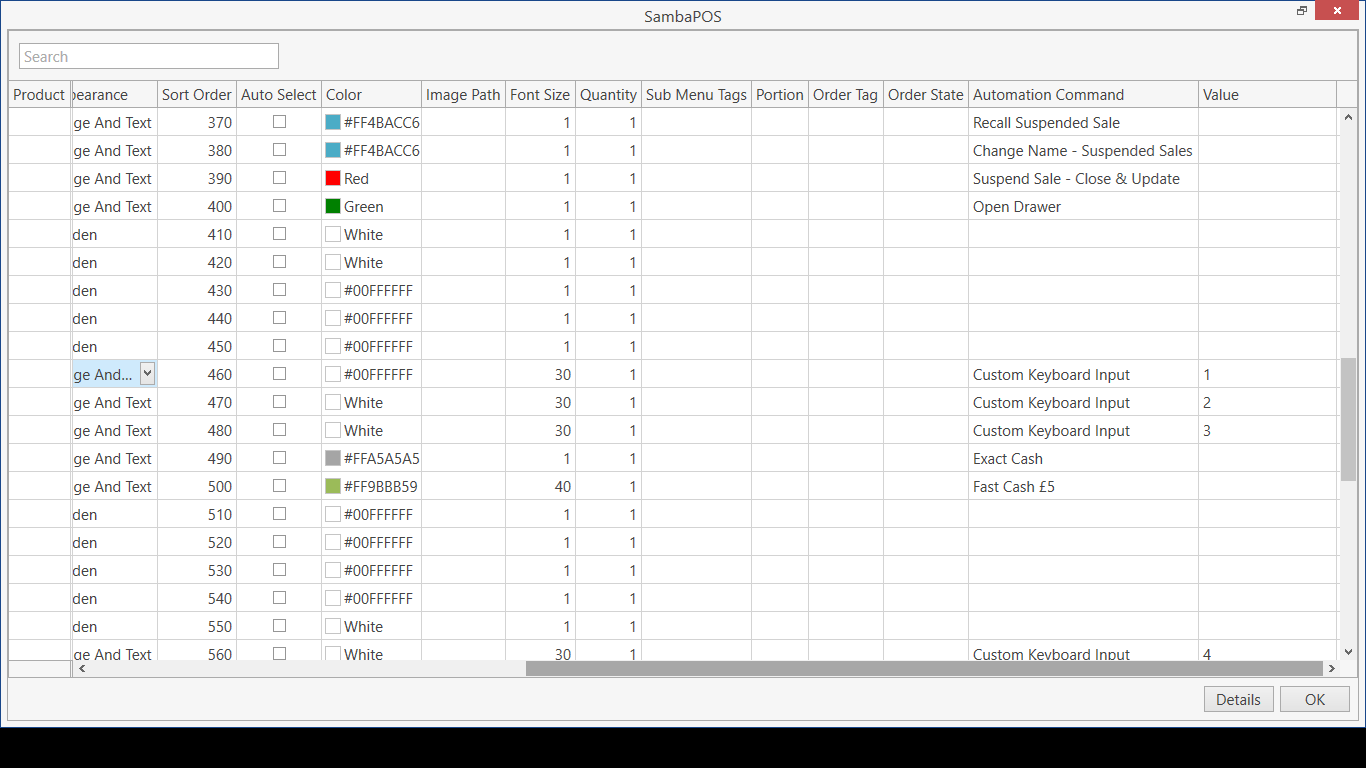
do this for all your keypad buttons until you achieve your desired layout, as you can see below i have pressed all the buttons on screen and these appear on screen, and you can now use these in other rules such as price changes etc

Step 7 - Creating Named Miscellaneous Item Buttons
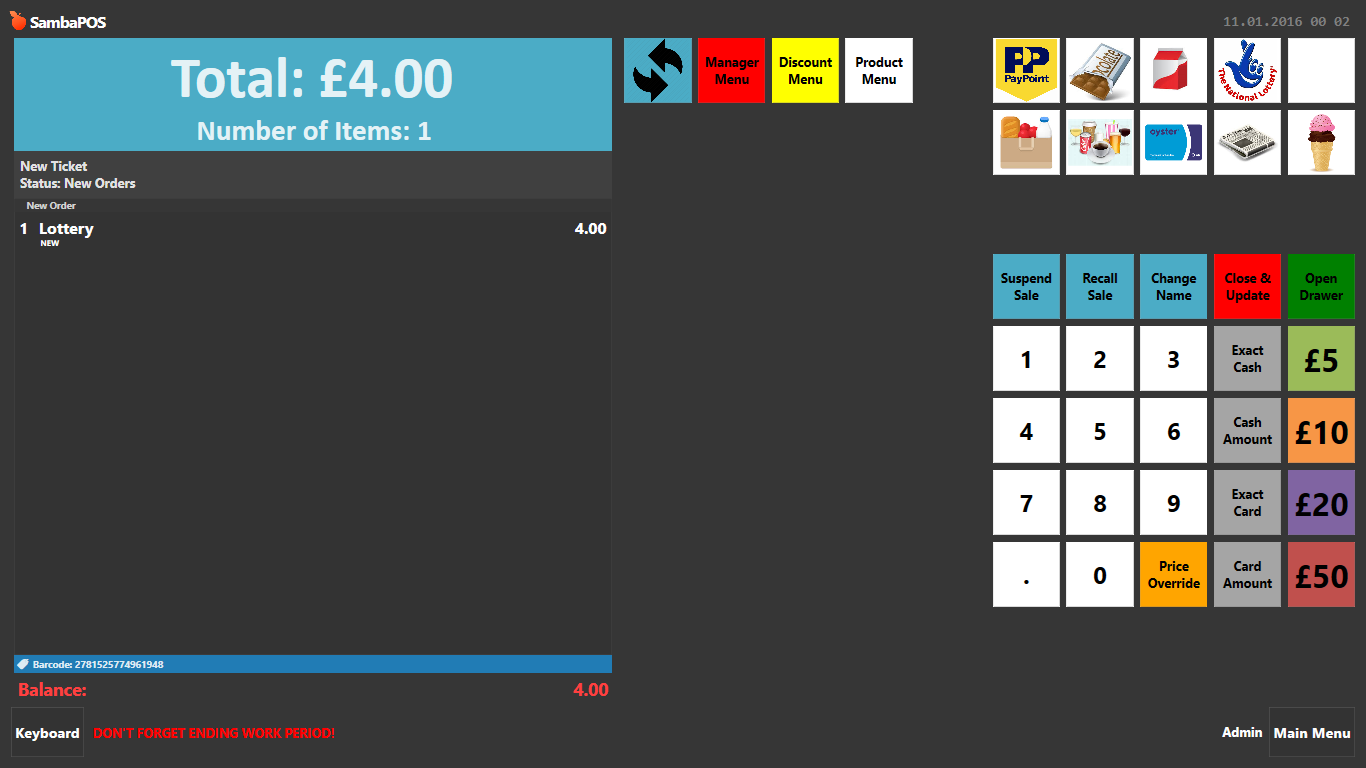
In my example setup the forum member wanted buttons for “Lottery”, “Grocery”, “Paypoint” etc so that when a customer buys these products they just type the price on the keypad and press the relevant Named Misc Item button as below
Type in 4.00 as price and press lottery button to add a £4 lottery sale to the ticket
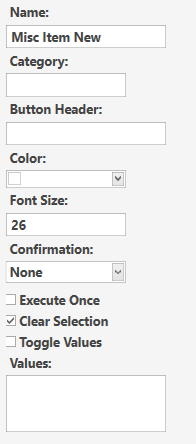
Create Automation Command as below, ive called it Misc Item New (call it whatever you want so long as it is the same across the actions and rules)
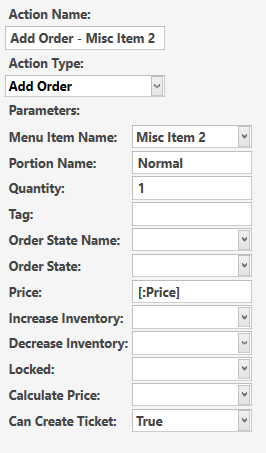
Create Action 1 as below (again name it however you want but it must be the same throughout the rule)
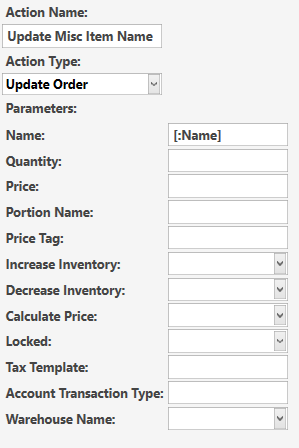
Create Action 2 as below to change the name of the product on the ticket
Create Rule as below
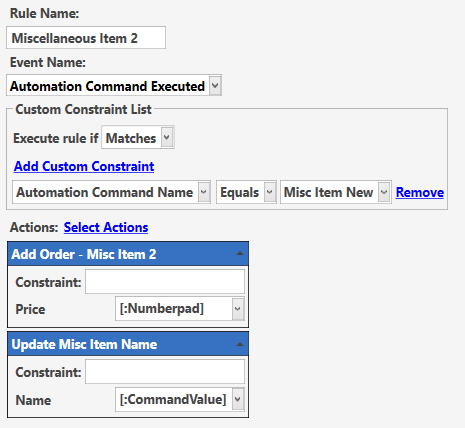
Now go back to your menu and edit product properties, decide where you want to place the buttons, to make them work you need to add the automation command and value settings as below
I choose button 6 for the paypoint button, set the header as an image by typing the file location. Then set the Automation Command column as the name of the auto command created above (Misc Item New) and the value is the name you want to appear as the product on the ticket, in this case paypoint
As always I need to thank everyone thats help tweaking the actions and rules, and Emre for implementing the features needed to create this setup