You need to install at least 5.1.51 version
Why we need logging?
SambaPOS contains improved ticket logging system to improve security. Adding Admin PIN’s or limiting staff permissions is always a good choice but each permission adds a little complexity to workflow. Instead of limiting users keeping track of how certain features used might be a better solution. By using techniques demonstrated here you can track anything done inside tickets. In this tutorial we’ll keep track of how many times print button clicked and which orders cancelled and how tickets settled.
Enabling Logging
Add Ticket Log action is used to keep logs for tickets.
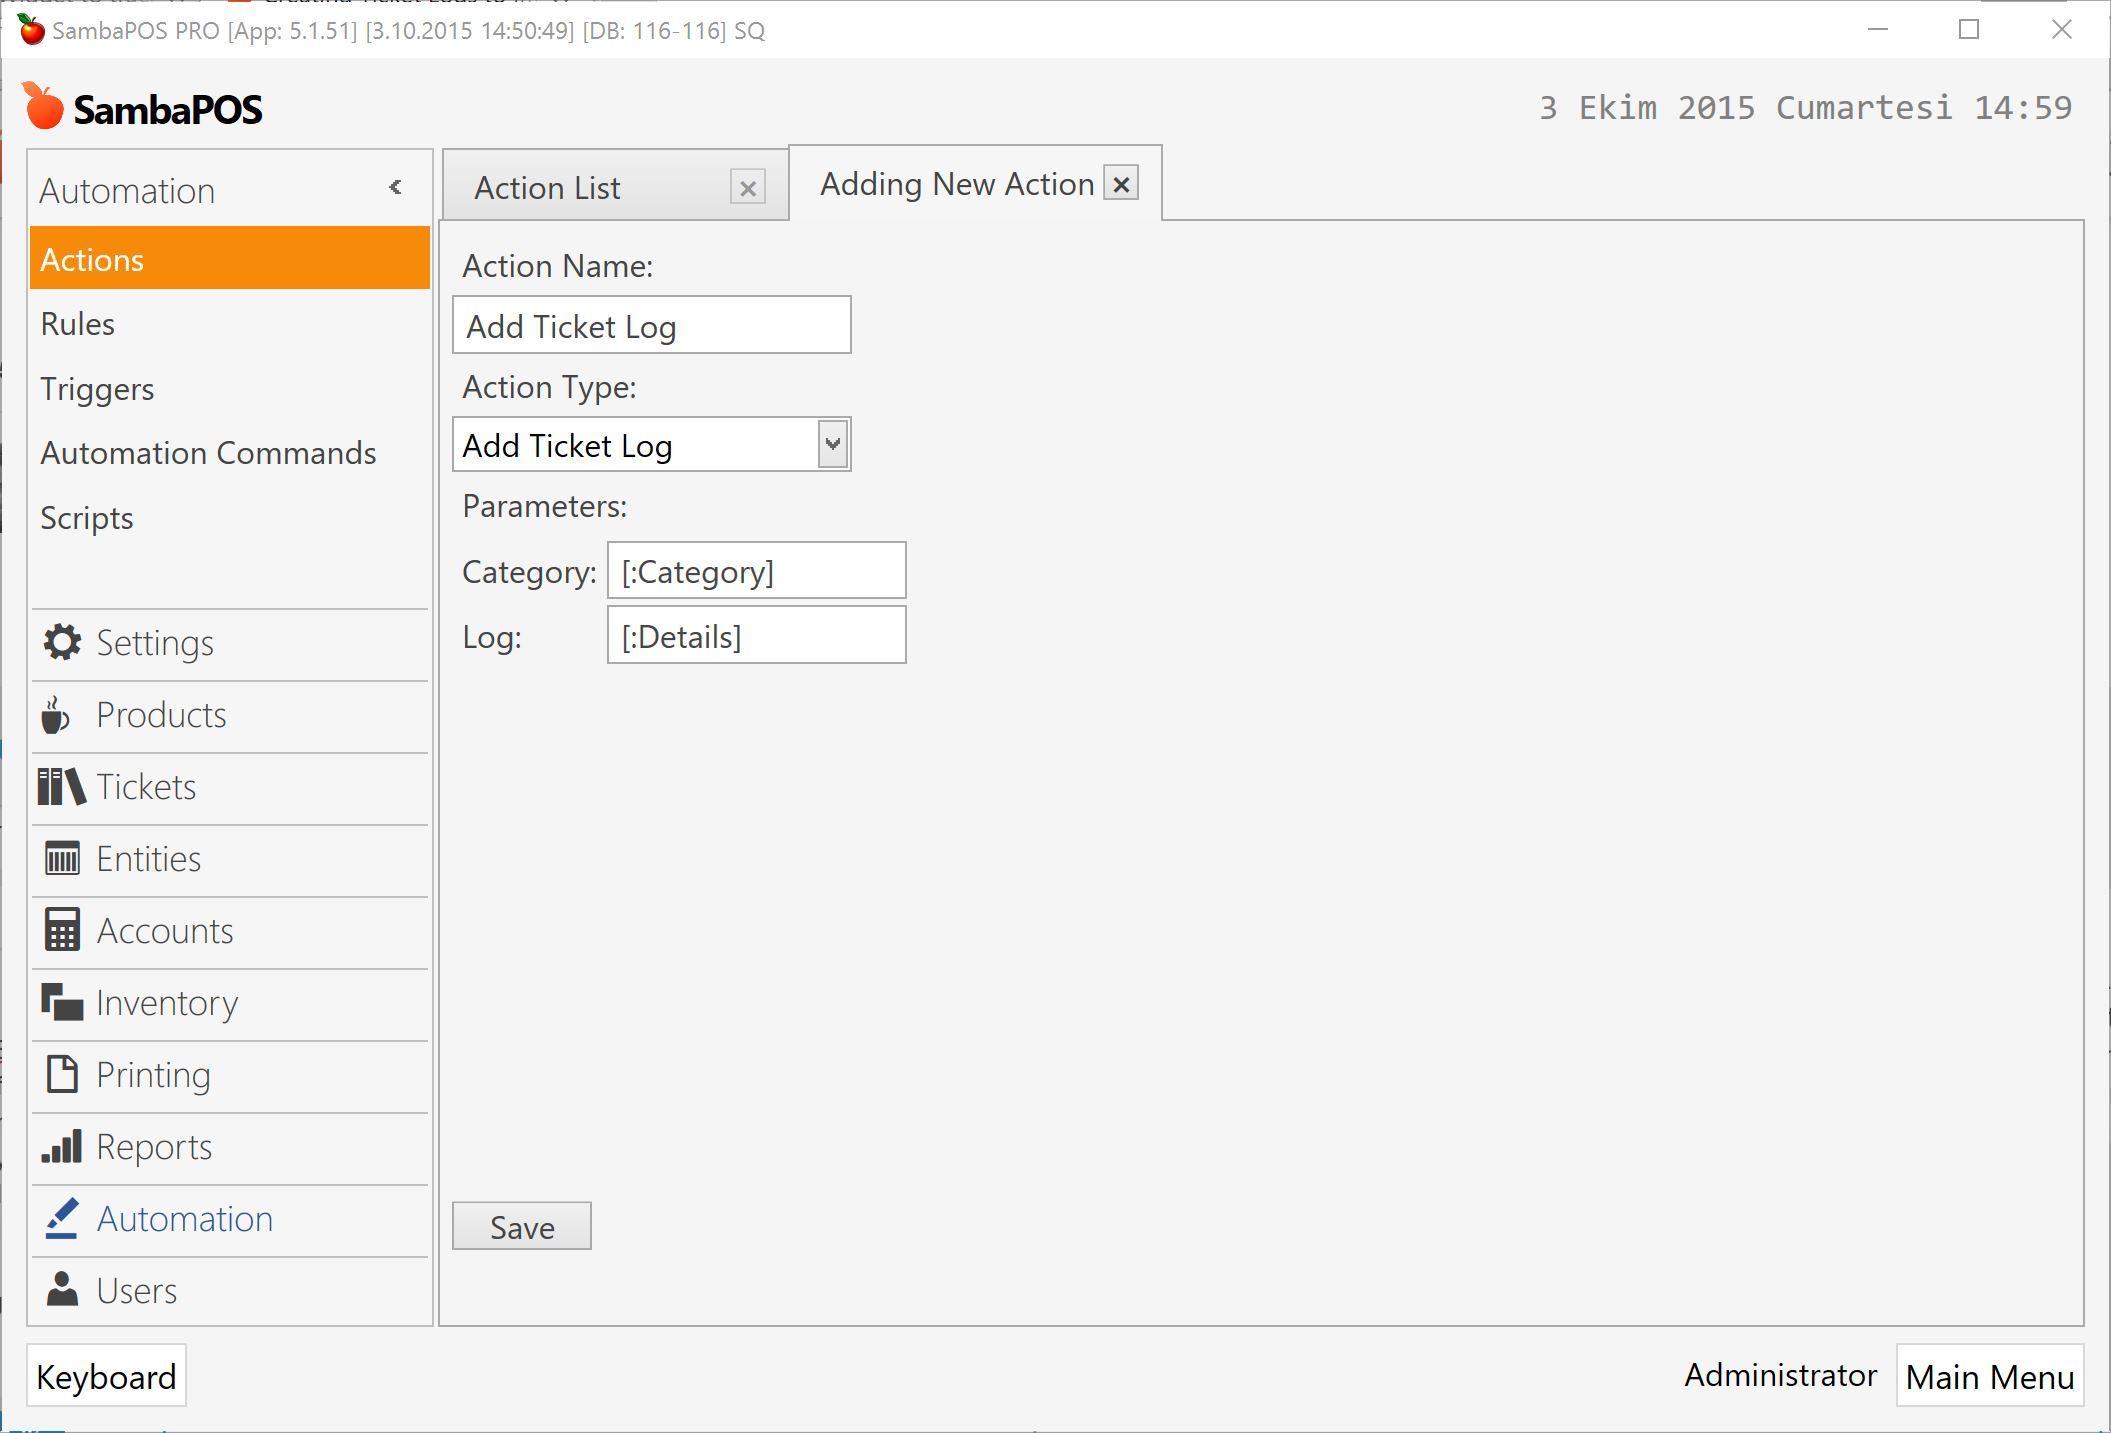
We can use log category to group / separate logs for certain actions. As I’ll keep track of print button, order cancellations and payments I’ll have three categories. For this reason instead of typing a static category name inside action I’m configuring category as a variable with [:Category] syntax so I can define it inside rules. Log is also a variable data so I can add detailed info about log. To demonstrate the difference I named it as Details.
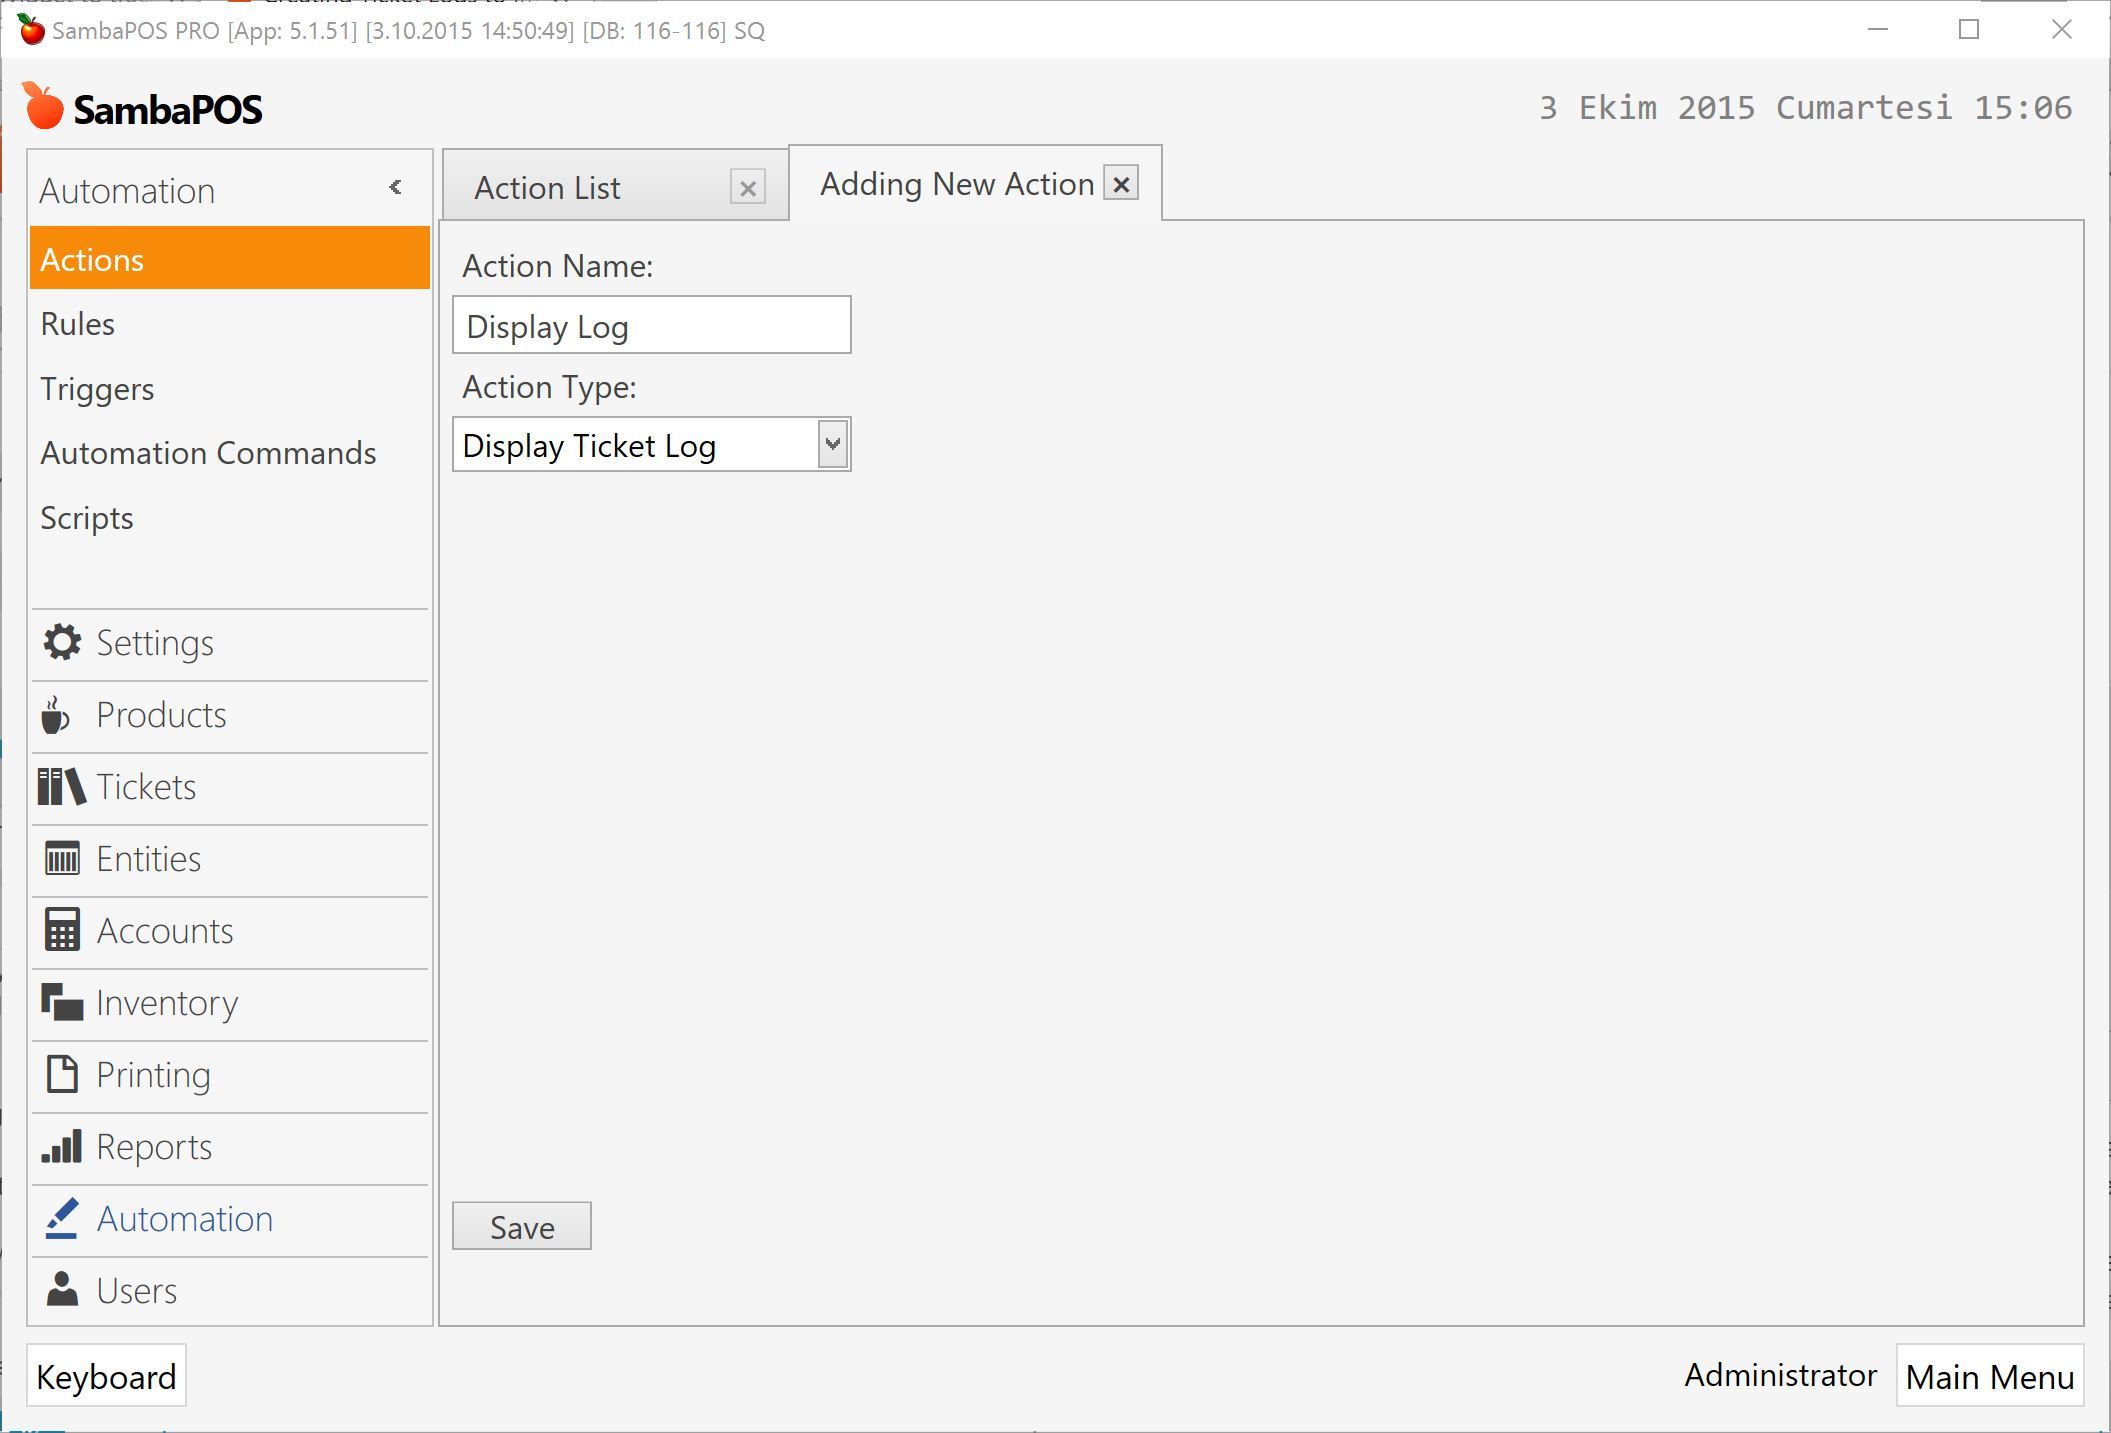
Display Ticket Log action shows log details inside tickets. I’m also configuring an action for it.
To see ticket logs I can add a button to ticket screen. I’m adding an Automation Command for that. Automation commands appears as buttons on Ticket Screen.
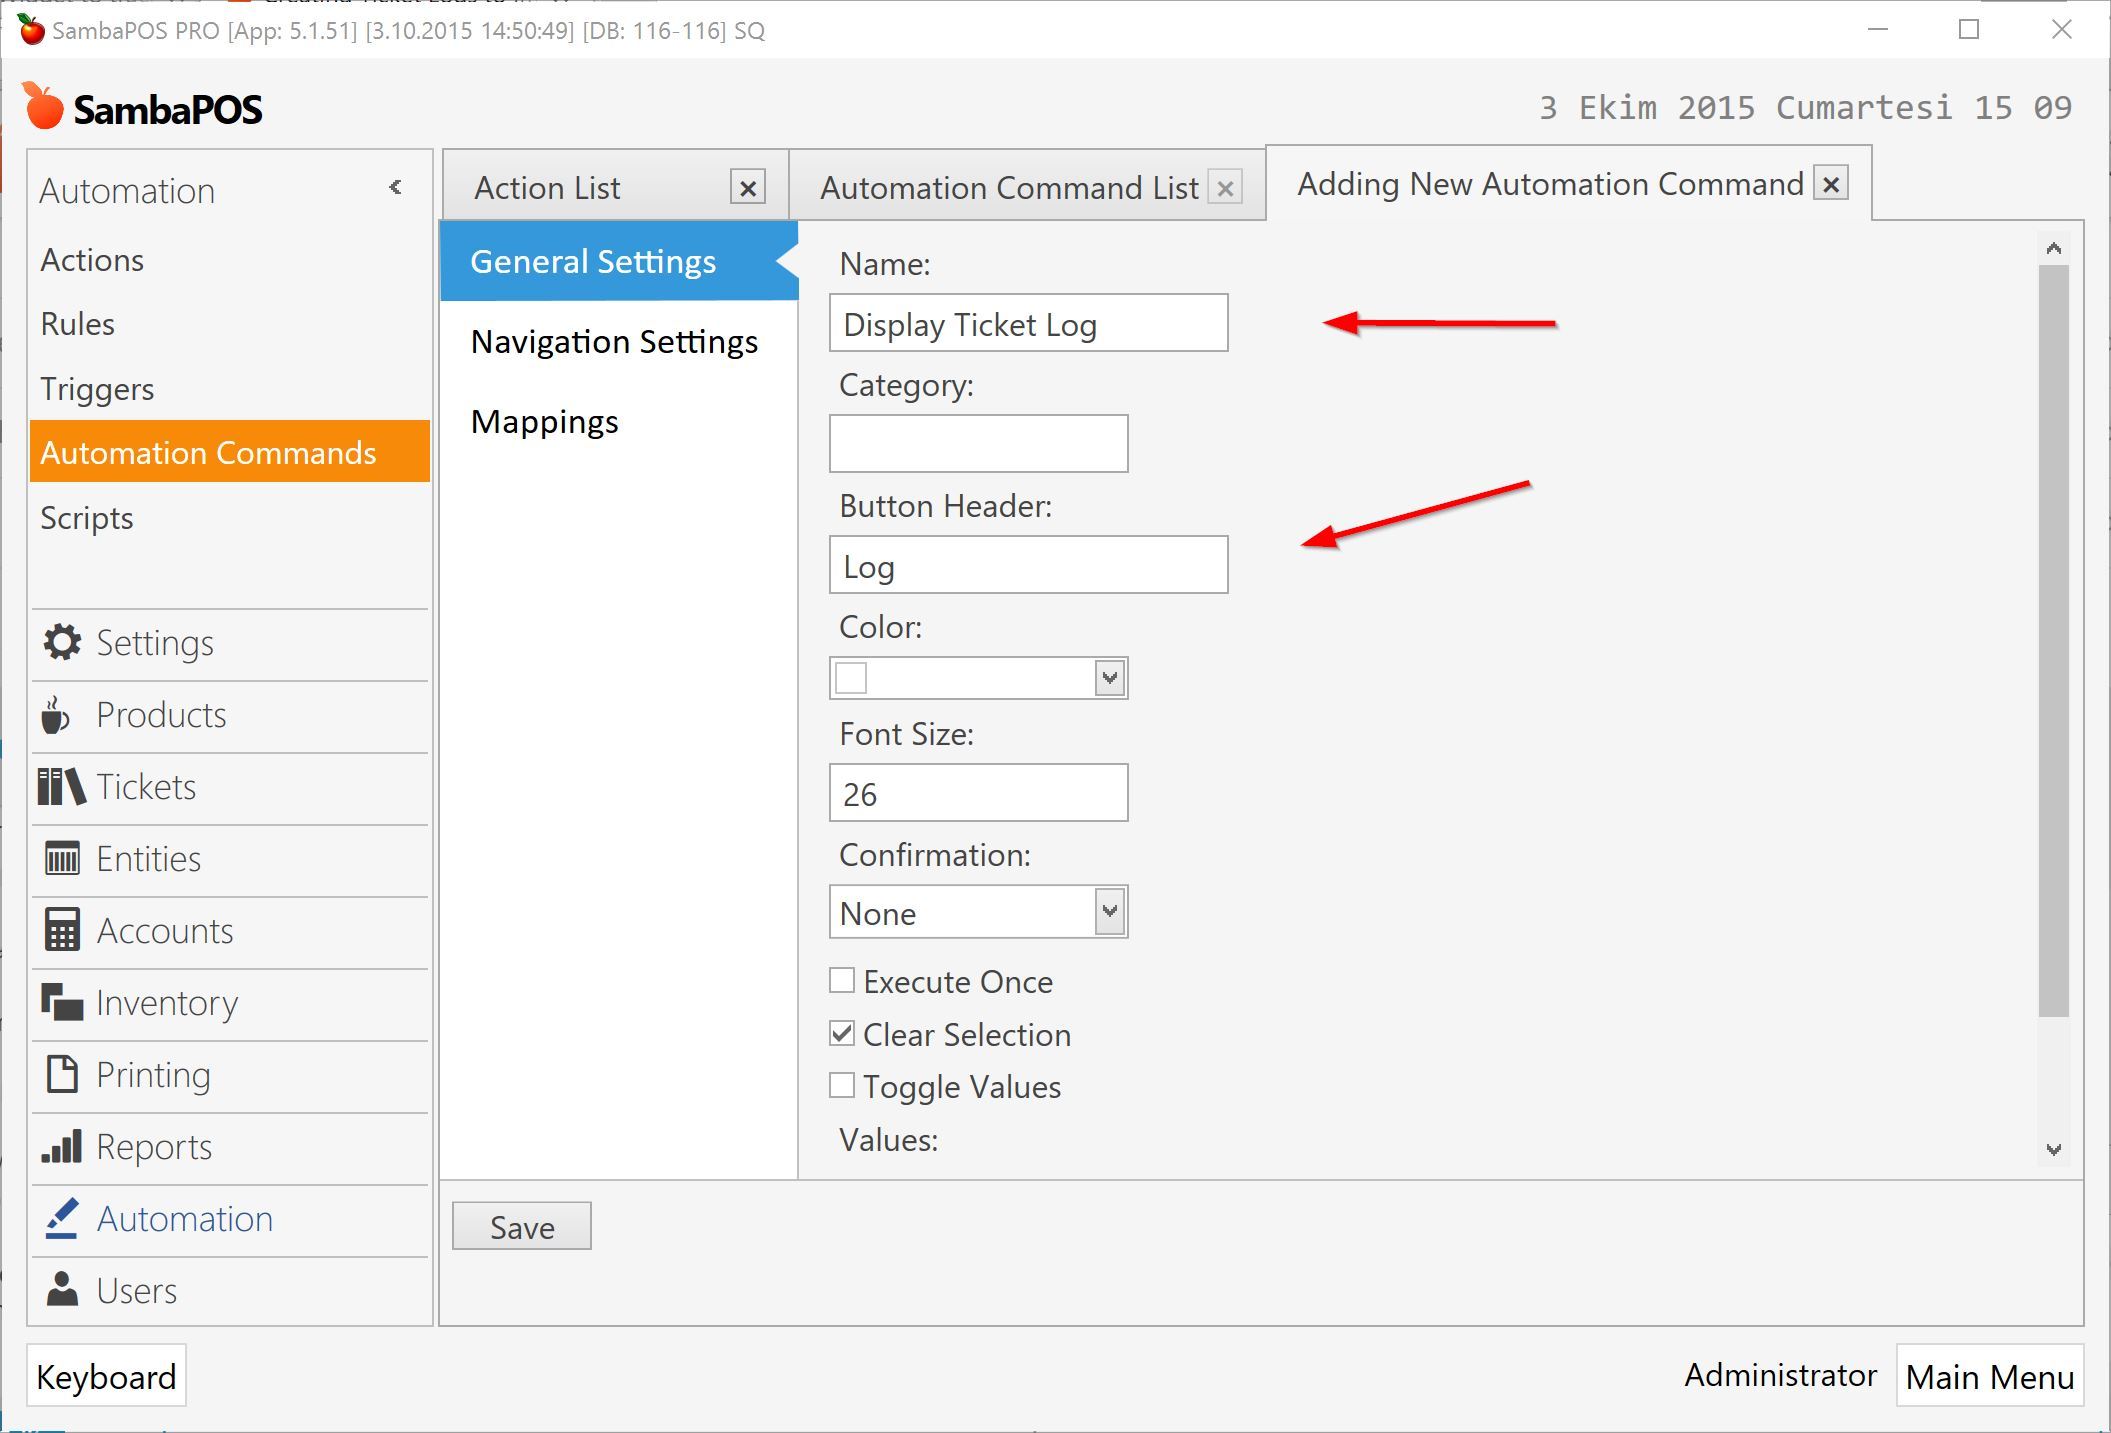
I’ve set Button Header as Log but you can change it if you want.
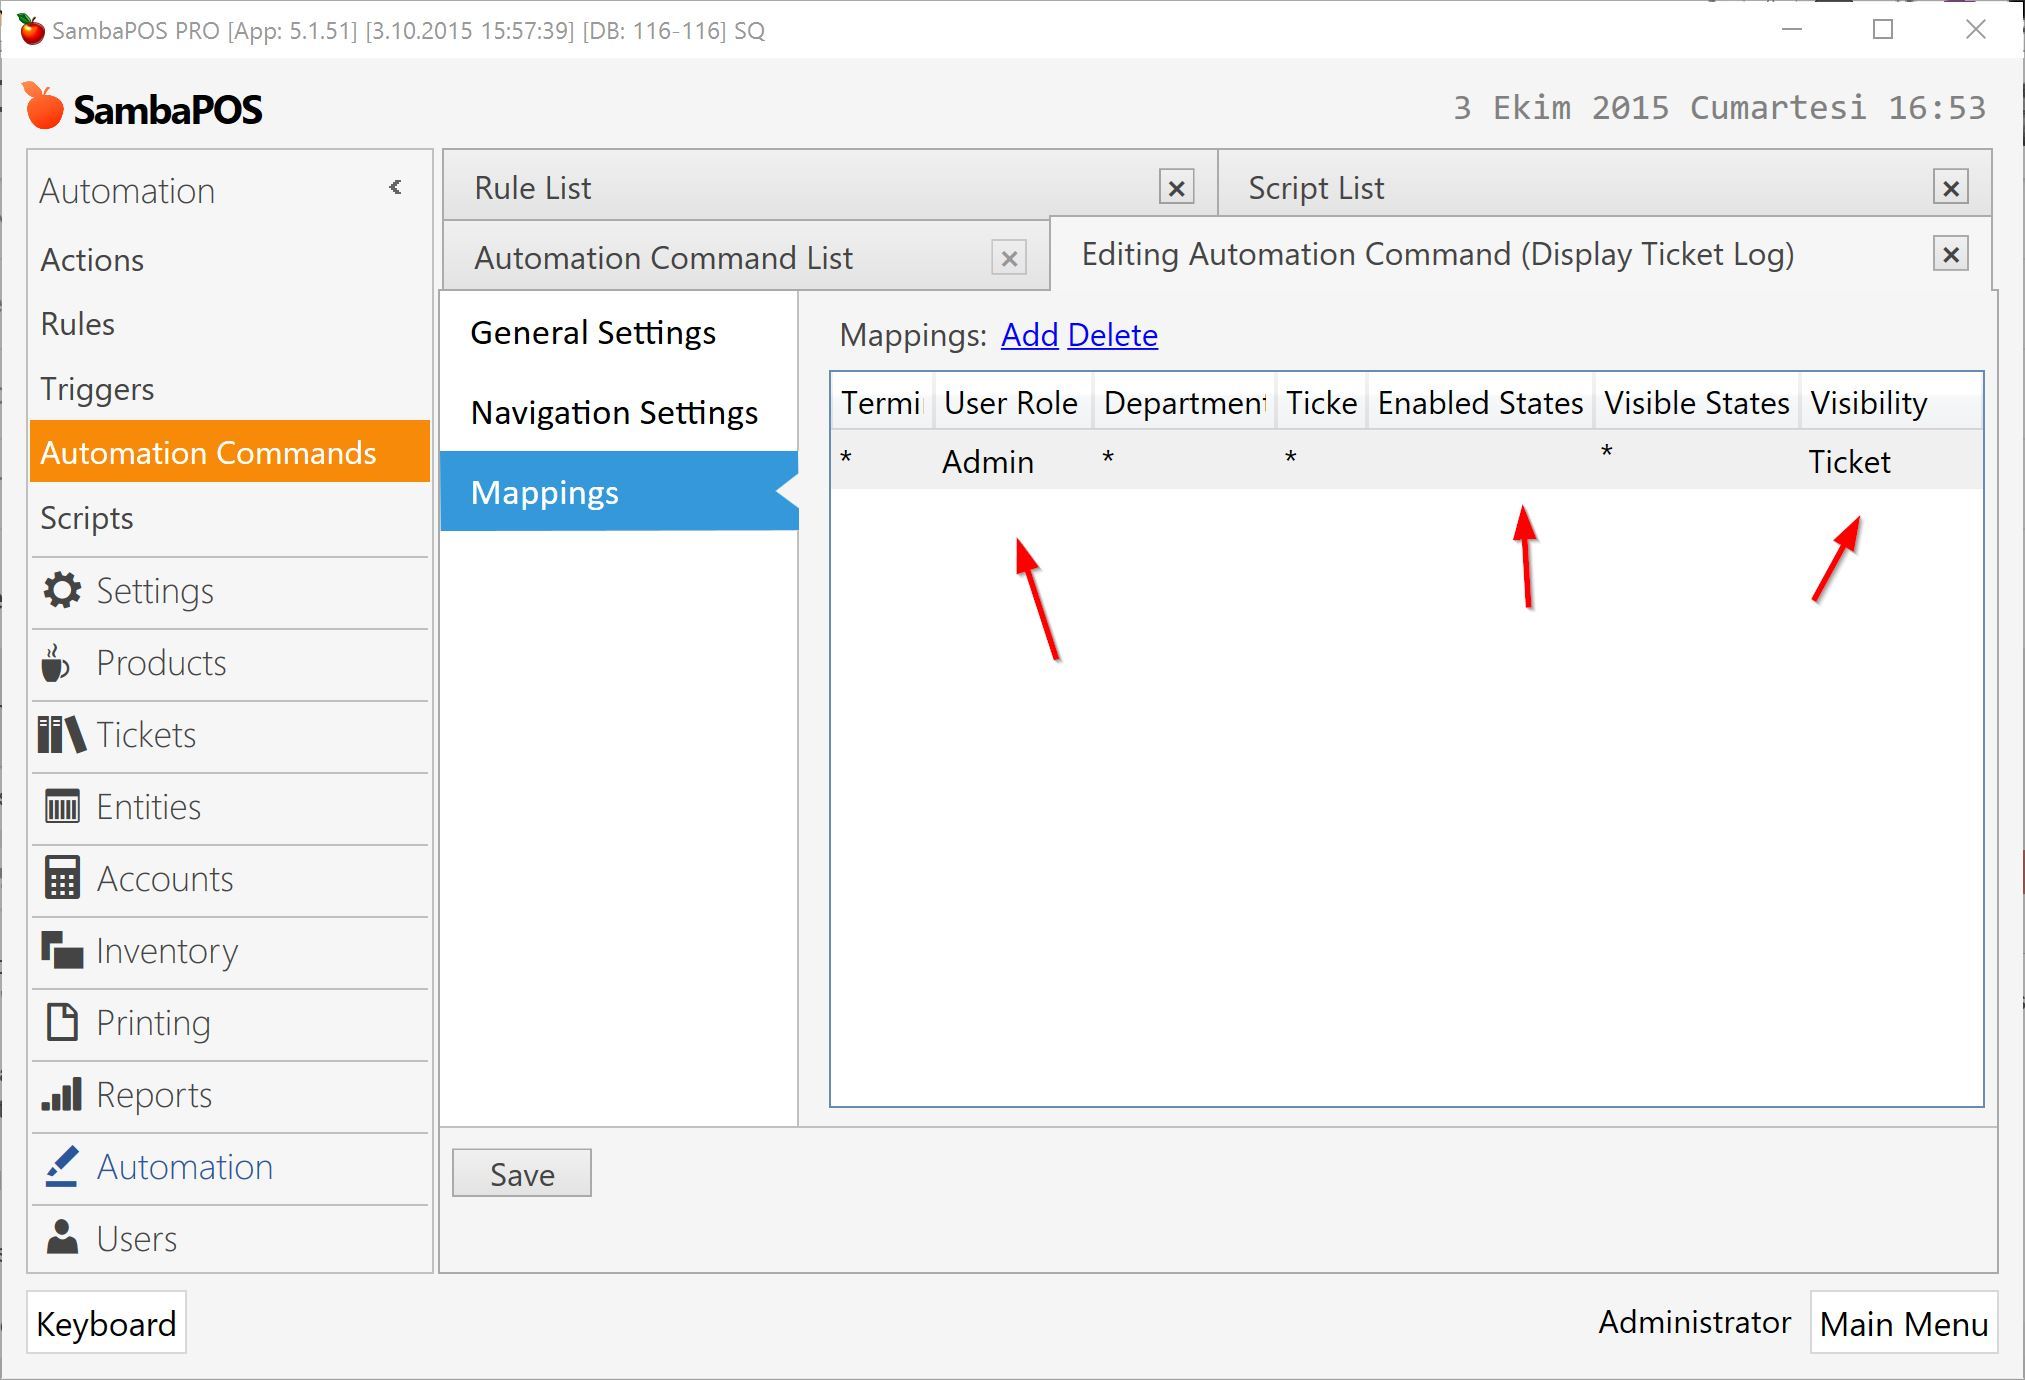
I want this button to appear in Ticket Screen with Log label. I may not want non-admin users to see logs so I can map Log button to a specific user role. I’m configuring it on Mappings page. I’ll also leave Enabled States empty to be able to use Log button on closed tickets.
Finally I need to create a new Rule to define what Log button will do when clicked.

- Select Event Name as
Automation Command Executed. - Add a constraint to define for which button this rule will work.
- Click
Select Actionslink and addDisplay Logaction we recently created.
So when a button clicked Automation Command Executed event fires. If that button named as Display Ticket Log SambaPOS will execute Display Log action.
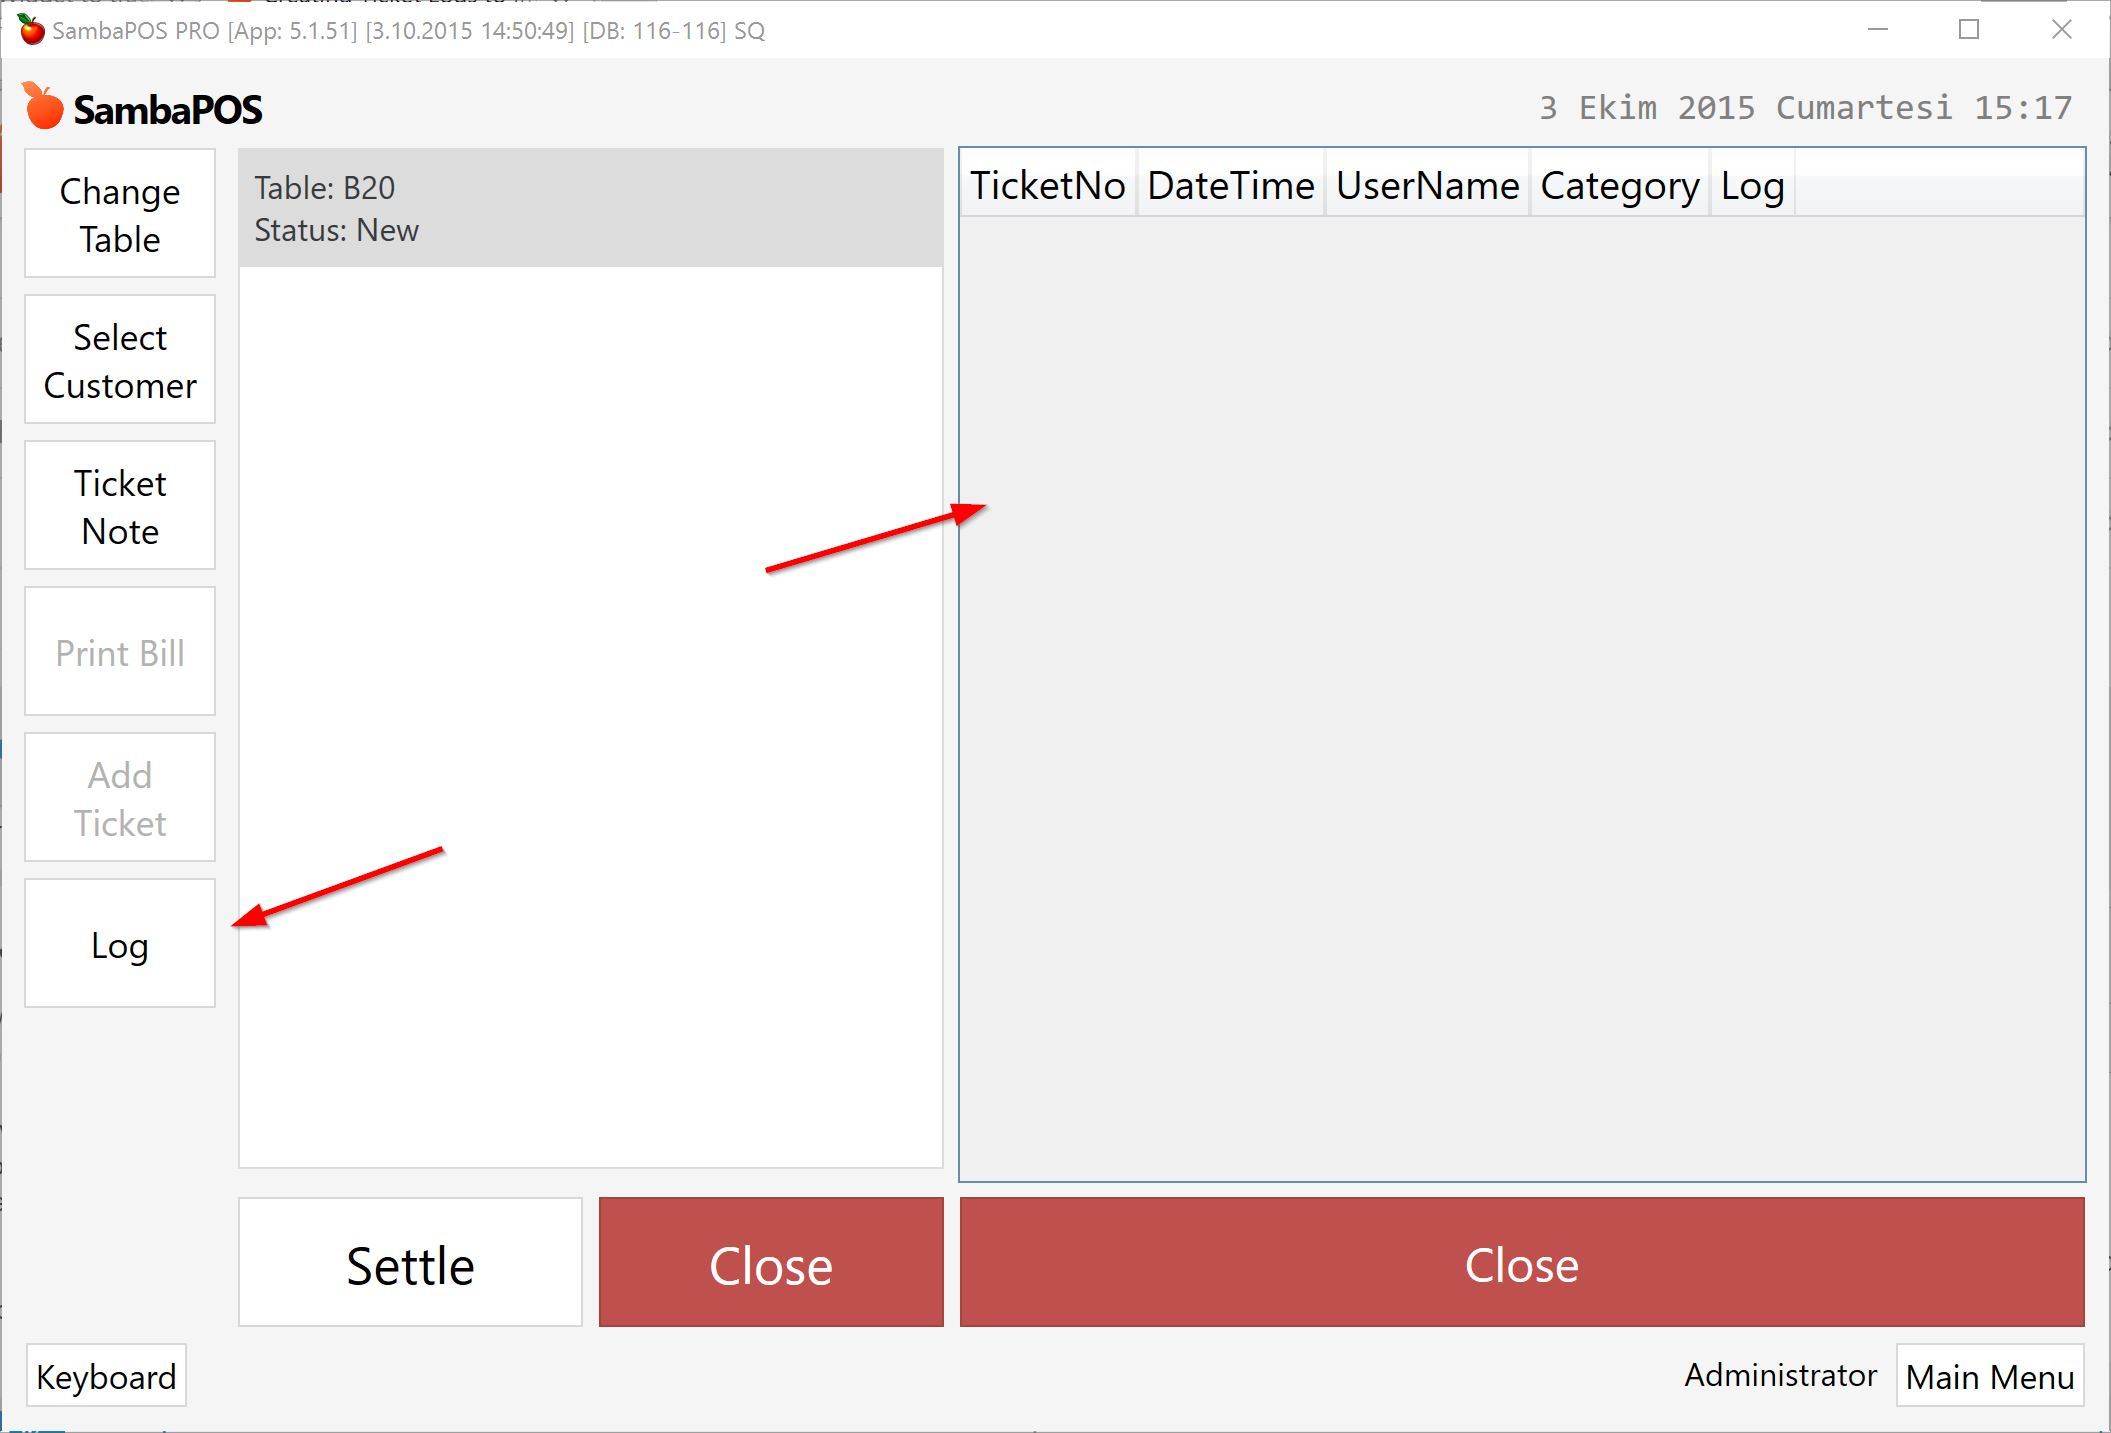
So we enabled basic Logging system. It is empty for now. We’ll use Add Ticket Log action to add logs.
Logging Printing
I’ll add a log when Print Bill button clicked. Print Bill button is also an Automation Command. I can modify pre-configured Print Bill Rule to include logging action or create a separate rule for Print Bill button. We can create multiple rules for events to be able to manage them easily. I’ll create a separate rule for logging.
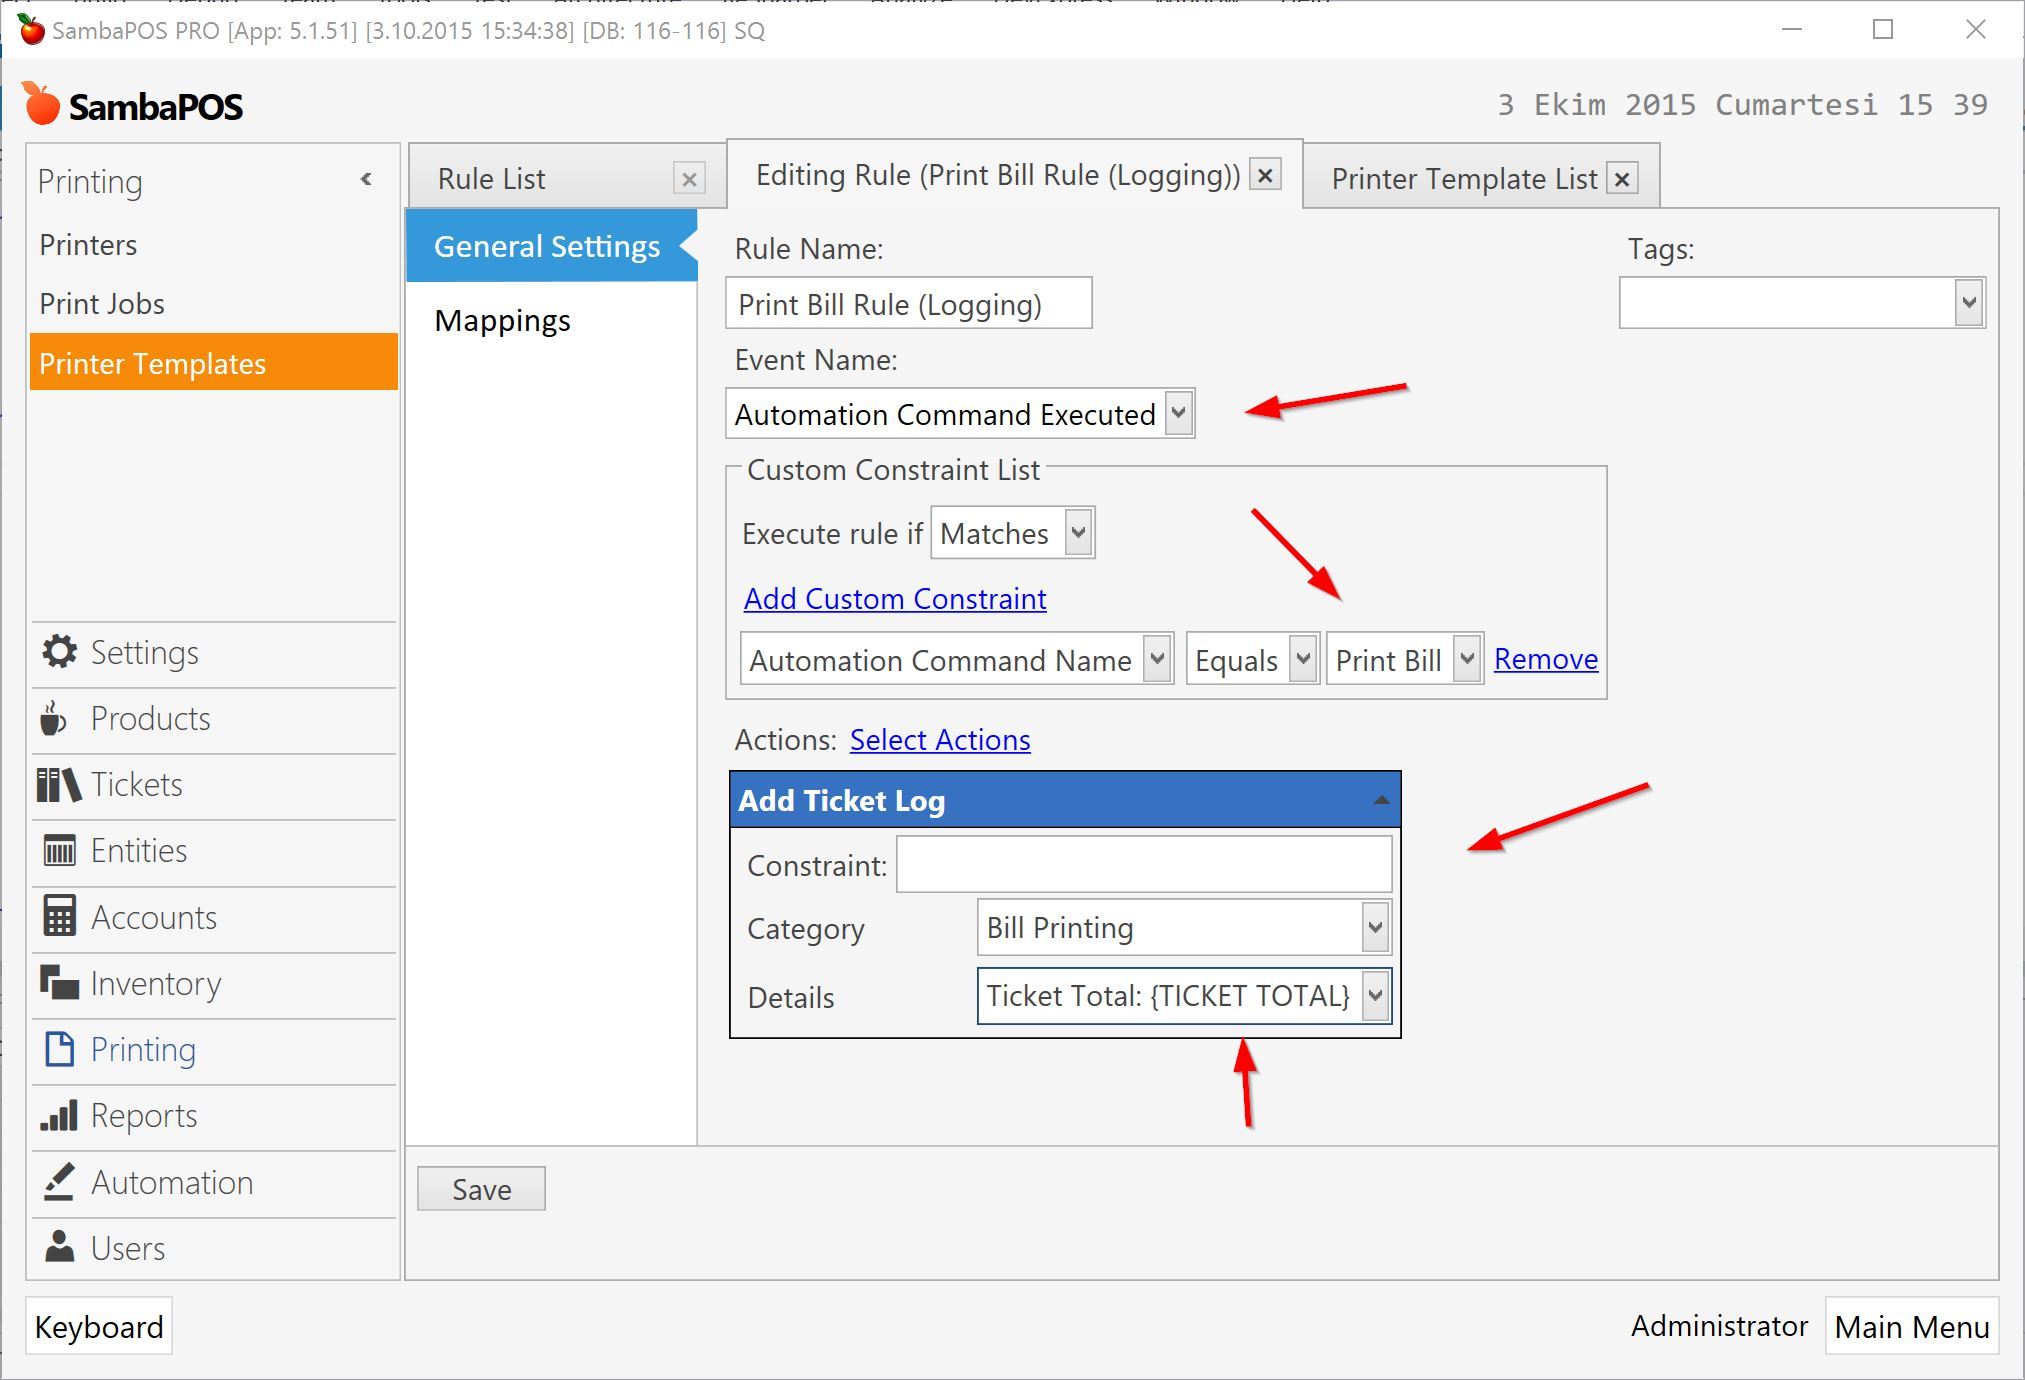
That will add a log every time we click on Print Bill button. I named log category as Bill Printing and added Ticket Total. This is important because that will keep log of actual ticket total at the time Print Bill button clicked.
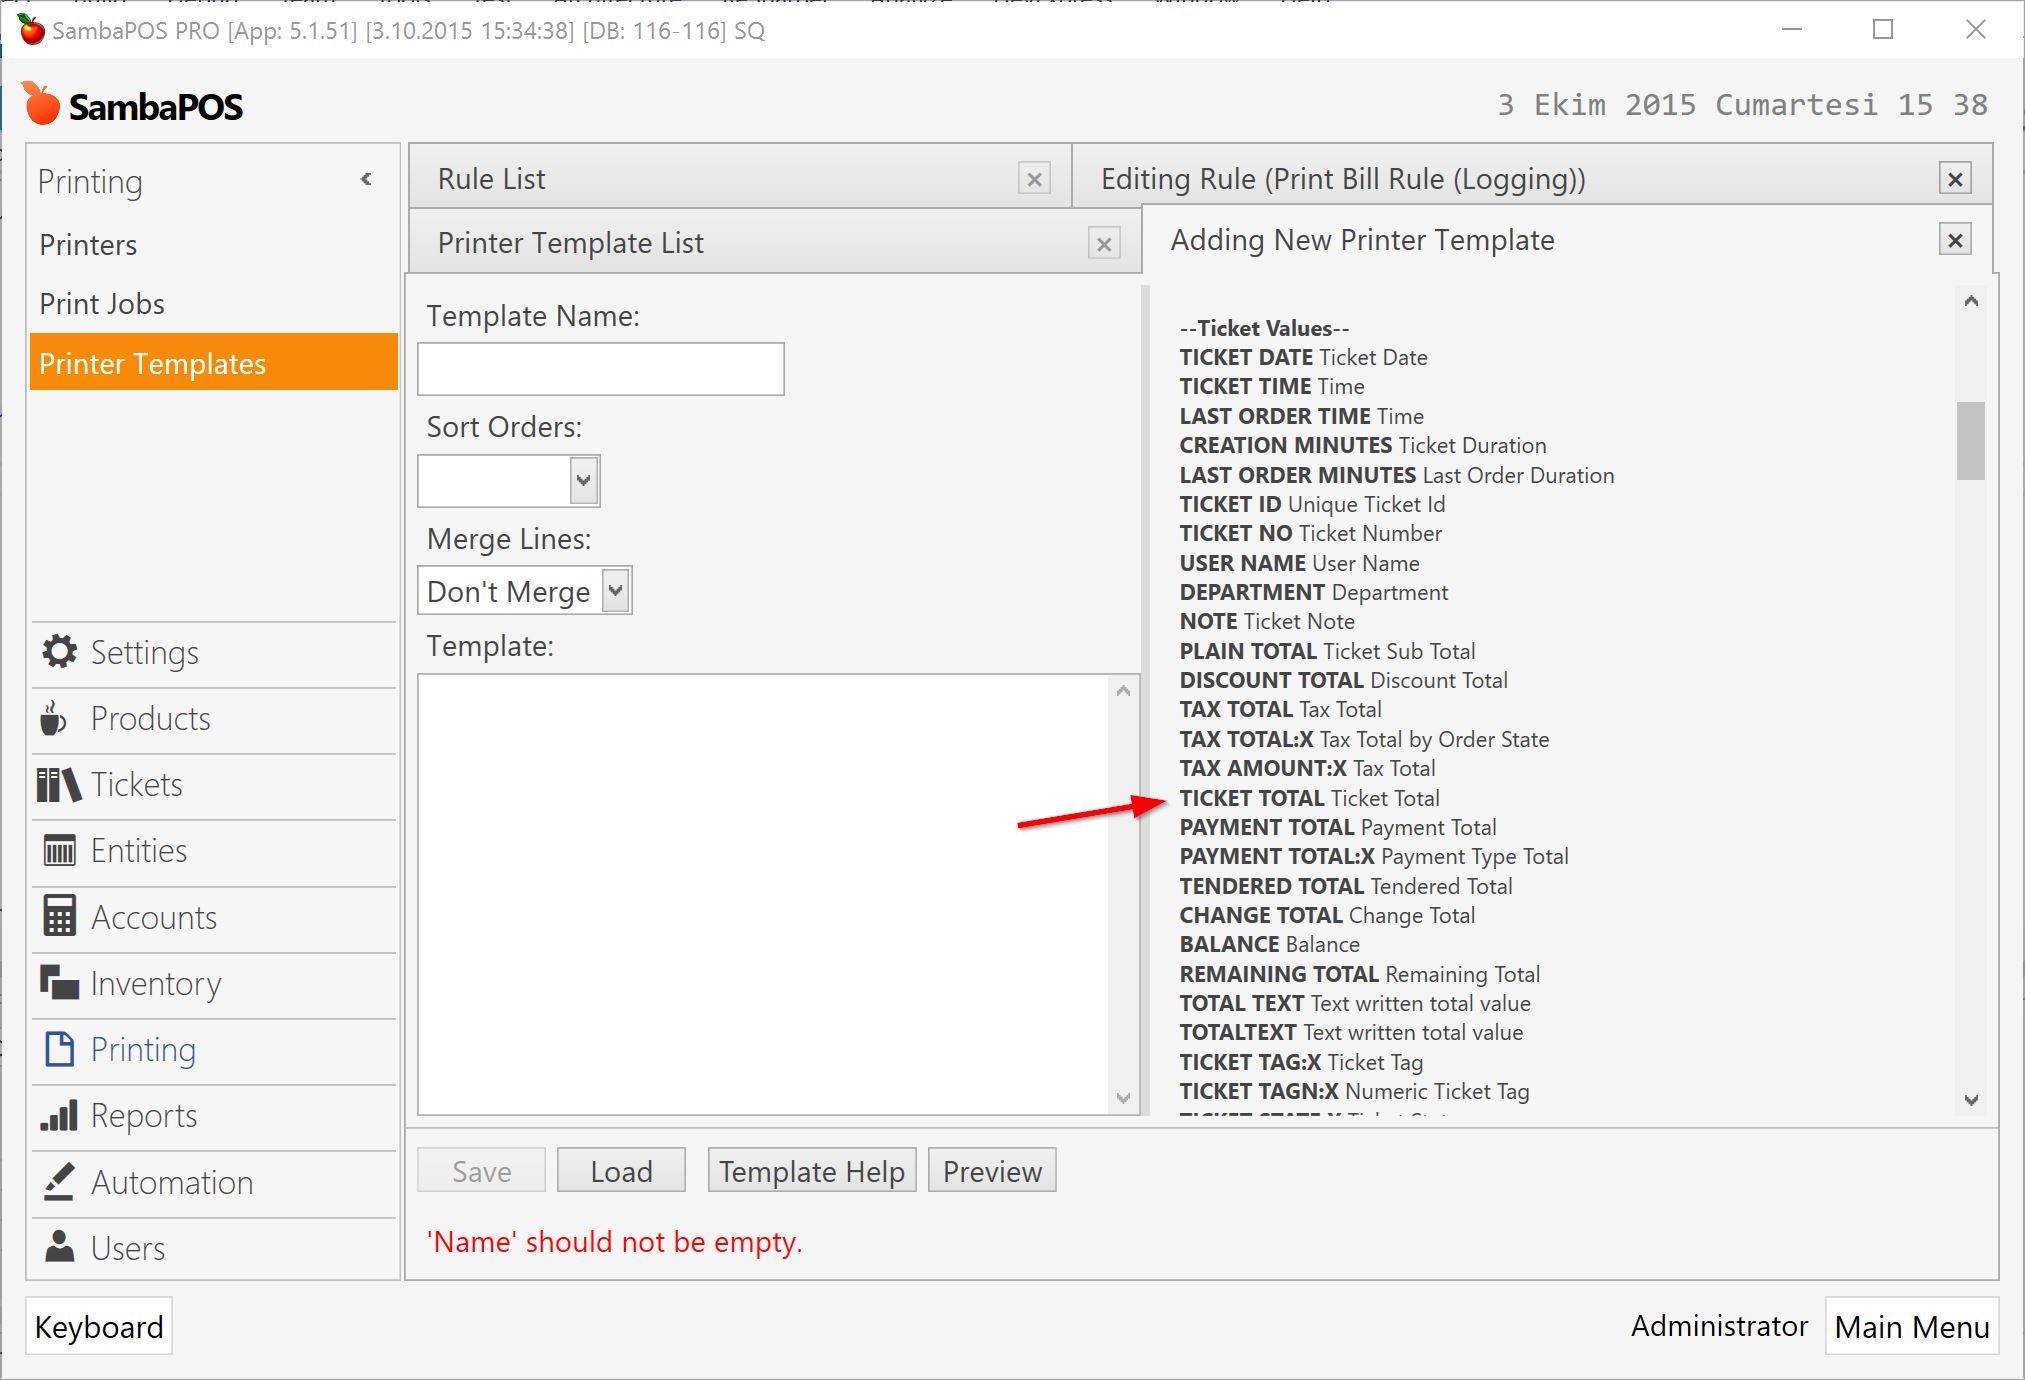
Hint: To learn possible values that can be read with printing tags like {TICKET TOTAL} you can create a new printer template and refer to tag list.
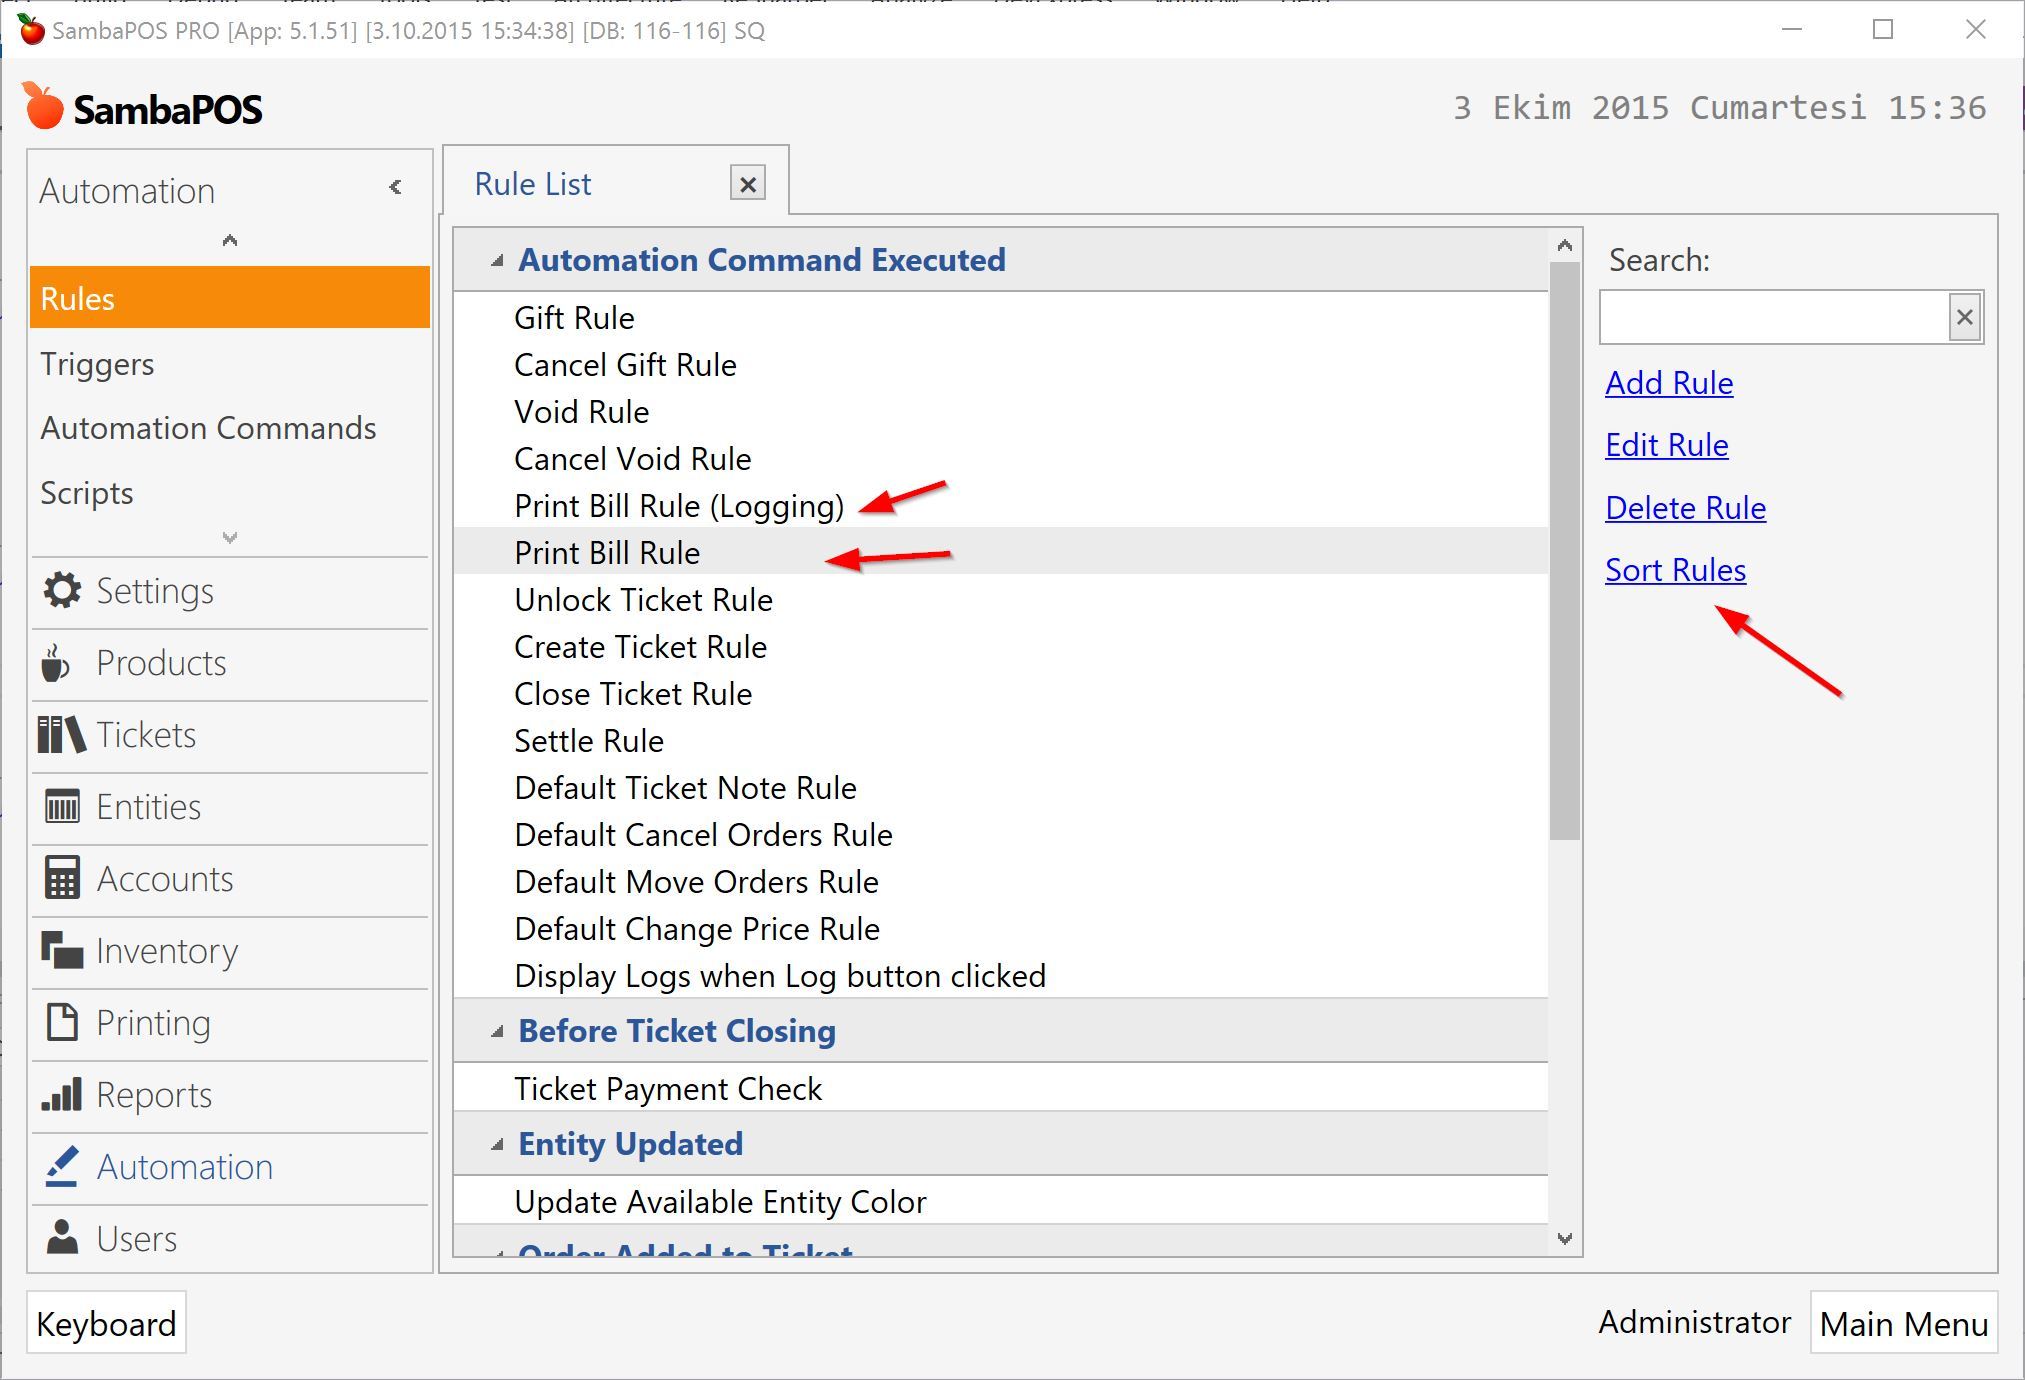
Now we should sort rules to define which one will work first.
VERY IMPORTANT STEP!!!
When you have multiple rules for an automation command you need to order them properly to define which one will work first. Logging should work first. If
Print Bill Ruleworks first it will close ticket and logs won’t gets saved. Click Sort Rules and moveLoggingrule on top.
Let’s see how it works. I’ll create a ticket, add two orders, print bill and add one more order.
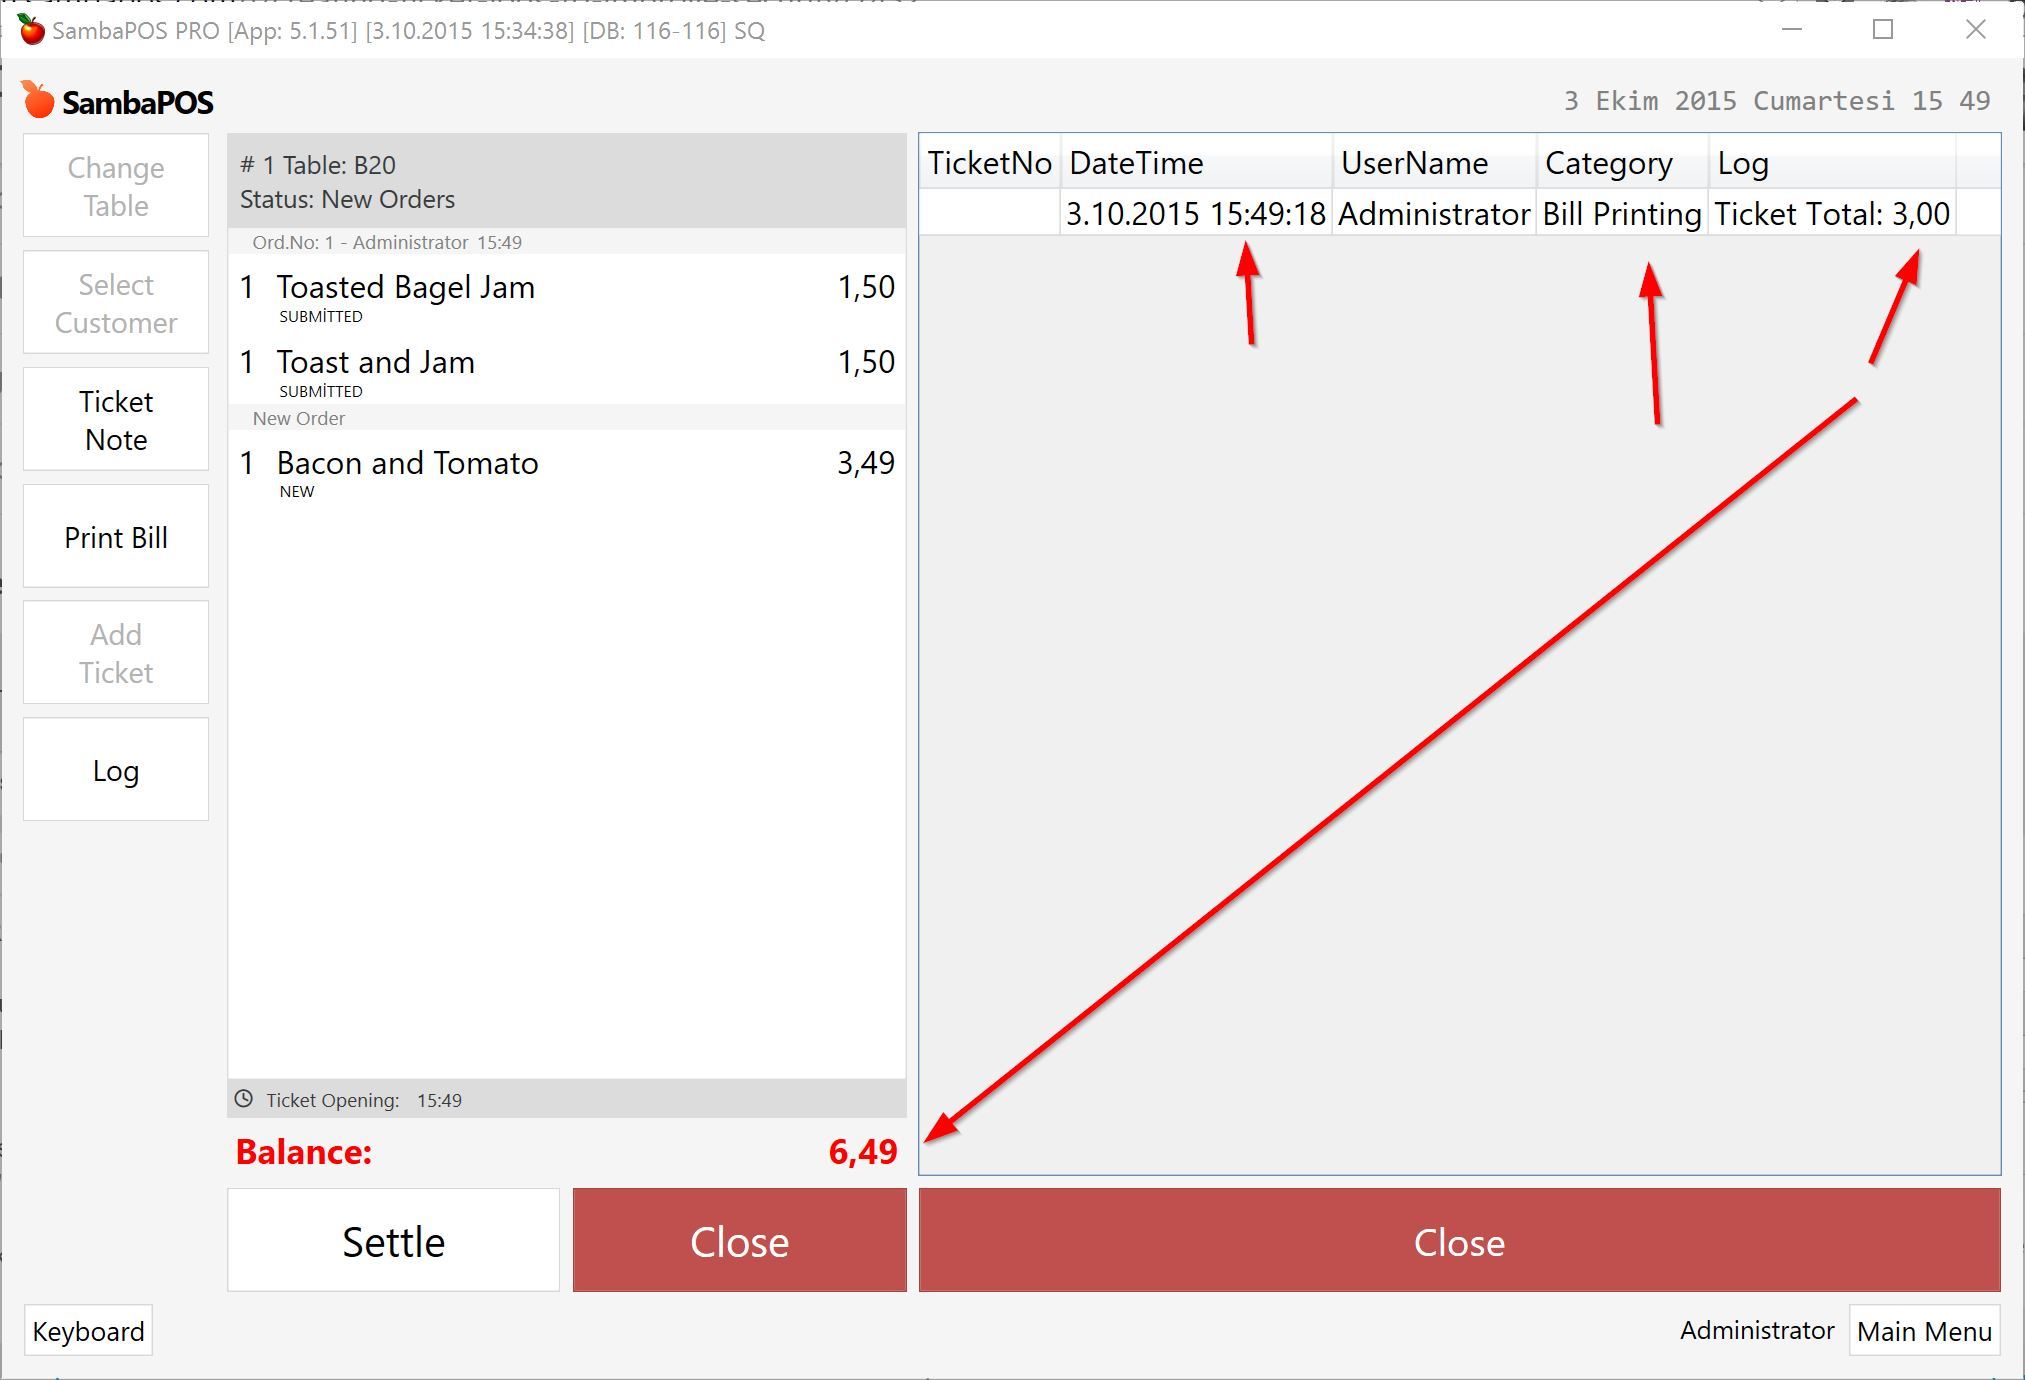
So I can clearly see a Bill Printed when Ticket Total was $3.00 but final ticket total is $6.49. That case might be something we should question.
Log date and user also automatically stored. Ticket number will update when I close ticket.
Logging Payments
I’ll create another rule to log how exactly ticket settled. This is especially useful if you allow canceling payments.
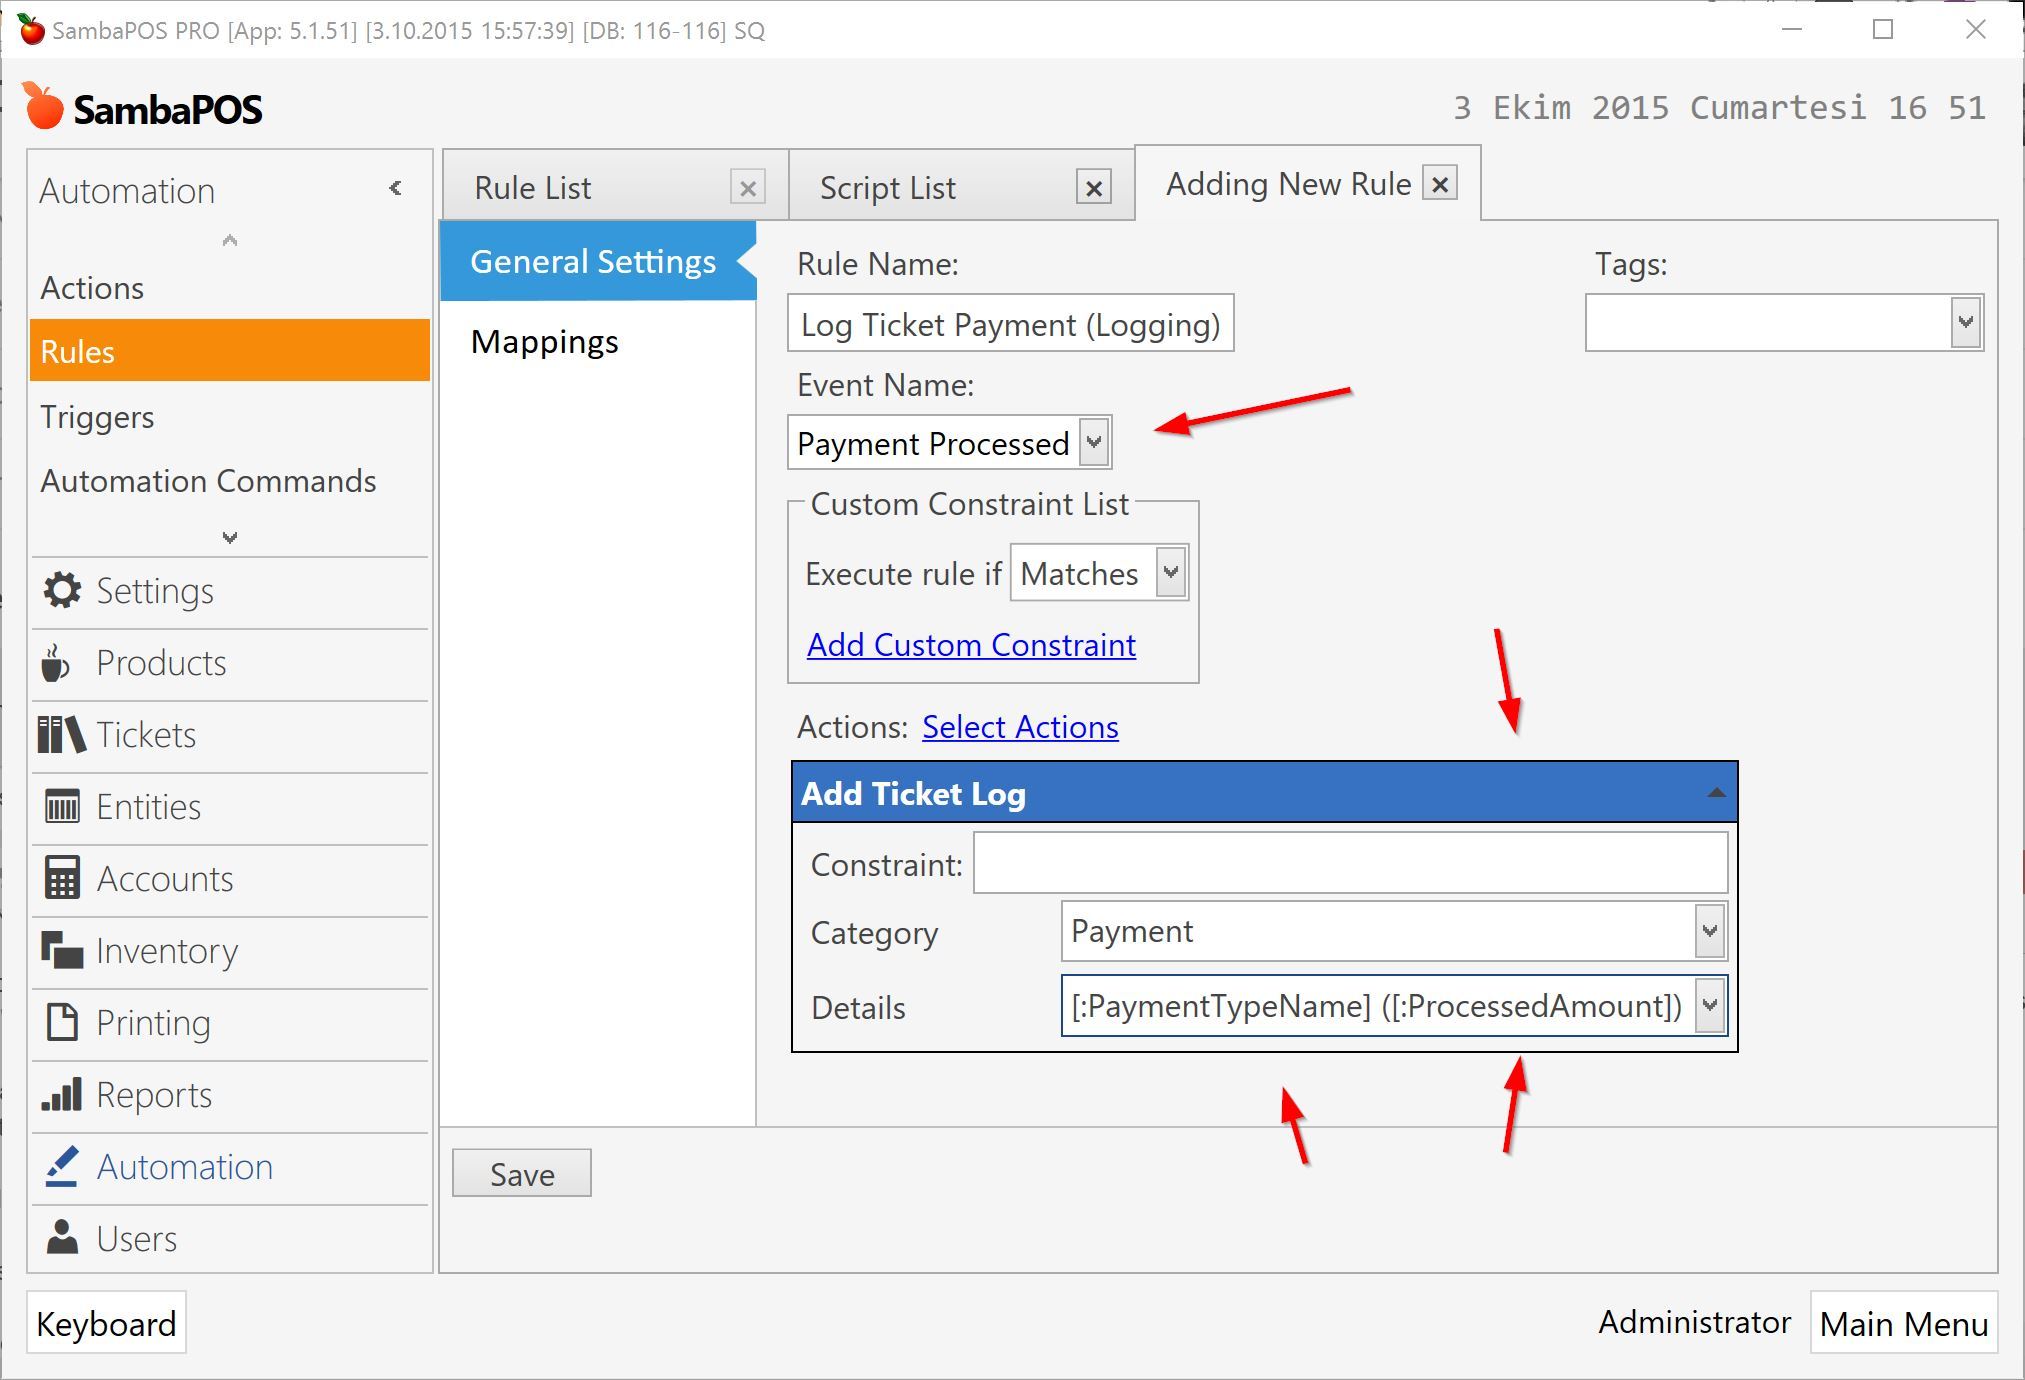
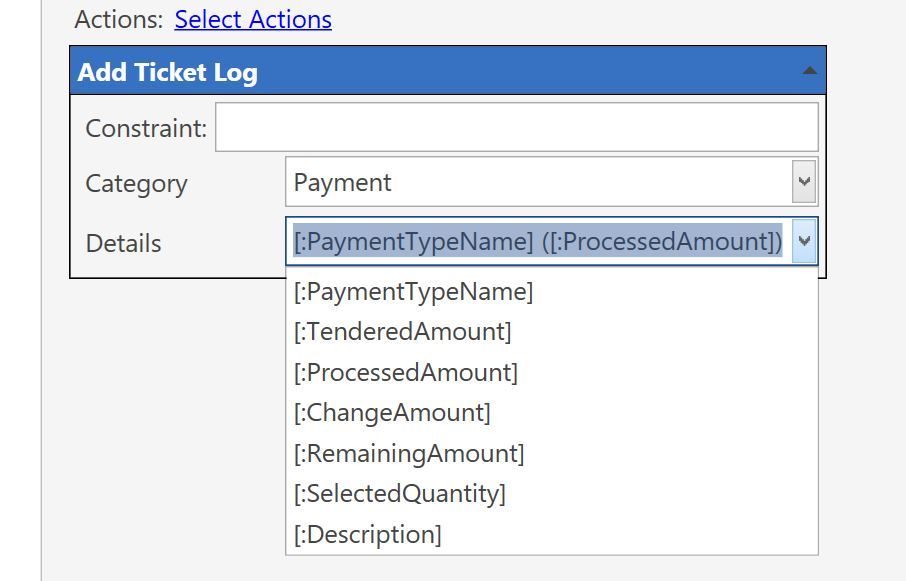
I’ll store payment type name and amount as log description. You can see a list of available values by clicking drop down list. You can customize log for your needs by using these values. We can also use printer template tags here as I’ve demonstrated on previous rule.
This is how logs stored as user prints & settles ticket.
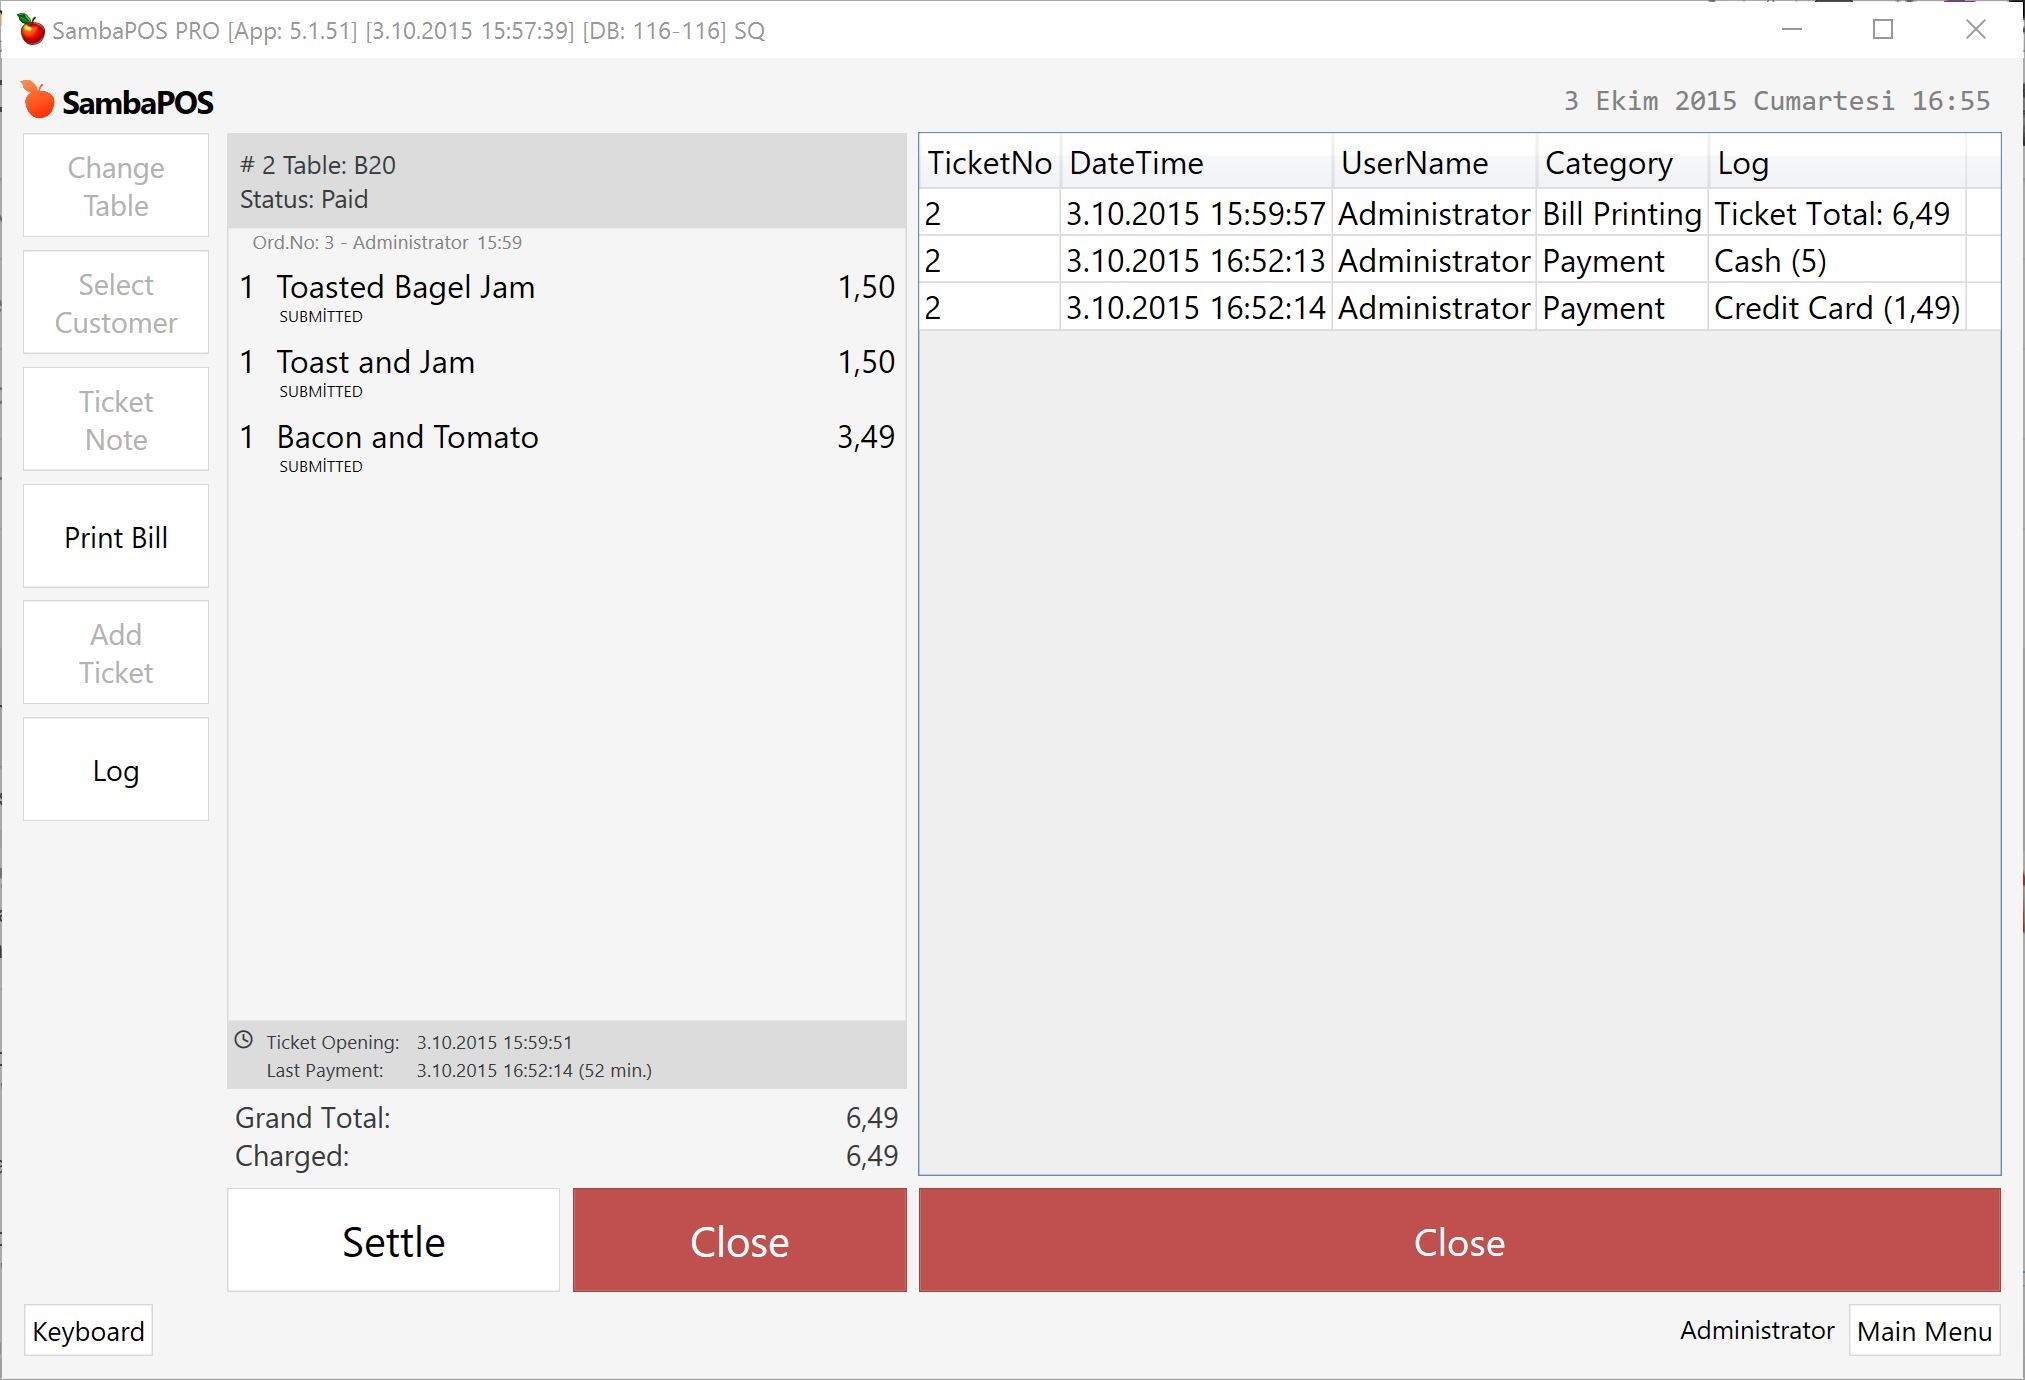
It will help a lot while trying to resolve some common issues.
Logging Order Cancellations
Here I’ll try to demonstrate how to log certain actions depended on some specific cases. In this sample I’ll show how to log cancelled orders and what added instead.
- Cashier adds a $10 order.
- It appears on customer display.
- Customer pays $10.
- After customer leaves Cashier cancels it before submitting ticket, adds $1 product instead and settle ticket.
It is possible to prevent this by limiting permissions or adding admin confirmations for cancel button however that may happen frequently and we may just allow canceling orders but keep a log for that.
Let’s see how it can be implemented. As I’ll also demonstrate how ticket states can be used you may also want to follow it even you won’t need such logging.
1.Logging Orders
To be able to show exact implementation steps I’ll start from adding a log for all orders added inside ticket.
I’ll create a rule that works for all added orders and create a new log line for all of them. I’m adding a new rule that handles Order Added event and Add Ticket Log action.

You should be familiar with {QUANTITY} and {NAME} tag if you’ve customized your bill printing template. For rules that relates with Orders you can use order printing tags. I mean you can’t use {PAYMENT TYPE} tag here as this rule does not relates with payments. You can use this tag inside payment related rules like Payment Processed rule.
This is how log screen should appear.

2. Toggling (enabling & disabling) Order Logging
I don’t want to log all orders so I have to be able to control which orders are logged. I only want to log orders these added after canceling an order. I’ll enable it after an order gets cancelled and disable it after log created. First I’ll create an action that enables & disables order logging.
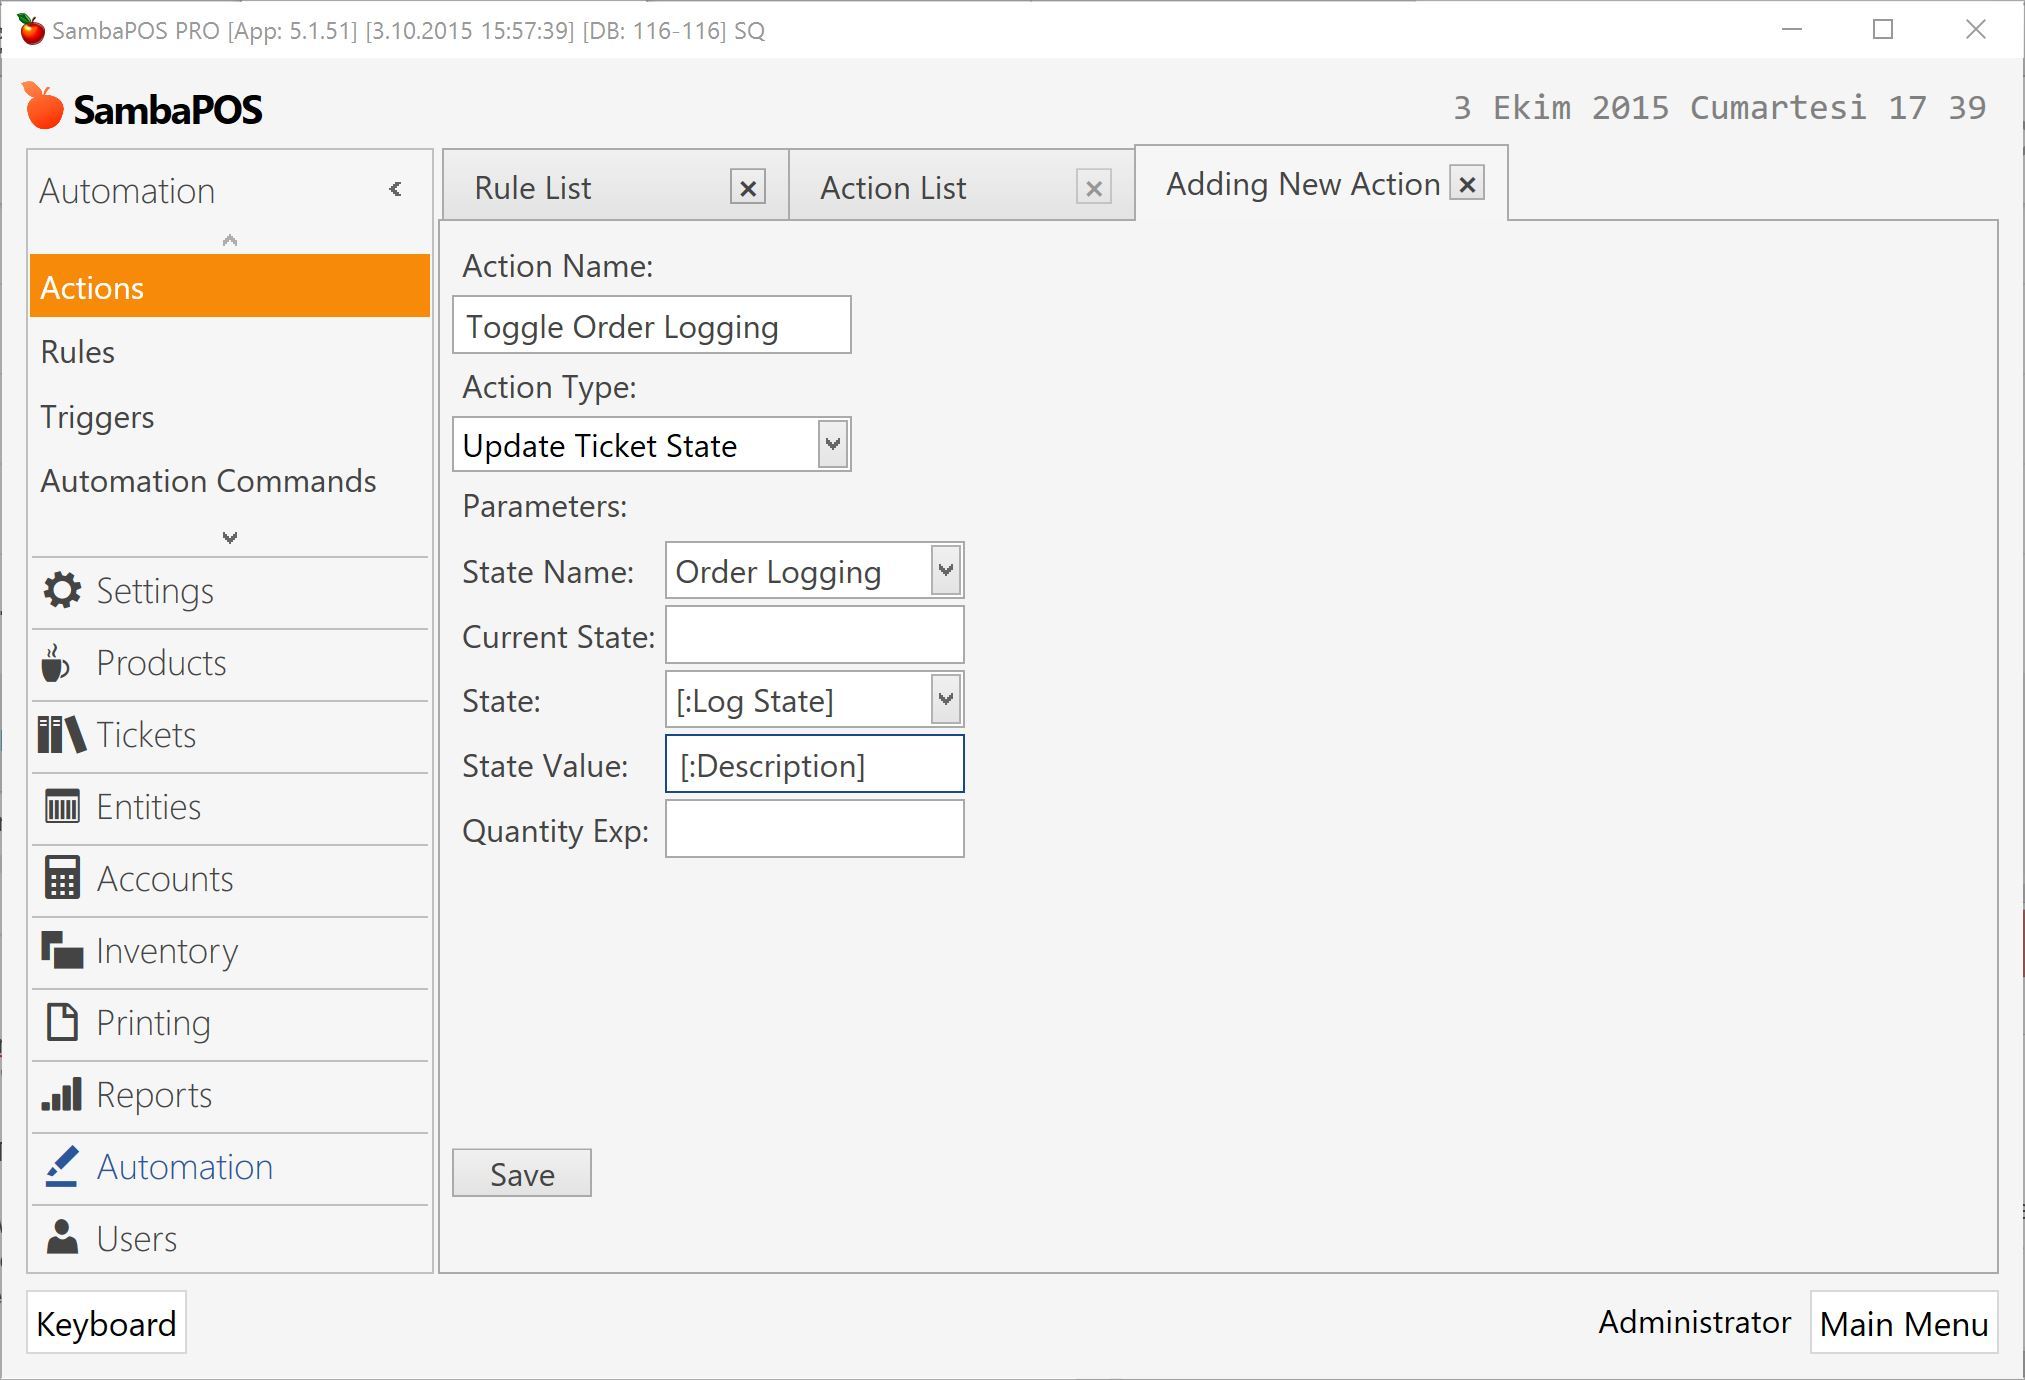
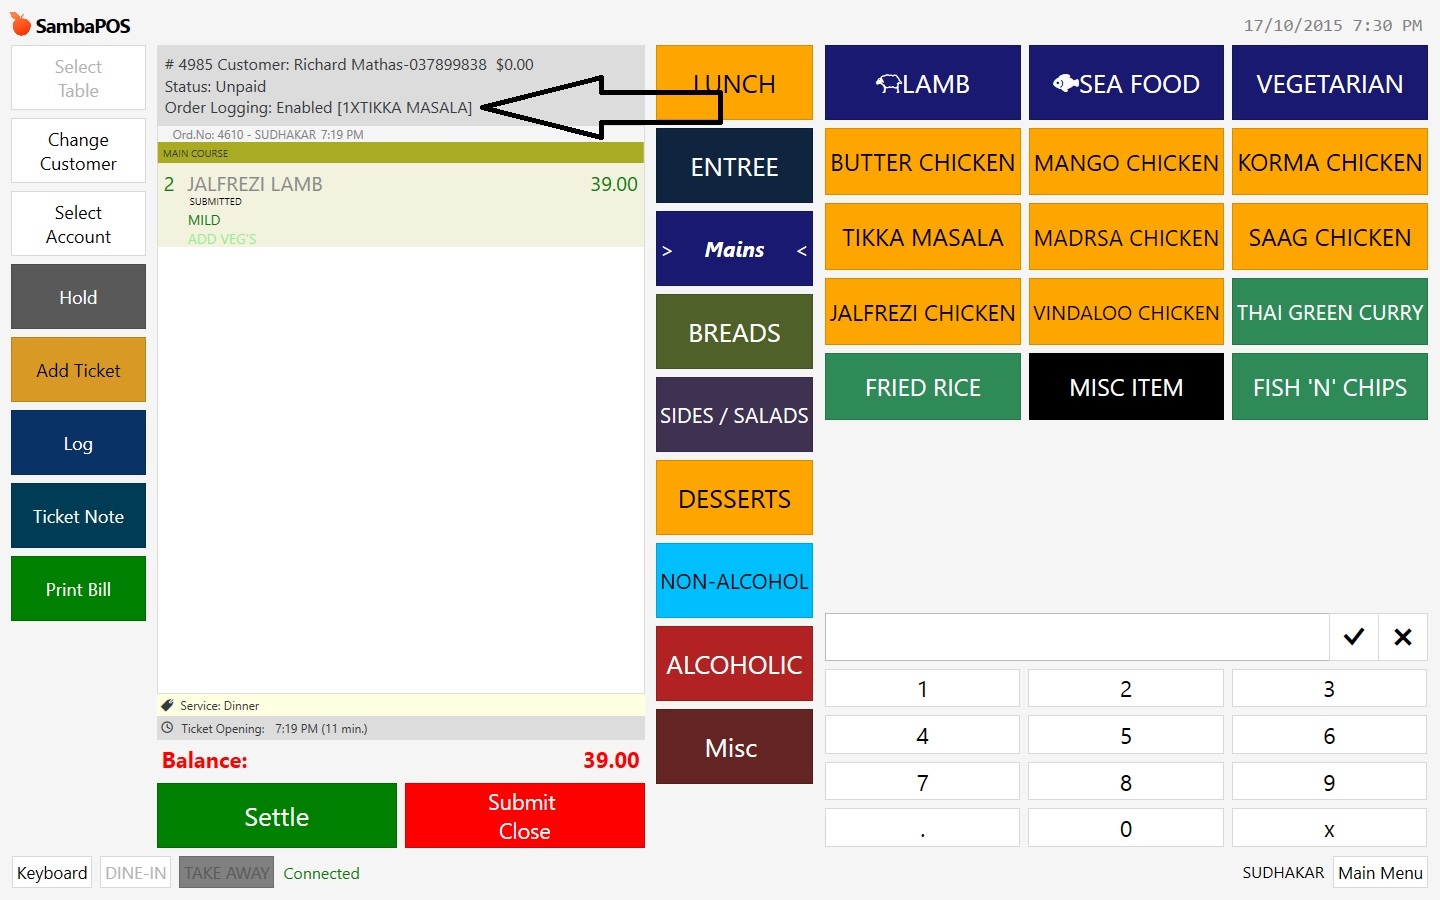
With this action I’ve configured a new Ticket State called Order Logging. When it’s value is Enabled I’ll log orders. I’ll also store a description about cancelled order.
On this step I’ll modify order logging rule to make it work if Order Logging is enabled.
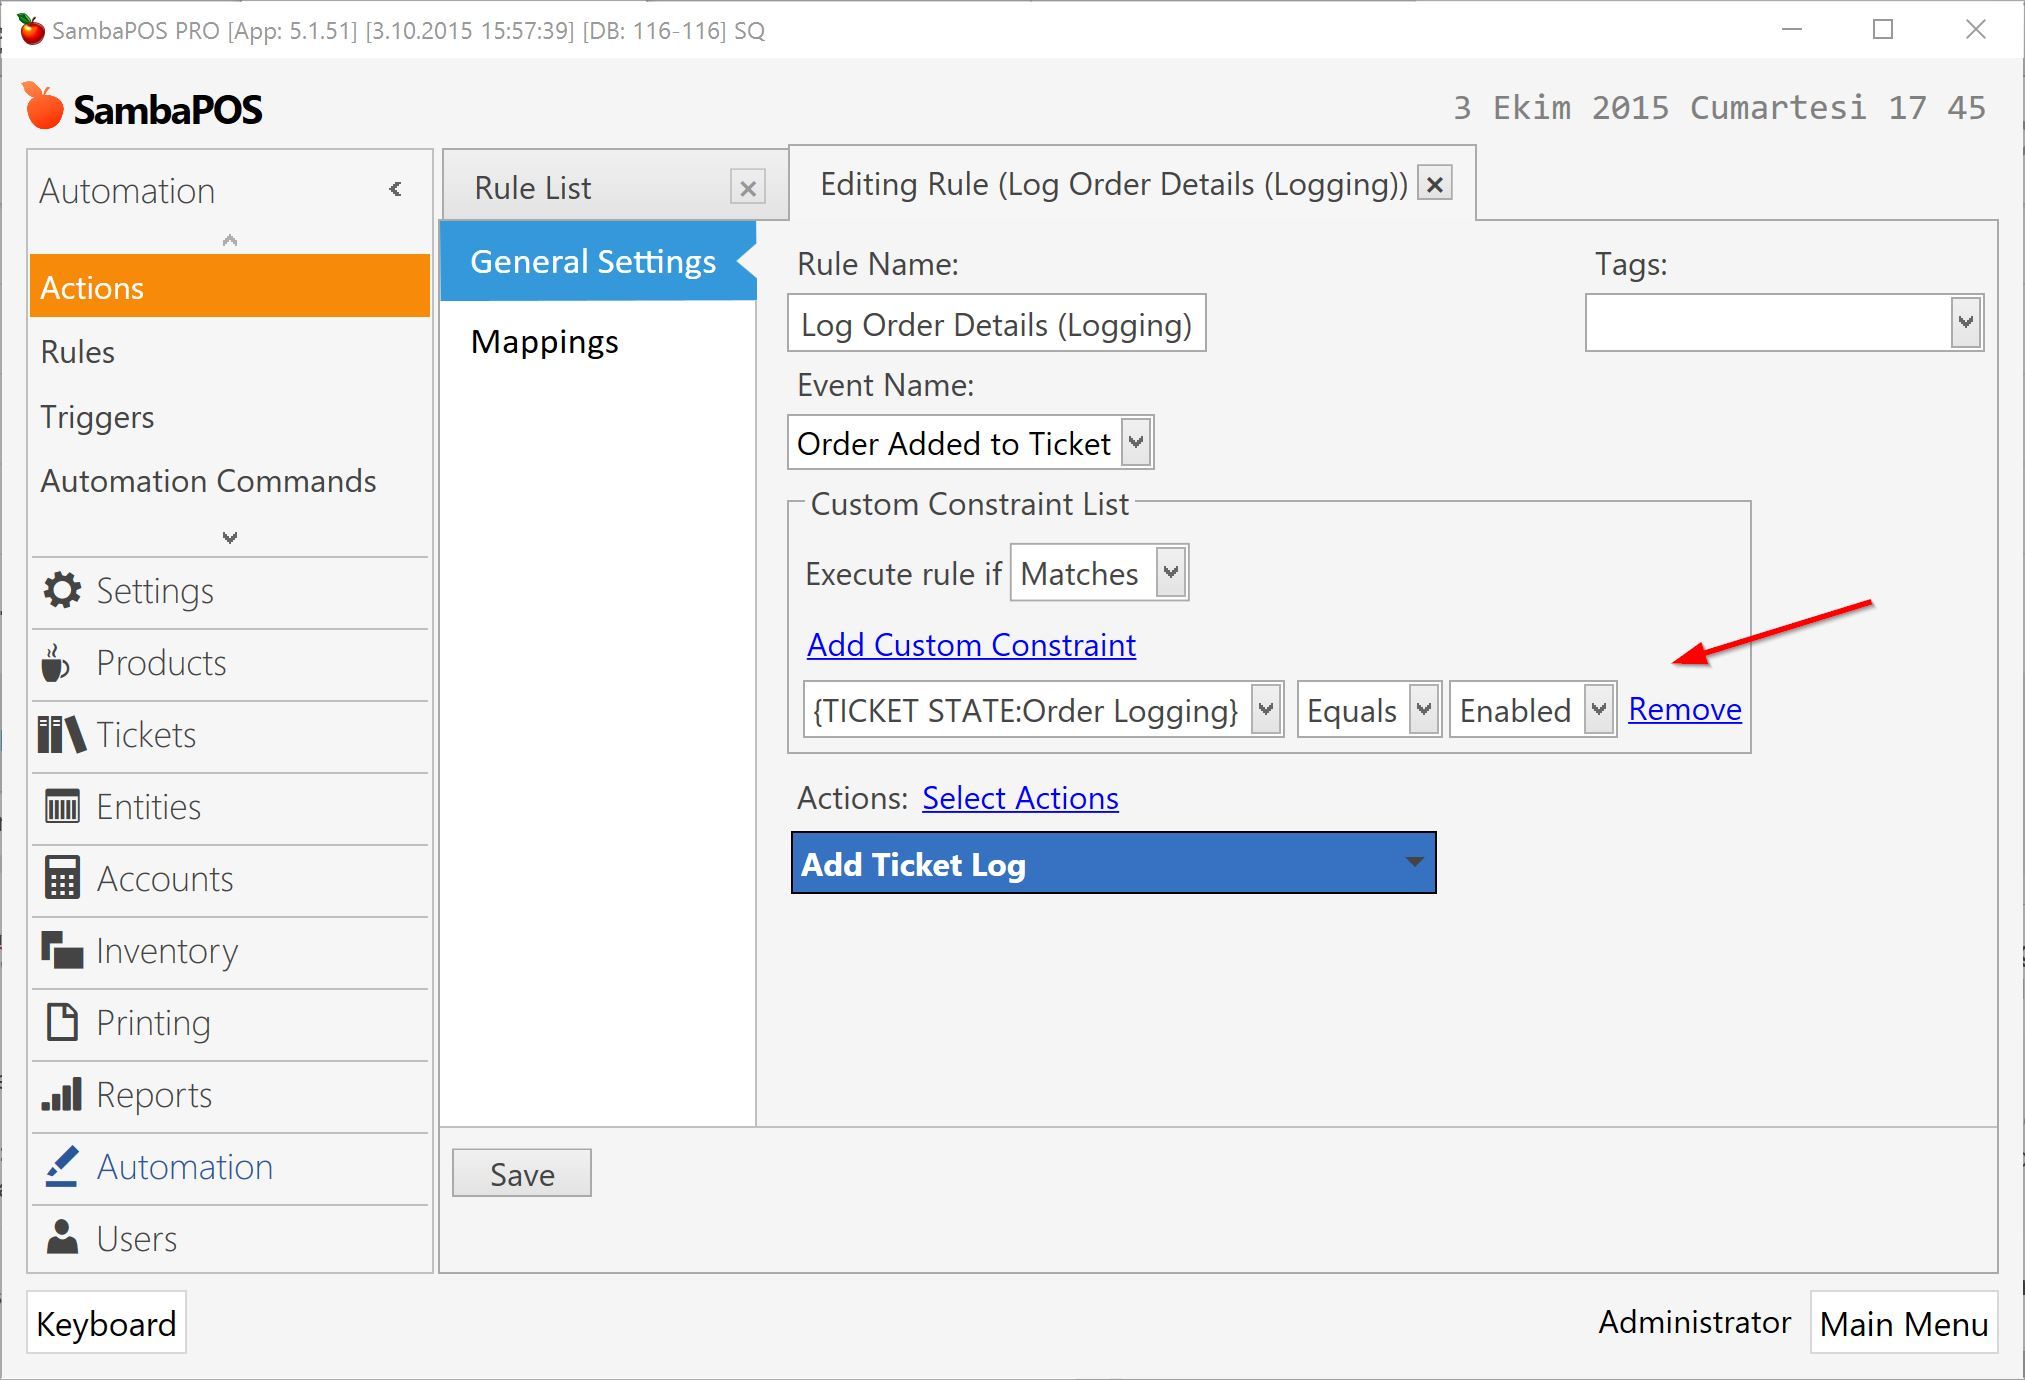
You’ll remember I didn’t configured a constraint while adding this rule so it logs all orders. I’m adding a constraint to make it log orders if Order Logging is Enabled.
{TICKET STATE:Order Logging}is a printing tag that reads current value of specified ticket state.
3.Disabling order logging.
I’ll show disabling order logging before enabling it as we’ll disable it just after adding an order log. I’ll keep modifying Log Order Details action to do that.
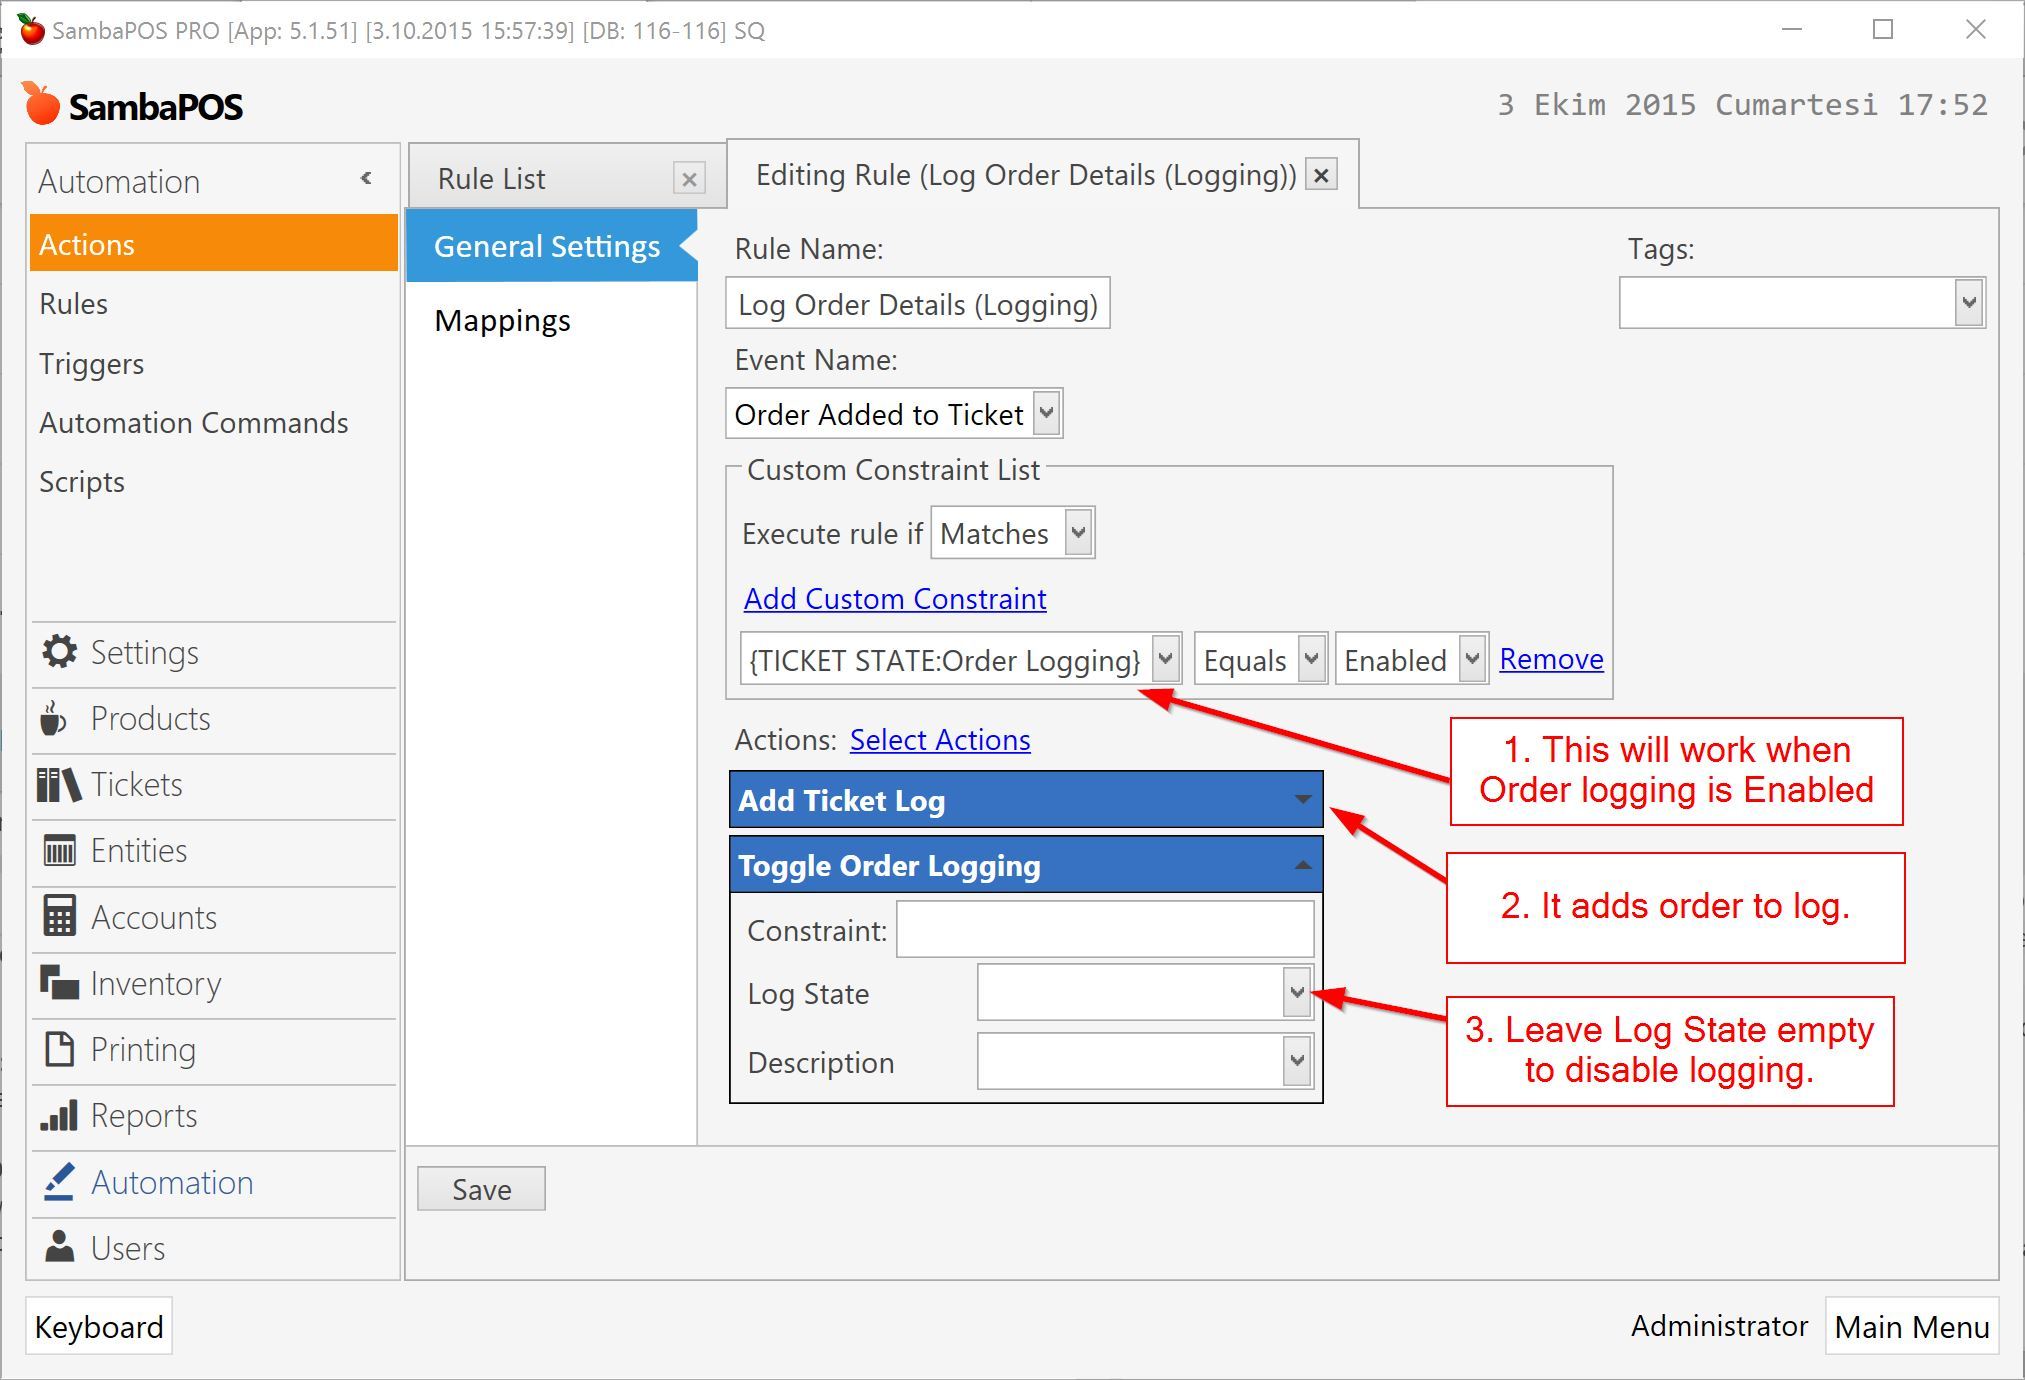
So order logging works when Order Logging value equals Enabled. Leaving Log State empty clears Enabled value so it won’t log next orders. Setting an empty value to a state will completely remove state from ticket so they won’t appear in reports or other places.
4. Enabling order logging.
Here comes the fun part. We’ll enable logging when an order line gets cancelled.
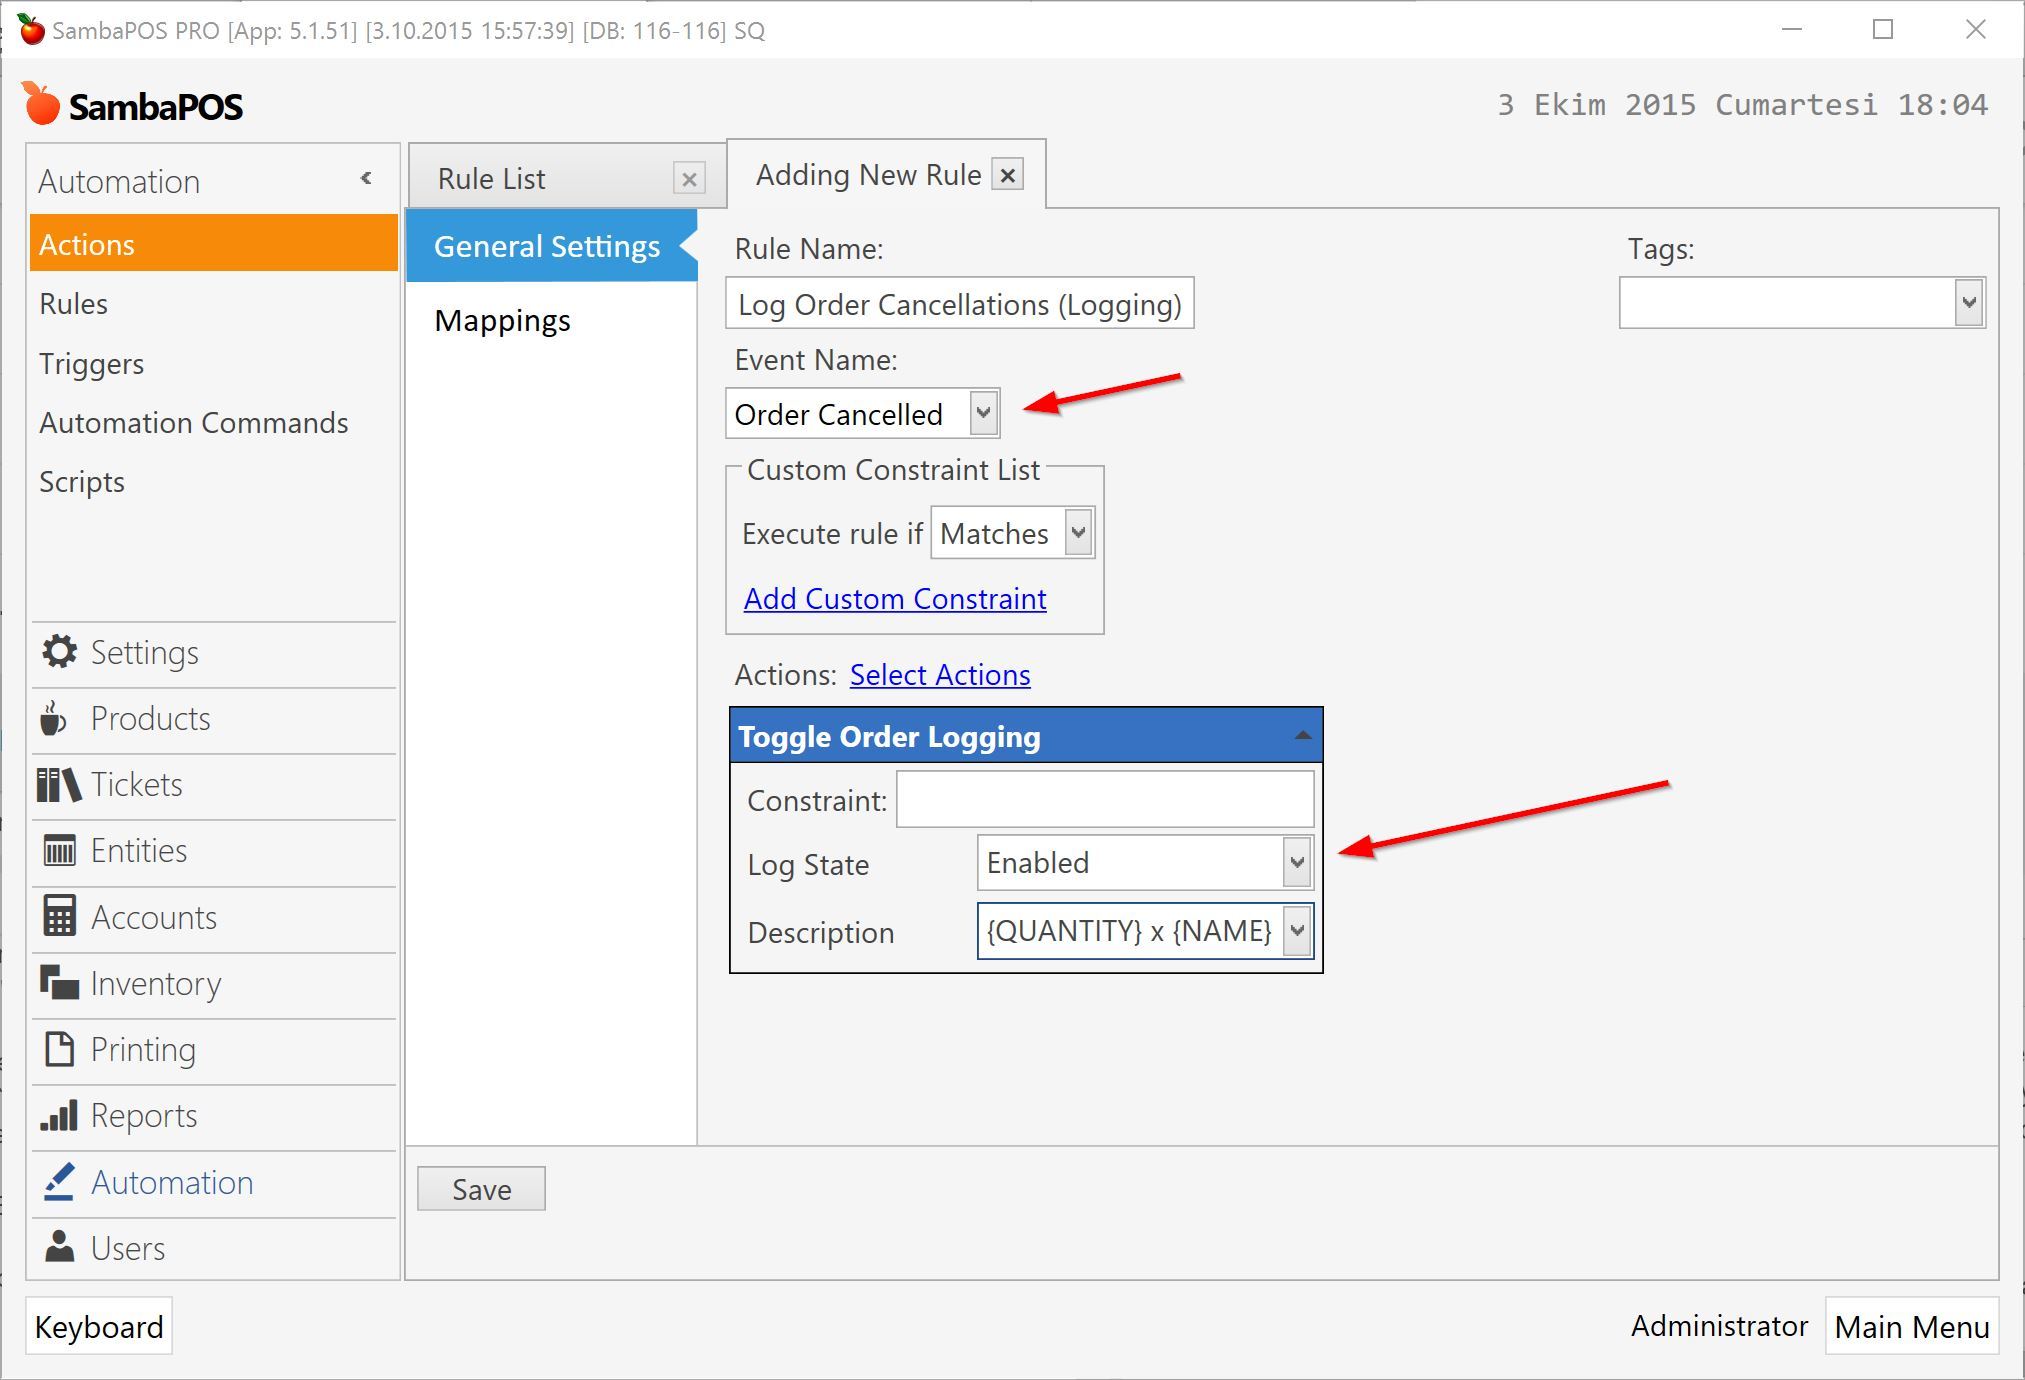
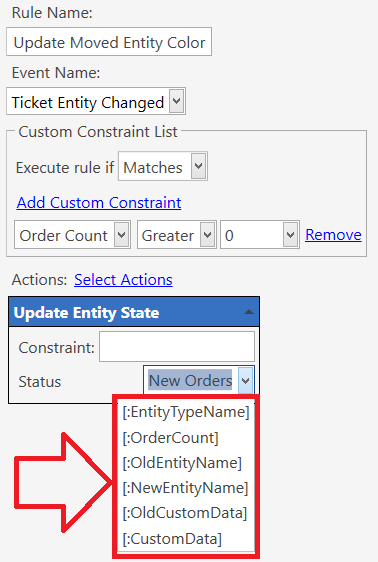
I’ve created a new rule that works when an order is cancelled. You know what happens here. Setting Log State to Enabled will enable logging so we’ll be able to log next added order instead of cancelled one.
You’ll notice I’m also storing quantity and name values for Cancelled order as state description. I can use that description to be able to know which order is cancelled. Now I’ll modify Log Order Details rule once more to include this description in logs.
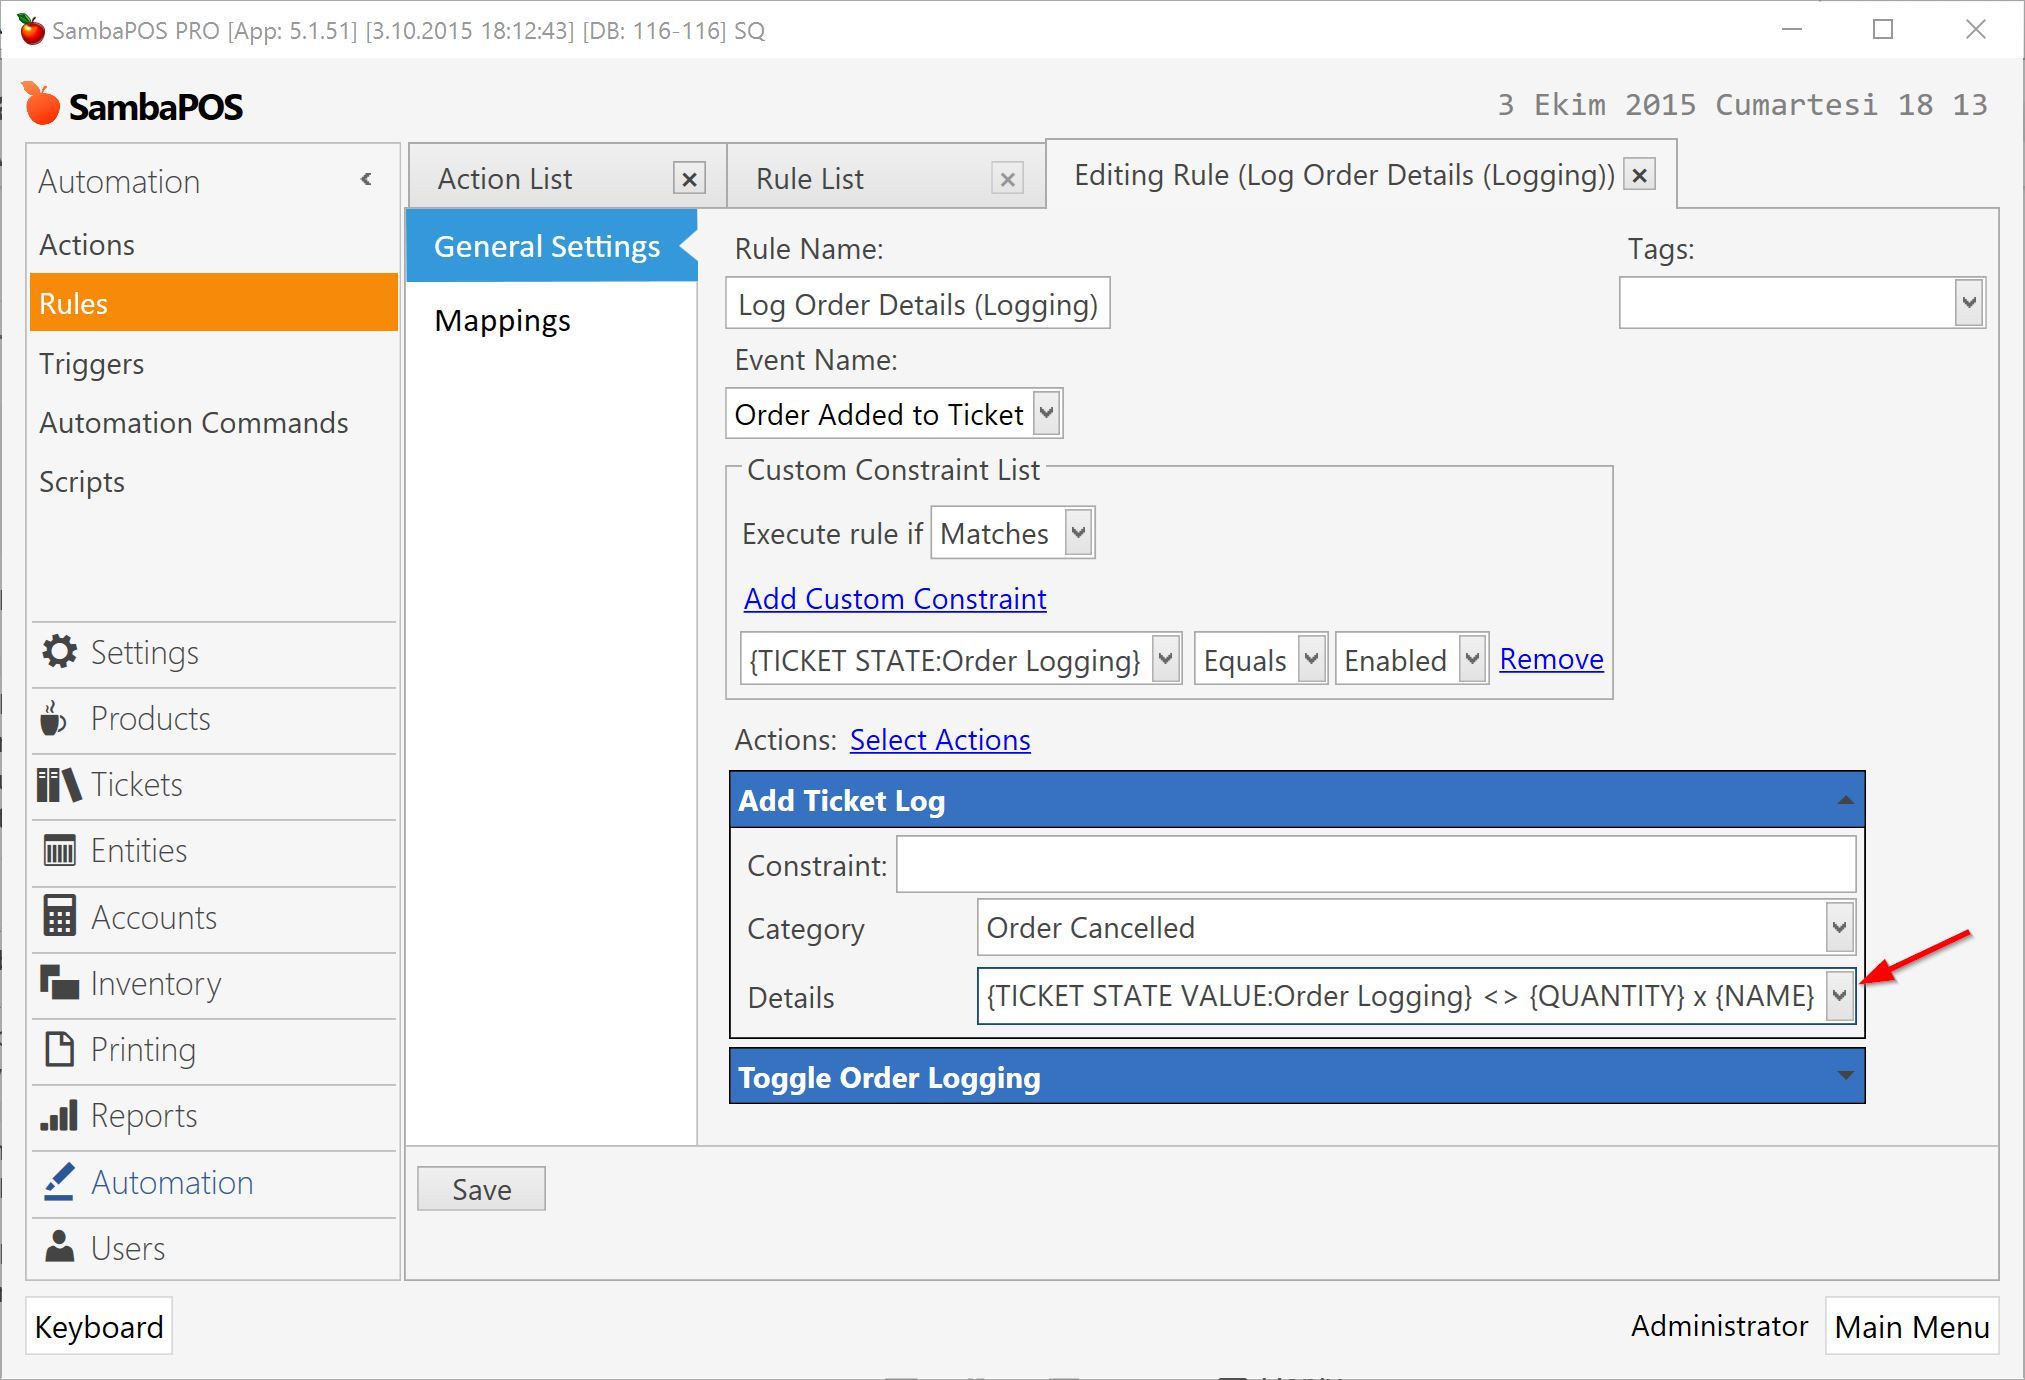
I’ve used {TICKET STATE VALUE:Order Logging} tag to retrieve state description. You’ll remember state description (value) holds info about cancelled order. This table contains details about Order Logging State
| Item | Value | How to read |
|---|---|---|
| State Name | Order Logging | |
| State | Enabled or Empty | {TICKET STATE:Order Logging} |
| State Value | Holds additional descriptions about state. In this sample it holds details about cancelled order. | {TICKET STATE VALUE:Order Logging} |
5. How it Works?
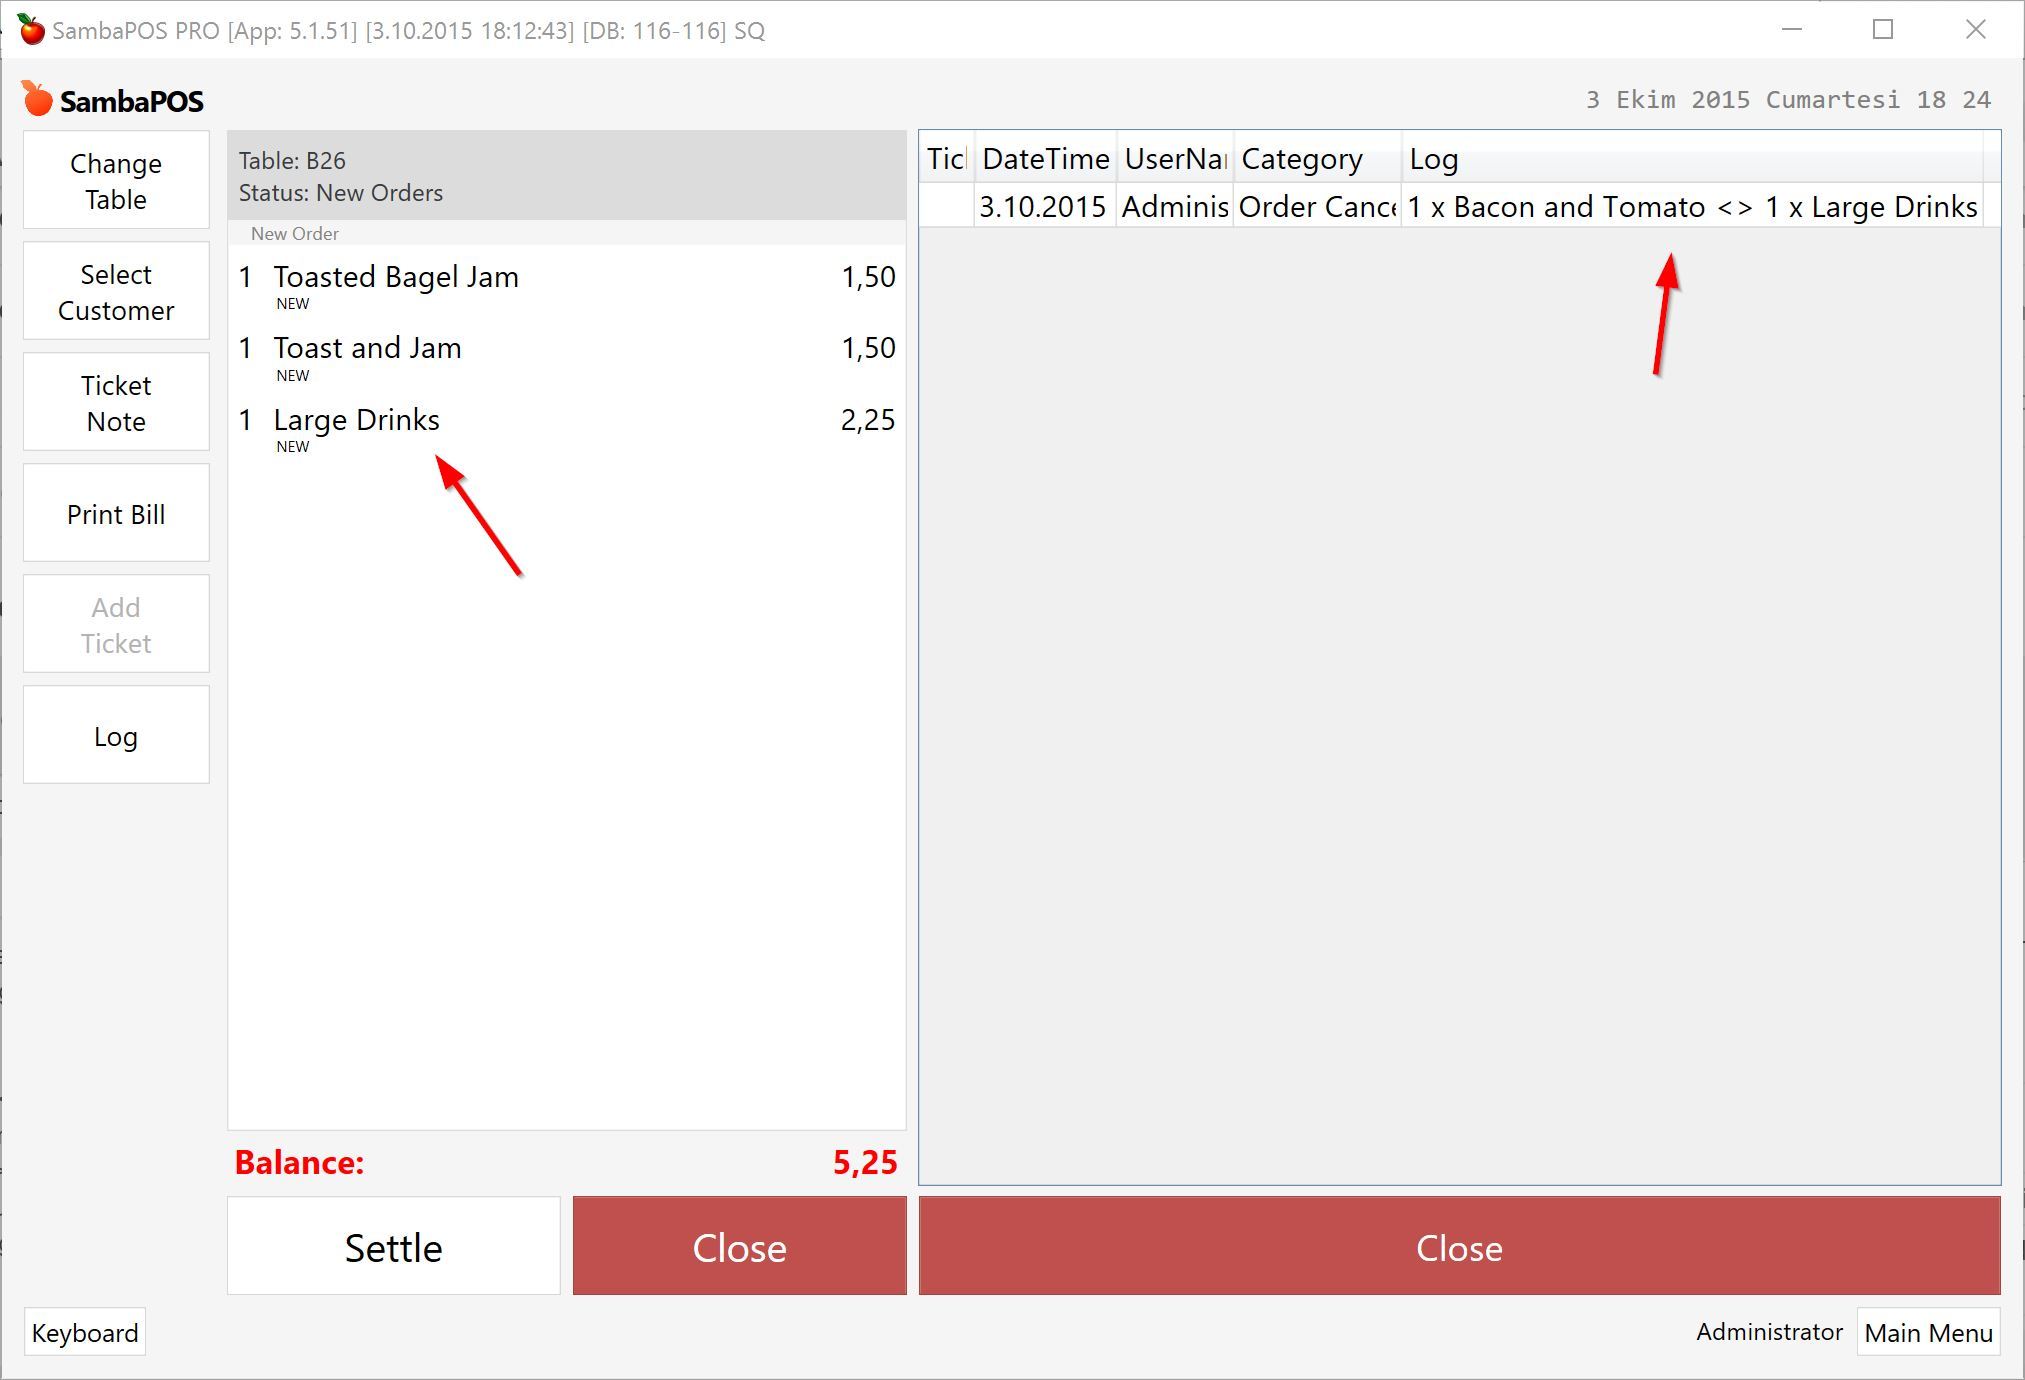
What I did?
- I’ve created a new ticket.
- Added three orders.
- Cancelled
Bacon and Tomato - Added Large Drinks instead.
How log appears?
![]() Hint: After canceling an order you’ll see how Ticket State updates on ticket header. That won’t be visible for non-admin users unless it configured to display for all users through
Hint: After canceling an order you’ll see how Ticket State updates on ticket header. That won’t be visible for non-admin users unless it configured to display for all users through Management > Settings States.
Reporting Logs
Other than displaying logs inside ticket you can use {REPORT TICKET LOG DETAILS} tag to report log details.
{REPORT TICKET LOG DETAILS}
Field Identifiers
L => Ticket Log Value
T => Ticket
{REPORT TICKET LOG DETAILS:L.TicketNo,L.DateTime,L.UserName,L.Category,L.Log}
All possible ticket log values
TicketNo, DateTime, UserName, Category, Log, Date, Time
Sample Report
This report shows Order Cancellations and tickets printed more than once.
[Cancelled Orders:1,2,2,4]
>Ticket No|Date|User|Details
{REPORT TICKET LOG DETAILS:L.TicketNo,L.DateTime,L.UserName,L.Log:L.Category = "Order Cancelled"}

[Tickets Printed More Than Once:1,1,1,1]
>Ticket Number|Times Printed|User Name
@{REPORT TICKET LOG DETAILS:T.TicketNumber,L.TicketNo.Count:L.Category = "Bill Printing":{0}::$2>1:,}
{REPORT TICKET LOG DETAILS:T.TicketNumber.asc,L.TicketNo.Count,L.UserName:T.TicketNumber = "$1" and L.Category = "Bill Printing"}

The main purpose of these tutorials is demonstrating how SambaPOS features works so you can customize it for your needs. Feel free to asking questions regarding things you don’t understand or sharing your thoughts about the tutorial.