#Printers, Printer Templates, Print Jobs
We need to define 2 Printers, 2 Printer Templates, and 2 Print Jobs to separate Food and Drink.
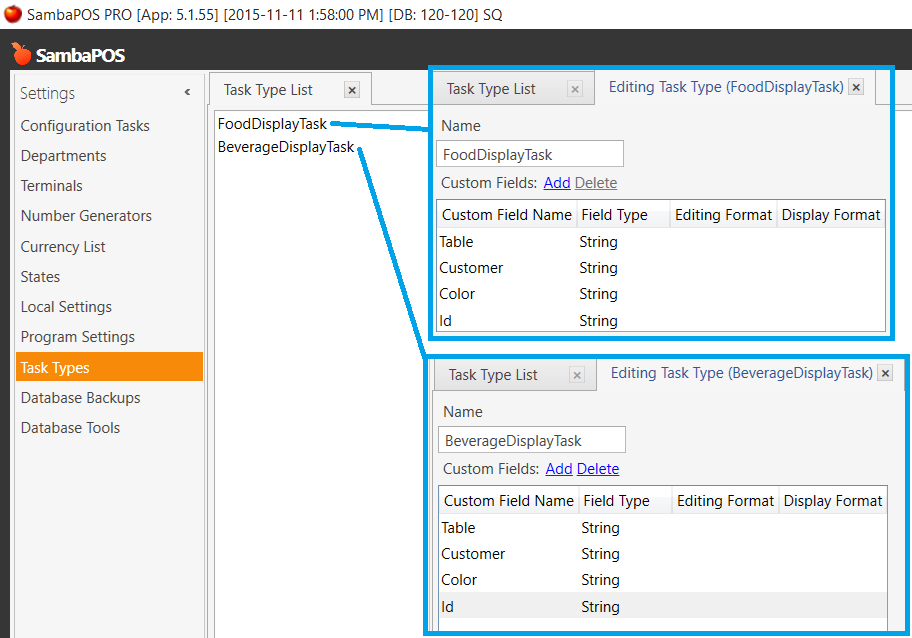
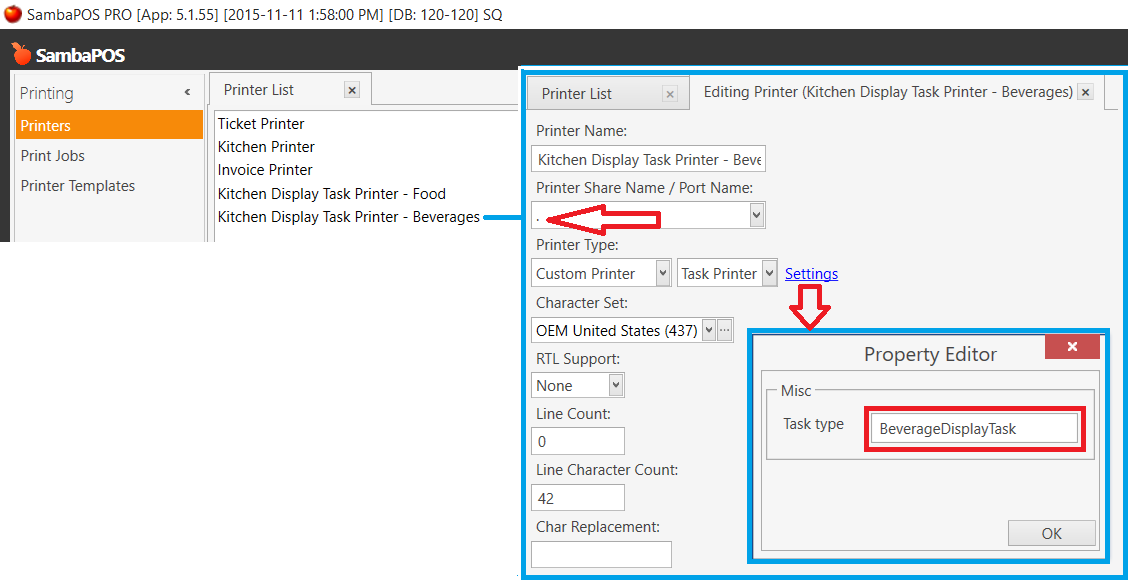
##Printers
Create a Printer for each of the Task Types.
 You must put a DOT (
 . ) in the Printer Share Name / Port Name field. If you do not do this, the Printer will not function!
Printer Type: Custom Printer - Task Printer
Click the Settings link, and set the Task Type field to match the Task Type that you defined on the previous step.
###Food Printer
###Beverage Printer
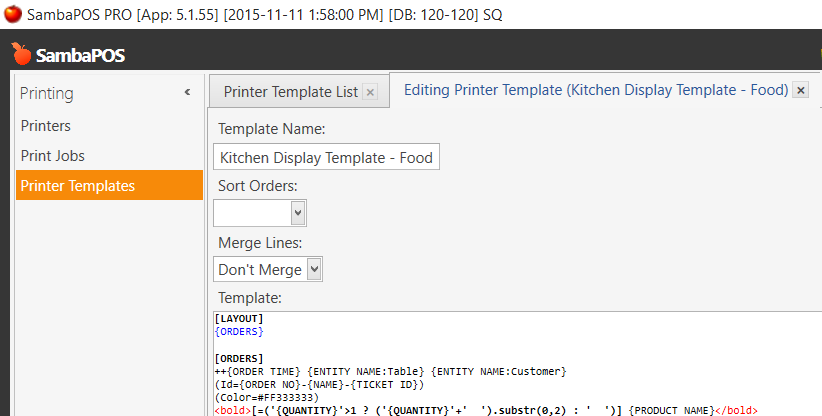
##Printer Templates
###Food Template
[LAYOUT]
{ORDERS}

[ORDERS]
++{ORDER TIME} {ENTITY NAME:Table} {ENTITY NAME:Customer}
(Id={NAME}-{ORDER UID})
(Color=#FF333333)
<bold>[=('{QUANTITY}'>1 ? ('{QUANTITY}'+'  ').substr(0,2) : '  ')] {PRODUCT NAME}</bold>
[='{PORTION}'=='' ? '' : '<font Consolas>  <color #FF55FF33><size 17><bold>{PORTION}</bold></size></color></font>']
{SORTED ORDER TAGS}

[ORDERS:Gift]
++{ORDER TIME} {ENTITY NAME:Table} {ENTITY NAME:Customer}
(Id={NAME}-{ORDER UID})
(Color=#FF333333)
<bold>[=('{QUANTITY}'>1 ? ('{QUANTITY}'+'  ').substr(0,2) : '  ')] {PRODUCT NAME}</bold>
[='{PORTION}'=='' ? '' : '<font Consolas>  <color #FF55FF33><size 17><bold>{PORTION}</bold></size></color></font>']
{SORTED ORDER TAGS}

[ORDERS:Void]
++{ORDER TIME} {ENTITY NAME:Table} {ENTITY NAME:Customer}
(Id={NAME}-{ORDER UID})
(Color=Red)
<bold>[=('{QUANTITY}'>1 ? ('{QUANTITY}'+'  ').substr(0,2) : '  ')] {PRODUCT NAME}</bold>
[='{PORTION}'=='' ? '' : '<font Consolas>  <color #FF55FF33><size 17><bold>{PORTION}</bold></size></color></font>']
{SORTED ORDER TAGS}

[SORTED ORDER TAGS:VIP Discount]
-- do not print

[SORTED ORDER TAGS:Happy Hour Discount]
-- do not print

[SORTED ORDER TAGS:Sides]
<size 14><color #FFFFAA55><font Consolas>   [=('{ORDER TAG QUANTITY}'>1 ? {ORDER TAG QUANTITY} : ' ')] {ORDER TAG NAME}</font></color></size>

[SORTED ORDER TAGS:Bread]
-- do not print

[SORTED ORDER TAGS:Meat]
<size 14><color #FFCCCCFF><font Consolas>   [=('{ORDER TAG QUANTITY}'>1 ? {ORDER TAG QUANTITY} : ' ')] {ORDER TAG NAME}</font></color></size>

[SORTED ORDER TAGS:Cheese]
<size 14><color Yellow><font Consolas>   [=('{ORDER TAG QUANTITY}'>1 ? {ORDER TAG QUANTITY} : ' ')] {ORDER TAG NAME}</font></color></size>

[SORTED ORDER TAGS:EXTRA Addons]
<size 14><color #FF55FF55><font Consolas>   [=('{ORDER TAG QUANTITY}'>1 ? {ORDER TAG QUANTITY} : ' ')] {ORDER TAG NAME}</font></color></size>

[SORTED ORDER TAGS:Veggies]
<size 14><color #FFCCFFCC><font Consolas>   [=('{ORDER TAG QUANTITY}'>1 ? {ORDER TAG QUANTITY} : ' ')] {ORDER TAG NAME}</font></color></size>

[SORTED ORDER TAGS:Condiments]
<size 14><color #FFFFCCCC><font Consolas>   [=('{ORDER TAG QUANTITY}'>1 ? {ORDER TAG QUANTITY} : ' ')] {ORDER TAG NAME}</font></color></size>

[SORTED ORDER TAGS GROUP|EXTRA Addons,Sauteed,OTS,Sides]

[SORTED ORDER TAGS GROUP:EXTRA Addons]
<size 14><color LightSalmon>     ~~~ ADDONS ~~~</color></size>

[SORTED ORDER TAGS GROUP:Sauteed]
<size 14><color LightSalmon>     ~~~ SAUTEED ~~~</color></size>

[SORTED ORDER TAGS GROUP:OTS]
<size 14><color LightSalmon>     ~~~ ON THE SIDE ~~~</color></size>

[SORTED ORDER TAGS GROUP:Sides]
<size 14><color LightSalmon>     ~~~ SIDES ~~~</color></size>
Special Template Fields in the above Template:
[ORDERS]
++{ORDER TIME} {ENTITY NAME:Table} {ENTITY NAME:Customer}
(Id={NAME}-{ORDER UID})
(Color=#FF333333)
- Lines prefixed with
++ become Header lines in the Task Card. They will appear in Bold.
- Task Field values are assigned using the syntax:
(<fieldName>=<value>)
Id is a field that we define to contain a unique Identifier for the Task Order. We will use this to update the Task using this Id field when necessary. For example, we need this value set in the Template so we can update the Task when an Order is Voided.Color is a special field we defined that allows us to set the background color of the Task Card.
We use the same syntax for Voided Orders, but we change the Color field to Red:
[ORDERS:Void]
++{ORDER TIME} {ENTITY NAME:Table} {ENTITY NAME:Customer}
(Id={NAME}-{ORDER UID})
(Color=Red)
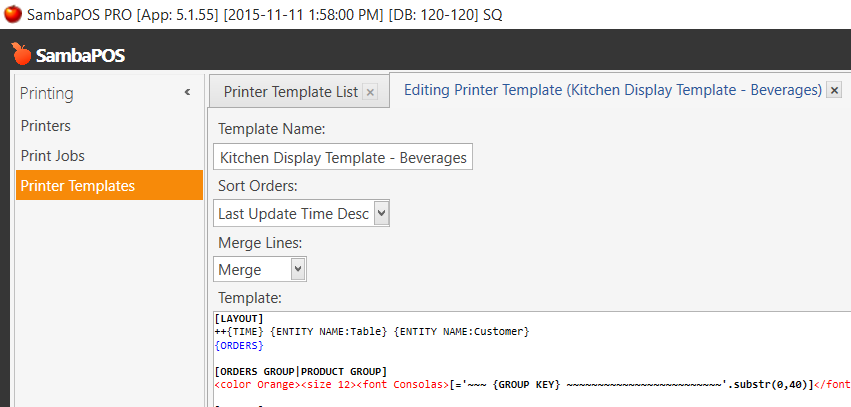
###Beverage Template
[LAYOUT]
++{TIME} {ENTITY NAME:Table} {ENTITY NAME:Customer}
{ORDERS}

[ORDERS GROUP|PRODUCT GROUP]
<color Orange><size 12><font Consolas>[='~~~ {GROUP KEY} ~~~~~~~~~~~~~~~~~~~~~~~~~'.substr(0,40)]</font></size></color>

[ORDERS]
<color White><bold><size 16><font Consolas>[=('{QUANTITY}'+'  ').substr(0,2)] {PRODUCT NAME}</font></size></bold></color>[='{PORTION}'=='' ? '' : '<font Consolas> <color #FF55FF33><size 14><italic>{PORTION}</italic></size></color></font>']
{SORTED ORDER TAGS}

[ORDERS:Gift]
<color White><bold><size 16><font Consolas>[=('{QUANTITY}'+'  ').substr(0,2)] {PRODUCT NAME}</font></size></bold></color>[='{PORTION}'=='' ? '' : '<font Consolas> <color #FF55FF33><size 14><italic>{PORTION}</italic></size></color></font>'] <bold> FREE</bold>
{SORTED ORDER TAGS}

[ORDERS:Void]
<color White><bold><size 16><font Consolas>[=('{QUANTITY}'+'  ').substr(0,2)] {PRODUCT NAME}</font></size></bold></color>[='{PORTION}'=='' ? '' : '<font Consolas> <color #FF55FF33><size 14><italic>{PORTION}</italic></size></color></font>'] <bold> VOID</bold>
{SORTED ORDER TAGS}

[SORTED ORDER TAGS]
<size 14><color Yellow><font Consolas>    [=('{ORDER TAG QUANTITY}'>1 ? {ORDER TAG QUANTITY} : ' ')] {ORDER TAG NAME}</font></color></size>

[SORTED ORDER TAGS:VIP Discount]
-- do not print

[SORTED ORDER TAGS:Happy Hour Discount]
-- do not print
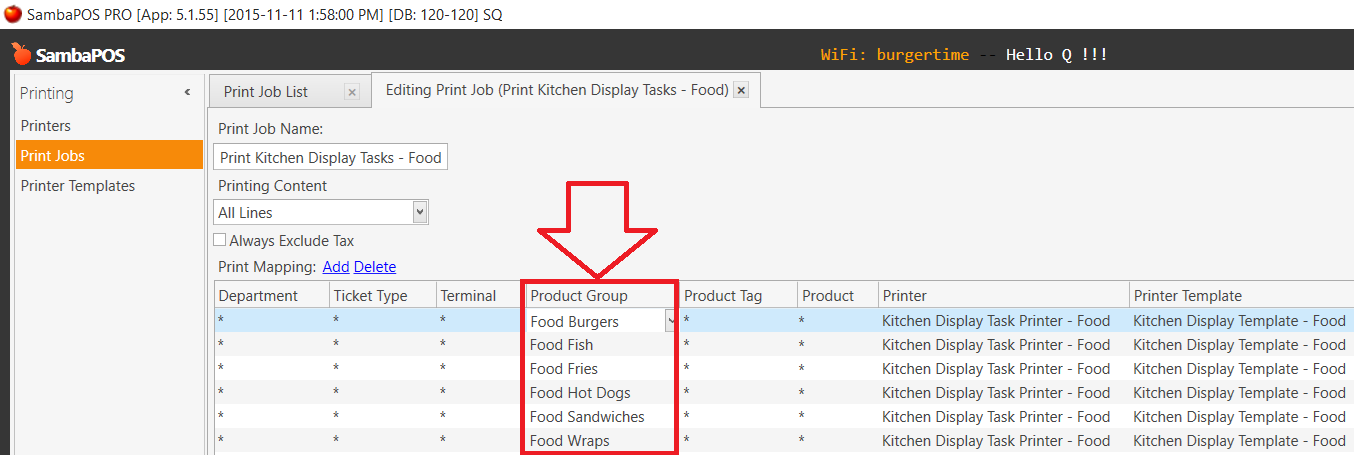
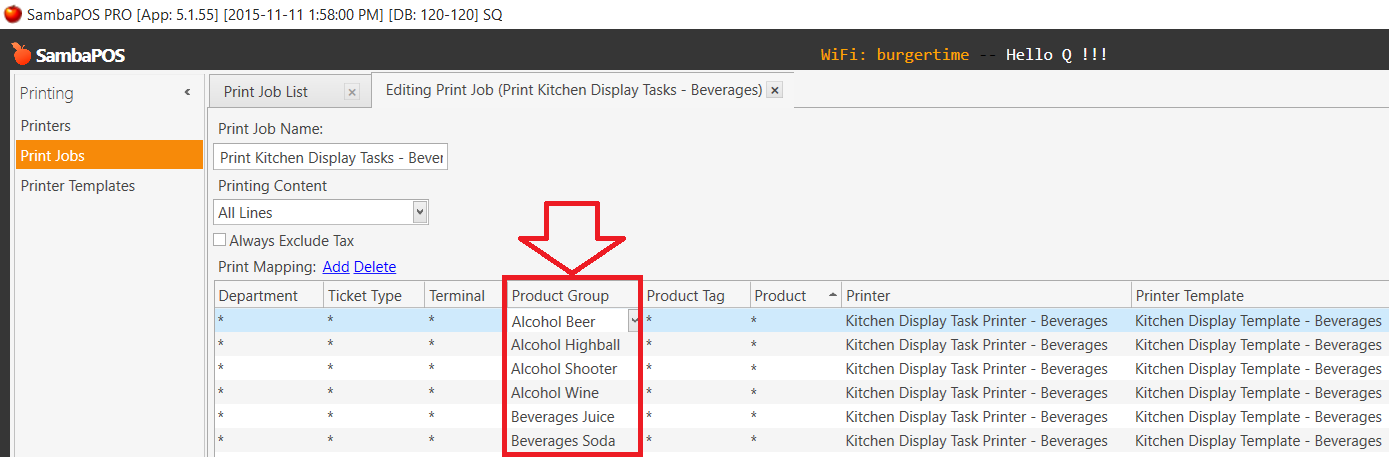
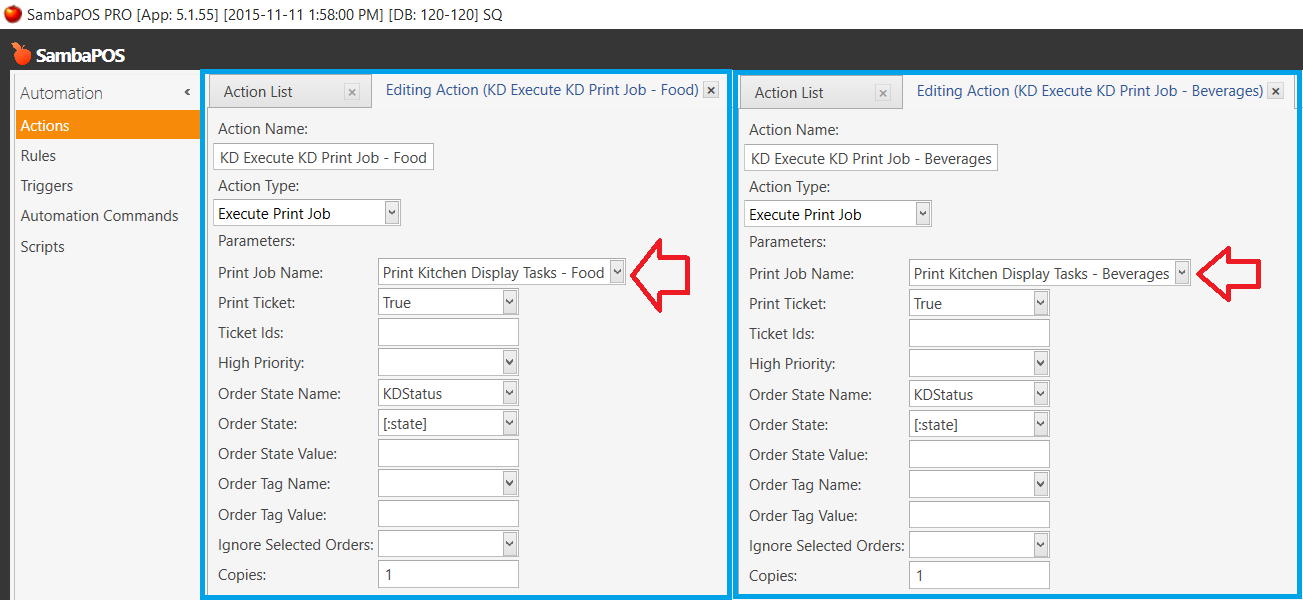
##Print Jobs
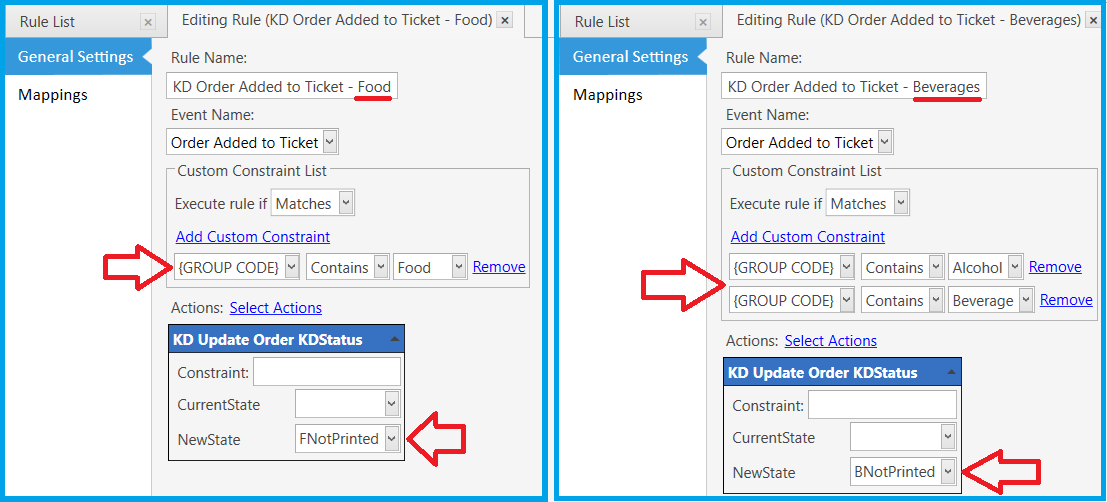
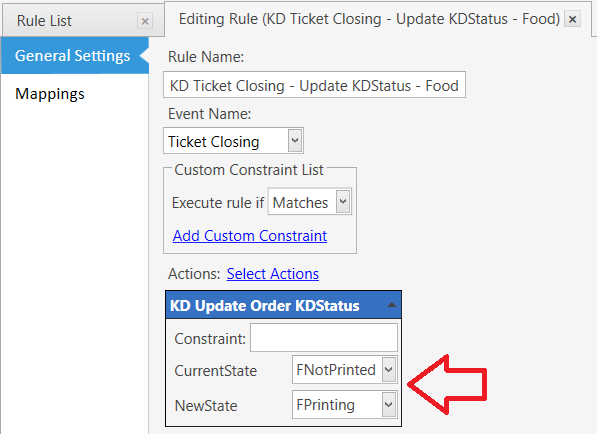
We use the Product Group Code to filter the types of Products that the Print Jobs will be allowed to print. You could also use the Product Tags to accomplish the same thing.
###Food Print Job
###Beverage Print Job
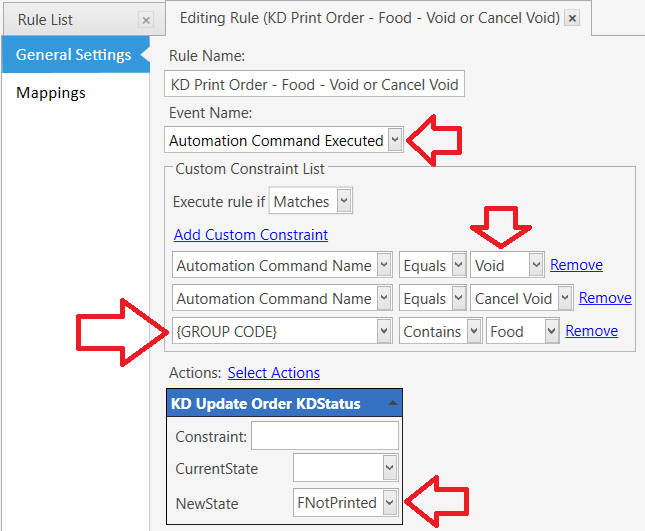
This setup also includes task updates for Void and Cancel Void.
Requires SambaPOS 5.1.55 or higher.